Disabling the internet connection can be used to fix some network connection issues on your Windows computer. Do you know how to disable the internet connection? This MiniTool post will show you a guide that is available on Windows 10/8/7/Vista/XP. Of course, it also shows you how to enable the internet connection on your PC.
When you use your computer to surf the internet, you need to make sure that the network connection is enabled. Usually, Windows can automatically enable and use built-in network interfaces like Wi-Fi and wired adapters on your computer. When there is something wrong with the network connection, you can disable the internet connection to solve the issue.
Disabling an internet connection can fix some network connection issues without rebooting your computer. Do you know how to disable the internet connection on your Windows computer? Now, we will show you a universal guide. No matter you are using Windows 10/8/7/Vista/XP, this guide can always work.
How to Disable the Internet Connection on Windows?
Take Windows 10 as an example.
1. Use Windows Search to search for control panel and select the first result to open it.
2. Select Network and Sharing Centre on your Windows 10/8/7/Vista. On your Windows XP, you need to change to the Category view and then go to Network and Internet Connections > Network Connections.
3. Click the Change adapter settings link from the upper-left list. On your Windows Vista computer, you need to choose Manage network connections.

4. You will see the Network Connections interface. Then, you need to right-click on the internet connection you want to disable and then select Disable. If the internet connection icon is greyed out, it means that the connection is disabled.
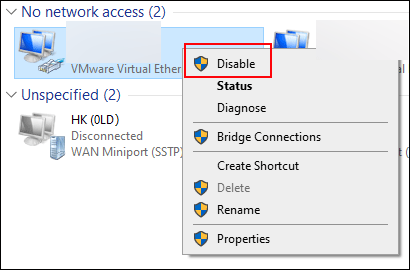
If you can’t see the Disable option from the right-click menu, it means that this internet connection has been disabled.
How to Enable the Internet Connection on Windows?
Of course, you still need to use the network connection for your work. How to enable the internet connection on your Windows computer? You can follow this guide:
- Use Windows Search to search for control panel and select the first result to open it.
- Select Network and Sharing Centre on your Windows 10/8/7/Vista. On your Windows XP, you need to change to the Category view and then go to Network and Internet Connections > Network Connections.
- Click the Change adapter settings link from the upper-left list. On your Windows Vista computer, you need to choose Manage network connections.
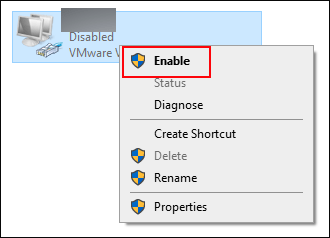
- You will see the Network Connections interface. Then, you need to right-click on the internet connection you want to disable and then select Enable.
How to Recover Your Lost Data on Your Computer?
When you use your computer to surf the internet, you need to protect your computer from viruses because there are many threats from the internet. Unfortunately, if your computer is attacked by viruses and malware, leading to the data loss issue, you can use MiniTool Power Data Recovery, a professional data recovery software, to get your lost data back.
This software has a trial edition. You can use it to scan your drive for lost data. If you find this software works to find your needed files, you can use a full edition to recover them.
MiniTool Power Data Recovery TrialClick to Download100%Clean & Safe
This article will be helpful: How To Recover Files Deleted By Virus Attack?
Bottom Line
Now, you should know how to enable and disable the internet connection on your Windows computer. Should you have any related issues, you can let us know in the comment. We will reply to you as soon as possible.
User Comments :