If you want to save power when using your laptop, you can turn on battery saver. However, some services might be blocked if you do so. Then, you could turn off battery saver. In this post, we will show you how to turn on or turn off battery savers on Windows 10.
Battery Saver is a Windows feature that enables you to use your laptop with lower power consumption. This can properly extend the usage time of the battery. However, if this power-saving mode is turned on, the notifications, email, and any instant messages along with updates might be hindered. So, you might want to turn off battery saver if you still need to receive this information.
In this MiniTool guide, we will walk you through the ways to turn off battery saver or turn on battery saver on Windows 10.
How to Turn on or Turn off Battery Saver on Windows 10?
Turn off Battery Saver on Windows 10
Here is how to turn off power saving mode on Windows 10:
Step 1: Click the battery icon in the taskbar. It is on the right side.
Step 2: Select Battery settings.
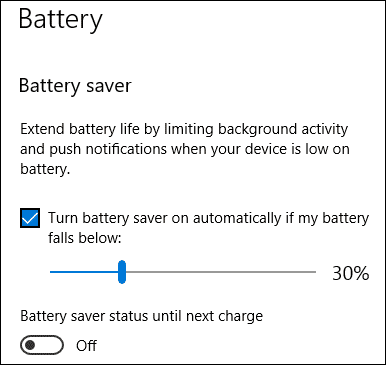
Step 3: An interface will pop up. You need to find the Battery saver section on the interface, then uncheck Turn battery saver on automatically if my battery falls below.
The above steps just disable the battery power-saving mode. If your computer is plugged in, the power saving mode is still working. However, you are allowed to disable the power saving mode while your device is plugged in:
Step 1: Right-click the battery icon in the taskbar and select Power Options.
Step 2: A page will pop up. Then, click Create a power plan from the left menu.
Step 3: Select High performance.
Step 4: Name the power saving plan in the Plan name field.
Step 5: Click the Next button.
Step 6: Select Never for both On battery and Plugged in on the next page.
Step 7: Click the Create button to continue.
Step 8: On the next page, click the Change plan settings link next to the power saving plan you just created.
Step 9: Click the Change advanced power settings link on the plan settings page to continue.
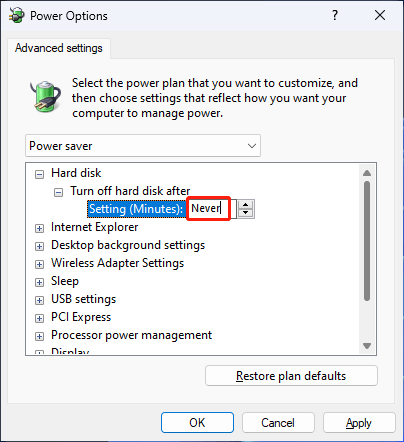
Step 10: You will see the Power Options window, on which you should find Hard disk and expand it. Then, select Never for both On battery and Plugged in.
Step 11: Type Never into the dropdown box for minutes to update the above settings.
Step 12: Click Apply, then OK to save these settings.

Turn on Battery Saver on Windows 10
If you want to save power energy for your laptop, you can turn on battery saver instead. You can also customize the settings according to your requirements. Here is how to turn on power saving mode on your Windows 10 computer.
Step 1: Right-click the battery icon in the taskbar and select Power Options.
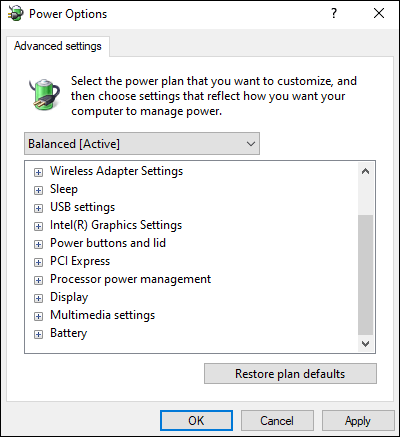
Step 2: A quick setting is just to select Balanced, which is the preconfigured power savings plan on Windows 10. If you want to customize the power saving plan to make it not interfere with the work you need to do on your computer, you need to create a new plan using the steps mentioned above. Then, click the Change plan settings link to continue.
Step 3: Make changes to the settings as per your requirements.
Step 4: Click Change advanced power settings to continue.
Step 5: The Power Options window will pop up. You can change the settings for these options as per your needs:
- Turn off hard disk after under Hard disk
- Desktop background settings
- Sleep
- Power buttons and lid
- Display
Step 6: Click Apply and then OK to save the changes.
Bottom Line
How to get computer out of power save mode on Windows 10? How to turn on battery saver to conserve energy as much as possible when using a laptop? This post shows you two related guides. We hope they can help you solve the issues you are facing.
If you want to recover data from your Windows 10 computer, you can try MiniTool Power Data Recovery, a professional data recovery software.
MiniTool Power Data Recovery TrialClick to Download100%Clean & Safe
Should you have any other related issues, you can let us know in the comments.
About The Author

Position: Columnist
Stella has been working in MiniTool Software as an English Editor for more than 8 years. Her articles mainly cover the fields of data recovery including storage media data recovery, phone data recovery, and photo recovery, videos download, partition management, and video & audio format conversions.
User Comments :