Internet Explorer is a browser that you can use to browse the web. But it is very frustrating when Internet Explorer has stopped working, then how to deal with it? This post from MiniTool has collected multiple methods to solve the problem, so read it carefully.
Internet Explorer used to be the built-in application with the Windows system, but it has been replaced by the Microsoft Edge in Windows 10. But luckily, you can still use Internet Explorer to browse the web in Windows 10.
You get the “Internet Explorer has stopped working” error message while browsing the web using Internet Explorer, then do you know how to deal with the problem? If you don’t know, then this post is what you need. You can find several methods below to fix the error.
Method 1: Update Your Graphics Driver
You may meet the “Internet Explorer has stopped working” error message when your graphics driver is outdated or corrupted, therefore, you’d better update your graphics driver. Here is a quick guide:
Step 1: Right-click the Start button to choose Device Manager.
Step 2: Expand Display adapters and right-click your graphics driver to choose Update driver.
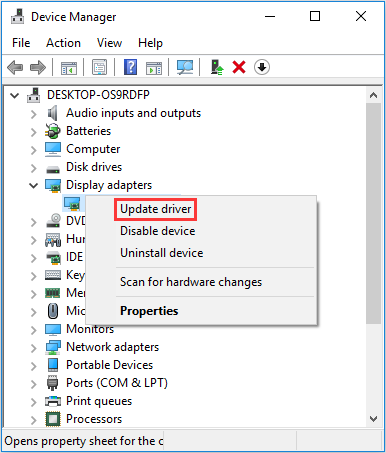
Step 3: Choose Search automatically for updated driver software and then follow the instructions showing on the screen to complete updating your graphics driver.
Step 4: Restart your computer to check if you can use Internet Explorer normally.
Method 2: Disable Add-ons
You can use add-ons to improve your user experience, but if one of your add-ons is faulty or other reasons, then you can meet the “Internet Explorer not working” error. Then how to fix it? You need to disable all your add-ons, and then check if Internet Explorer is working normally.
If it is, then there is something wrong with your add-ons, and you need to figure out which one. Here is the tutorial:
Step 1: Open the Win + R keys at the same time to open the Run box.
Step 2: Type inetcpl.cpl in the box and then click OK to open Internet Properties.
Step 3: Go to the Programs tab and then click Manage add-ons.
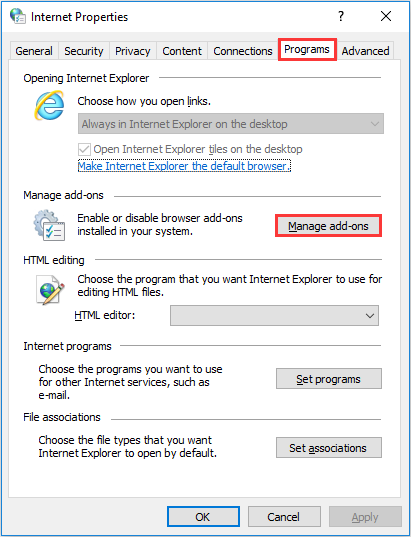
Step 4: A new window pops out, and you can see a list of all your Internet Explorer add-ons. Click add-on one by one and then click Disable.
Step 5: Restart your computer to check if the “Internet Explorer has stopped working” error is fixed. If it is fixed, then the culprit of the error is one of your add-ons. Therefore, you need to enable the add-ons one by one to check which one causes the error. After finding the faulty add-on, disable it again.
Method 3: Reset Security Zone
Resetting Internet Explorer’s security zone can help you fix the “Internet Explorer not working” error. Here is a quick guide:
Step 1: Open the Run box, type inetcpl.cpl in the box and then click OK.
Step 2: Go to the Security tab and then click Reset all zones to default level. Click OK to save changes.
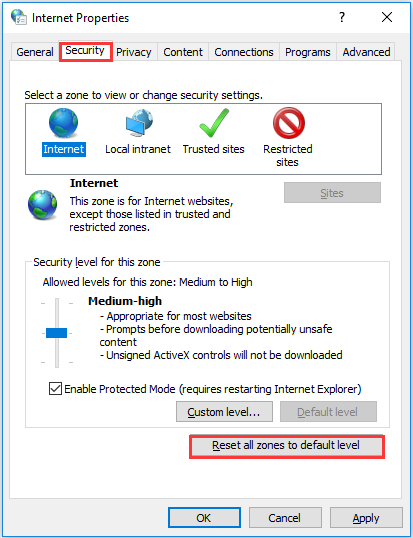
Step 3: Reboot your PC to check if the “Internet Explorer not working” error is fixed.
Method 4: Change Your Hardware Acceleration Setting
You can try to change your hardware acceleration setting to solve the problem because some computers run better with hardware acceleration turned on while some runs better with it turned off. So you can check if your hardware acceleration is turned on, if it does, then turn it off. Vice versa. Here is the tutorial:
Step 1: Open the Run box, type inetcpl.cpl in the box and then click OK.
Step 2: Go to the Advanced tab, and then check if the Use software rendering instead of GPU rendering box is ticked. If it is ticked, then untick it. If it is unticked, then tick it. Click OK to save changes.
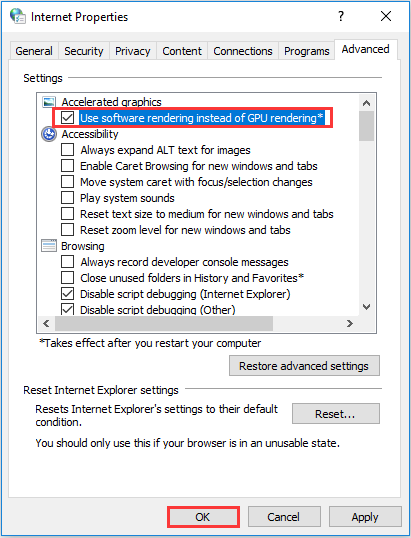
Step 3: Restart your system to check if the “Internet Explorer has stopped working” error is gone.
Method 5: Uninstall Toolbars
You can also meet the “Internet Explorer has stopped working” error because of the third-party toolbar, thus, you need to uninstall them to fix the error. Here is the tutorial:
Step 1: Open the Run box, type appwiz.cpl in the box and then click OK.
Step 2: Find your toolbars in the list, right-click them one by one to choose Uninstall/Change. Click Yes to confirm.
Step 3: Restart your computer to check if the error is fixed. If the error is fixed, then you can try to reinstall your original toolbars one by one to figure out which one causes the error. Then uninstall it again.
Method 6: Reinstall Internet Explorer
If none of the methods fixes the error, then you’d better reinstall Internet Explorer. Here is the tutorial:
Step 1: Open the Run box, type appwiz.cpl in the box and then click OK.
Step 2: Click Turn Windows features on or off in the left panel. Uncheck the box next to Internet Explorer 11 and then click Yes to confirm.
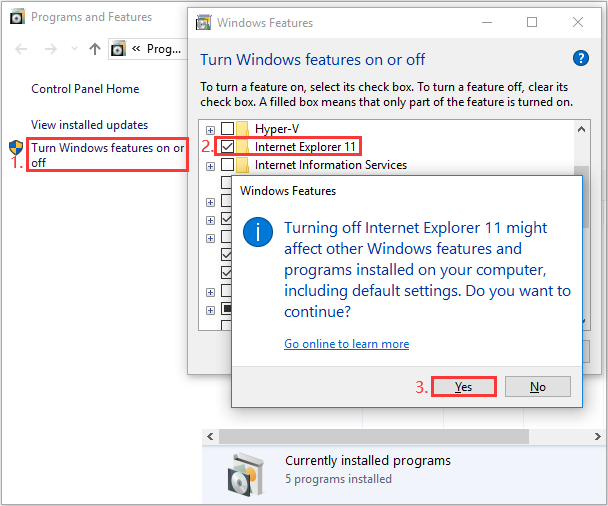
Step 3: Click OK and wait until Internet Explorer turns off.
Step 4: Restart your computer, type appwiz.cpl in the Run box and then click OK.
Step 5: Click Turn Windows features on or off again. Check the box next to Internet Explorer 11 and then click OK to save changes.
Step 6: Wait until Internet Explorer turns on and relaunch it to check if the error is fixed.
Bottom Line
How to fix Internet Explorer has stopped working? This post has gathered 6 useful methods to get rid of it. Thus, if you meet the problem, try the methods mentioned above.

User Comments :