A NAS device not showing up on your Windows will block you from accessing data stored on it. What causes this problem on your computer? How can you resolve this issue? To help you out of the problem, MiniTool gives this guide.
Network-attached storage (NAS) is a file-level data storage server connected to your computer via a network. The NAS system provides an unlimited and flexible data storage scale, allowing you to add extra devices when you require larger data storage capacity. With faster and cheaper advantages, NAS devices are welcome to heterogeneous groups of clients. Therefore, it could be annoying to discover a NAS device not showing up on the network on your computer.
Why a NAS Drive Not Visible
As we said above, the NAS device is connected via a computer network. When you find your NAS device not showing up, you can first connect whether the computer and the NAS device use the same network. Other possible causes are the disabled SMBv1, corrupted DNS cache, disabled network discovery, Windows Firewall block, etc.
The same question can be triggered by different reasons. You need to try the following workarounds to find which one works on your issue.
How to Fix NAS Not Visible on Windows
Fix 1. Check Network Connection
At the very beginning, you should ensure that your device is under a stable network connection environment. Additionally, to find a network drive on your local computer, make sure that the NAS device and the computer are in the same local network.
Fix 2. Enable Windows Network Discovery
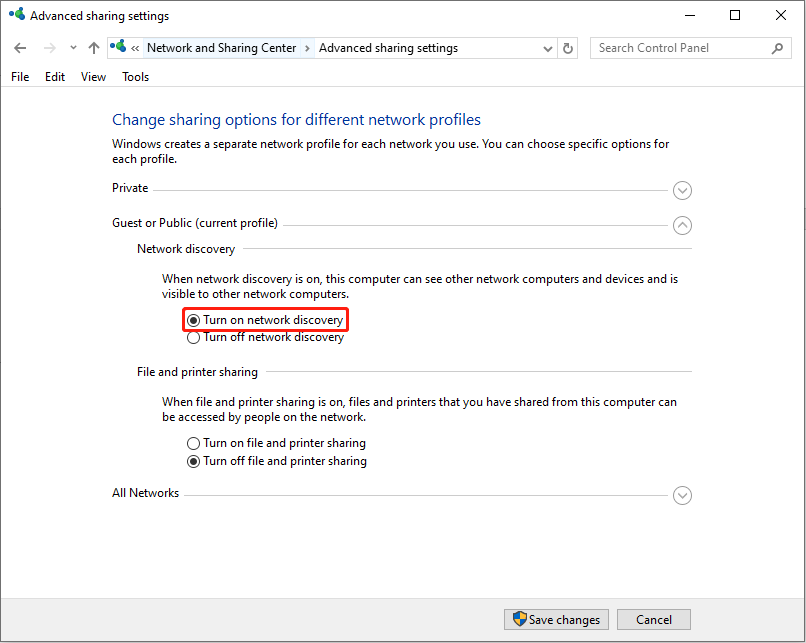
Sometimes, you can’t find the NAS device because the Network Discovery setting is not enabled on your computer. This setting allows your computer to find other network devices. Here is how to enable Windows Network Discovery.
Step 1. Press Win + I to find Windows Settings.
Step 2. For Windows 10 users, navigate to Network & Internet > Status > Network and Sharing Center > Change advanced sharing settings. Under the Network discovery section, choose Turn on network discovery and click Save changes.
For Windows 11 users, head to Network & Internet > Advanced network settings. Locate Private networks and enable both the Network discovery and File and printer sharing options.
Fix 3. Enable SMBv1
Server Message Block (SMB) is a protocol that is used to share files and printers on a network. SMB version 1 isn’t installed by default on Windows 10 (except the Home and Pro editions), Windows 11, and Windows Server 2019 and later. Legacy NAS requires SMBv1 on your computer. If you are running a NAS that needs SMBv1, follow the next steps.
Step 1. Type Control Panel into the Windows Search bar and hit Enter to open the window.
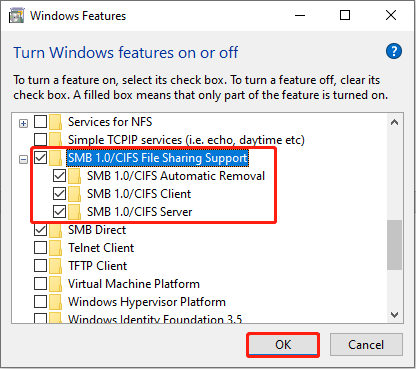
Step 2. Head to Programs > Turn Windows features on or off. In the following window, find and check SMB 1.0/CIFS File Sharing Support and click OK.
After the process, you need to restart the computer to fully apply the feature. You can see whether the NAS device not showing on Network issue is resolved on your computer.
Fix 4. Disable the Windows Firewall
Sometimes, the NAS device not showing up issue is caused by the misconfiguration of Windows Firewall. You can temporarily disable Windows Firewall to try to fix this issue.
Step 1. Press Win + S and type Windows Defender Firewall, then hit Enter to open the window.
Step 2. Select Turn Windows Defender Firewall on or off at the left pane.
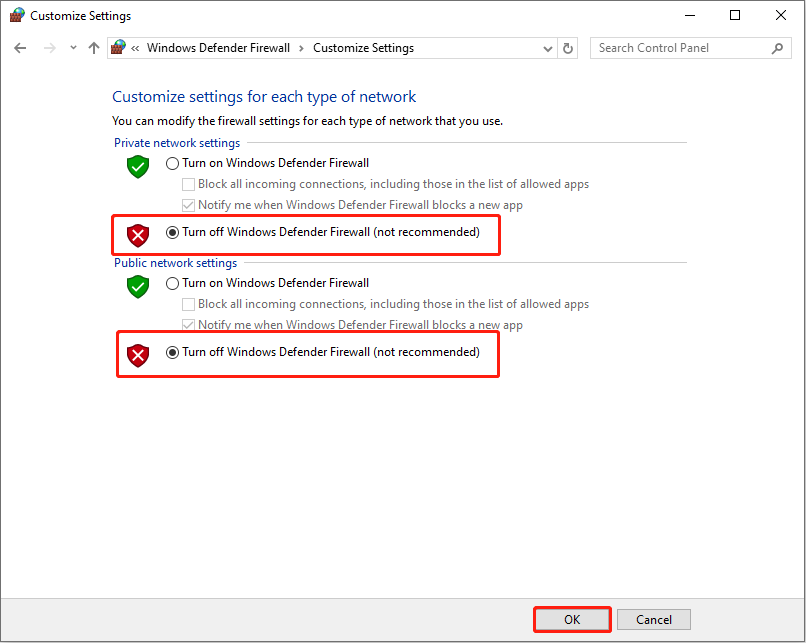
Step 3. Tick Turn off Windows Defender Firewall (not recommended) under both the Private network settings and Public network settings section. Click OK to save your changes.
Afterward, go to check if the NAS device can be detected on your computer. If the NAS drive is still not visible, remember to turn on the Windows Firewall and move on to the next method.
Fix 5. Clear the DNS Cache
Corrupted cache files may interfere with the normal performance of the NAS device. Try to clear the DNS cache to see if it helps to fix the issue.
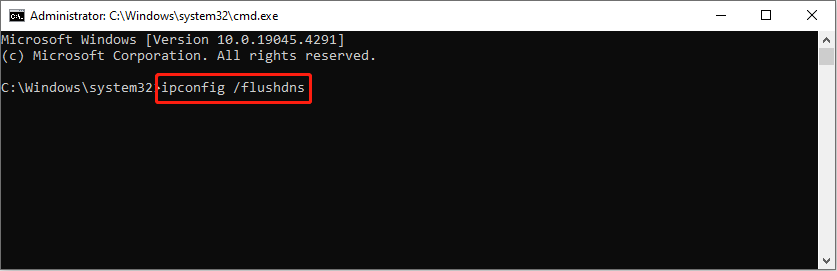
Step 1. Press Win + R to open the Run window.
Step 2. Type cmd into the dialog and press Shift + Ctrl + Enter to run Command Prompt as administrator.
Step 3. Copy and paste ipconfig /flushdns into the command window and hit Enter to execute it.
Fix 6. Reset the NAS
To avoid any data loss, you are highly suggested to rescue your data from the NAS device before resetting the NAS device. To get data from the NAS device on Windows, it’s best to disconnect your NAS drive’s disks from it and plug them directly into your PC. Then, run MiniTool Power Data Recovery, a free data recovery software, to recover files from the disk.
MiniTool Power Data Recovery FreeClick to Download100%Clean & Safe
After successfully transferring data from the NAS device, you can start resetting the NAS device. For Synology NAS, you can press and hold the Reset button until you hear a beep. You can read this post to learn specific information about Synology NAS reset.
Bottom Line
This post shows six methods to resolve the NAS device not showing up on Network on your computer problem. You can try these methods one by one.
User Comments :