Have you updated Windows 11 24H2? Did you find any problems after the update? If not, you are so lucky. Recently many people have discovered some audio issues. This MiniTool article will tell you how to fix the Realtek audio issues after Windows 11 24H2 update.
MiniTool Power Data Recovery FreeClick to Download100%Clean & Safe
Realtek Audio Issues After Windows 11 24H2 Update
Windows 11 24H2 update brings several enhancements and features. However, since its release, many users said their Realtek audio has no sound after Windows 11 24H2 update. What’s more, there are also other audio glitches and even errors related to Realtek software. Most of these issues are related to the driver. Besides this, there are some other reasons that can cause this problem.
Audio is an important part of everyday computer use and plays a large role in the daily use of your computer. Understanding the reasons behind these audio glitches and knowing how to fix them is important to restoring functionality. This article will fully explain how to fix Realtek audio issues after Windows 11 24H2 update.
Exclusive 50% OFF Glary Utilities
Fix 1: Copy the Audio File to a New Location
When the default sound file settings in Windows 11 cannot be changed, you can move the desired sound file to another location and rename it.
Go to the Windows.old/Media directory, find the wanted audio file, copy it to another location, and rename it. Then paste the renamed file into the Windows/Media directory. After that, go and check your default sound.
Fix 2: Check the Audio Output Device
If you find that there is a problem with your audio, first check the settings to see if the change in the relevant settings caused the problem. Here are the steps to check the audio output device.
Step 1: Right-click on the Start button and choose Settings to open it.
Step 2: In settings, click on System > Sound.
Step 3: Under Output, make sure the Realtek audio device is selected.
Step 4: Under Master volume, toggle the button to check if the audio is not working. If yes, move to the next method to fix it.
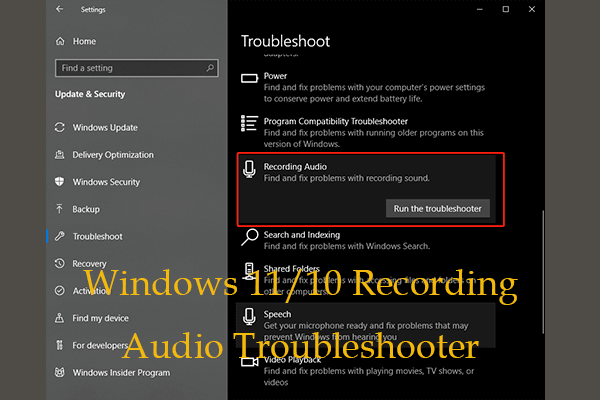
Fix 3: Run the Audio Troubleshooter
Windows comes with a troubleshooter designed to diagnose and resolve basic audio problems. This audio troubleshooter will automatically run diagnostics and attempt to fix most audio problems. Here is how you can run it to troubleshoot audio issues in Windows 11 24H2.
Step 1: Open the Settings app and click on System > Troubleshoot > Other troubleshooters.
Step 2: Click on the Run button at the end of Playing Audio to start detecting.
After the detection process is completed, follow the on-screen instructions to complete the remaining operations.
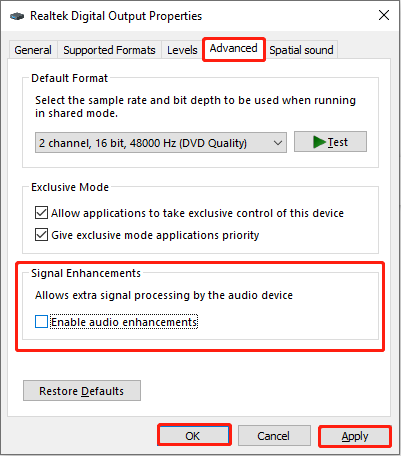
Fix 4: Disable Audio Enhancements
When working with real-time digital audio, it is best to remove any unnecessary processing of the audio signal to ensure the best latency performance and minimize undesirable signal coloration. So, you should disable audio enhancements to see if your audio can get to normal.
Step 1: Right-click on the Speaker icon on your taskbar and choose Sounds.
Step 2: Switch to the Playback tab, right-click on your default device, and choose Properties.
Step 3: In the new window, go to the Advanced tab and uncheck the Enable audio enhancements under Signal Enhancements. Then click on Apply > OK.
Fix 5: Update Realtek Driver
As mentioned above, the audio problem is related to the driver. An outdated driver can be one of the causes of these issues. In this case, you are expected to update the Realtek driver. Here is a way.
Step 1: Type Device Manager in the Windows search box and press Enter.
Step 2: Click on the small arrow in front of the Sound, video, and game controllers.
Step 3: Right-click on your Realtek Audio and select Update driver.
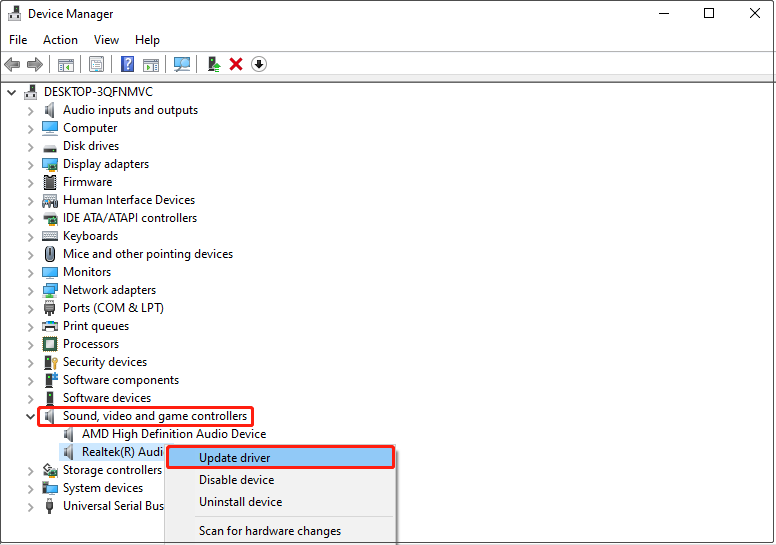
Step 4: In the new window, choose Search automatically for drivers.
If there is an available update, you need to update it according to the on-screen instructions.

Fix 6: Perform a System Restore
When an application in your computer becomes corrupted, the System Restore can restore your system to a working state without reinstalling the operating system. It repairs the Windows environment by restoring the files and settings saved in the restore point. The perations are as follows.
Step 1: Type Create a restore point in the Windows search and hit Enter.
Step 2: In the System Protection tab by default, click on System Restore.
Step 3: In the pop-up window, click on Next to continue.
Step 4: Choose a system restore and click on Next > Finish.
Final Thoughts
This article lists many ways to solve Realtek audio issues after Windows 11 24H2 update including no sound after updating win11 to 24H2. When you encounter the same issue in the future, you can use these methods as you like to fix it.
About The Author

Position: Columnist
Chelsea graduated from university with a major in English. She has a strong interest in English writing. It is this passion for writing that led her to become an English editor. Her articles mainly focus on data recovery and other computer industry news. As an energetic and outgoing girl, Chelsea enjoys listening to music, singing, riding bikes, and eating in her spare time.
User Comments :