If you have problems with recording audio on your computer, you can run Windows 11/10 Recording Audio troubleshooter to automatically detect and fix problems with recording sound. Check how to do it in this post. If you have other computer problems, you may also find solutions from MiniTool Software website.
If you can’t record audio on your Windows 11/10 computer or your microphone is not working, you can try the built-in Windows Recording Audio troubleshooter to fix the common audio recording problems. Some other tips to help you fix audio recording problems or the microphone not working issue are also provided.
Find and Run Windows 11/10 Recording Audio Troubleshooter
Windows Recording Audio troubleshooter is one of the Windows Troubleshooter tools that you can find from Settings.
- On Windows 11, you can click Start -> Settings.
- Under the System tab, click Troubleshoot in the right window.
- Click Other troubleshooters.
- Find Recording Audio Click the Run button next to it to run the Windows 11/10 troubleshooter. Let it automatically find and fix the audio recording problems for you.
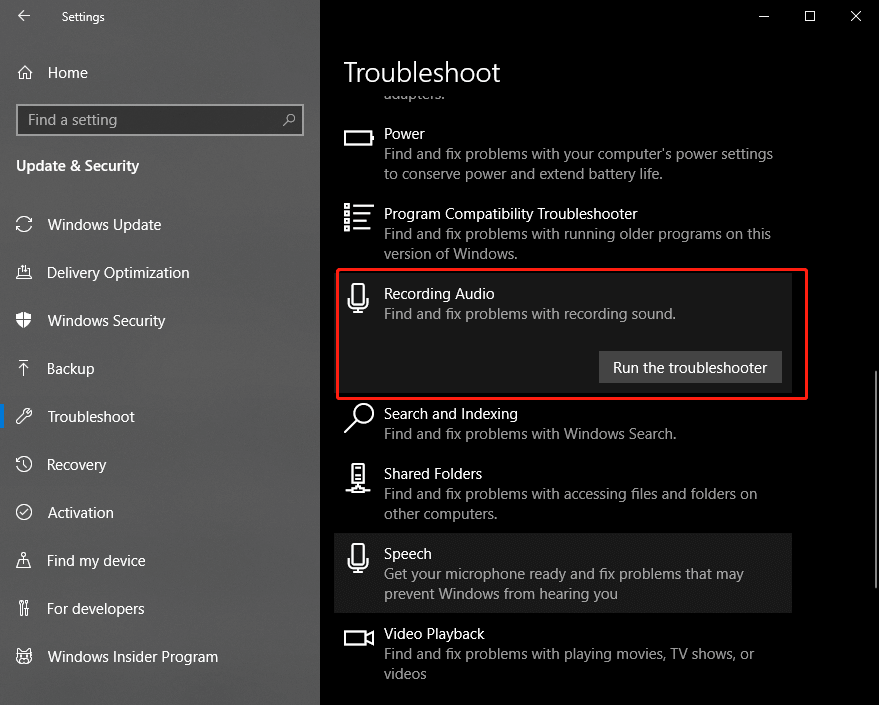
On Windows 10, you can click Start -> Settings -> Update & Security -> Troubleshoot, click Recording Audio and click Run the troubleshooter button.
Fix Microphone Not Working on Windows 11/10 – 5 Tips
If your microphone is not working on your Windows 11/10 computer, you can try the 5 tips below to fix the issue.
Tip 1. Check the connection. If you connect an external microphone, you can check if it is well connected. You can also connect it to another device to see if it works. Restart your computer and plug in your microphone again to have a try. Also, check the sound volume.
Tip 2. Check if Windows 11 microphone is enabled. Right-click Start and select Device Manager. Expand Audio inputs and outputs. Right-click the microphone and select Enable device.
Tip 3. Check the default audio recording device. Click Start, type change system sounds in the Search box, and choose Change system sounds. Click the Recording tab, and make sure the target microphone is set as the default recording device.
Tip 4. Check the microphone settings. Press Windows + I, and click Privacy & security -> Microphone. Make sure the Microphone access and Let apps access your microphone options are turned on.
Tip 5. Update audio driver on your Windows 11/10 computer. Right-click Start and select Device Manager. Expand Audio inputs and outputs. Right-click the problematic microphone and select Update driver. Choose Search automatically for drivers option to install the updated driver for the microphone.
Top Free Audio Recorders for Windows 11/10
To record audio on Windows 11/10, you can try some professional audio recorder software. You can try the built-in Windows Voice Recorder or third-party tools like Audacity, Online Voice Recorder, etc.
Best Free Screen and Audio Recorder for Windows
To record PC screen and audio for free, we recommend MiniTool Video Converter.
MiniTool Video Converter lets you record any part of your computer screen and allows you to choose to record the system audio or microphone audio or not. Use this program to easily record the full screen or part of the screen on PC.
Aside from recording screen and audio, MiniTool Video Converter also allows you to convert any video or audio format and download YouTube videos for offline playback.
MiniTool Video Converter FreeClick to Download100%Clean & Safe
Bottom Line
This post teaches you how to run Windows 11/10 Recording Audio troubleshooter to fix audio recording problems on Windows 11/10, how to fix microphone not working issue, how to record screen and audio, etc. Hope it helps.
User Comments :