Speech Recognition in Windows 10 Is Wonderful
To be specific, speed recognition is an interdisciplinary subfield of computational linguistics; it refers to the capability of a machine/device/program to identify the words and phrases in spoken language. After that, it will convert the spoken words to a machine-readable format.
Microsoft adds this wonderful feature to achieve Windows 10 speech to text (in Windows 10 Fall Creators Update or higher) so as to help users free their hands. Here, I will introduce speech recognition in Windows 10 (how to setup it and how to use it).
How to Setup Windows 10 Speech Recognition
There are many people in favor of Windows 10 voice recognition since it offers easy-to-use experience: control your PC completely through Windows 10 voice commands.
How to setup:
- Click on the Start button in the lower left corner.
- Scroll down to find Windows System folder and expand it.
- Select Control Panel.
- Click on the Ease of Access link.
- Click on the Speech Recognition link.
- Click on the Start Speech Recognition link.
- Click Next in the Set up Speech Recognition window.
- Decide what type of microphone you will use and click Next. (Headset Microphone and array microphones are recommended by Microsoft.)
- Click Next again.
- Read the sentences aloud to finish the voice test.
- Click Next.
- Click Next again.
- Check Enable document review or Disable document review.
- Click Next.
- Select an activation mode: check Use manual activation mode or Use voice activation mode.
- Click Next.
- Click Next (You can click on the View Reference Sheet button to know what Windows 10 speech recognition commands you can use.)
- Check Run Speech Recognition at startup if you’d like to let it run automatically at startup.
- Click Next.
- Finally, click Start tutorial to see Microsoft’s video tutorial or click Skip tutorial to complete setup directly.

4 Ways To Fix Audio Services Not Responding Window 10.
How to Use Speech Recognition in Windows 10
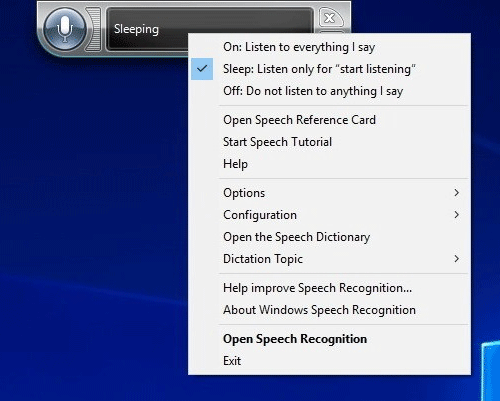
- After the setup is finished, you’ll see a Speech Recognition interface at the top of your screen.
- Right click on the interface to select a state for the feature: On (Listen to everything I say), Sleep (Listen only for “start listening”), or Off (Do not listen to anything I say).
- Start to control your device by using the voice commands included in the Speech Reference Card by talking directly or saying start listening at first. For instance, the command Show Desktop will help you to minimize everything on the screen.
What if Speech Recognition doesn’t understand what you say?
Solution 1: make use of Show numbers.
- Use the Show numbers command to bring up the number list.
- Say the number that stands for the corresponding action.
- Say ok to confirm and execute the command.
You can end recognition by saying stop listening or clicking the microphone button.
In addition to the Windows 10 voice recognition feature, there are also many voice recognition apps which can achieve Windows 10 text to speech or speed to text (the list is in no particular order).
- Braina
- Cortana
- VoxCommando
- Dragon NaturallySpeaking Premium Edition
- …
This post tells you how to turn off speech recognition Windows 10 if you don’t want it anymore.
User Comments :