In Windows 10, there are two command-line tools that let you use a set of command lines to do some tasks efficiently. That is: Command Prompt and PowerShell. You could think of PowerShell as an advanced tool of the old Command Prompt utility. However, for some users, they may think PowerShell is useless and want to uninstall it. Check how to uninstall PowerShell in Windows 10 in the 4 ways below.
MiniTool System Booster TrialClick to Download100%Clean & Safe
Way 1. Uninstall PowerShell from Start Menu
- You can click Start menu at the bottom-left, type PowerShell in the search box, and you will see Windows PowerShell app.
- Right-click Windows PowerShell app, and select Uninstall, or expand the menu in the right to select Uninstall to remove Windows PowerShell exe from Windows 10.
Tip: Since Windows 10 build 19307, you can use this way to delete Windows PowerShell app, just as other applications. For older Windows 10 versions, you may not see the Uninstall option after you right-click Windows PowerShell app.
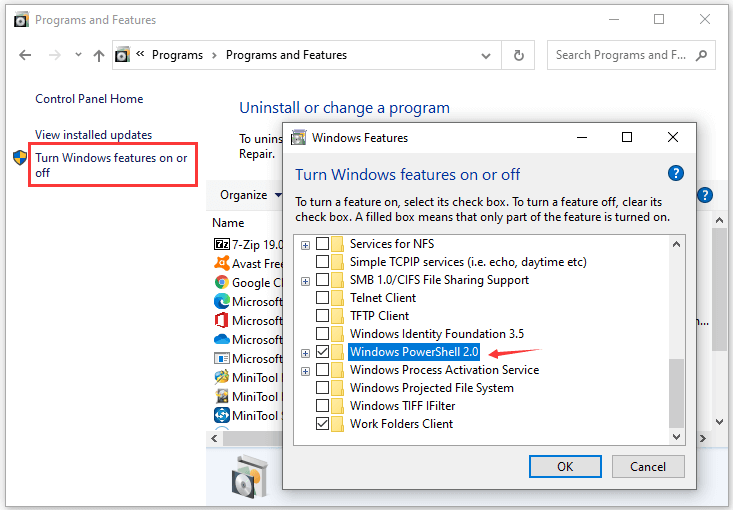
Way 2. Remove Windows PowerShell from Control Panel
- Press Windows + R, type control panel, and press Enter to open Control Panel in Windows 10.
- Click Uninstall a program under Programs.
- Click Turn Windows features on or off in the left.
- Scroll down to find Windows PowerShell 2.0, and uncheck the box next to it. Click OK to disable PowerShell in Windows 10.
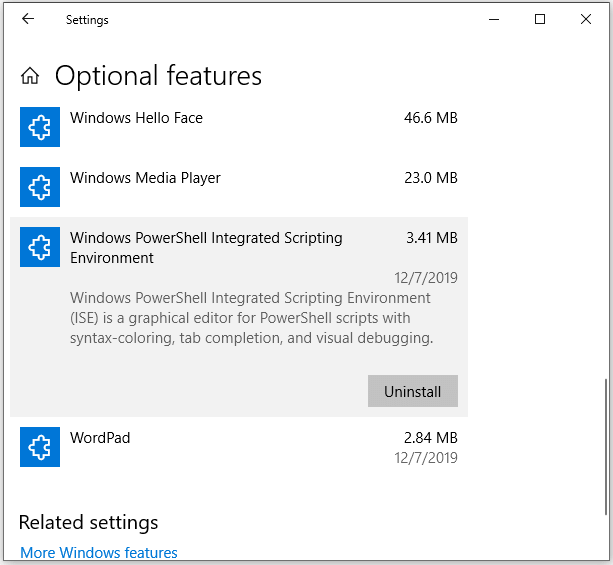
Way 3. Uninstall PowerShell Windows 10 from Settings
- Press Windows + I to open Windows Settings. Click Apps -> Apps & features. Click Optional features in the right window.
- Scroll down to find Windows PowerShell Intergrated Scripting Environment and click it.
- Click Uninstall button to uninstall Windows PowerShell in Windows 10.
Tip: If you want to add Windows PowerShell again, you can click Add a feature in Optional features window, click Windows PowerShell Intergrated Scripting Environment and click Install.
Way 4. Uninstall Windows PowerShell with CMD
The fouth way you can use to remove PowerShell from Windows 10 computer is to use Command Prompt. Check how to do it below.
Step 1. Press Windows + R, type cmd, and press Ctrl + Shift + Enter to open elevated Command Prompt.
Step 2. Type the command lines below to uninstall PowerShell utility.
At first, type the command below to check if PowerShell is enabled or disabled.
- DISM /online /get-features /format:table | find “MicrosoftWindowsPowerShellV2Root”
To disable Windows PowerShell, type the command line:
- DISM /online /Disable-Feature /FeatureName:”MicrosoftWindowsPowerShellV2Root”
To enable Windows PowerShell again, type the command line:
- DISM /online /Enable-Feature /FeatureName:”MicrosoftWindowsPowerShellV2Root”
End Words
As for how to uninstall PowerShell in Windows 10, you may try the 4 ways above.
For Windows users, you may be also interested in some free utilites, for instance, a free data recovery program MiniTool Power Data Recovery, a free disk partition manager MiniTool Partition Wizare, a free video converter/recorder/downloader MiniTool Video Converter, and more. You can go to MiniTool Software official website to find more useful tools.
User Comments :