Are you suffering from Van Restrictions HVCI error while trying to launch Valorant on your computer? If you find the Vanguard system requires you to enable HVCI to start Valorant, don’t fret. Follow this guide from MiniTool to get the answer.
Van Restrictions HVCI Error
Since its release, Valorant has soared in popularity, with over 20 million concurrent players worldwide. Even after several years, some new bugs still appear from time to time. Van Restrictions HVCI error is one of the most annoying errors that prevent you from launching the game. The complete error message is as follows:
VAN RESTRICTION:
Your account does not meet the following requirements in order to play:
HVCI enabled
HVCI is a Windows security feature that makes it harder for malicious programs to use low-level drivers to take control of your computers. The occurrence of Van Restrictions HVCI error indicates that Vanguard requires enabling this feature to function correctly. The following factors can give rise to this error:
- Outdated drivers.
- Outdated BIOS version.
- Conflicted software.
- Corrupted Vanguard files.
MiniTool ShadowMaker TrialClick to Download100%Clean & Safe
Solution 1: Check for Conflicted Drivers
Some old versions of Logitech drivers or software might be the main causes for Van Restrictions HVCI error, as they are likely to be conflicted with Memory Integrity. To find out these conflicted drivers or programs. Follow these steps:
Step 1. Type Windows Security in Windows Search and hit Enter.
Step 2. Navigate to Device security > Core isolation details > toggle on Memory integrity.
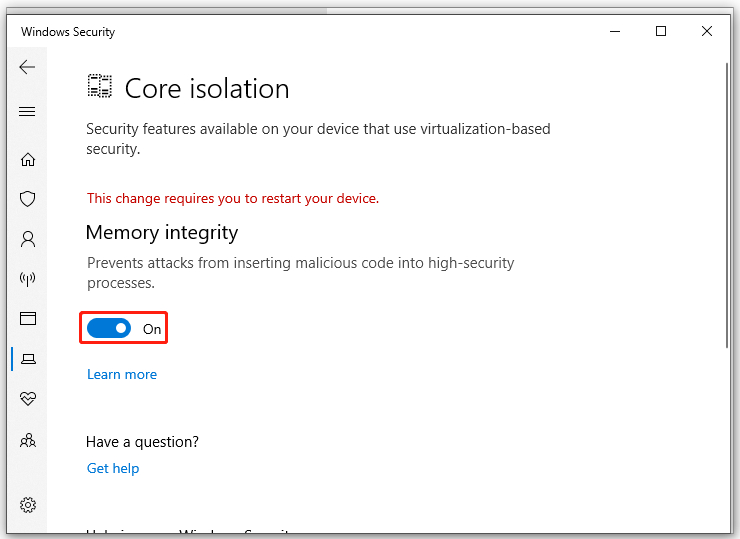
Step 3. Tap on Scan again and then it will list incompatible drivers for you. Check if any Logitech-related drivers below are listed:
- LGSHidFilt.sys
- Logi.sys
- Logitech Gaming Software drivers
- Older Logitech G-Hub drivers
If yes, please move the next solution to remove or update them.

Solution 2: Uninstall the Conflicted Drivers
After finding the conflicted driver with Memory Integrity, it’s time to uninstall them.
Step 1. Right-click on your Start menu and select Device Manager.
Step 2. Expand Human Interface Devices, Keyboards, Mice and other pointing devices to see if there are any Logitech-related drivers.
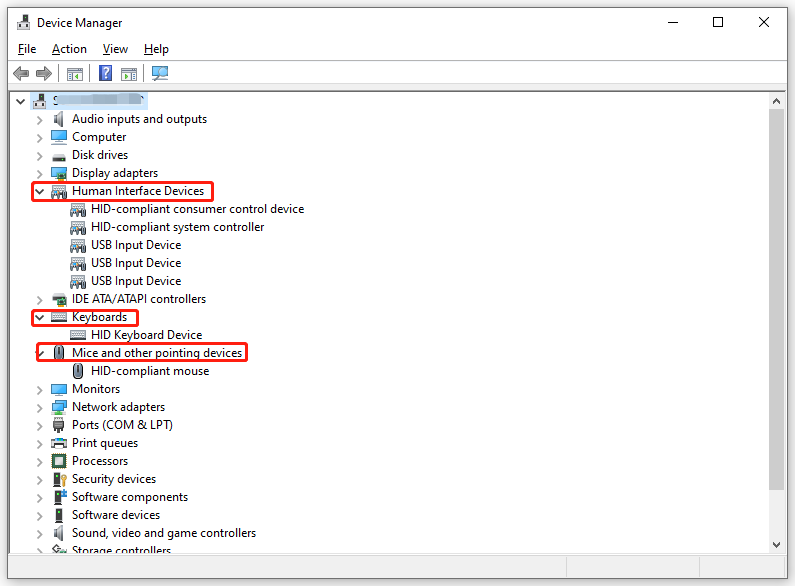
Step 3. If yes, right-click on them to select Uninstall device, confirm this operation and then reboot your computer. Once done, try turning on Memory Integrity again.
Solution 3: Manually Delete the Driver
If you suspect there are any leftovers after uninstalling these conflicted drivers via Device Manager, it’s a good option to remove them manually. To do so:
Step 1. Press Win + E to open File Explorer.
Step 2. Navigate to the following path:
Local Disk C: > Windows > System32 > drivers
Step 3. Inside the drivers folder, find any Logitech-related drivers like LGSHidFilt.sys and Logi.sys. Right-click on them to select Delete.
Solution 4: Uninstall the Conflicted Software
According to some users, certain software like DOSBox and MASM might be conflicted with Valorant, leading to the occurrence of Van Restrictions HVCI error. Therefore, please make sure to uninstall these programs before launching the game.
Step 1. Press Win + R to open the Run box.
Step 2. Type appwiz.cpl and hit Enter to launch Programs and Features.
Step 3. In the programs list, right-click on DOSBox or MASM and select Uninstall.

Step 4. Follow the on-screen prompts to complete the uninstallation.
Solution 5: Enable Virtualization Based Security
To address HVCI enabled error in Valorant, you can enable Virtualization Based Security via Local Group Policy Editor. Here’s how to enable HVCI for gaming:
Step 1. Press Win + R to open the Run dialog.
Step 2. Type gpedit.msc and hit Enter to launch Local Group Policy Editor.
Step 3. Head to: Computer Configuration > Administrative Templates > System > Device Guard.
Step 4. In the right pane, double-click on Turn On Virtualization Based Security and then tick Enabled.
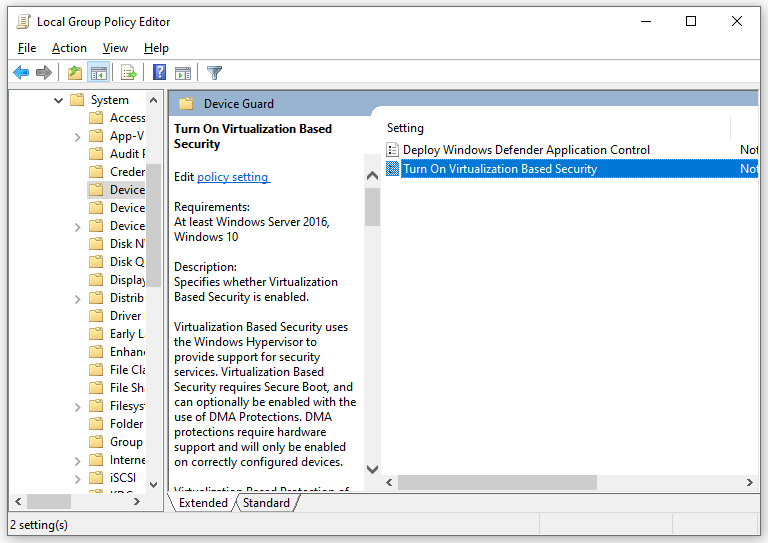
Step 5. Click on Apply & OK.

Solution 6: Reinstall Vanguard Anti-Cheat
Corrupted Vanguard files might be another culprit of Van Restrictions HVCI error. As a result, a clean reinstallation of this program might work. To do so:
Step 1. Launch the Riot Games client.
Step 2. Right-click on the Vanguard icon > select More > Uninstall Vanguard.
Step 3. Restart your computer and open Riot Games to reinstall Vanguard automatically.
# Other Possible Fixes for Valorant HVCI Van Error
- Update BIOS.
- Update your Windows 10/11.
- Perform a clean boot.
- Disable third-party antivirus software.
Final Words
In a nutshell, the HVCI enabled VAN error in Valorant is essential for detecting cheats and maintaining a fair competitive environment. After applying the solutions above, we sincerely hope that you can run Valorant at its full potential!
User Comments :