Volume Keeps Automatically Resetting on Windows
“Volume keeps automatically resetting on Windows” is usually caused by outdated audio drivers, conflicting applications trying to control the sound, or settings in the sound configuration. In this case, you can try updating your audio drivers, checking your communications settings, and disabling any unnecessary sound enhancements in the Sound Settings panel. The following content explains the specific operations for you. Keep reading to get them.

Fixes for Volume Keeps Automatically Resetting on Windows
Fix 1: Change Sound Settings
“Windows 10 volume keeps resetting” is mostly caused by a problem with the sound settings. You can change the sound settings to adjust the volume of different audio types, select the output device that suits you (such as speakers or headphones), and use the equalizer to set custom audio quality. What’s more, changing the settings can allow you to adapt to specific environments based on your needs and situations, such as watching a movie, listening to music, or making a phone call. Here is how to change sound settings.
Step 1: Type Sound settings in the Windows search box and press Enter.
Step 2: Click on Device properties in the Output section.
Step 3: Scroll down to the bottom to click on Additional device properties under Related Settings.
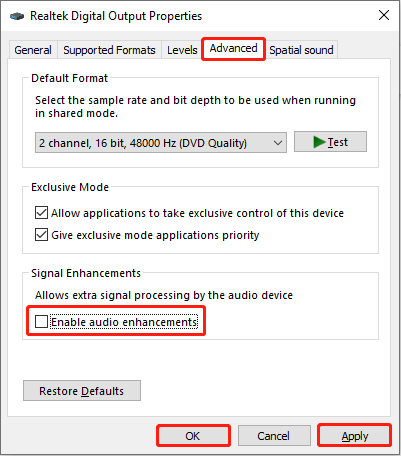
Step 4: Change to the Advanced tab, and untick the checkbox for Enable audio enhancements under Signal Enhancements.
Step 5: Finally, click on Apply > OK to make the change take effect.
Fix 2: Update or Reinstall the Audio Drivers
If you are experiencing sound issues, such as problems with a specific application including “system sounds keep resetting”, you should update or reinstall your audio drivers as outdated or faulty drivers are often the reason your computer cannot communicate properly with your audio hardware. Updating them ensures your sound system is running optimally and can apply new features to fix bugs. Work with the following steps to update or reinstall the audio drivers.
Update driver:
Step 1: Right-click on the Start button and choose Device Manager to open it.
Step 2: Click on the small arrow in front of the Audio inputs and outputs to expand it.
Step 3: Right-click on the adapter to select Update driver from the context menu.
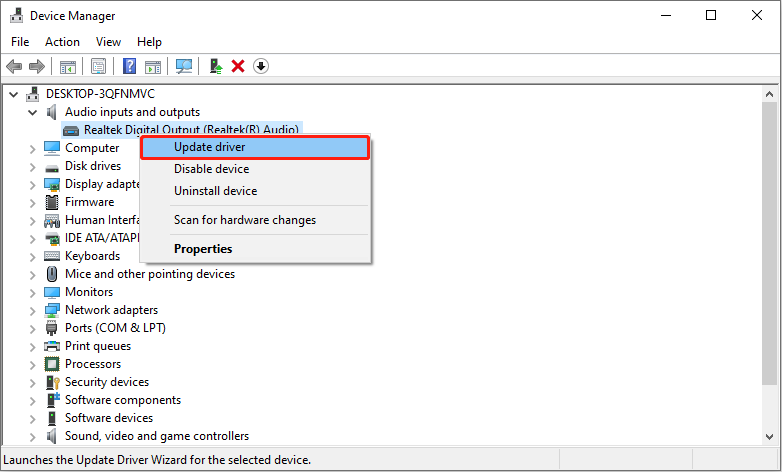
Step 4: In the pop-up window, select Search automatically for drivers to detect any available updates. If there is one, follow the wizard to complete the rest process.
Uninstall driver:
Step 1: Open the Device Manager, double-click on Audio inputs and outputs, and right-click on the adapter to choose Uninstall drivers.
Step 2: In the pop-up prompt, click on the Uninstall button to confirm the action.
Fix 3: Switch to Another User Account
Problems with the user account can also affect the volume and cause this problem. To check if the issue is caused by the account, you can switch user account to see if it can be improved. If it works, the account is the key to this problem. You need to run a virus scan with your antivirus software, or simply use the built-in troubleshooting utility in Windows. Here is a way.
Step 1: Right-click on the Start button and choose Settings to open it.
Step 2: Click on Update & Security > Troubleshoot > Additional troubleshooters.
Step 3: Select the Playing Audio and click on Run the troubleshooter.
Step 4: The scan will start and then you need to choose the device you want to troubleshoot. Select the faulty one and click on Next to get started.
Step 5: If there are any problems, click on Apply this fix to repair it.

Compatible with Windows 11/10/8/8.1, so most users can use it directly after downloading and installing it. What’s more, you can recover 1 GB of files for free. Click on the following button to give it a try.
MiniTool Power Data Recovery FreeClick to Download100%Clean & Safe
Final Words
This post gives you a guide on how to fix “Volume keeps automatically resetting on Windows”. If you encounter this problem, you can try the methods above such as changing the sound settings, updating or uninstalling the audio driver, etc. Hope they can help you fix it successfully.
About The Author

Position: Columnist
Chelsea graduated from university with a major in English. She has a strong interest in English writing. It is this passion for writing that led her to become an English editor. Her articles mainly focus on data recovery and other computer industry news. As an energetic and outgoing girl, Chelsea enjoys listening to music, singing, riding bikes, and eating in her spare time.
User Comments :