Encountering a webcam shuts down Windows audio? How to make the audio utility work properly? If you are also searching for solutions to this issue, this MiniTool post is the right place for you to get answers.
Audio Stops Working When Webcam Is Connected
Plenty of people report that when they connect their webcams to the device, the device audio doesn’t work properly. The webcam shuts down Windows audio, preventing them from normally dealing with work or using the device. Here is a real case:
When plugging my Logitech C920 into my Acer Nitro 5, the audio completely shuts off on the computer (as in, no audio devices at all, including the laptop speakers), and when troubleshooting, it says "one or more audio devices aren't running". This is the same for input devices, my Blue Snowball mic doesn't work. reddit.com
If you are troubled by this error as well, how can you fix it? Let’s go on to discover some practical measures.
MiniTool System Booster TrialClick to Download100%Clean & Safe
Fixes for Webcam Shuts Down Windows Audio
Way 1. Disable the Sound Driver of the Webcam
The most direct and easiest way is to disable the sound driver of your webcam. Thus, your computer audio function can work properly.
Step 1. Right-click on the Windows icon and choose Device Manager.
Step 2. Find and expand the Sound, video and game controller option.
Step 3. Locate your webcam device and right-click on it. Choose Disable device from the context menu.
However, modifying this configuration disables the built-in microphone of the webcam. If you still want the embedded microphone function, please move on to the next method.
Way 2. Modify the Windows Audio Service
The Windows Audio service manages audio for Windows-based programs. When audio stops working after connecting the webcam, you can try this method to make it work properly.
Step 1. Press Win + S to launch the Windows Search utility.
Step 2. Type services into the bar and hit Enter to open Windows Services.
Step 3. Scroll down to find and double-click on the Windows Audio option.
Step 4. Change to the Log On tab and select the Local System account option.

Step 5. Click Apply > OK in sequence to save your change.
Step 6. Back to the Windows Services window and right-click on the Windows Audio option to choose Restart.
Step 7. Restart your computer. Then, press Win + I to open Windows Settings and head to System > Sound.
Step 8. Scroll down to find the Input section. Click on the webcam device and choose Off from the dropdown menu of the Audio enhancements section.
Step 9. Repeat steps 1-3 to open the Windows Audio Properties window. Change to the Log On tab and choose This account.
Step 10. Click Browse > Advanced > Find Now > LOCAL SERVICE > OK.
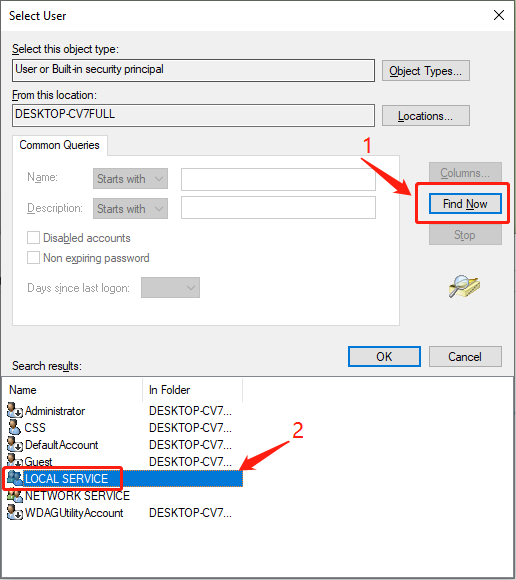
Step 11. When returning to the Windows Audio Properties window, you should delete all the content in the Password section. Click OK to confirm.
Now, you can check if this helps to handle the issue where the Webcam shuts down Windows audio.
Way 3. Run the Hardware and Devices Troubleshooter
Device incompatible issue is another possible cause of the audio not working after connecting a webcam. If this is the reason, utilize the Hardware and Devices Troubleshooter to find and handle the issue.
Step 1. Press Win + R to launch the Run utility.
Step 2. Type cmd into the dialog and press Shift + Ctrl + Enter to run Command Prompt as administrator.
Step 3. Type msdt.exe -id DeviceDiagnostic and hit Enter to launch the Hardware and Devices troubleshooter automatically.
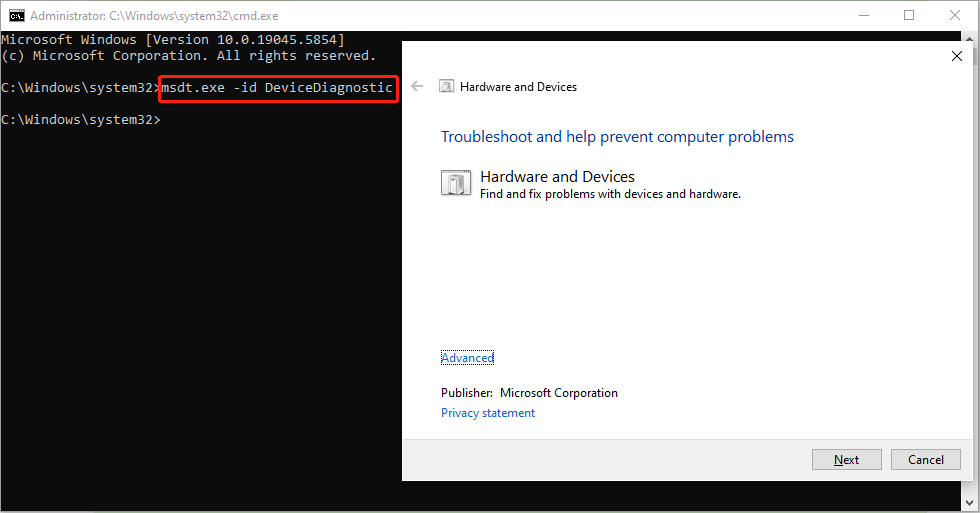
Step 4. Click Next to run the troubleshooter. Wait and follow the on-screen instructions to complete the rest operations.
Final Words
This post gives three solutions for you when you encounter the webcam shuts down Windows audio unexpectedly. Try them one by one to find one that works in your case.
User Comments :