There are many factors that can affect your gaming experience and latency is one of them. What is latency in gaming and how to improve latency on PC? This post on MiniTool Website will how you in details.
What Is Latency in Gaming?
Latency, also called ping, indicates the quality of your internet connection and is measured in milliseconds. Well, what is latency in gaming? It refers to the total time that it takes your gaming device to send data to the game server and receive it back on your device.
What is a good latency for gaming? Is low latency good or high latency good? The answer is obvious. The lower the number, the better performance you will enjoy. Therefore, you had better try your best to minimize the latency in gaming.
How to Improve Latency in Gaming on PC?
Preparation: Run a Ping Test
Before you take any measures, you need to know how to run a ping test to determine a baseline for your latency. To do so:
Step 1. Press Win + S and type cmd to locate Command Prompt.
Step 2. Do a right-click on it to choose Run as administrator.
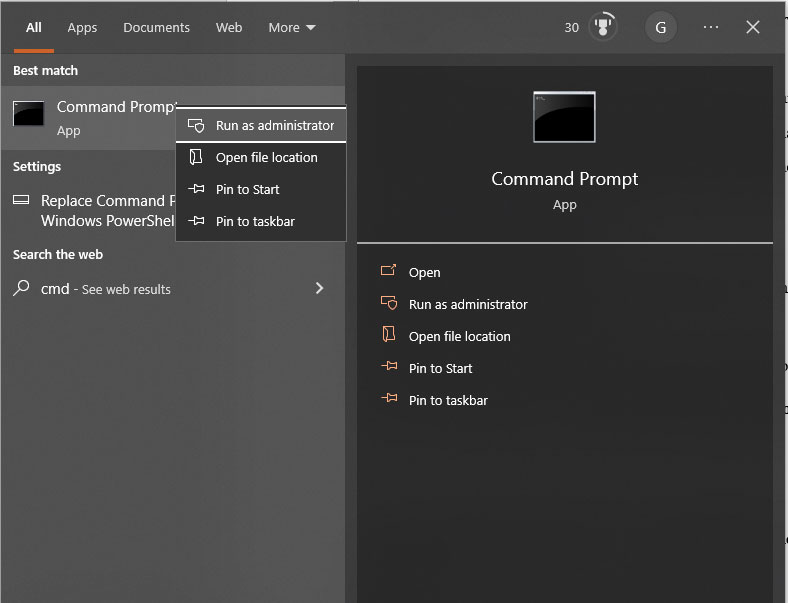
Step 3. Type ping, hit the space bar, add your IP address and hit Enter to show the ping results.
Method 1: Stop Using Wi-Fi and Start Connecting to an Ethernet Cable
It is highly recommended to use an Ethernet cable when playing gaming on a PC. Although Wi-Fi seems very convenient, it may increase latency when gaming. Make sure to check if all the cables are plugged into both your router and computer firmly.
Method 2: Close Background Programs
If there are other programs running in the backend, you’d better shut them down because those programs can drain your available bandwidth. Any programs like streaming music, videos and more may slow down the speed at which information is funnelled through your router and delivered to your game server.
Method 3: Stop Updates
Updates are important for any activities on your computer but automatic updates when gaming will occupy a great deal of bandwidth hence triggering high latency. It is advised to schedule your update time at your convenience.
Method 4: Make the Game Through Firewall
Windows Defender Firewall secures our computer from attacks of viruses or malware. At the same time, it may block some safe programs by mistake. As a result, you can make your game through Windows Firewall. Here’s how to do it:
Step 1. Go to Control Panel > System and Security > Windows Defender Firewall.
Step 2. Click on Allow an app or feature through Windows Defender Firewall.
Step 3. Hit Change settings and scroll down to tap on Allow another app at the bottom of the popping-up window.
Step 4. Press Browse to choose the path of your game executable file.
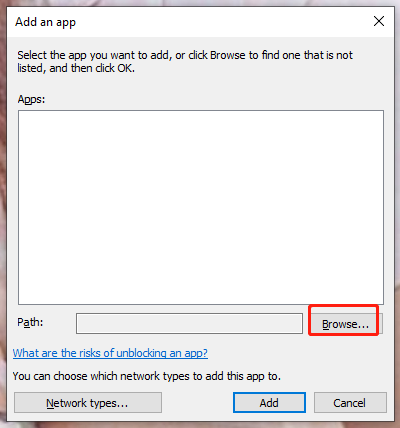
Step 5. After making your decision, click Add and OK to save the changes.
User Comments :