If you’d like to change Windows 10 lock screen timeout settings, this post provides two ways. Learn how to adjust the lock screen timeout in Windows 10 by editing the registry or using command line. Editing registry can be dangerous, you can easily make a system backup with MiniTool professional backup software.
Windows 10 computer features a lock screen before you sign into your account. Windows 10 lock screen displays date and time, beautiful background images.
The computer display will turn off after 60 seconds when you lock your Windows 10 computer screen. This is a default design. After 60 seconds, the computer screen will turn black.
Users can’t customize this Windows 10 lock screen timeout settings in Control Panel or Settings. But there are other two ways to allow you to change the Windows 10 lock screen timeout. One is editing the Registry, another is to use command line. Check the detailed steps below.

How to Change Windows 10 Lock Screen Timeout by Editing the Registry
Before you adjust Windows 10 lock screen timeout by editing the Registry, it’s highly recommended you make a full backup of your Windows 10 PC. Editing the registry can cause irreversible damages to your computer if you make some mistakes in doing it.
MiniTool ShadowMaker offers all-around backup schemes incl. system backup and restore, files and folders backup, automatic backup, and more. You can use this free software to easily backup OS, individual files and folders, disks and partitions to external hard drive, USB flash drive, etc. Always keep your data safe.
After you back up your PC operating system and important files, you can check below how to change Windows 10 lock screen timeout by editing the registry.
Step 1. You can press Windows + R keys on the keyboard at the same time to open Windows Run dialog.
Type regedit and hit Enter button to open the Registry Editor application.
Step 2. In the Registry Editor window, you can browse from the left panel by following the path below to find the target Registry key.
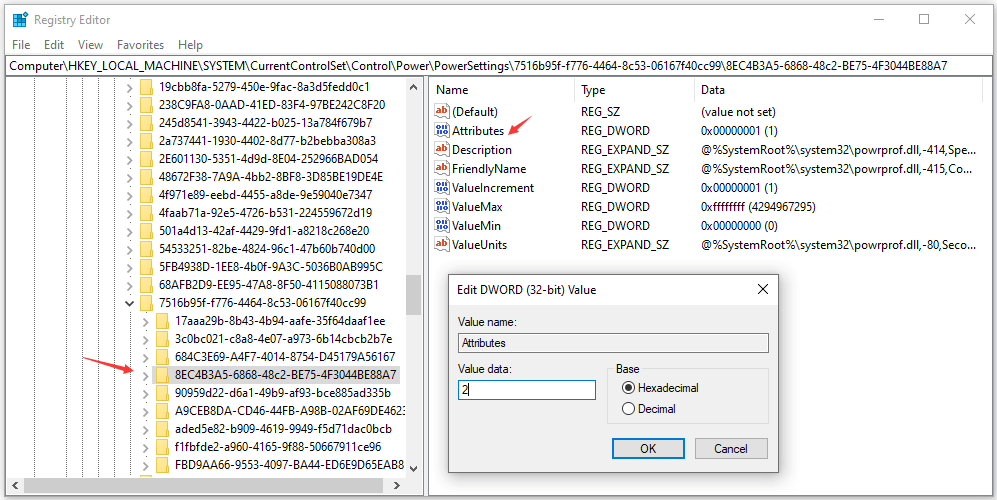
HKEYLOCAL_MACHINE\SYSTEM\CurrentControlSet\Control\Power\PowerSettings\7516b95f-f776-4464-8c53-06167f40cc99\8EC4B3A5-6868-48c2-BE75-4F3044BE88A7
Step 3. Then you can click Attributes DWORD in the right window, and change the value from 1 to 2. Click OK.
Step 4. Next you can click Start and type Power Options. Choose and open Power Options.
Step 5. Click Change plan settings to open Edit Plan Settings window. Click Change advanced power settings link.
Step 6. Expand Display and click Console lock display off timeout. Now you can change the default time to any time you want in minutes. Click Apply and click OK.
Any time you want to revert to the original setting, you can follow the same steps to change the registry value from 2 to 1 in Step 3.
How to Change Windows 10 Lock Screen Timeout Using Command Prompt
Step 1. You can press Windows + R key to open Windows Run. Type cmd and press Ctrl + Shift + Enter keys at the same time to run Windows Command Prompt as administrator.
Step 2. Next type this command: powercfg.exe /SETACVALUEINDEX SCHEME_CURRENT SUB_VIDEO VIDEOCONLOCK 60. Replace “60” with the time (in seconds) you want to set the timeout. Hit Enter to execute the command.
Step 3. Next input this command: powercfg.exe /SETACTIVE SCHEME_CURRENT, and hit Enter.
After that, you can press Windows + L keys on the keyboard to lock your Windows 10 PC and check if the new setting of Windows 10 lock screen timeout works.
User Comments :