Is Windows 11 24H2 not showing up in Windows Update even though your PC meets all the requirements? You are not alone. This guide on MiniTool dives into the reasons for this issue and walks you through proven methods to resolve it quickly.
Windows 11 24H2 Not Showing up in Windows Update
Windows 11 24H2 is a major update that has been available for a long time. However, many users have reported that it still does not appear in Windows Update, even though their devices meet the basic system requirements. This can be so frustrating, especially for those looking forward to the new features and improvements included in this update. The issue may be caused by various factors, such as incompatible system settings.
This guide is designed to help you use Windows’ built-in tools to troubleshoot the problem and successfully download and install the Windows 11 24H2 update.
How to Fix Windows 11 24H2 Won’t Show Up
Method 1. Use “Fix Problems Using Windows Update”
The first fix to solve the Windows 11 24H2 not showing up issue is to run the “Fix problems using Windows Update” tool. This Windows Update recovery tool performs a reinstall of the current Windows version, and your files, applications, and system settings will be preserved.
Nevertheless, for data security considerations, it is also recommended to back up your data, especially important files before using this repair tool. You can use MiniTool ShadowMaker to back up files, partitions, or the system for free within 30 days.
MiniTool ShadowMaker TrialClick to Download100%Clean & Safe
Before running this tool, save all your open work in case of any data loss because you will need to restart the computer.
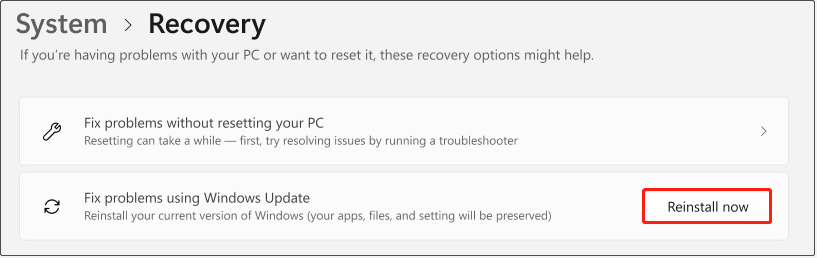
Open Windows Settings and click System. Scroll down and click Recovery.
Click Reinstall now in the Fix problems using Windows Update section.
In the new window, choose if you want to allow the computer to automatically restart 15 minutes after the installation is finished. And then wait for the repair version to download completely.
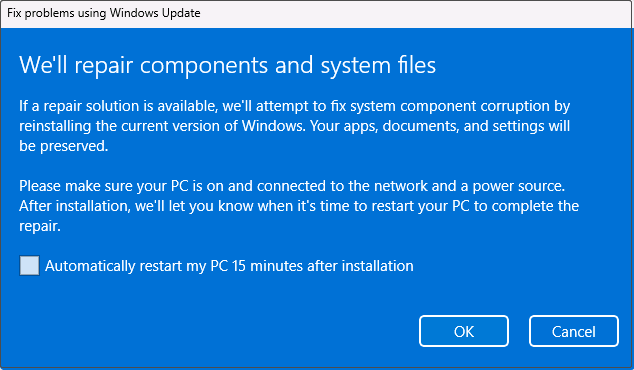
Finally, follow the on-screen instructions to complete the process.

Method 2. Modify Group Policies or Registry Values
If Windows 11 24H2 is still not showing up after using the basic troubleshooting tool, you may need to make deeper changes to your system. Modifying group policies or registry values can help force Windows to check for updates or bypass certain restrictions that may be preventing the installation.
Step 1. Open Local Group Policy Editor by using Windows Search.
Step 2. Navigate to Computer Configuration > Administrative Templates > Windows Components > Windows Update > Manage updates offered from Windows Update.
Step 3. In the right panel, double-click Select the target Feature Update version.
Step 4. In the new window, tick the Enabled option. In the “Which Windows produce version would you like to receive feature updates for” section, type Windows 11. Under “Target Version for Feature Updates”, input 24H2. After that, apply this change.
Step 5. Restart your computer and check if Windows 11 24H2 shows up.
If you are using Windows Home editions, there may be no Local Group Policy Editor. In this case, you can use Registry Editor to complete the same task.
Step 1. Press the Windows + R key combination, type regedit in the box, and press Enter.
Step 2. Go to the following location:
Computer\HKEY_LOCAL_MACHINE\SOFTWARE\Policies\Microsoft\Windows\WindowsUpdate
If WindowsUpdate does not exist, right-click Windows and choose New > Key. Then name it WindowsUpdate.
Step 3. Right-click WindowsUpdate and select New > String Value.
Step 4. Name the value ProductVersion. Then double-click on it, set its value data to Windows 11, and click OK to save it.
Step 5. Create another string value in the right panel. Name it TargetReleaseVersionInfo and set its value data to 24H2.
Step 6. Right-click on the blank area and select New > DWORD (32-bit) Value. Name it TargetReleaseVersion, set its value data to 1, and save the change.
Step 7. Restart your computer and Windows 11 24H2 should appear in Windows Update.

Method 3. Use Windows 11 Installation Assistant
The Windows 11 Installation Assistant is designed to help upgrade the current system to a newer version. Download it from Microsoft’s official site and run it. Next, follow the instructions on your screen to accept the terms and complete the installation.
MiniTool ShadowMaker TrialClick to Download100%Clean & Safe
Method 4. Use Windows 11 24H2 ISO
Alternatively, you can download the ISO file for Windows 11 24H2 to upgrade your system.
- Download Windows 11 Media Creation Tool from Microsoft.
- Run this tool, choose the Create installation media for another PC option, and click Next.
- In the new window, keep the Use the recommended options for this PC option ticked and click Next.
- Select the ISO file option and click Next. Then choose a location to store the ISO file and wait for the download to complete.
- Right-click the ISO and choose Mount.
- Double-click the setup.exe file and wait for the installation to finish.
Exclusive 50% OFF Glary Utilities
MiniTool Power Data Recovery is the best free data recovery software for Windows 11/10/8/8.1. Whether you are facing data loss right now or preparing for potential risks in the future, it offers a safe and effective solution.
MiniTool Power Data Recovery FreeClick to Download100%Clean & Safe
Bottom Line
If you encounter the situation of Windows 11 24H2 not showing up, use the solutions above to resolve it. Then you will get this update installed and you can enjoy its new features and improvements.
About The Author

Position: Columnist
Shirley holds a bachelor’s degree in English and has been an editor at the MiniTool Team for many years. She specializes in IT-related content, with a focus on data recovery, file backup, disk management, and other technical topics. She is committed to delivering clear, accurate, and practical solutions to help users resolve common computer issues.
User Comments :