Quick Settings is a new feature in Windows 11. Perhaps you don’t know it. In this post, MiniTool Software will tell you what Windows 11 Quick Settings is, how to open it using different methods, and how to edit it according to your requirements, and how to use it to change your computer settings.
What Is Windows 11 Quick Settings?
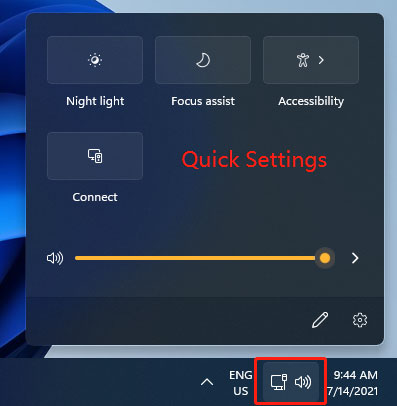
In Windows 11, Microsoft has removed the Action Center from the taskbar. Instead, another section is added. It is Quick Settings. You can say that Quick Settings replaces the Action Center. It looks like the Control Center on a Mac computer.
When you want to change some settings on your Windows 11 computer, Quick Settings give you’re quick access to it. But where is Windows 11 Quick Settings? It is a set of status icons on the taskbar. For example, if you are using a laptop and using a Wi-Fi network connection, the Quick Settings area is the section of the Wi-Fi icon, the battery icon, and the volume icon on the right section of the taskbar. If you are using a desktop computer and a cable internet connection, the Quick Settings area is the section of the internet access icon and the volume icon.
How to Open Quick Settings in Windows 11?
So far, there are two ways to open Quick Settings in Windows 11.
Way 1: Click the Set of Status Icons on the Taskbar
As mentioned above, the Quick Settings section is a set of status icons on the taskbar. So, you can click one of these icons to open it. You can also click the space between two status icons to open Quick Settings in Windows 11.
![]()
Way 2: Use Quick Settings Keyboard Shortcut
To match the new features in Windows 11, Microsoft adds some new keyboard shortcuts in this new operating system. One of the shortcuts is to open Windows 11 Quick Settings.
It is very simple to do this: you can press the Windows key and the A key at the same time to open it on your Windows 11 computer.
How to Edit Quick Settings in Windows 11?
By default, there are only limited settings in Quick Settings. But the purpose of Quick Settings is to offer you quick access to your needed settings. Fortunately, you can edit Quick Settings according to your requirements. For example, you can add or remove an option from Quick Settings.
How to Add or Remove an Option from Quick Settings?
Add a Setting to Quick Settings in Windows 11
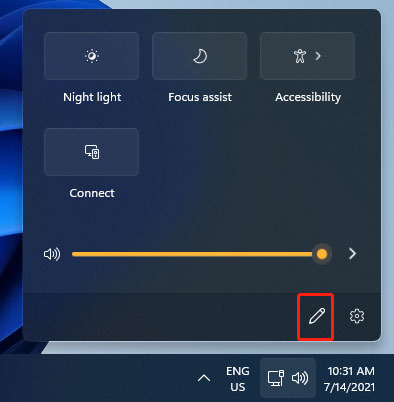
1. Press Win+A to open Quick Settings.
2. Click the pen icon at the bottom to continue.
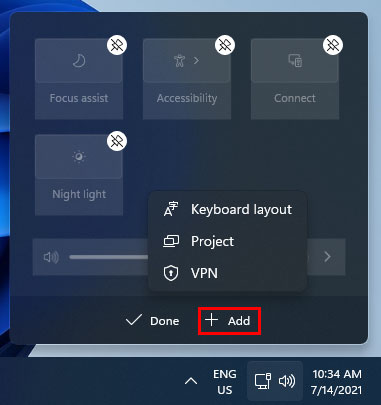
3. Click Add.
4. Select your needed option to add it to Quick Settings. If you are using a laptop, you will see more available options like Mobile hotspot and Nearby sharing after clicking Add.
5. Click Done to save the change.
Remove a Setting from Quick Settings in Windows 11
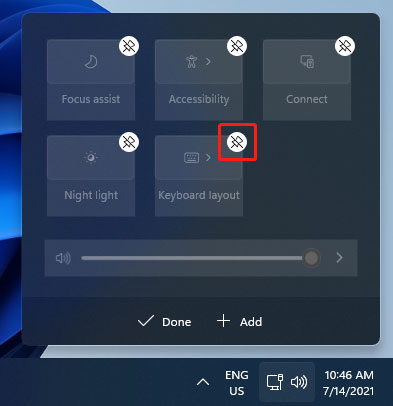
- Press Win+A to open Quick Settings.
- Click the pen icon.
- The settings in it will become grey with a unpin icon on the top-right corner of each. You can click the corresponding unpin icon to remove a setting from Quick Settings in Windows 11.
- Click Done to save the change.
How to Use Quick Settings in Windows 11?
It is very easy to use Quick Settings to change your computer settings in Windows 11. You can just open it and click the setting you want to use. For example, if you want to use night light, you can just click Night light to enable it. You can try other options to see what they can do for you.

Bottom Line
After reading this post, you should know what Windows 11 Quick Settings is, how to open it, and how to edit it in Windows 11. Should you have other related issues, you can let us know in the comments.
About The Author

Position: Columnist
Stella has been working in MiniTool Software as an English Editor for more than 8 years. Her articles mainly cover the fields of data recovery including storage media data recovery, phone data recovery, and photo recovery, videos download, partition management, and video & audio format conversions.
User Comments :