Besides the other new features brought to Windows 11, the new methods of input catch the eyes of most users. One of them is voice/speech input. What is voice input in Win11 and how to use it? Let’s have a look at the following content edited on MiniTool official website.
Update: The official Windows 11 is already available since October 5, 2021.
Windows 11 Voice Input Types
While Win11 works well with a keyboard and mouse, people are also able to take advantage of an improved speech recognition technology to type. Microsoft offers online (cloud-based) speech recognition and device-based speech recognition technologies to help users achieve voice input.
Online Speech Recognition vs Device-Based Speech Recognition
When you use the cloud-based speech recognition tech, Microsoft collects and uses your voice recordings to create a text transcription of the spoken words in the voice data. Yet, you can use device-based speech recognition without sending your voice data to Microsoft.
However, the online speech recognition tech offers more accurate recognition than device-based speech recognition. When the online speech recognition setting is disabled, speech services that don’t base on the cloud and only rely on device-based recognition will still work, such as Narrator and Windows Speech Recognition.

How to Use Windows 11 Voice Input?
#1. Enable Windows 11 Voice Typing Tool
The voice typing tool is a system-wide AI utility that is built in Windows 11. It works in all programs and environments including Teams, Office, Notepad, Edge, Outlook, Windows Media Player, etc. If you see a text field, just trigger the speech dictation toolbar and you are all set! Yet, remember that you have to keep a network connection during voice typing.
1. The simplest way to turn on voice typing is to use a Windows 11 keyboard shortcut Windows key + H. Just press the hotkeys and the speech recognition box will prompt immediately showing the following message:
Microsoft Speech Services
Voice typing turns your voice into text with Microsoft’s online speech technologies. Select the mic button to start using voice typing.

If you are using a touch keyboard, just click on the microphone button to enable the voice typing program.
2. Then, click on the mic button and begin speaking. The Microsoft Speech Services will convert your speech to text. If the speech dictation little box is obstructing your screen view, you can drag and move it around the monitor by clicking and holding the bar at the top of the box.
3. To optimize your voice typing, you can enable the Auto Punctuation feature to make it add punctuations into the converted text. Just click on the Settings icon (cog) next to the mic icon and switch on Auto punctuation in the popup.
There, you can also turn on the Voice typing launcher, which lets you quickly access voice typing when you are in a text box. When enabled, every time you open a text field, an overlay of voice typing will appear. Just click on the microphone icon to start voice typing.
4. In case your dictation isn’t being picked properly, you can go to Windows Settings > Time & Language > Speech and select a proper Speech language according to your region or accent.
Can’t Open Voice Typing Tool
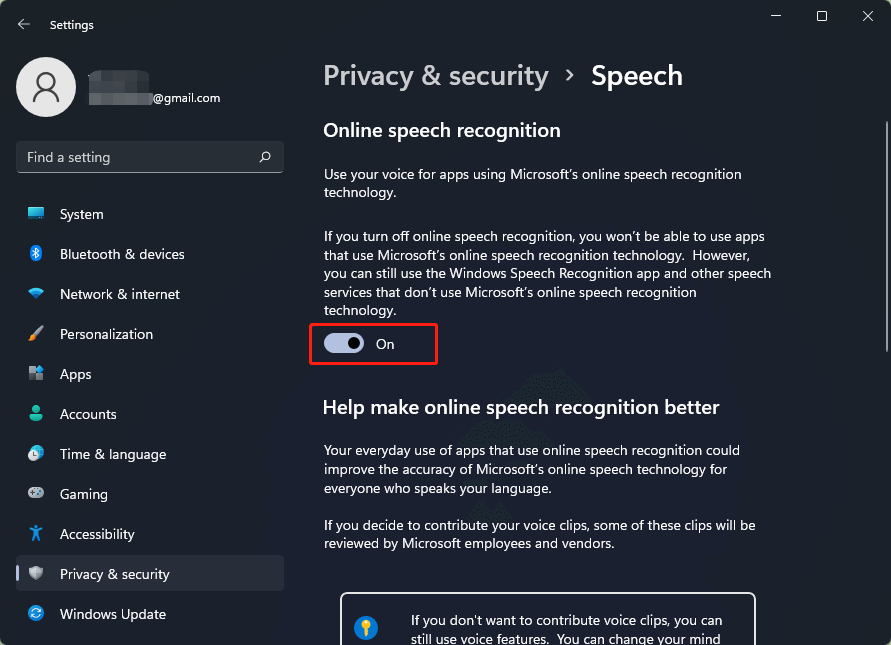
If you fail to launch the voice typing application using the method above, you may fix the problem by turning on online speech recognition. Navigate to Settings > Privacy & security > Speech and switch on the online speech recognition utility.
Sometimes, you need to download and install the speech language pack before you can use the voice typing tool.
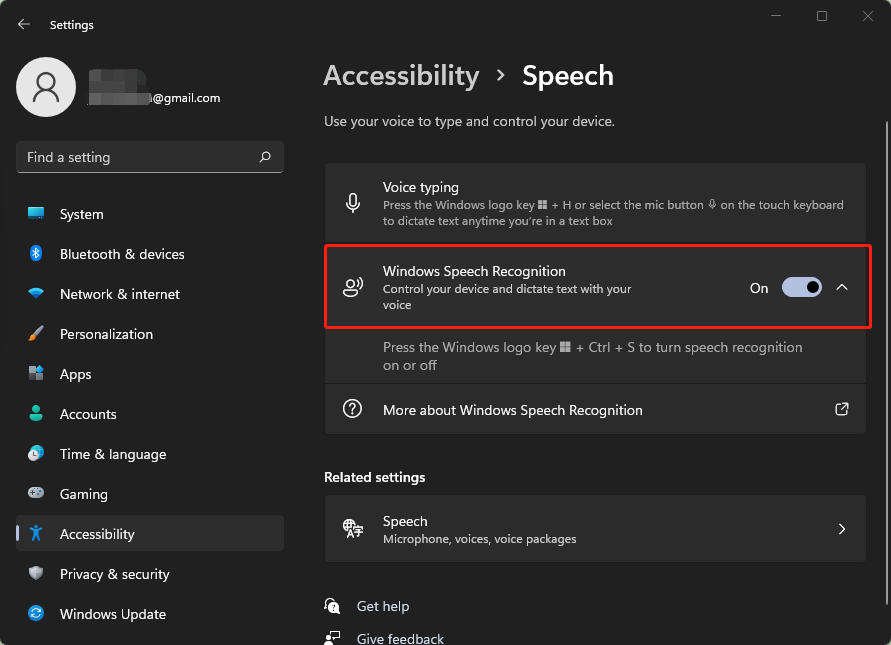
#2 Turn on Device-Based Speech Recognition
Move to Settings > Easy of Access > Speech and enable Windows Speech Recognition. Then, follow the instruction to finish the setup.
#3 Dictate Text in Microsoft Office
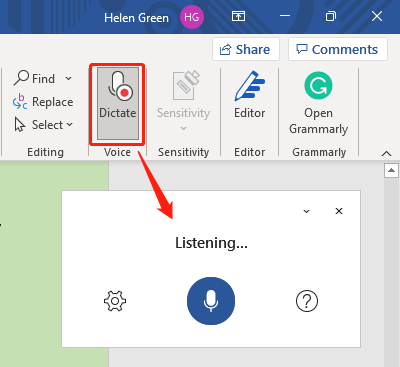
If you are a Microsoft 365 subscriber and running Windows 10 or above, you are able to use the speech-to-text feature to author content in Office with a microphone and reliable Internet connection. Here we will take the Word document as an example to show you how to use the speech dictation tool in Office.
Make sure your mic is well connected, working, and no other app is using it. Open Microsoft Word (editable state) and click on the mic icon in the right of the toolbar. Then, a little box will pop up. There, just click on the mic icon to start or stop the voice recognition.
You can also enable auto punctuation and specialize your language through the Dictation Settings icon (gear). Similarly, you can move the little box anywhere on the screen by simply dragging it.
Conclusion
No matter which voice input technology you use in Windows 11, you will find it amazing by typing words faster without a keyboard!
About The Author

Position: Columnist
Helen is a tech writer with over 10 years of experience. She specializes in creating easy-to-follow guides for video editing, media file conversion, and computer performance. Helen doesn't just write—she tests every software herself and listens to feedback from users and experts. Her goal is to make complex programs simple so that everyone can solve their tech problems with confidence.
User Comments :