If Windows keeps assigning drive letter to recovery partition and making this partition visible in File Explorer, how can you get rid of this issue? Read this MiniTool guide and you will master several methods to remove drive letter from recovery partition.
Windows Keeps Assigning Drive Letter to Recovery Partition
The recovery partition is a special partition that stores the Windows Recovery Environment information and factory recovery data (for some computer brands). By default, this partition is hidden and does not have a drive letter. However, Windows may occasionally assign a drive letter to it by mistake, causing it to appear in File Explorer, which can be confusing.
If Windows keeps assigning drive letter to recovery partition, what can you do to fix it? I have gathered several user-proven solutions from various forum posts and listed them below for your reference.

How to Fix if the Recovery Partition Keeps Appearing in File Explorer
Way 1. Remove Drive Letter With CMD
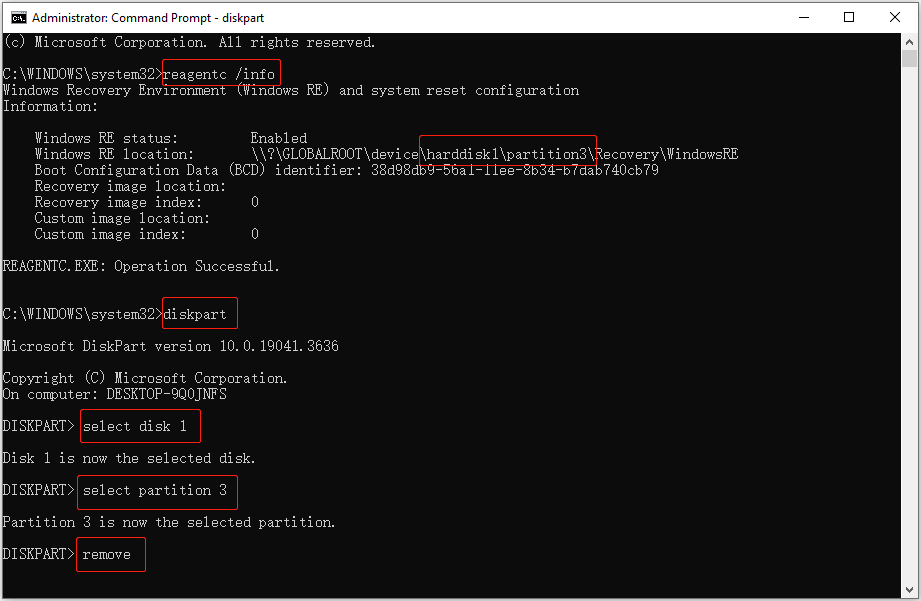
If the recovery partition has a drive letter, you can use the Remove command line to clear it. The steps below are about diskpart remove drive letter.
Step 1. Type cmd in the Windows search box, then click Run as administrator under Command Prompt to run it with privileges.
Step 2. Type reagentc /info and press Enter to identify what drive and partition the recovery partition resides on.
Step 3. Type diskpart and press Enter. After that, type the following command lines one by one, and press Enter after each command.
- select disk x
- select partition x
- remove
Way 2. Use the mountvol Command
Alternatively, you can use the mountvol command line to remove the drive letter of the recovery partition so as to hide the partition.
Step 1. Open an elevated Command Prompt.
Step 2. Type mountvol drive letter /d and press Enter. Replace the drive letter with the one you want to remove. After executing this command, the drive letter will no longer appear in File Explorer and Disk Management.
Way 3. Set up the Partition ID
Sometimes Windows keeps assigning drive letter to recovery partition because the disk is wrongly recognized. In this case, you can fix it by setting up a specific partition ID and attribute for the recovery partition.
Step 1. Open Command Prompt as an administrator, and then execute the reagentc /info command to get the information about the recovery partition.
Step 2. Next, type diskpart and press Enter. Then, execute the following command lines one by one:
- select disk x (x represents the disk number of the recovery partition)
- select partition x (x represents the partition number of the recovery partition)
- set id=”de94bba4-06d1-4d40-a16a-bfd50179d6ac”
- gpt attributes=0x8000000000000001
Way 4. Delete the \DosDevices\ Registry
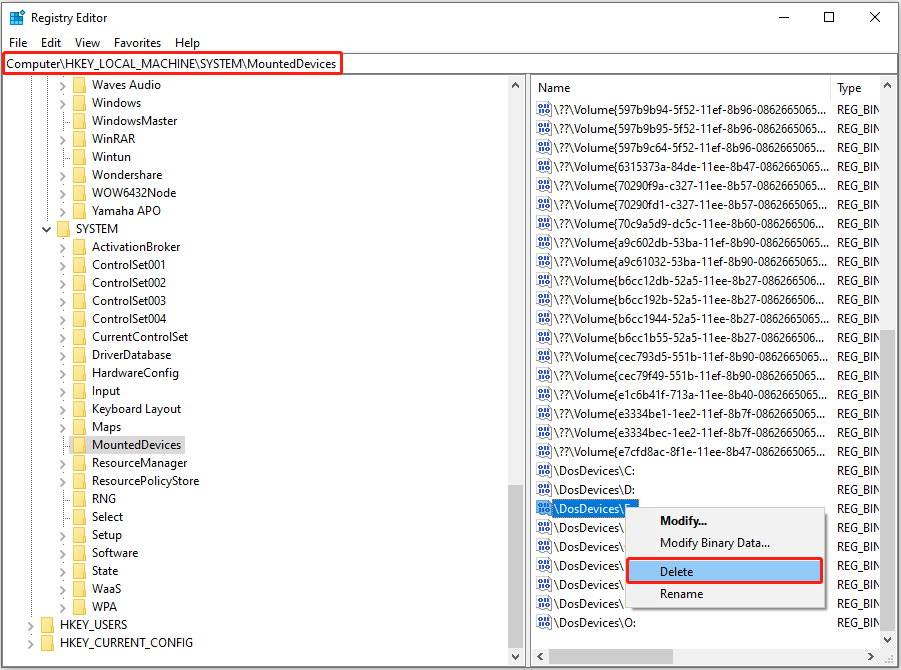
If the recovery partition keeps appearing in File Explorer, you can also tweak the registry value to remove the drive letter forcibly. Work with the following steps.
Step 1. Press Windows + R to open Run. Type regedit in the text box and press Enter to open the Registry Editor.
Step 2. Navigate to the following location:
Computer\HKEY_LOCAL_MACHINE\SYSTEM\MountedDevices
Step 3. In the right panel, right-click the \DosDevices\ value that contains the drive letter of the recovery partition and click Delete.
Step 4. Restart your computer and check if the recovery partition is still displayed in File Explorer.
Way 5. Delete the Recovery Partition
Deleting the recovery partition is an extreme measure that should only be used when all other methods have failed to solve your problem. Deleting the recovery partition will prevent you from using the Windows built-in recovery feature in the event of a system failure. Therefore, unless you have created a recovery drive or a recent system image backup, I do not recommend deleting the recovery partition.
To create a system image backup, you can use MiniTool ShadowMaker, the best Windows data and system protection program. Within 30 days, you can use it to back up your Windows system for free.
MiniTool ShadowMaker TrialClick to Download100%Clean & Safe
How to delete the recovery partition? Operate with the following steps.
Step 1. Open Command Prompt as an administrator.
Step 2. Execute the following commands:
- reagentc /info
- diskpart
- select disk x
- select partition x
- delete partition override
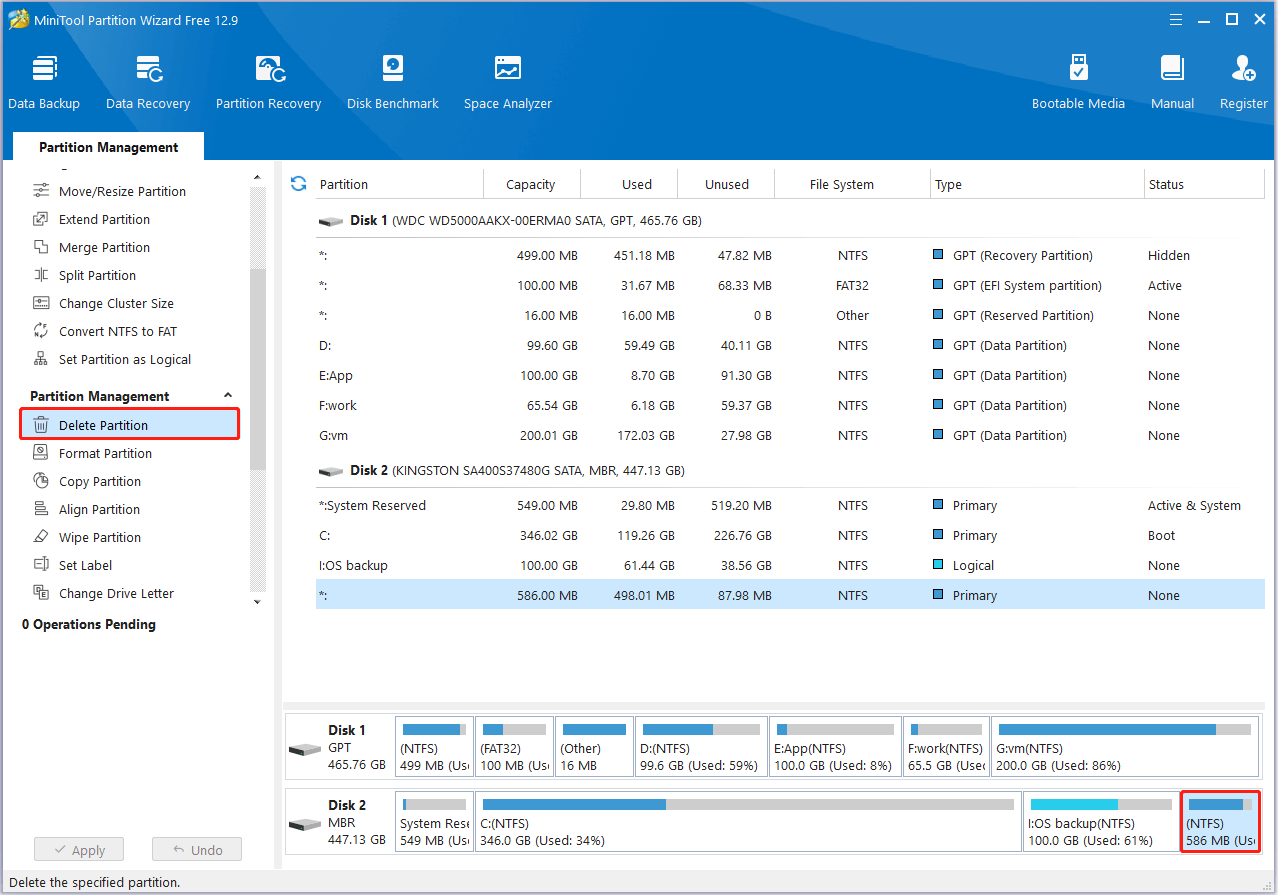
If you prefer an intuitive interface for deleting the recovery partition, you can use MiniTool Partition Wizard. This partition magic supports deleting partitions for free and performing other disk management tasks, such as disk formatting, disk conversion, hard drive cloning, and so on.
MiniTool Partition Wizard FreeClick to Download100%Clean & Safe
Launch MiniTool Partition Wizard. On its main interface, select the recovery partition and click Delete Partition from the left menu bar. Next, click Apply in the lower left corner to confirm the action.
Verdict
If Windows keeps assigning drive letter to recovery partition, use the methods outlined above to remove the drive letter. If it fails, you may consider deleting the recovery partition if you have other options to restore your computer to a normal state.
About The Author

Position: Columnist
Shirley holds a bachelor’s degree in English and has been an editor at the MiniTool Team for many years. She specializes in IT-related content, with a focus on data recovery, file backup, disk management, and other technical topics. She is committed to delivering clear, accurate, and practical solutions to help users resolve common computer issues.
User Comments :