Wondering how to transfer files between remote desktop and local machine? This comprehensive guide on MiniTool covers detailed instructions to carry out Windows remote desktop file transfer efficiently.
Is It Possible to Do a Windows Remote Desktop File Transfer?
A remote desktop is often used to access another computer from a distance, whether for work or personal use. Sometimes, you may need to send files from your local computer to the remote one. At that time, you may wonder: Can I transfer files to a remote desktop?
The good news is, yes. Windows Remote Desktop Connection lets you perform RDP file transfer easily. In the following section, I will show you how to do that.
MiniTool ShadowMaker TrialClick to Download100%Clean & Safe
How to Transfer Files From Local PC to Remote Desktop?
Step 1. Enable Remote Desktop
Before you can connect to another computer remotely to transfer files, you need to do a few things to set up the controlled computer. In addition to making sure the computer is powered on and has an appropriate user account configured, you also need to configure the computer to accept remote connections. Here is how to do that.
Step 1. Press the Windows + I key combination to open Settings.
Step 2. Navigate to System > Remote Desktop.
Step 3. In the right panel, switch the button to On to enable the remote desktop. In the new window, click Confirm.
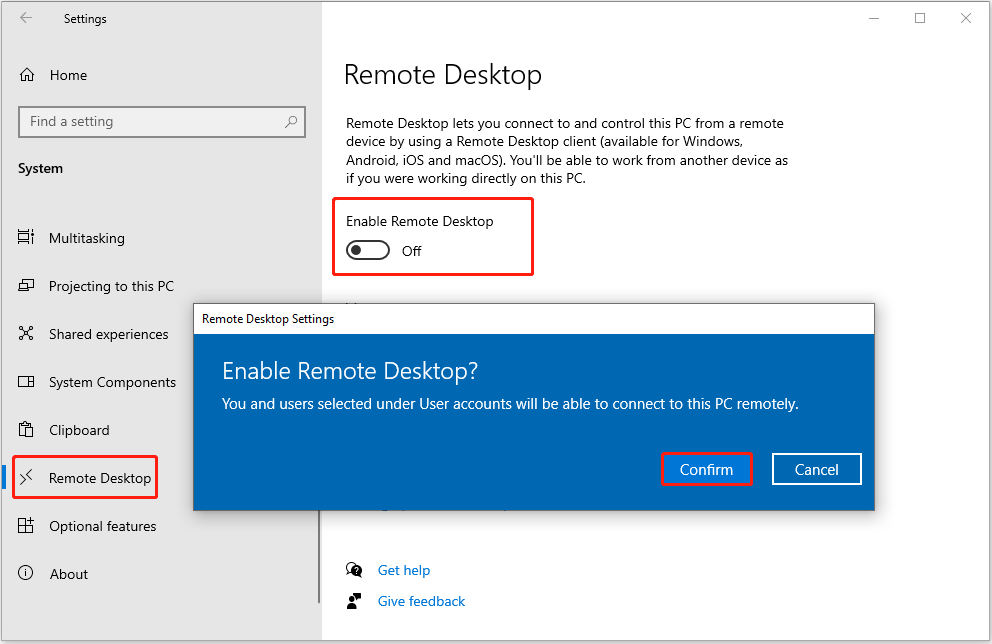
Important:
Under the How to connect to this PC section, you will see the name of the PC you want to connect to. Make sure to copy or write it down, because you will need it when you try to connect to another device.
Step 2. Turn on Drive Sharing
The next step is to enable drive sharing so that you can access your local hard drives from the remote desktop session. This allows you to easily transfer files between your local computer and the remote desktop. On your local computer, do the following things:
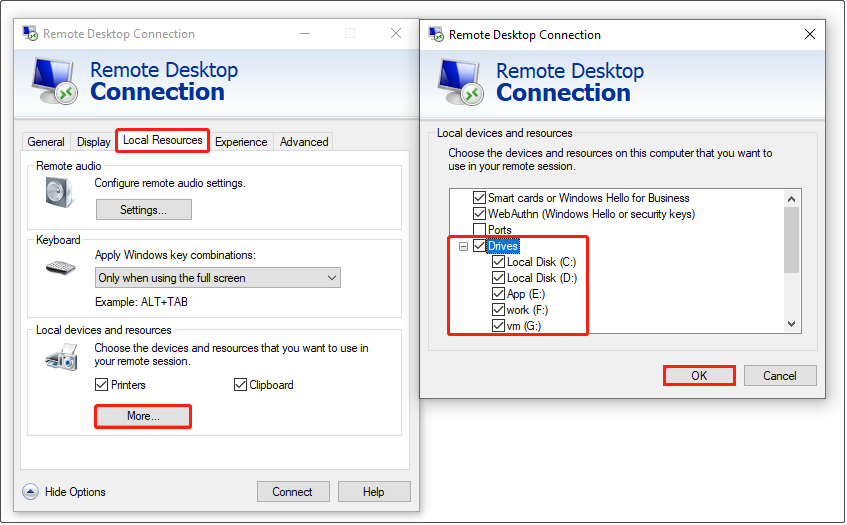
Step 1. In the Windows search box, type Remote Desktop Connection. When it pops up, click it from the best results to open it.
Step 2. Click Show Options in the Remote Desktop Connection window.
Step 3. Go to the Local Resources tab, and then click the More button under Local devices and resources. In the next window, expand Drives and tick the partitions on your local computer that you want to use in your remote session. Next, click OK to apply this change.
Step 3. Connect to the Remote Desktop
Now, you can go back to the General tab, input the computer name of your remote device, and click Connect. Make sure the name is correct, otherwise you will get an error saying that Remote Desktop can’t find the computer.
Once you are connected to the remote desktop, you can open File Explorer. The drives you selected will be displayed under Redirected drives and folders. Now you can do Windows remote desktop file transfer easily.
In addition to Windows Remote Desktop Connection, you can also use third-party remote desktop tools such as AnyDesk to perform RDP file transfer.
Read More:
If you accidentally lose files while transferring them between the remote desktop and the local computer due to an interrupted transfer, accidental deletion, or a copy-paste error, do not worry.
You can use MiniTool Power Data Recovery to scan the local disk and recover the lost files. It supports the recovery of diverse types of files, including documents, photos, videos, audio, and so on.
MiniTool Power Data Recovery FreeClick to Download100%Clean & Safe
Bottom Line
Now you should know how to complete Windows remote desktop file transfer. Simply enable the Remote Desktop feature in the remote device, then enable the drive sharing, and connect to the device using the computer name.
About The Author

Position: Columnist
Shirley holds a bachelor’s degree in English and has been an editor at the MiniTool Team for many years. She specializes in IT-related content, with a focus on data recovery, file backup, disk management, and other technical topics. She is committed to delivering clear, accurate, and practical solutions to help users resolve common computer issues.
User Comments :