Word allows people to add pictures to the document but some people find that the added pictures can’t show up. Why does the thing happen? And how to fix the “Word document not displaying images” issue? If you are struggling with this error, you can read this post on MiniTool and get the solutions.
Word Document Not Displaying Images
Why does your Word not display images? There are multiple reasons for “Word document not displaying images”. For example,
- Your pictures are not supported by Word.
- Your computer’s graphics card is outdated.
- The images are not embedded or linked correctly.
- Some document settings are misconfigured.
- There are some glitches or bugs in Word.
Targeting these possible reasons, you can try the following solutions for troubleshooting.
To prevent that situation, you can use MiniTool ShadowMaker, free backup software, to back up the Word document and set the task performed as scheduled.
MiniTool ShadowMaker TrialClick to Download100%Clean & Safe
Fix Word Document Not Displaying Images
Method 1: Update Your Graphics Driver
Go to check your graphic drivers for updates and make sure the latest version has been installed. To finish that, you can do as follows.
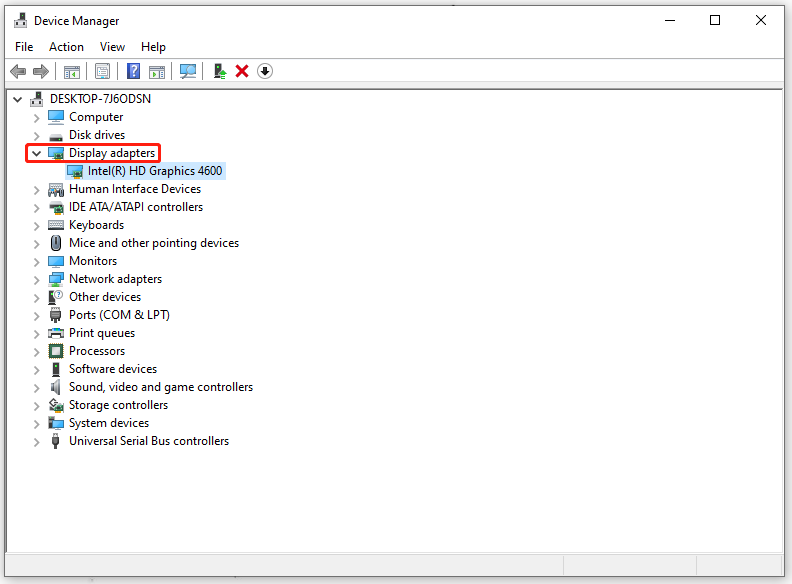
Step 1: Right-click on the Start icon and choose Device Manager.
Step 2: Expand Display adapters and then right-click on the driver to choose Update driver.

Method 2: Check Some Document Settings
There are some Word settings you need to check if they are enabled. If not, you can configure the settings and then re-add the picture to check if the picture can’t be displayed in Word.
1. Enable Show drawings and text boxes on screen
Step 1: Open Word and click File at the top left corner to choose Options.
Step 2: In the page, go to the Advanced tab and scroll down to check the box next to Show drawings and text boxes on screen under Show document content. Click OK to save it.
2. Enable Print drawings created in Word
Go to File > Options > Display and scroll down to check the box next to Print drawings created in Word under the Printing options section. Then click OK to save it.
3. Disable Use draft quality
Go to File > Options > Advanced and uncheck the option of Use the draft quality under Printing. Then click OK to save the changes.
4. Disable Picture Placeholders options
Go to File > Options > Advanced and scroll down to uncheck the option of Show picture placeholders under the Show document content section. Click OK to save the changes.
Method 3: Use in Line with Text
Another method is to configure some options in your Word. You can use the In line with text option or change the view in Word, so please follow the next steps to get things done.
Step 1: Locate and right-click on the inserted image and choose the Wrap Text option.
Step 2: Then in the next menu, please choose In line with Text.
Or if you are using Draft or Outline view, you can follow these steps to change the settings.
For MS Word 2016 or Office 365 users, please go to View and then choose Print Layout.
For Word 2010 users, please go to File and then choose Print.

Bottom Line:
This article has issued some solutions to help fix the “Word document not displaying images” error and you can follow them one by one for troubleshooting. Hope this article is useful for you.
User Comments :