What causes the error your computer appears to be correctly configured Windows 10? How to fix this error of DNS Server not responding Windows 10? The post from MiniTool will show you the solutions.
What Causes the Error Your Computer Appears to Be Correctly Configured Windows 10?
When the DNS is not responding, you may run the Network troubleshooter. Hence, you may receive the error message your computer appears to be correctly configured Windows 10. The DNS Server not responding Windows 10 error will lead to the Internet connection issue, such as the failed network error on Google Chrome.
In addition, the error of your computer appears to be correctly configured but the device or resource (DNS Server) Windows 10 may be caused by the faulty or outdated network drivers or the incorrect DNS and IP address.
Hence, in the following section, we will show you how to fix the error your computer appears to be correctly configured Windows 10.

3 Solutions to the Error Your Computer Appears to Be Correctly Configured Windows 10
In this section, we will show you 3 solutions to fix the issue of your computer appears to be correctly configured Windows 10.
Solution 1. Restart the Router
To fix the error your computer appears to be correctly configured but the device or resource (DNS Server) Windows 10, you can restart the router first.
Now, here is the tutorial.
- Remove the power cable from the router.
- Wait at least 10 seconds after all lights on the router have gone out.
- Reconnect the power cord to the router.
After it is finished, check whether the issue of your computer appears to be correctly configured Windows 10 is solved.
Solution 2. Configure the TCP/IP Settings
The second way to fix the issue of your computer appears to be correctly configured Windows 10, you can choose to configure the TCP/IP address.
Now, here is the tutorial.
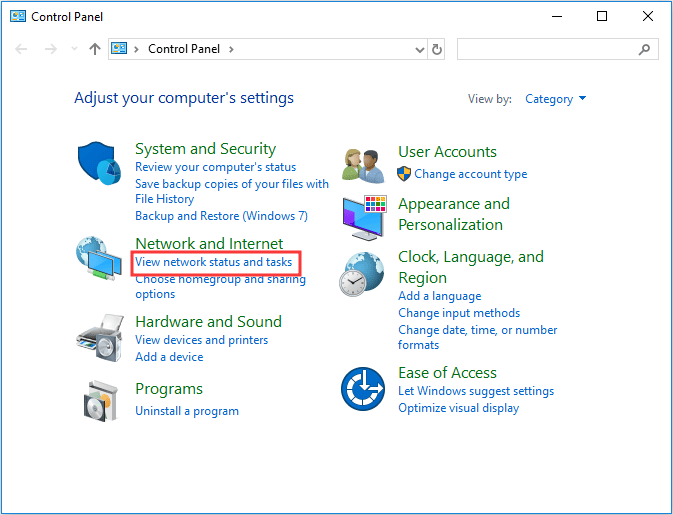
Step 1: Type Control Panel in the search box of Windows and choose the best-matched one. Then choose View network status and tasks under Network and Internet section to continue.
Step 2: In the pop-up window, choose Change adapter settings from the left panel to continue.
Step 3: Select the local network connection and right-click it, then choose Properties to continue.
Step 4: Select the Internet Protocol Version 6 (TCP/IPv6) and Properties to continue.

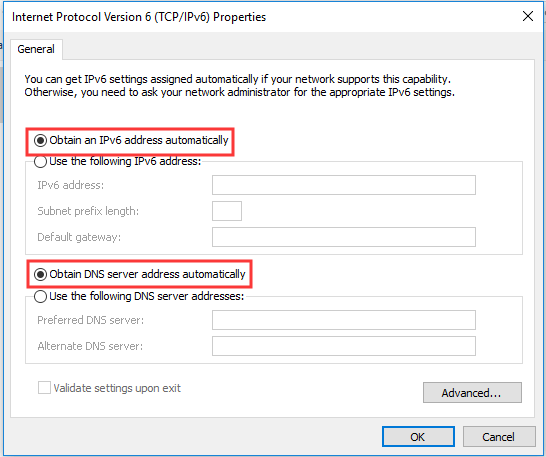
Step 5: Select the options Obtain an IPv6 address automatically and Obtain DNS server address automatically. At last, click OK to continue.
Step 6: After that, select the Internet Protocol Version 4(TCP/IPv4) and click Properties to continue.
Step 7: Select the options Obtain an IP address automatically and Obtain DNS server address automatically. Then click OK to continue.

After that, reboot your computer and check whether the issue of your computer appears to be correctly configured Windows 10 is solved.
Solution 3. Use the Ipconfig Command Line Tool
In order to solve the issue of your computer appears to be correctly configured Windows 10, you can use the Ipconfig command line tool.
Now, here is the tutorial.
Step 1: Type Command Prompt in the search box of Windows and choose the best-matched one. Then right-click it to choose Run as administrator to continue.
Step 2: In the command line window, type the following commands:
ipconfig /flushdns
ipconfig /registerdns
ipconfig /release
ipconfig /renew
After that, reboot your computer and check whether the issue of your computer appears to be correctly configured but the device or resource (dns server) Windows 10 is solved. Besides, you can click here to know more internet connection problems.
Final Words
In conclusion, this post has introduced what causes the error your computer appears to be correctly configured Windows 10 and also shown 3 ways to fix the DNS Server not working issue. If you come across the same Internet issue, try these solutions.
User Comments :