What Is GNS3?
GNS3, short for Graphical Network Simulator-3, is an open-source network software emulator initially released in 2008. It combines the best features of the existing emulation software (such as Dynamips and Qemu) into a GUI interface and allows you to create an unlimited number of Cisco routing-and-switching lab scenarios.
Many small and mid-size businesses use GNS3 because this software allows them to create a virtual network right on a PC and conduct experiments with different configurations there rather than on actual hardware. This can save a lot of costs.
Of course, GNS3 also has some disadvantages. For example, it’s hard for beginners and you will have to supply your own IOS (Internetwork Operating System) image to import the correct IOS software for the router you are emulating.
In addition, because GNS3 does not support full switch functionality or switch IOS images, you will have to configure your router with NM-16ESW switch modules.
Preparatory Work
To run a GNS3 VM, you should do some preparations.
- Prepare the space GNS3 VM.
- Install GNS3 and a VM program.
- Prepare GNS3 VM and GNS3 IOS files.
Prepare the Space for GNS3 VM
To run a GNS3 VM, you should install a VM program first, import the GNS3 VM into the VM software, and then set up and configure the GNS3 VM. To manage your GNS3 VM better, I recommend you create a separate partition.
If you can take enough unallocated space from one partition, you can shrink that partition in the Windows Disk Management tool. If you need to take enough unallocated space from multiple partitions, I recommend you use MiniTool Partition Wizard. This software allows you to move the location of partitions to put the unallocated space together. Here is the guide:
MiniTool Partition Wizard FreeClick to Download100%Clean & Safe
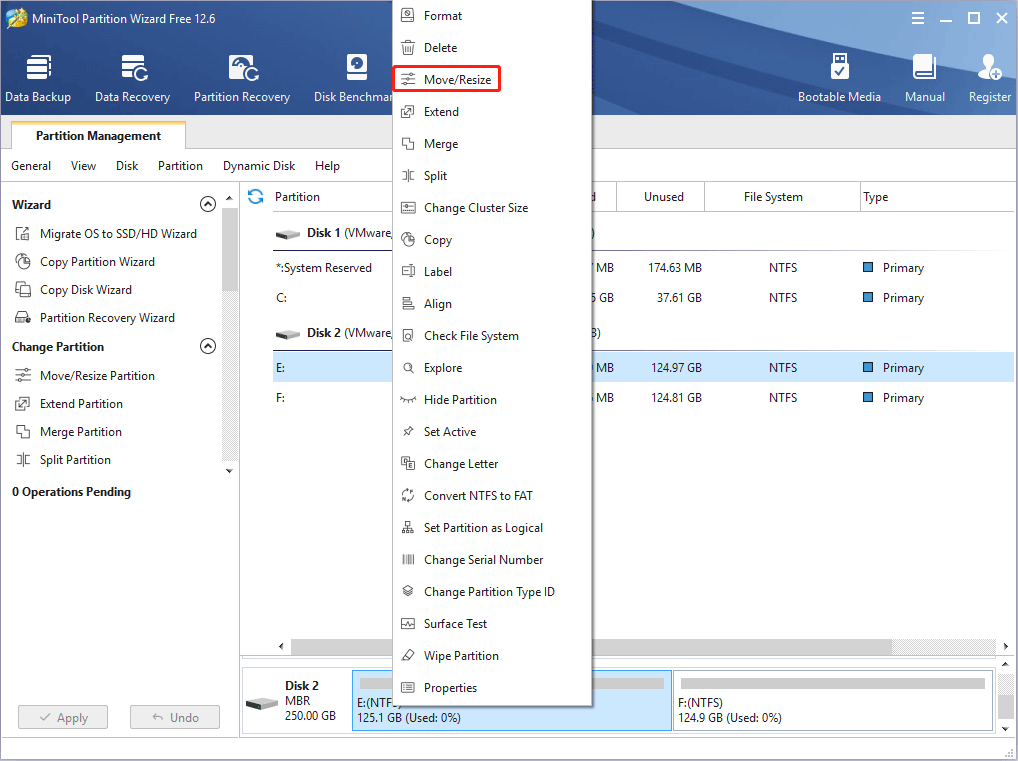
Step 1: Launch MiniTool Partition Wizard and go to its main interface. Right-click a partition and choose Move/Resize.
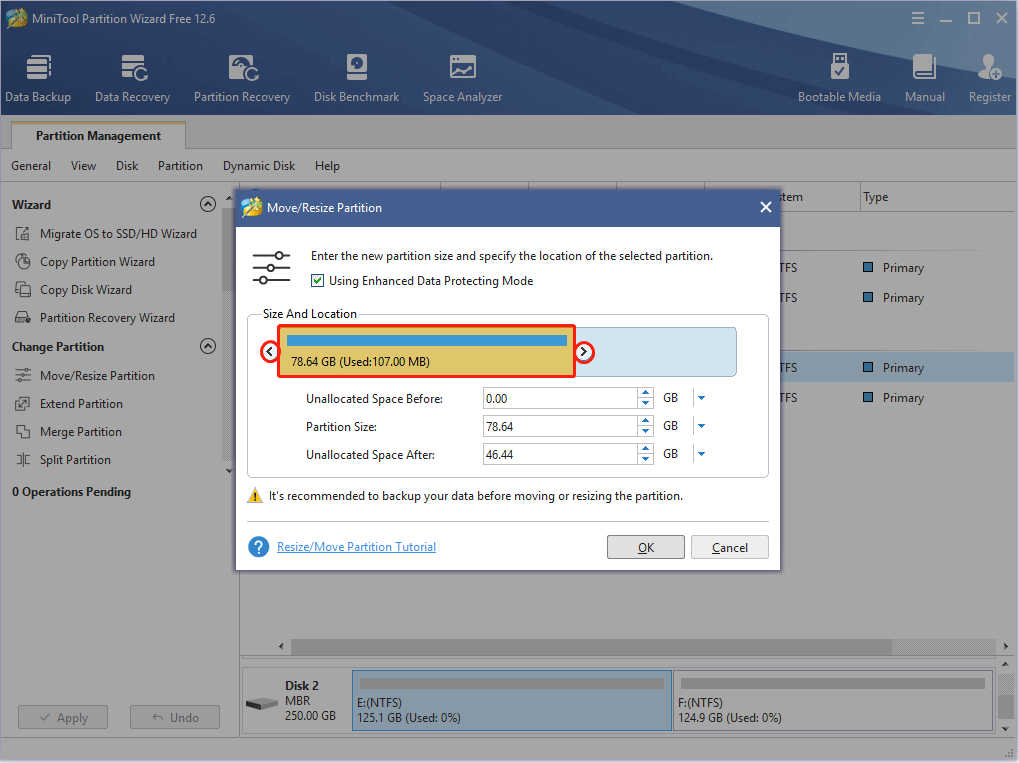
Step 2: Drag the arrow icon to decide how much space you want to shrink. Click the partition block and drag it to decide the location of the unallocated space. Then, click the OK button. In the same way, you can take unallocated space from multiple partitions and then put the unallocated space together by moving the location of partitions.
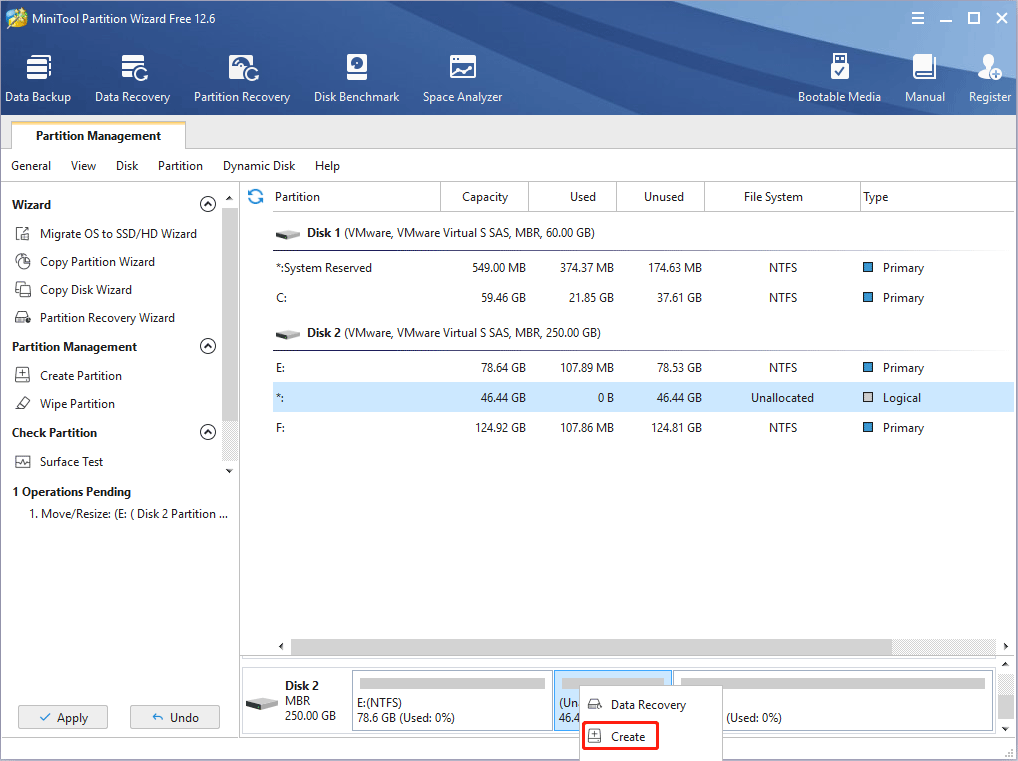
Step 3: Right-click the unallocated space and choose the Create button.
Step 4: Set parameters for the new partition. You can keep all of them to the default value if you don’t have specific demands. Then, click the OK button.
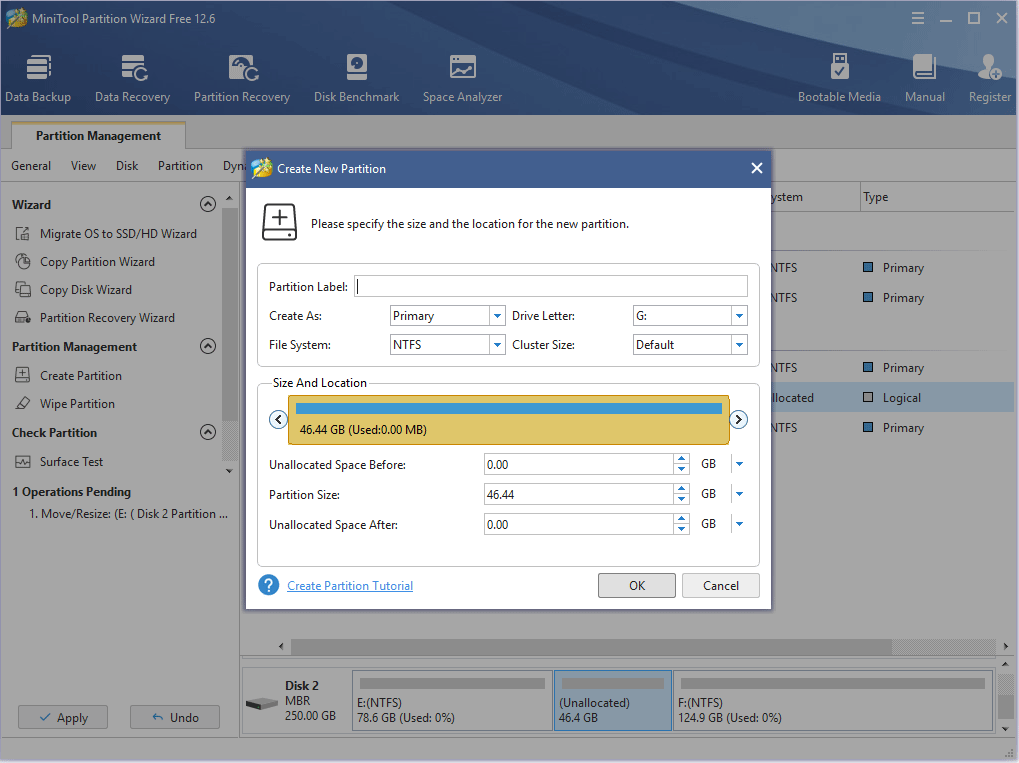
Step 5: Click the Apply button to execute pending operations.

Dual Boot vs Virtual Machine: Which One Should You Choose?
Install GNS3 and a VM Program
Install GNS3
Step 1: Get the GNS3 download.
- Go to the GNS3 official website, click the Software link at the top bar, and then click the Free Download button on the new page.
- On the new page, according to what PC you are using (Windows, Mac, or Linux), click the Download button in the corresponding section.
- Now, you are asked to create or log in to an account. An account is required to download the GNS3 Software and participate in the Community. Follow the wizard to create an account and log in to it.
- Now, you can download the GNS3 installer file.
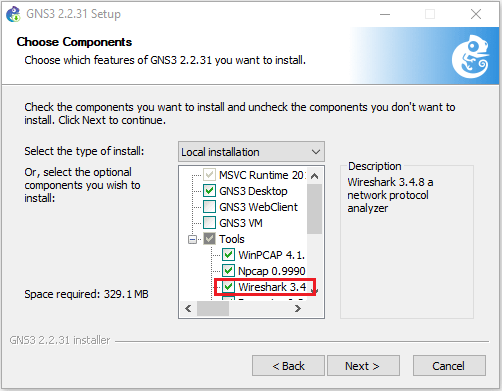
Step 2: After getting the GNS3 download, run the installer file and follow the wizard to complete the installation. During this process, you don’t need to change anything except for the following two items:
- Many people will install Wireshark in advance. If you have done so, you can uncheck this component when you are asked to choose components you wish to install.
- When you are asked to choose the install location, please click the Browse button to change the location to a folder in the partition you created just now.
Install a VM Program
You can run a GNS3 VM on many VM programs including VirtualBox, VMWare, and Microsoft Hyper-V. However, many people will choose VMWare maybe because VMWare is faster and supports nested virtualization (the VMs inside the VM are accelerated by your CPU).
GNS3 supports both VMware Workstation Pro and VMware Fusion (Paid software), as well as VMware Player (Free software). You can choose one of them to install.
After deciding which software to install, please go to its official website to download its installer file. Then, run this installer file and follow the on-screen instructions to complete the installation. During this process, please change its install location to a folder in the partition you created before.
Prepare GNS3 VM and GNS3 IOS Files
GNS3 VM Download
GNS3 will not only offer the GNS3 download but also offer a GNS3 VM download corresponding to the version of the GNS3 software you install.
Please go to the GNS3 official website, click the Software link at the top bar, and then click the Download VM for GNS3 link under the Free Download button. Then, according to the VM software you install, choose a version of GNS3 VM to download. The GNS3 VM download should be a zip file, you should extract it.
GNS3 IOS Image Download
Where to download GNS3 IOS images? Unfortunately, due to legal requirements, GNS3 is unable to provide IOS images or any other Cisco images. You will need to provide your images to use with GNS3.
Some vendors make their software images freely available, but unfortunately, this is not true for Cisco images. To get Cisco images, you can use the following ways:
- Download images directly from Cisco: https://software.cisco.com/download/navigator.html. This will require a Service Contract.
- Purchase a VIRL license to get access to multiple images that are very useful for GNS3 labs. Please note that you can use VIRL images without license authentication. You can therefore download the VIRL images, integrate them with GNS3, and use them offline if needed.
- Download a GNS3 IOS image offered by individuals. You should do that at your own risk.
If you want to download GNS3 IOS images for free, you can try downloading from this page. On this page, you can get the GNS3 IOS images for router 7200 download (c7200 and c7200p) and other popular IOS images (c1700, c2600, c3745, etc.).
How to Set Up GNS3 VM
In this part, I will show you how to set up a GNS3 VM.
- VM software: VMware Workstation 16 Pro
- GNS3 IOS image: c3745
Step 1: Import the GNS3 VM into VMWare.
- Launch the VMWare software.
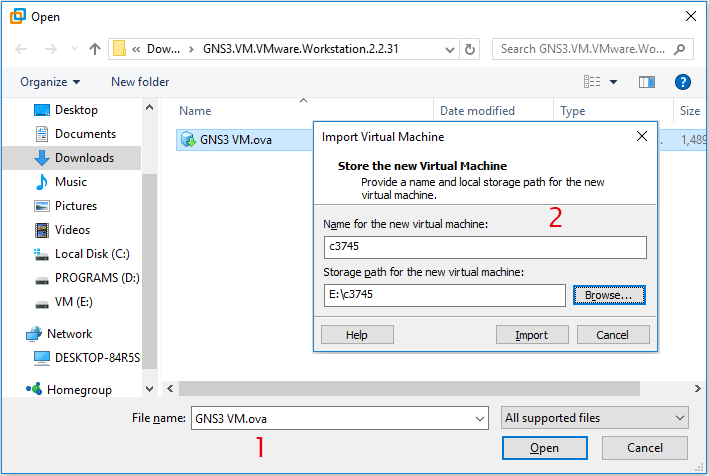
- Click File > Open, find the GNS3 VM file you downloaded before (the file should be GNS3 VM.ova), and click the Open button.
- On the Import Virtual Machine window, name the new VM as your will, and change its location to a folder on the partition you created just now.
- Click the Import button and wait until the import process completes.
Step 2: Set up the GNS3 VM local server.
- Launch the GNS software and click Help > Setup Wizard.
- Choose Run appliances in a virtual machine and click the Next button.
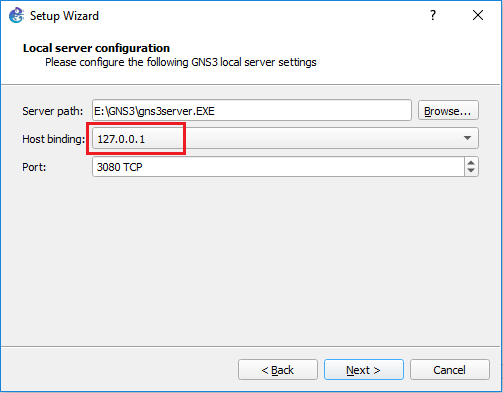
- When checking the Local server configuration, please change the Host binding to 0.0.1 and click the Next button. Selecting the 127.0.0.1 local loopback address tends to be the most trouble-free option to use as a host binding.
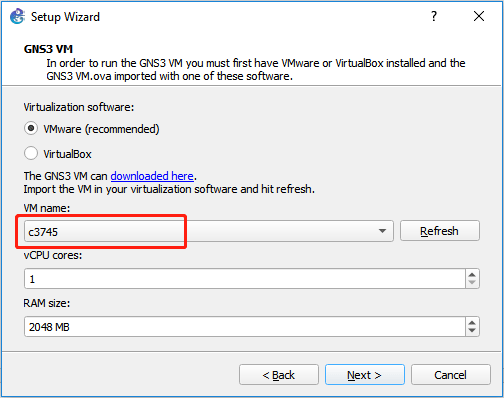
Step 3: After getting the message “connection to the local GNS3 server is successful”, click the Next button. Now, you are asked to run the GNS3 VM. Expand the drop-down menu under the VM name and choose the GNS3 VM that you imported just now. Then, click the Next button.
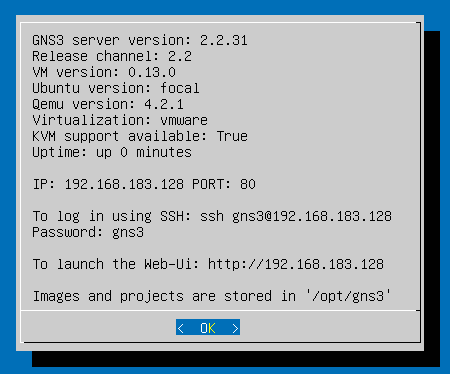
Step 4: Once the GNS3 VM boots successfully, the IP address of the GNS3 VM will be displayed. You will get the following picture.
Step 5: Go back to the GNS3 software to add the IOS file.
- Click Edit > Preferences > IOS Routers > New.
- Check Run this IOS router on the GNS3 VM and click the Next button.
- Click the Browse button and navigate to the downloaded IOS file. Then, click the Next button.
- Check the name and platform and click the Next button.
- Check the Default RAM and click the Next If you want to change it, please click the Check for minimum and maximum RAM requirements link first. Then, you can know the safe range of the RAM.
- On the Network adapters window, in addition to the prepopulated GT96100-FE (in slot 0), you can add some other network adapters (1FE-TX, 4T, or 16ESW) to other slots according to your needs. Then, click the Next button. Of course, you can also choose to add them later.
- On the WIC modules window, you can choose WIC-1T or WIC-2T modules and then click the Next You should make sure the device supports WICs.
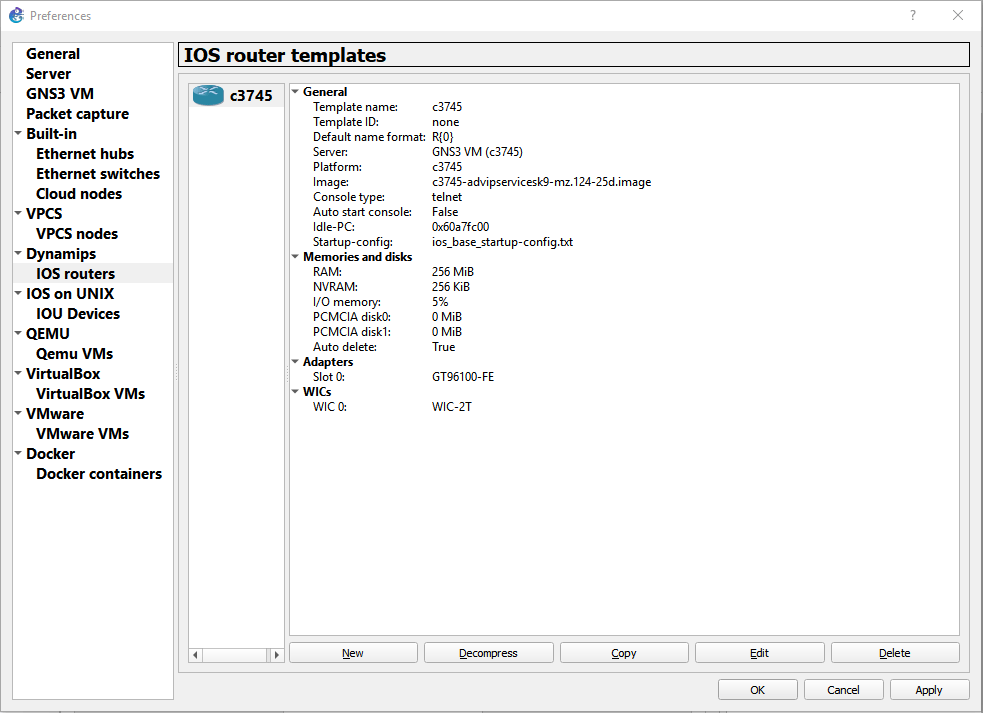
- On the Idle-PC window, click the Idle-PC finder button to get a green Idle-PC value. Then, click the Finish Then, view the IOS router templates and click the OK button.
Then, you can do your test. If you have other demands, you should do more configurations.
How to Convert BIN to ISO for Free
Bottom Line
Is this post useful to you? Do you have other ideas about how to run a GNS3 VM? Please leave a comment in the following zone. In addition, if you encounter problems when using MiniTool Partition Wizard, please feel free to contact us via [email protected]. We will get back to you as soon as possible.
About The Author

Position: Columnist
Linda has been an editor at MiniTool for seven years. She continuously learns about computers and puts her knowledge into practice. Moreover, she is particularly knowledgeable in disk management, data recovery, system installation, and PDF editing. Her articles typically reference multiple examples or are based on her own experience, providing users with the most suitable solutions.
User Comments :