Hard drive disposal involves securely erasing sensitive or personal data and discarding the disk, which can often be challenging. This MiniTool guide outlines several secure data erasure methods, including physically destroying the disk, using data shredding tools, and utilizing Windows disk management utilities.
Hard disks are widely used in many scenarios, but their lifespan is limited. Over time, hard disks will wear out or become damaged and need to be replaced with new ones. At this point, old hard drives require proper disposal.
However, a hard disk is not like ordinary garbage that can be simply thrown into a recycle bin, as it often stores sensitive or personal information. Improper handling of old hard drives can lead to serious data security risks.
Keep reading to learn about the significance of proper hard drive handling and common challenges.
Importance of Secure Hard Drive Disposal
The safe disposal of a hard drive depends on three key factors:
- Ensuring that stored data has been securely erased.
- Considering whether the data that seems useless now may be needed in the future.
- Avoiding environmental damage during the disposal process.
These aspects are explained in detail below.
Data Breach Prevention
Preventing data breaches is a primary concern when dealing with an old hard drive.
Hard disks usually store private personal information, company files, or customer data. If these files are leaked, it may result in privacy violations or intellectual property loss.
In certain industries, improper disposal of file storage devices may even violate data protection regulations and lead to legal liabilities.
Irreversible Data Destruction
To reduce the risk of data leakage, data stored on old hard drives should be unreservedly cleared so that it cannot be recovered by any data recovery tools.
However, if the files are eliminated without a backup, another problem may occur:
The hard drive has been destroyed, but it is later discovered that the data stored on it is still needed.
This can be extremely frustrating and may affect personal activities or business operations.
Environmental Responsibility
In addition to data security concerns, environmental responsibility should be considered when dealing with old disks.
Hard disks are made of metal, plastic, and other materials that are not easily degradable. Improper disposal of these components can damage soil and water resources.
Challenges of Secure Hard Disk Disposal
Minimizing the environmental impact during disk disposal is relatively easy to achieve. However, ensuring that data is thoroughly erased is more difficult.
In addition, secure data destruction often requires additional effort, time, and financial cost.
Risks of Privacy and Important Data Recovery
Since hard disk data loss commonly occurs due to disk corruption or human errors, data recovery software and services have developed rapidly.
This is useful when files are accidentally lost, as data recovery tools can quickly scan the disk and restore missing data.
However, regarding hard drive disposal, this becomes a challenge.
Many data removal methods only delete file system indexes rather than the actual data. If the data itself is not overwritten or the disk is not physically damaged, advanced techniques can still recover files easily.
Time and Financial Costs
To prevent data from being recovered, secure data destruction usually requires multiple overwrites of data or complete physical destruction.
If you are not familiar with these processes, you may encounter excessive time consumption and huge financial costs.
This issue is more serious when handling a large number of old hard drives.
Overall, there are many risks when dealing with an old hard drive, especially data breaches. Many misconceptions can lead to this.
Common Mistakes in Hard Drive Disposal
Mistakes in hard drive disposal are usually related to incorrect data erasure methods. Below are some of the most common issues.
Mistakenly Assuming That File/Partition Deletion or Quick Disk Formatting Is Sufficient
Based on forum discussions, many users think that deleting files, formatting the drive, or deleting the disk partitions can completely erase data.
In fact, these operations only remove file system structures or partition information and do not overwrite the actual data stored on the disk.
As long as the data has not been overwritten, it is recoverable. Professional data recovery software, such as MiniTool Power Data Recovery, can often scan the drive and restore deleted files.
Mistakenly Believing That Water Immersion Is Effective
In many cases, when a disk is immersed in water, it will experience failures and become unusable.
However, this does not mean that the files stored on it are truly removed. Instead, data remains on the platters or NAND flash memory chips. Professional recovery services can scan these components and recover the files.
Mistakenly Assuming That a Factory Reset Is Enough
A factory reset is usually used to reinstall the Windows operating system and restore default system settings.
While it removes all user data on the system partition, the actual data is not securely erased. These files may still be restored using data recovery tools.
Additionally, a factory reset only affects the system partition. Files stored on other partitions or disks are not deleted.
Therefore, a factory reset is not an effective method for permanently destroying hard drive data.
Overlook Bad Sectors and Slight Physical Damage
Bad sectors and minor physical damage to the hard disk may render the disk inaccessible or cause partial data loss. However, this is far from meeting the standards for secure hard disk disposal.
On the contrary, data wiping tools or other techniques may be unable to overwrite the bad sectors, leading to residual data after disposal.
Erase Hard Drive Data Directly Without Backup
As mentioned earlier, once data is securely erased, it cannot be recovered.
After erasing the files without creating a backup, if the files are needed later, recovery is no longer possible.
Do Not Verify Whether Data Can Still Be Recovered Before Disposal
According to forum reports, many users do not verify whether files can still be recovered after data handling and then discard the hard drive immediately.
This increases the risk of sensitive data being recovered by others.
Now you know the common mistakes to avoid before discarding a useless hard drive. Next, we will introduce common techniques for hard drive destruction, including physical destruction and logical data erasure, along with their advantages and limitations.
Physical Destruction VS Logical Destruction
There are three main types of data destruction methods: physical destruction, data erasure, and cryptographic erasure.
Each of these methods has advantages and limitations in terms of timing, effort, and cost.
What Is Physical Disk Destruction and Its Benefits
As the name suggests, physical destruction indicates breaking the physical structure of the disk using mechanical means. This is the safest solution to ensure that data cannot be recovered.
Common methods include:
- Use tools to break the disk into pieces.
- Crush the disk platters for mechanical hard drives and the NAND flash memory chips for solid-state drives.
Benefits:
- The disk is visibly destroyed, and the data cannot be recovered by any service.
- There is no need for any software or data overwriting operations.
- The destruction process is nearly unaffected by the type of disk.
- The disk does not need to be working normally or recognized by the computer.
Disadvantages:
- There are safety risks during the process.
- It is not suitable for large quantities of disks unless you have large-scale cutting tools.
- It may require significant time and effort.
What Is Logical Data Destruction and Its Benefits
Unlike physical destruction, logical destruction involves eliminating data on the disk, rather than physically destroying the disk itself. After the operation, the disk remains accessible but the files are erased.
Common methods include:
- Use disk wiping tools to fully wipe hard drive partitions.
- Use data shredding tools to purge files on the disk.
- Use built-in Windows disk management tools to perform a deep clean or format of the hard drive.
Benefits:
- There are many tools available, offering flexibility in selection.
- There is no need to disassemble the disk or spend a lot of physical effort.
- It is sufficient for most situations to prevent data leakage.
- It is environmentally friendly, with no negative effects on the water or soil resources.
Disadvantages:
- Multiple data overwriting operations may be required, which can be time-consuming.
- Some software may require payment.
- Using untrusted software may lead to viruses or other security issues on your computer.
- The disk must be properly recognized by the computer or the wiping tools.
- It is difficult to verify whether the files are truly unrecoverable.
What Is Cryptographic Erasure and Its Limitations
Cryptographic erasure, also known as crypto-shredding or crypto-erase, is a data destruction method that works by intentionally deleting or overwriting the encryption keys.
Without the correct encryption key, the files stored on the disk cannot be accessed or recovered.
This method is best suited for self-encrypting drives (SEDs), which integrate encryption directly into the hardware. These disks automatically encrypt all written data using strong encryption algorithms throughout their entire lifecycle.
For these types of hard drives, crypto-erase can typically be easily performed using a lifecycle controller.
Benefits:
- There is no need to overwrite data or physically deconstruct the disk.
- The data processing is easy to operate, and this method is especially useful for large quantities or sizes of disks.
Limitations:
- It is not applicable if the data was not encrypted when stored.
- Some older or lower-end disks may lack hardware support for cryptographic erasure.
- It does not work if the disk has bad sectors, as any bad sectors cannot be encrypted after data has been written to those locations.
- If the encryption key is not fully deleted or overwritten, the files can still be recovered.
Data Destruction on SSDs VS HDDs
While physical and logical data erasure methods can be used for both SSDs and HDDs, there are some differences.
For HDDs, data is stored in sectors on the physical platters, and it can be absolutely eliminated by overwriting multiple times.
However, SSDs do not overwrite the original data directly after deletion. Instead, new data is written to new locations.
In addition, SSDs have unique wear leveling and garbage collection features, which make it more likely that deleted data may remain.
For SSDs, cryptographic erasure is a more suitable method, as it bypasses the physical limitations of data overwriting, as long as the hardware supports this feature.
| Destruction methods | HDDs | SSDs |
| Physical destruction | Applicable and effective, but may require more effort and have a higher operational risk | Effective but may need to increase effort, and is not suitable for a large number of disks |
| Logical destruction | Applicable, as multiple overwrite operations fully destroy the original data | Less applicable because complete file destruction is difficult to guarantee due to SSD’s wear leveling and garbage collection features |
| Cryptographic erasure | Applicable especially for self-encrypting disks | Most suitable for self-encrypting SSDs |
After learning the types of data destruction methods, the next step is to do some necessary preparations before disposing of an old hard drive.
Preparations Before Hard Drive Disposal
In addition to erasing all the files on the old disk, data backup is the most important action. Backing up ensures you have a copy of your files in case you need them after the disk is discarded.
There are several methods available for data backup, and below are three common ones.
Method 1. Copy and Paste the Files to Another Disk
This is the simplest and most direct method to back up files, without requiring any extra tools or financial costs. You only need to select the target files on the old disk, copy them, and paste them to a new drive.
However, this method may not be suitable for a large number of files, and the process could take a lot of time.
Method 2. Upload Files to Cloud
There are many cloud backup services available (OneDrive, Google Drive, or Dropbox) that allow you to store your files online instead of on a local device.
By using this method, you can easily view your files from any device by logging into the same cloud account. Additionally, this method protects your files from being lost due to physical damage to the local hard disk.
However, most cloud backup services offer limited free storage. Additionally, if files are missing from the cloud, recovery can be difficult since most data recovery software does not support scanning cloud storage.
Method 3. Use Professional Data Backup Software
This is the most recommended approach for backing up files to an external hard drive or network storage. If you are looking for a reliable backup tool on Windows, try using MiniTool ShadowMaker, which supports backup compression to reduce the size of the backup image.
MiniTool ShadowMaker offers automatic data/disk backups rather than manually copying and pasting the files.
If needed, download and install MiniTool ShadowMaker to back up your files.
MiniTool ShadowMaker TrialClick to Download100%Clean & Safe
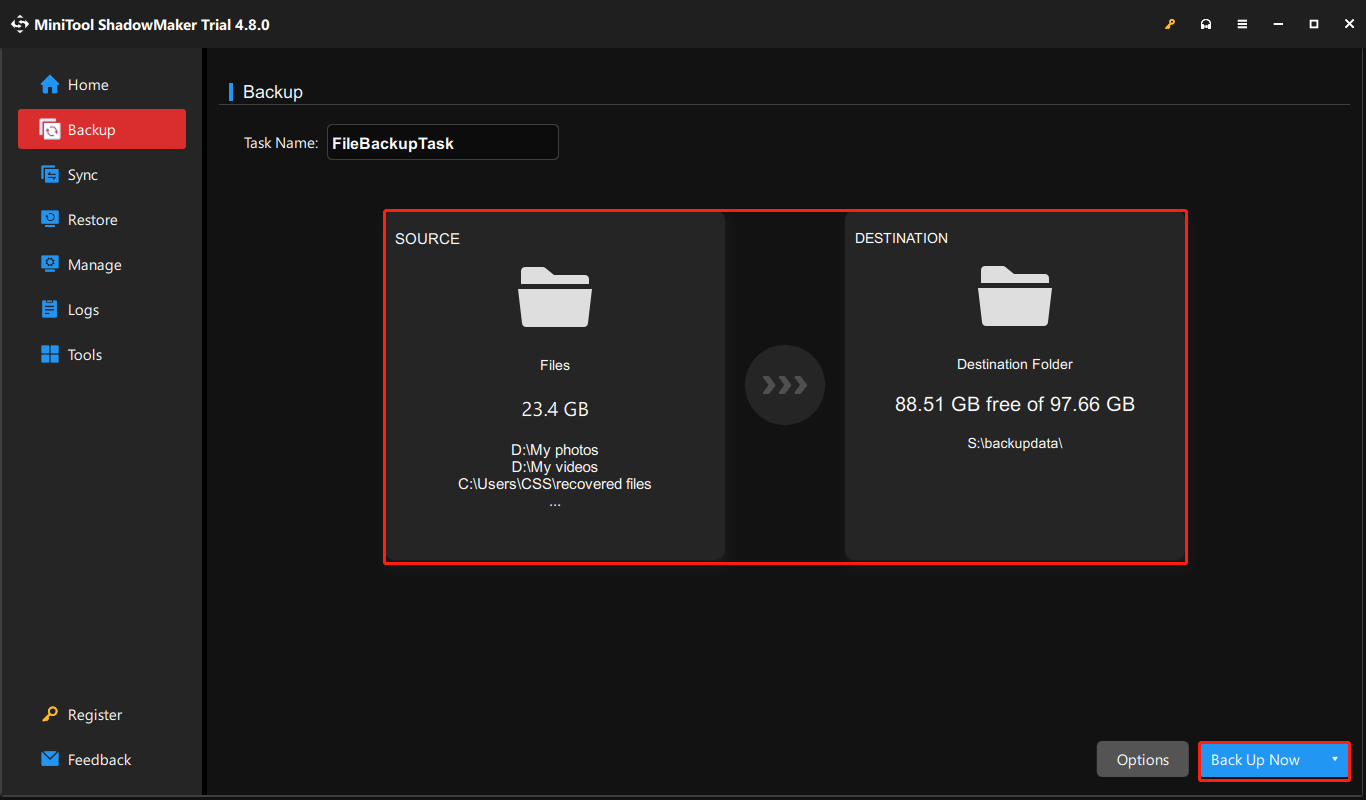
Step 1. Run MiniTool ShadowMaker, and then click Keep Trial to enter its main interface.
Step 2. Go to the Backup tab.
Step 3. Click SOURCE and choose the files/folders or partitions/disks to back up. Next, click DESTINATION to choose a path to store the backup image.
To configure backup settings like the compression level, click Options.
Step 4. Click Back Up Now and wait for the process to complete.
After backing up your files, start erasing files on the old disk.
Methods for Secure Hard Drive Disposal
“I’m looking to recycle my old hard drive, but I want to make sure all of my personal data is wiped clean before doing so. I’m using a Windows 11 computer, and I want to make sure I handle this correctly to avoid any chance of data recovery. I’ve heard there are different methods and tools available, but I’m not sure which one is the best for securely erasing the drive.”techcommunity.microsoft.com
This section outlines multiple approaches for permanently removing files from an old hard drive at both the physical and logical levels.
For the logical aspect, there are disk wiping tools, data shredding utilities, and built-in cleaning tools in Windows. Additionally, some models of computers and hard drives support a secure erase feature in BIOS or UEFI.
The steps for performing these operations are detailed below.
Method 1. Physically Destroy the Disk
To physically wreck a disk, you can perform the following operations:
- Use a hammer, a professional cutter, or other tools to completely shred the disk.
- For HDDs, heat the disk platters until the magnetic surface melts. For SSDs, destroy the NAND flash memory chips completely.
- Use a strong magnetic field to disrupt the magnetic data inside the hard drive. Note that this works only for mechanical hard drives, but not for solid-state drives.
If you are unable to perform the above physical destruction methods, try the following logical methods.
Method 2. Use Data Wiping Tools
To meet common data erasure demands, many disk wiping tools are available on the market.
These tools overwrite the entire disk space using predefined data patterns, such as repeated 0s or 1s, following standards like DoD 5220.28-STD. This ensures that the original data is overwritten and becomes impossible to recover.
MiniTool Partition Wizard is a disk management tool that includes a disk wiping feature for securely overwriting data. It offers various wiping methods to meet both quick erasure needs and the requirement for secure and permanent data removal.
The Wipe Disk feature is totally free, and the software is easy to use.
MiniTool Partition Wizard FreeClick to Download100%Clean & Safe
Follow these steps to wipe a disk by using this free partition manager:
Step 1. Launch MiniTool Partition Wizard to enter its main interface. Select the target drive and choose Wipe Disk from the left action panel.
Step 2. In the new window, choose a wiping method and click OK.
The options of Fill Sectors with Zero and Fill Sectors with One wipe the disk more quickly. The DoD 5220.22-M and DoD 5220.28-STD methods provide a more thorough wipe, but they are extremely slow.
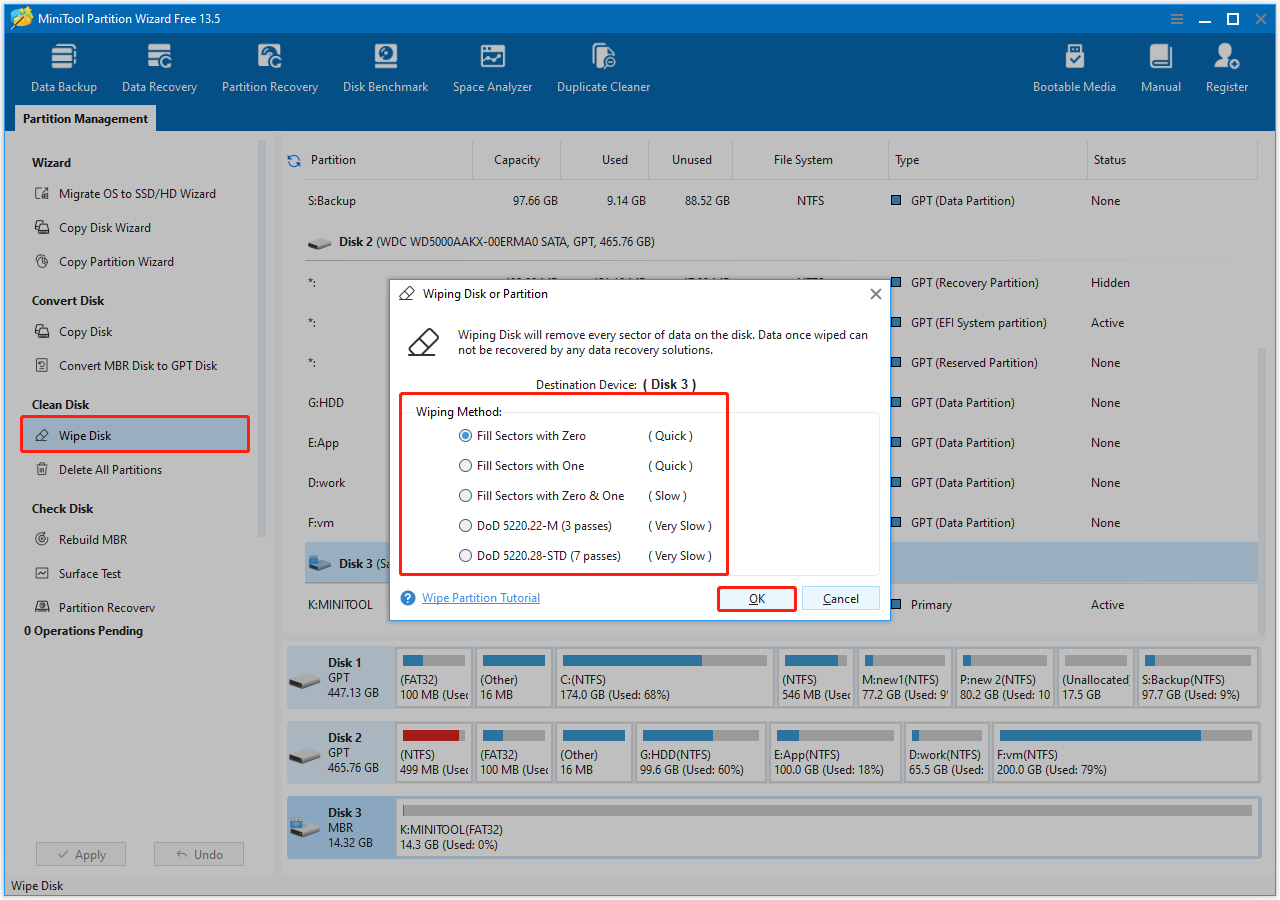
Step 3. Click Apply in the lower left corner to start the wiping process and wait for it to finish.
Apart from MiniTool Partition Wizard, there are many other data wipe software, such as DBAN and KillDisk. For more details, refer to the DoD wipe software guide.
Method 3. Employ Data Shredding Tools
Data shredding software is capable of overwriting the original files with random binary data multiple times. This process is called file shredding.
Similar to disk wiping tools, data shredding tools also permanently delete files using different shredding algorithms.
These tools include File Shredder, Eraser, and Blancco. You can visit their official websites to learn more about their features and limitations, and download the one that suits your needs.
Method 4. Utilize the BIOS/UEFI Secure Erase Function
Many modern models of computers come with an embedded secure erase feature. This feature allows you to execute a command directly from the BIOS or UEFI to wipe all files on the disk.
For example, many newer Lenovo computers support this feature for internal hard drives.
Next, we will walk you through the process of performing a secure erase on a Lenovo ThinkCentre M725S.
2. The wiping procedure is usually quick for an SSD, but it can take several hours for an HDD.
Step 1. Restart your computer. During the startup process, press F1 to access the BIOS interface.
Step 2. In BIOS, use the arrow keys on your keyboard to switch to the Security tab. Then select the Hard Disk Password option.
Step 3. You will see an option displaying the disk password status. If it is disabled, select it and follow the on-screen instructions to set up a user password.
Step 4. Press F10 to save the password and restart the computer.
Step 5. During boot, press F1 to enter BIOS again, and then navigate to Security > Hard Disk Password > Security Erase HDD Data.
Step 6. Follow the prompts on your screen to input the password you just set and complete the erase process.
What if there is no secure erase option in BIOS/UEFI?
Sometimes, you may not find the secure erase option in BIOS/UEFI. This could be due to the following reasons:
- The hard disk does not support the feature.
- The BIOS/UEFI version is too old to support the feature.
To resolve this, make sure to update your BIOS/UEFI to the latest version and check if the option becomes available. If not, proceed with the following solutions.
Method 5. Use the DiskPart Clean All Command
DiskPart is a useful command-line tool built into Windows that allows you to manage disk partitions.
The clean all command is used to purge all data on the selected disk, including both the partition information and the actual data. During this process, it zeroes each sector on the disk, making the files unrecoverable.
Therefore, it is also a good option for data erasure before disposing of a hard disk.
Here is how to run the clean all command:
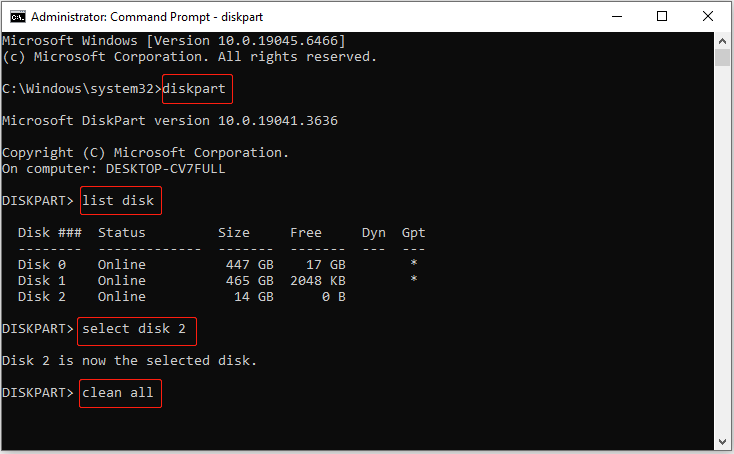
Step 1. Type cmd in the Windows search box. When the Command Prompt option appears, right-click it and choose Run as administrator.
Step 2. Input the following commands one by one and press Enter after each:
- diskpart
- list disk
- select disk # (# represents the disk number of the target disk)
- clean all
Some forum discussions report a lot of confusion between the clean and clean all commands. Here are their differences.
| Clean | Clean all | |
| Effect on the disk | Removes the partition information on the disk, making data inaccessible by general means. | Clears all data on the disk and sets each sector to zero. |
| Data recovery possibility | The actual data remains on the disk and can be easily recovered by using professional data recovery software. | All data on the disk becomes unrecoverable. |
| Procedure time | Quick. | May be very slow. |
Method 6. Perform a Full Format
As mentioned earlier, disk formatting does not fully meet the requirements for data erasure before disk disposal. However, this refers to the quick format. There is another formatting option called full format that can purge all files on a disk.
Here are the differences between quick format and full format.
| Quick format | Full format | |
| Functions | Removes the directory structure and file index table on a disk. | Not only removes the partition table, but it also performs bad sector checks on the disk and overwrites every sector. |
| Data recovery possibility | Data is invisible but can still be recovered easily. | Each disk sector is overwritten, and data recovery is impossible. |
| Formatting speed | Very fast because it does not overwrite data. | Very slow because it performs disk sector overwriting. |
Here are two approaches to perform a quick format.
Option 1. Use File Explorer
Step 1. Press Windows + E to open the File Explorer.
Step 2. Right-click the target disk and choose Format.
Step 3. Set up the disk information, such as the file system. Uncheck the Quick Format option, and then click Start.
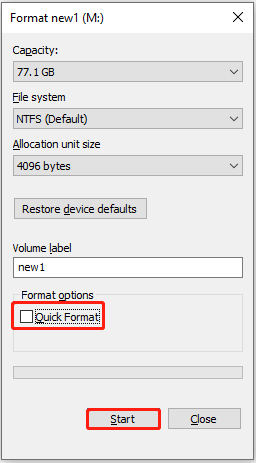
Step 4. In the new window, click OK to start the formatting and wait for the process to complete.
Option 2. Utilize Disk Management
Step 1. Right-click the Start button and choose Disk Management.
Step 2. Set up the file system and other disk information. Uncheck the Perform a quick format option, and then click OK.
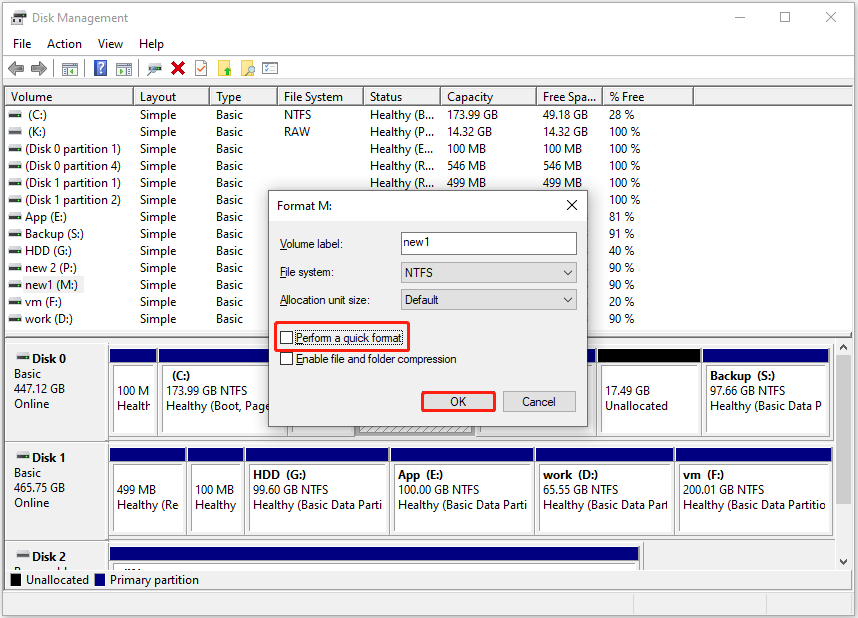
Step 3. Click OK again to start formatting the disk.
This is all the reliable methods on how to dispose of old hard drives at home. If they do not apply to you, you may need to contact a professional hard drive disposal service.
Method 7. Seek Help From Hard Drive Destruction Services
You can find many hard disk destruction companies online, and the fees vary depending on the destruction method.
Common destruction approaches include shredding the hard drive into small pieces or drilling holes in the disk.
Reputable companies will also ensure proper disposal of the hard drive residue after destruction to minimize environmental impact.
When searching for such a company, focus on the following considerations:
- Check reviews to ensure they follow strict data confidentiality agreements.
- Understand the different pricing plans to ensure they fit within your budget.
These are the reliable practices for erasing files on a hard disk before disposal. The next section explains how to verify if the files are truly eliminated to ensure the highest level of data security.
How to Check if Hard Disk Data Is Really Destroyed
To check if erased data can still be recovered, use reputable data recovery tools to scan the hard disk for any recoverable files.
- If no files are found, it generally indicates that the data has been permanently removed, and you can dispose of the disk without concerns about data leakage.
- If any important files are found, it suggests that the erasure process is not thorough. In this case, you need to repeat the data wiping procedures or try a different method of data destruction.
There are several recovery tools available, such as MiniTool Power Data Recovery, Recuva, and EaseUS Data Recovery Wizard, that can scan your disk deeply for lost files.
The disk scanning and file previewing procedures are generally similar in these tools. Below, we will use MiniTool Power Data Recovery to walk you through the process of scanning and checking files on a hard disk. This tool supports free disk scanning and file previewing.
MiniTool Power Data Recovery FreeClick to Download100%Clean & Safe
Step 1. Launch MiniTool Power Data Recovery to enter its main interface. Switch to the Devices tab, select the target disk, and click Scan.
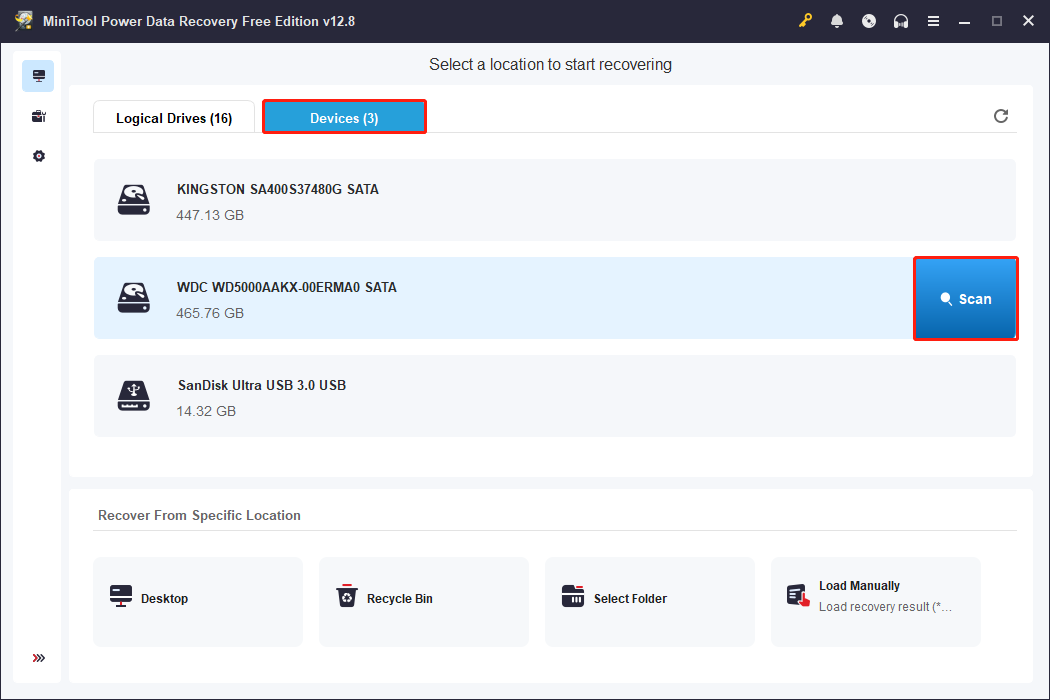
To get the most complete scan results, it is recommended to allow the full scan to finish automatically.
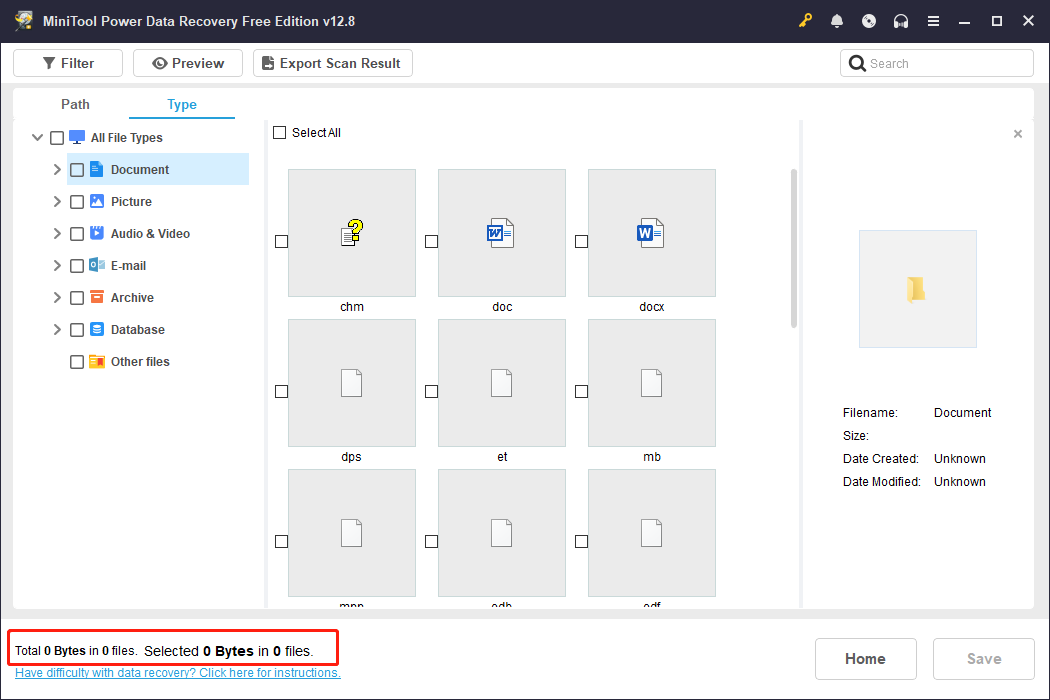
Step 2. After scanning, the files will be listed under Path by file path or Type by data type. Expand the folders or categories to check for any recoverable private files.
During this process, the Filter feature can help narrow down results by file type, modification date, file size, or category. The Search feature allows you to find a specific file by entering a partial or full file name.
Most files that are not corrupted can be previewed by double-clicking them.
The ideal scan results should show no meaningful data, and sometimes it may display a message saying that 0 files are found, as shown in the picture below.
Bottom Line
To sum up, the content above outlines how to dispose of old hard drives, covering data recovery prevention, data erasure methods, and file recovery verification.
Each time you dispose of a hard disk, make sure to back up any important files in case they need to be reused.
Then, use proper disk wiping tools, data shredding software, or Windows disk cleaning utilities to erase files. During this process, avoid simply formatting the drive, deleting partitions, or just deleting files.
Finally, take the hard drives to an electronic waste recycling station to prevent environmental pollution.
If you encounter any issues or have any questions when using MiniTool products, please contact the support team at [email protected]
Hard Drive Disposal FAQ
Even powerful neodymium magnets need to be very close to the drive and require an extremely strong magnetic field to damage the disk.
Additionally, SSDs use NAND flash memory chips for data storage and do not contain any moving parts. Therefore, they are not affected by strong magnets.
If the disk platters are not destroyed completely, there is a possibility that the data can still be recovered. If all the platters or chips turn to dust, the hard drive is broken.
Short contact with clean water usually does not destroy the disk, but may only cause the drive not to work normally when connected to a computer. Once dried, professional data recovery tools may still be able to access the data.
However, if the hard drive is immersed in corrosive liquids, such as salt water, the disk components and chips may be corroded, making it irreparable.
About The Author

Position: Columnist
Shirley holds a bachelor’s degree in English and has been an editor at the MiniTool Team for many years. She specializes in IT-related content, with a focus on data recovery, file backup, disk management, and other technical topics. She is committed to delivering clear, accurate, and practical solutions to help users resolve common computer issues.
User Comments :