Do you want to install Pop OS on your PC? Here are 3 ways for you. This post from MiniTool offers you a step-by-step Pop OS install guide. You can select one accordingly. It also tells you how to get the Pop OS download.
How to Download Pop!_OS
Pop!_OS is a free and open-source Linux distribution, based upon Ubuntu, and featuring a customized GNOME desktop environment known as COSMIC. It is developed and maintained by System76, an American Linux computer manufacturer.
This distro is designed for fast navigation, easy workspace organization, and fluid and convenient workflow. It is also suitable for STEM and creative professionals who use their computers as a tool to discover and create.
Pop!_OS is primarily bundled with the System76 laptops, but it can also be downloaded and installed on most computers for free. How to get the Pop OS download? This is very simple. Go to the Pop OS by System76 website. Click the Download button. Then, you can 3 versions: the pure version, the Nvidia version, and the Ras Pi 4 version.
If your PC has Nvidia graphics installed, download the Nvidia version. This version has been optimized for the Nvidia GPU. If you want to install Pop OS onto Raspberry Pi 4, download the Ras Pi 4 version. Note that Pop!_Pi for Raspberry Pi 4 is a Tech Preview. If you are not in the above cases, just download the pure version.
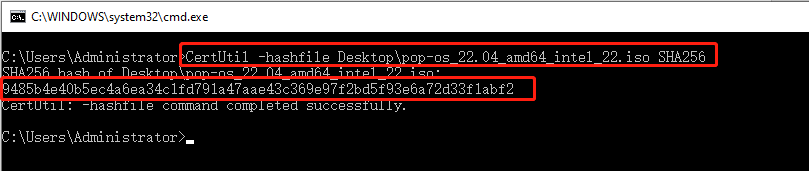
Then, verify your download using the checksum to ensure that you’ve received the full, complete download and that it is not corrupted. Open the Command Prompt and run the following command: CertUtil -hashfile folder-path\pop-os_22.04_amd64_intel_22.iso SHA256.
You need to replace the folder-path accordingly. In addition, the .iso filenames will change over time, so please make sure you are using the correct .iso filename.
If the checksum does not match the one on the download page, you may need to re-download your copy of Pop!_OS.
7 Best Lightweight Linux Distros for Old PCs
Pop OS System Requirements
To install Pop OS on a PC, the PC needs to meet the following requirements.
- CPU: 64-bit x86
- RAM: 4GB (8GB for the recommendation)
- Storage: 20GB
To check your PC whether meets the above requirements, you can follow the steps below:
- Press the Windows key + R keys to open the Run dialogue.
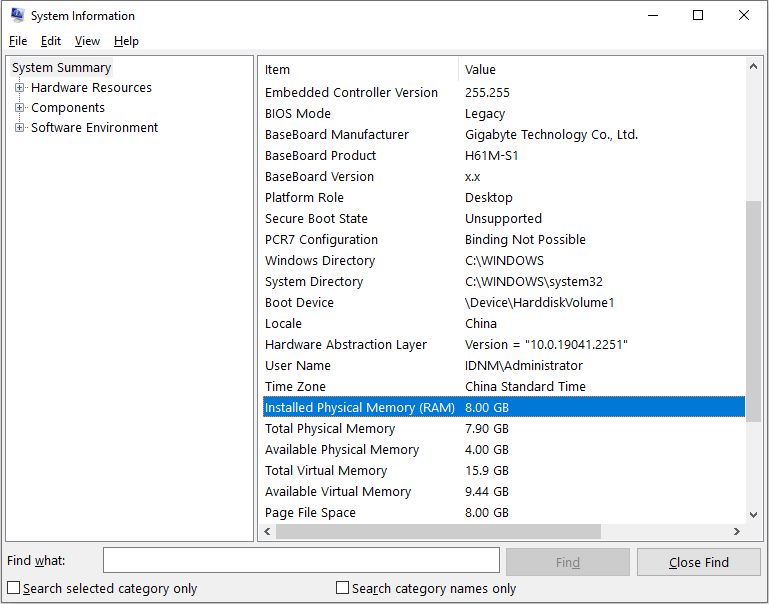
- In the text bar, type “msinfo32” and press Enter.
- In the System Information window, scroll down to find the Installed Physical Memory (RAM) item and check if it is 4GB or more.
If the memory of the PC is less than 4GB, you may need to replace the old RAM or add a second RAM. You can refer to this post: How to Get More RAM on Laptop—Free up RAM or Upgrade RAM.
As for the storage requirement, any PC hard drive can meet it. Of course, you can also upgrade the hard drive to a larger or faster one.
How to Install Pop OS on a PC
If your PC can run Pop OS, you can then get the Pop OS download and install it. In general, you can use the following 3 ways to install Pop OS on a PC:
- Create a Pop OS VM. This option will help you learn Pop OS operation without any risk.
- Dual boot Pop OS and Windows.
- Replace Windows with Pop OS thoroughly.
In this part, I will show you the 3 Pop OS installation ways.
Dual Boot vs Virtual Machine: Which One Should You Choose?
How to Create a Pop OS VM
To manage the VM better, I recommend you create a separate VM partition. You can use MiniTool Partition Wizard, which is a professional disk and partition management tool. Here is the guide:
MiniTool Partition Wizard FreeClick to Download100%Clean & Safe
Step 1: Launch MiniTool Partition Wizard. Right-click a partition and choose Move/Resize.
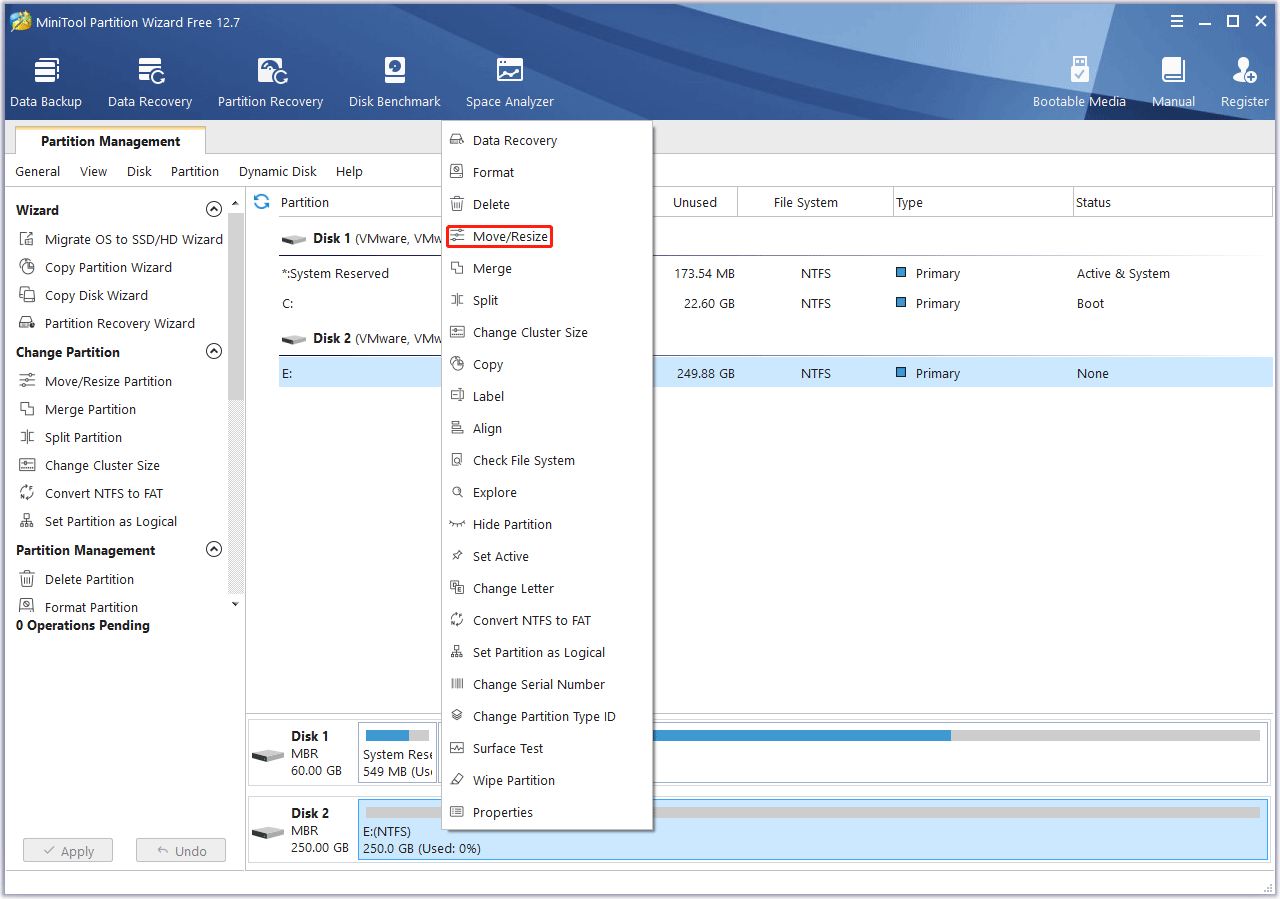
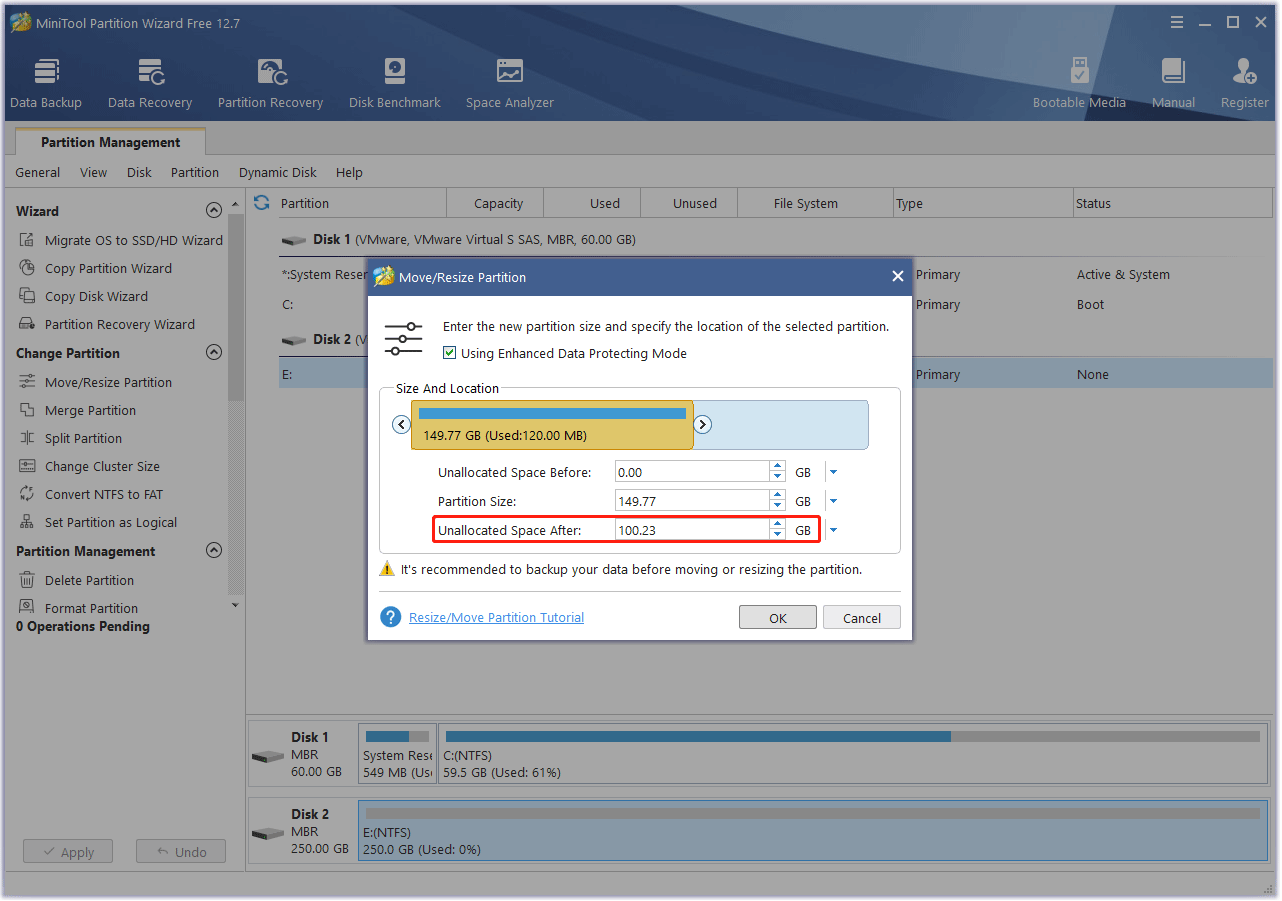
Step 2: Drag the arrow icon to decide how much space you want to shrink. Click the partition block and drag it to decide the location of the partition. Then, click the OK button.
- In general, the VM file will increase as your VM usage frequency increases. Therefore, I recommend you create a partition of more than 40GB. Of course, you can decide according to your condition.
- You can check the unallocated space before and after to know how much space you have shrunk. You need to make sure the unallocated space is enough. If not, you need to move/resize multiple partitions.
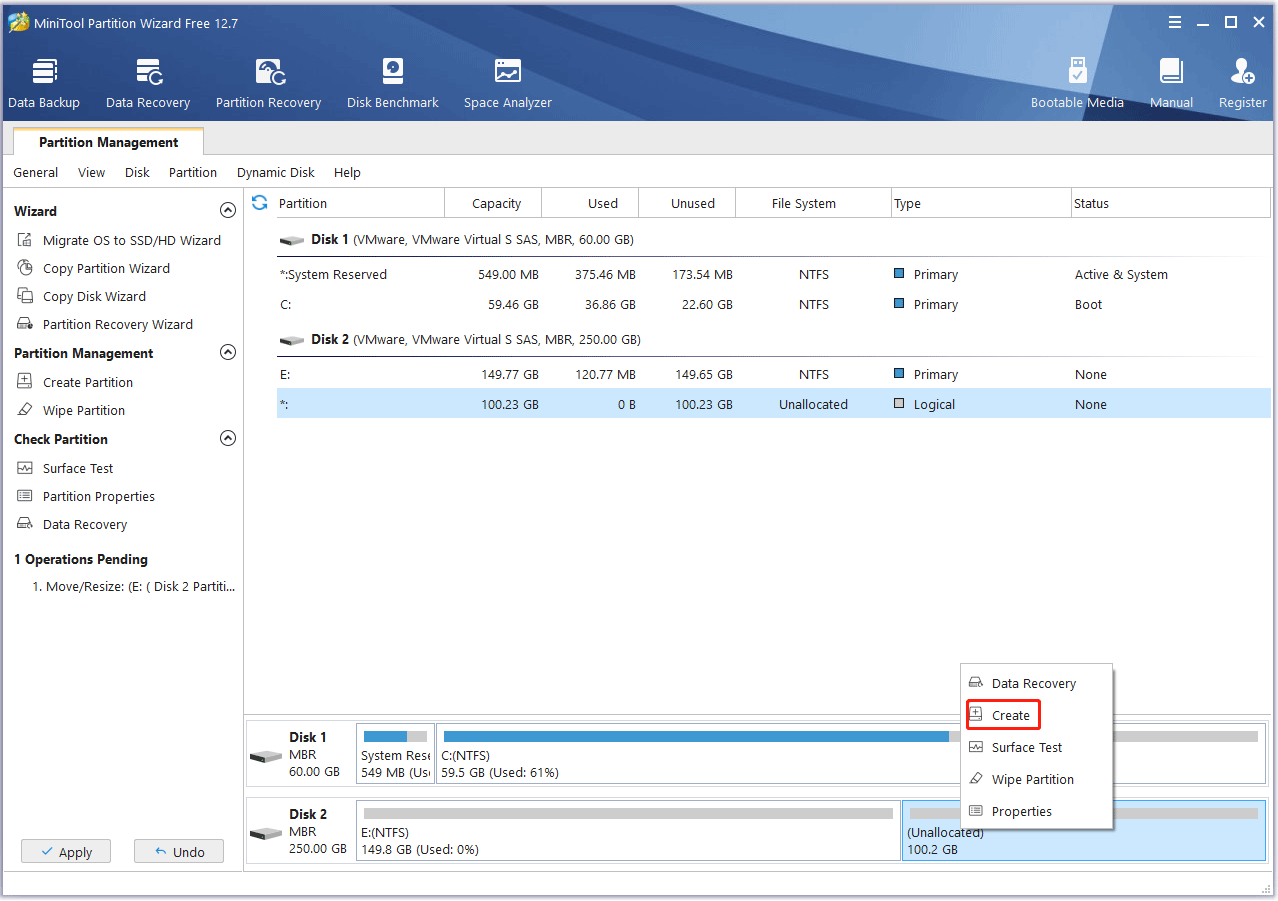
Step 3: Right-click the unallocated space and choose the Create button.
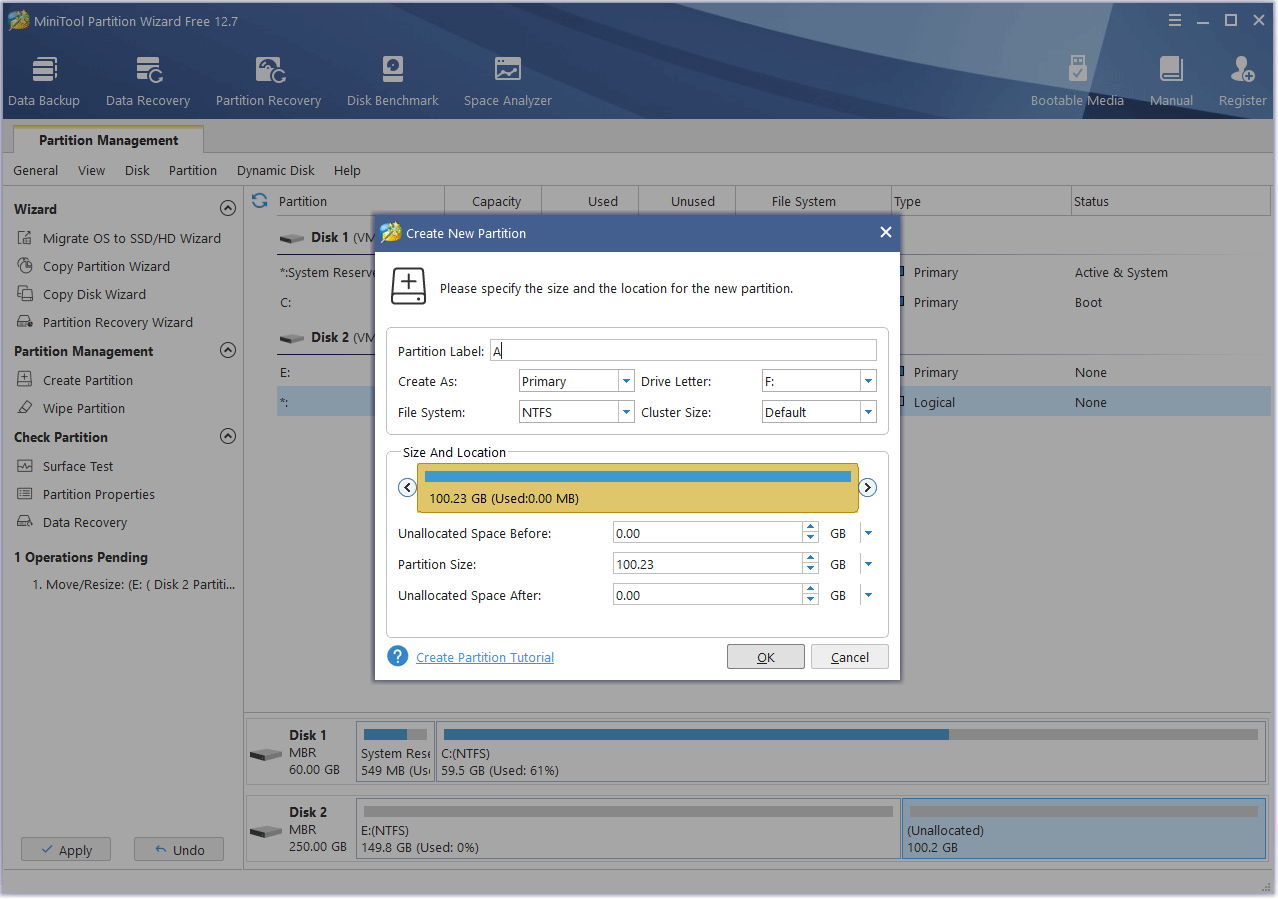
Step 4: Set parameters for the new partition. You can keep them to the default value if you don’t have specific demands. Then, click the OK button.
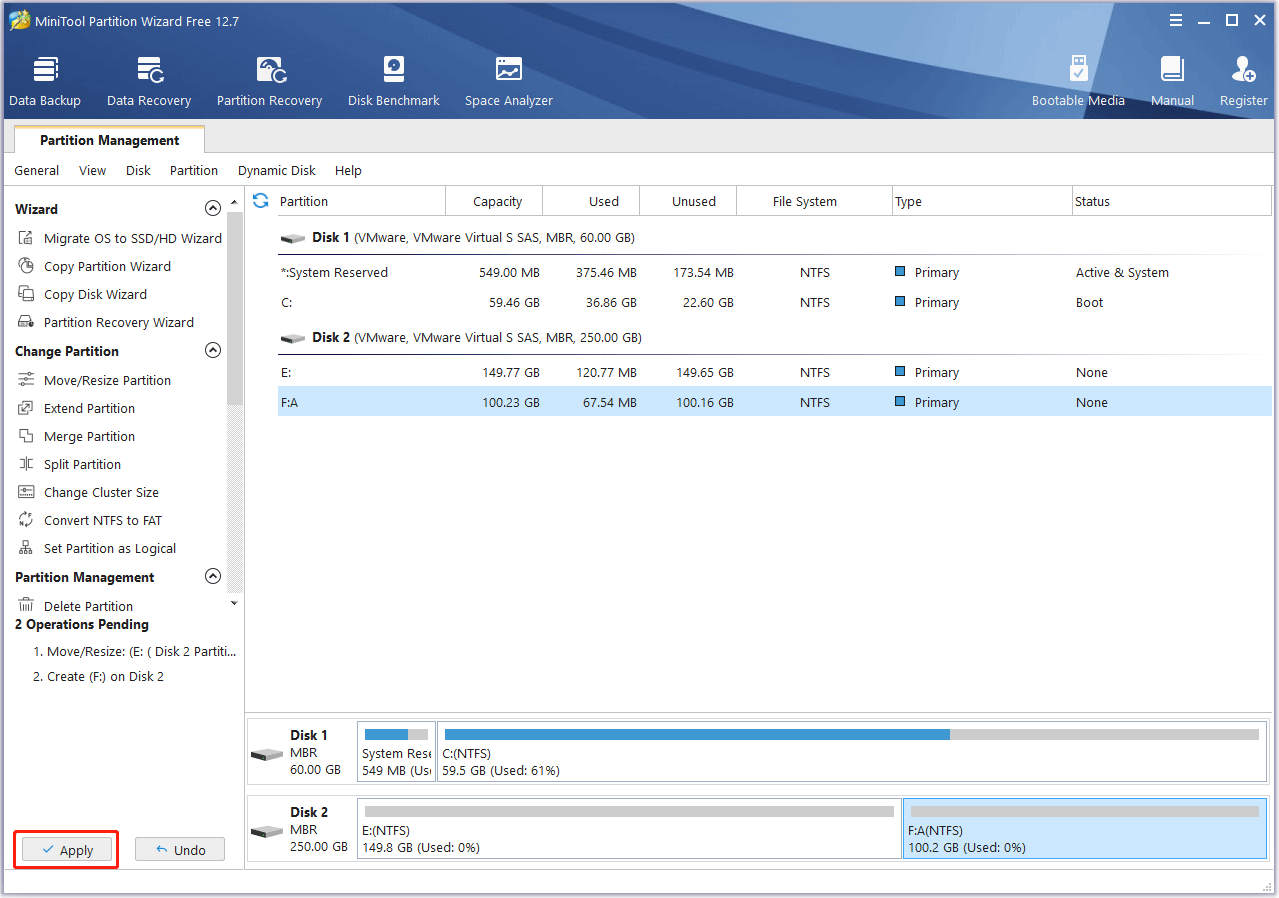
Step 5: Click the Apply button to execute pending operations.
Then, you need to install a VM program on this partition and use this software to create a Pop OS VM. You can use VMware or VirtualBox. Here, I will show you how to install Pop OS on VMware. The guide is as follows:
Step 1: Create a VM on VMware.
- Launch VMware and click File > New Virtual Machine.
- On the pop-up window, select Custom (advanced) and click Next.
- On the next window, click Next again.
- Select the Installer disc disk image file (iso) option and click the Browse button.
- On the Browse window, navigate to the Pop OS ISO file and click the Open Then, click Next.
- Select Linux and Ubuntu 64-bit. Then, click Next.
- Change the VM name to Pop OS and change the VM location to the partition you created just now. Then, click Next.
- Allocate the number of processors. Keep the default value and click Next.
- Specify the memory size. Change the memory size to 4GB or more and then click Next.
- Then, keep the default values and click Next all the way through until you are asked to specify the disk capacity. You can change the Maximum disk size to a larger number if you think 20GB is too small. Then, click Next.
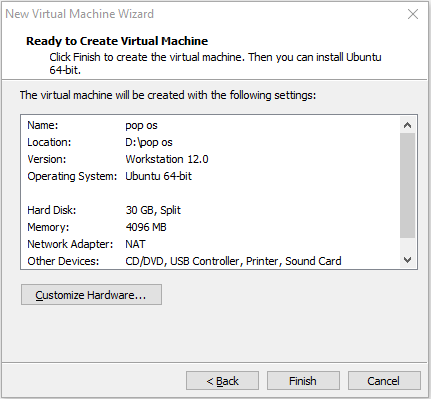
- Click Next again. Then, review all the virtual machine settings. If they are OK, click Finish.
Step 2: Power on the Pop OS virtual machine. Wait until the Pop OS install wizard launches. Then, go through the Pop OS installation process.
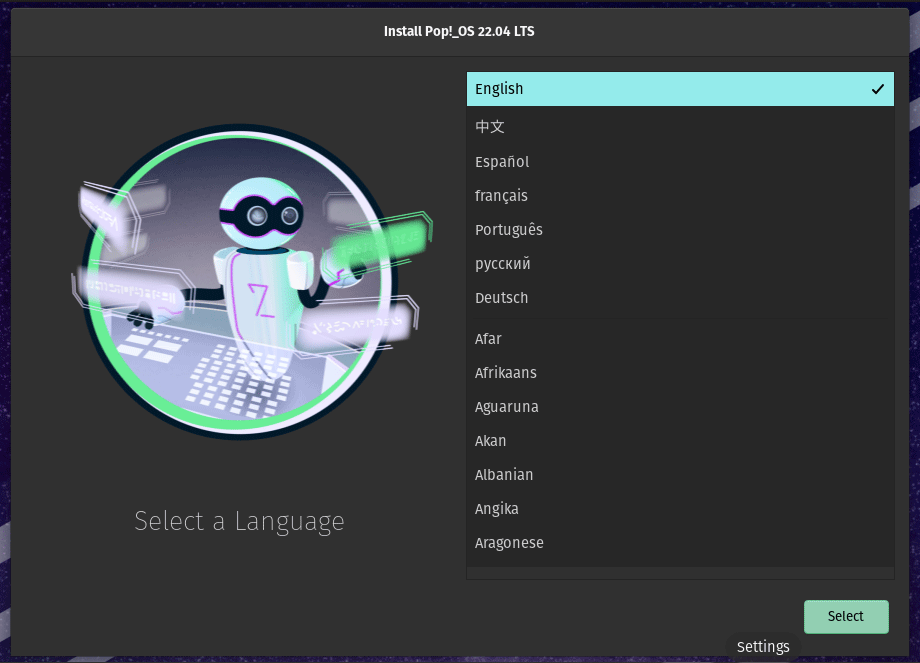
Follow the wizard to select a language, a locale, a keyboard input language, and a keyboard layout.
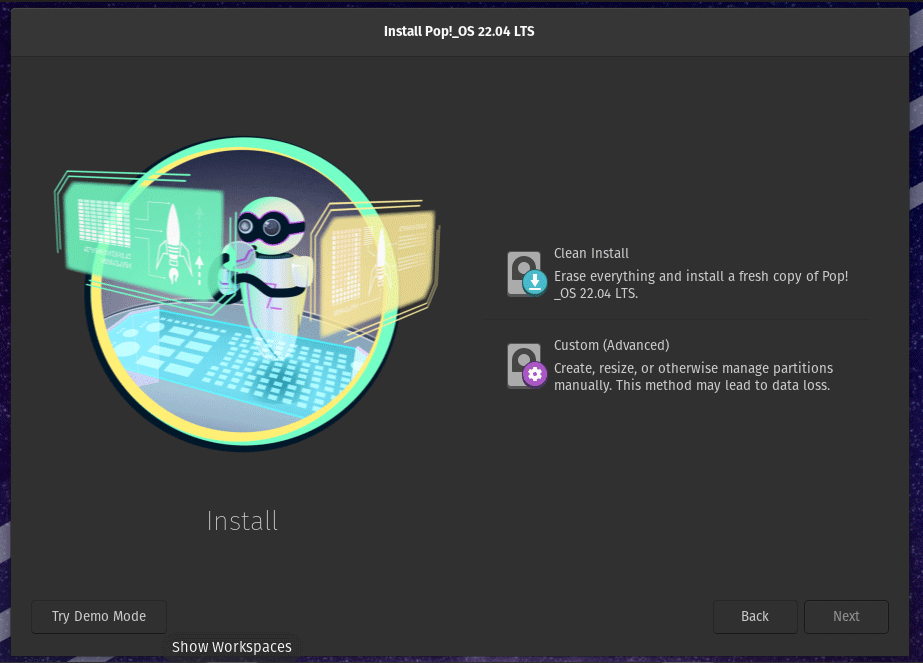
Choose the Clean Install option. This will erase all contents of the target drive. If you want to create a Pop OS VM or replace Windows with Pop OS thoroughly, this option is OK.
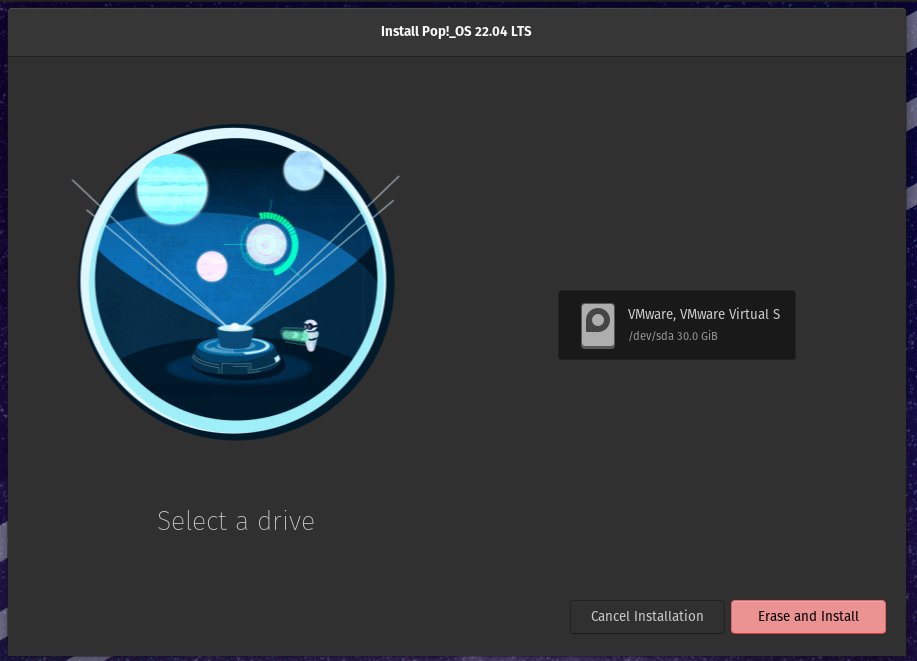
Select the VMware disk and click the Erase and Install button.
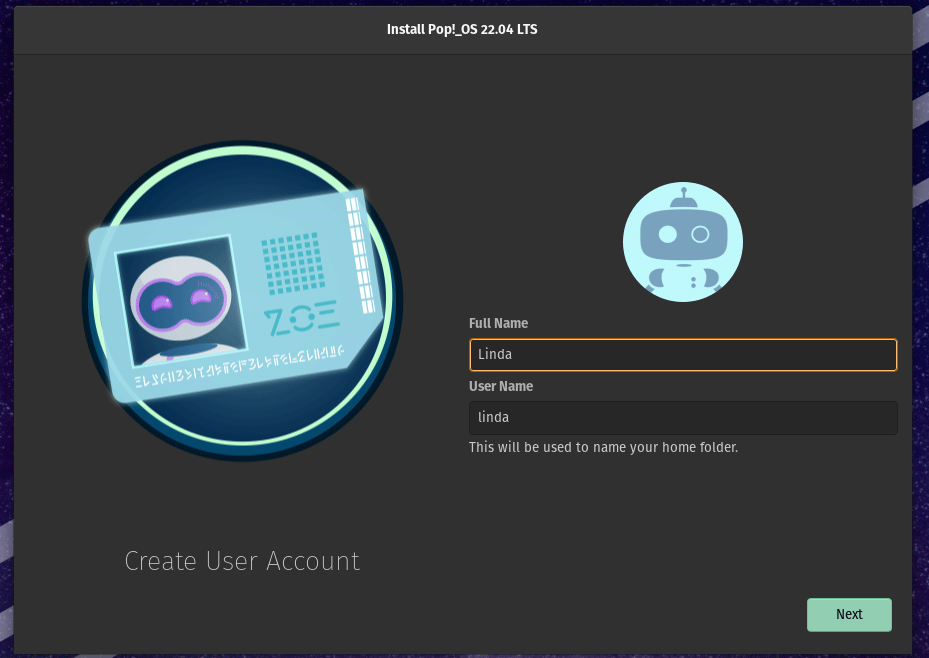
Create a user account and click Next. Then, you need to set the password.
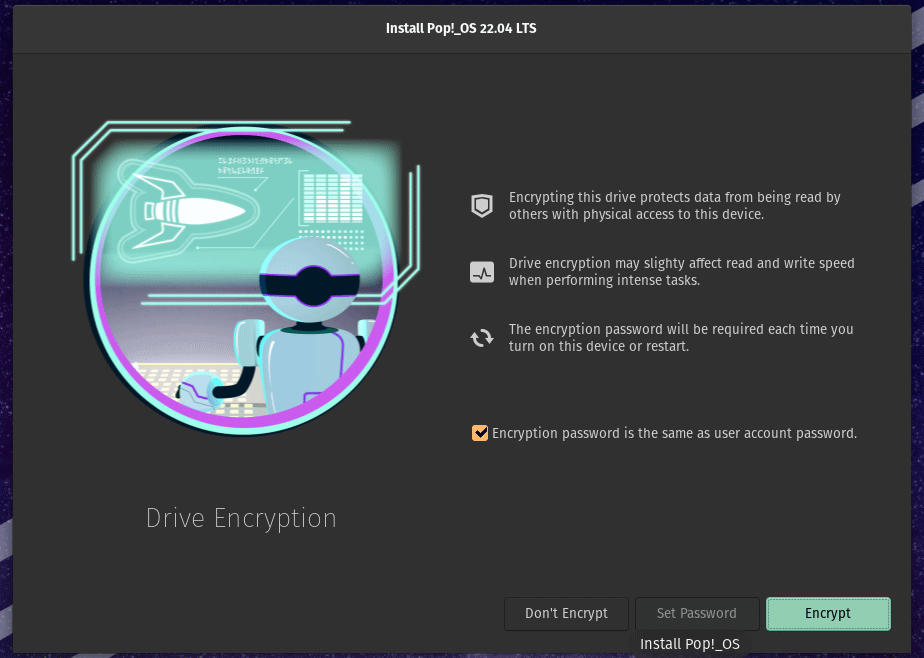
Decide whether to encrypt the system drive. The function of this feature is similar to BitLocker. You can decide according to your condition.
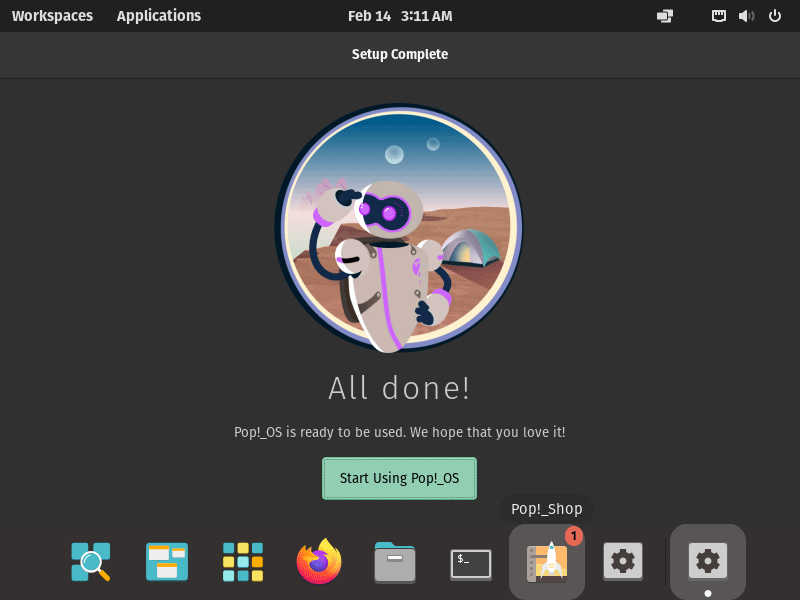
Then, the Pos OS install wizard starts to partition the drive, extract files, etc. This may take a long time. When the installation is completed, reboot your computer and log in to complete the user account setup process. Then, you can use Pop OS. If you think the screen is too small, right-click on the desktop and choose Display Settings to change it.
How to Replace Windows with Pop OS
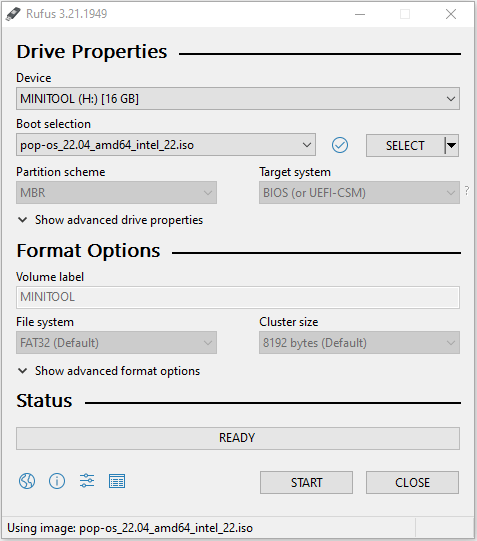
Step 1: Create a Pop OS installation media. You need to insert a USB larger than 8GB into the PC. Then, download an ISO burning program like Rufus and use it to burn the Pop OS ISO file into the USB drive.
- Launch Rufus. It will detect the USB drive automatically.
- Click the Select button and choose the Pop OS ISO file. Then, click OK.
- Click the Start Then, click OK. After the burning process completes, click Close.
Step 2: Insert the USB drive into the PC where you want to install Pop OS. Make sure the PC is powered down. Then, power on the PC and press the BIOS key to enter the firmware. Then, you need to do the following things in order:
- Disable the Secure Boot because this feature may prevent Pop OS from booting.
- Set the USB drive as the first boot device.
- Save changes and exit the firmware. The PC will boot from the USB drive, and then you just need to go through the complete Pop OS installation process.
- Enter the firmware again and make the PC boot from the internal storage. Now, if all is OK, your PC should enter Pop OS.
How to Dual Boot Pop OS and Windows
Step 1: Shrink partitions to get enough free space (unallocated space). You can also use the Move/Resize feature of the MiniTool Partition Wizard, especially if you need to shrink multiple partitions and get the unallocated space together.
Step 2: Create a Pop OS installation media, disable Secure Boot, and make the PC boot from the USB drive.
Step 3: Go through the Pop OS installation process, but this time you need to choose the Custom (Advanced) option. Click Modify Partitions. This will open the GParted tool. You need to use this tool to create 3 partitions (“/”, “/boot”, and “swap”).
The “/boot” partition stores boot files. The "/" partition is used to store system files. You can also use it to store personal files. The "swap" partition is used as the virtual memory.
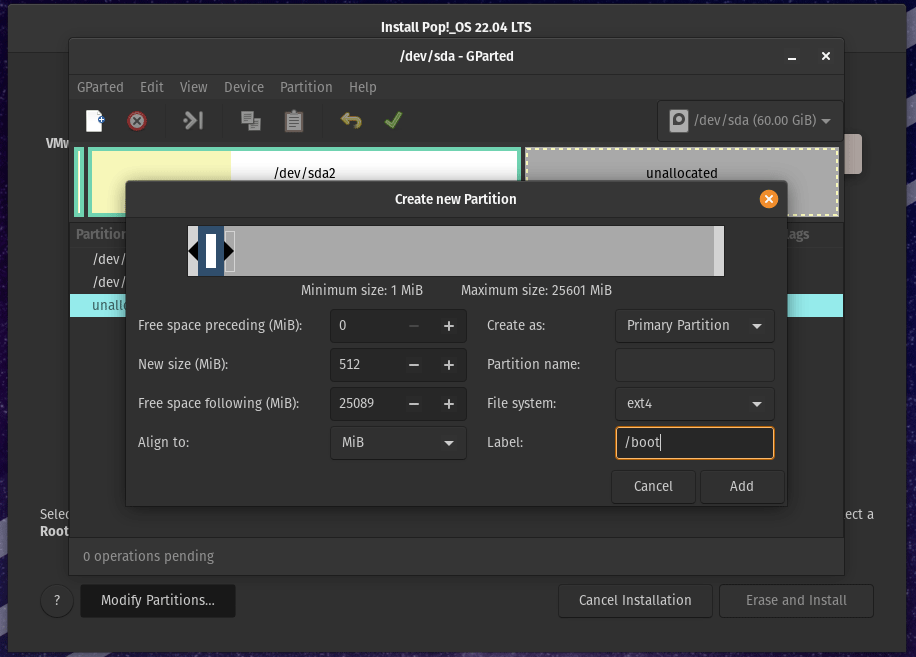
Right-click on the unallocated space and choose New from the menu.
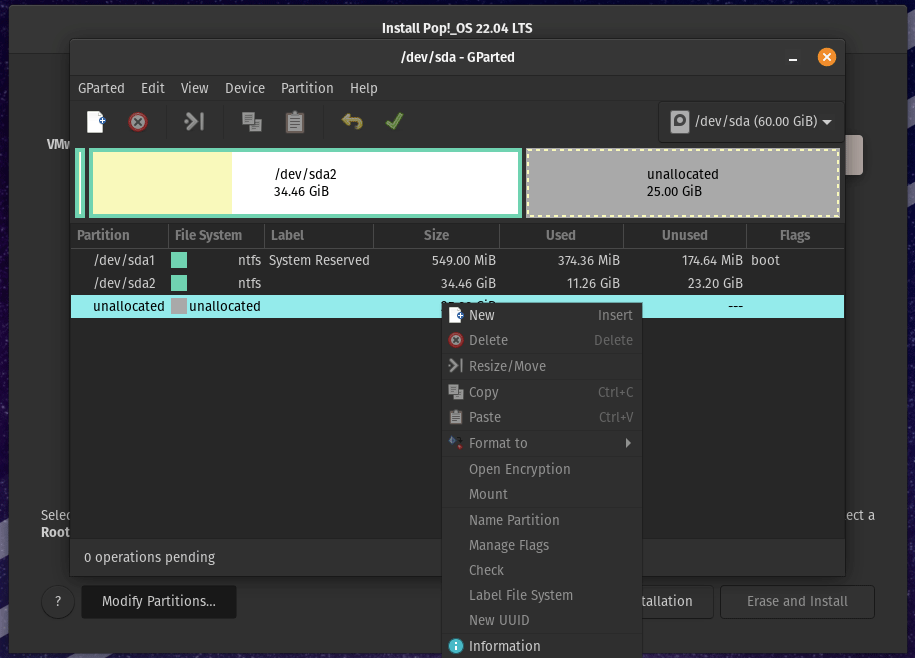
On the new window, change the New Size to 512 (MB), label the partition as “/boot”, and click Add. Please note that the boot partition must be a primary partition.
Then, add the “swap” partition and the “/” partition.
The number of partitions on an MBR disk can’t exceed 4. So, if your disk is MBR style, you need to create an Extended Partition first. To do that, you just keep the default value and change the Create as parameter. If your disk is GPT style, skip this step.
The “swap” partition should be 2048 (MB) and its File System should be Linux-swap. Use the same way to create the “/” partition. This time, you don’t need to change anything. Just label the partition as “/” and click Add.
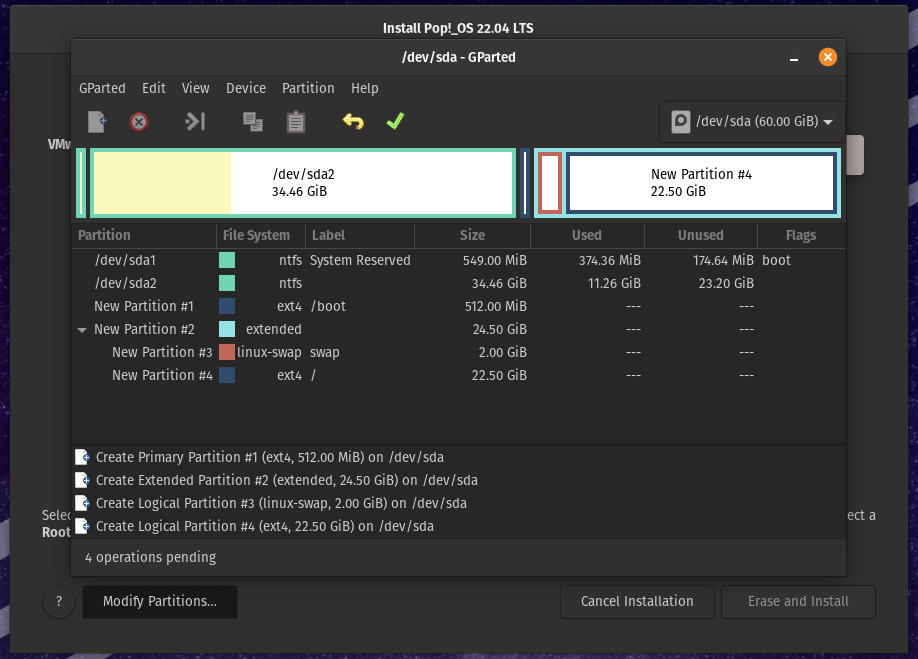
Click the green tick icon to execute all operations. Click Apply. After the operation is executed successfully, click Close. Then, close the GParted tool.
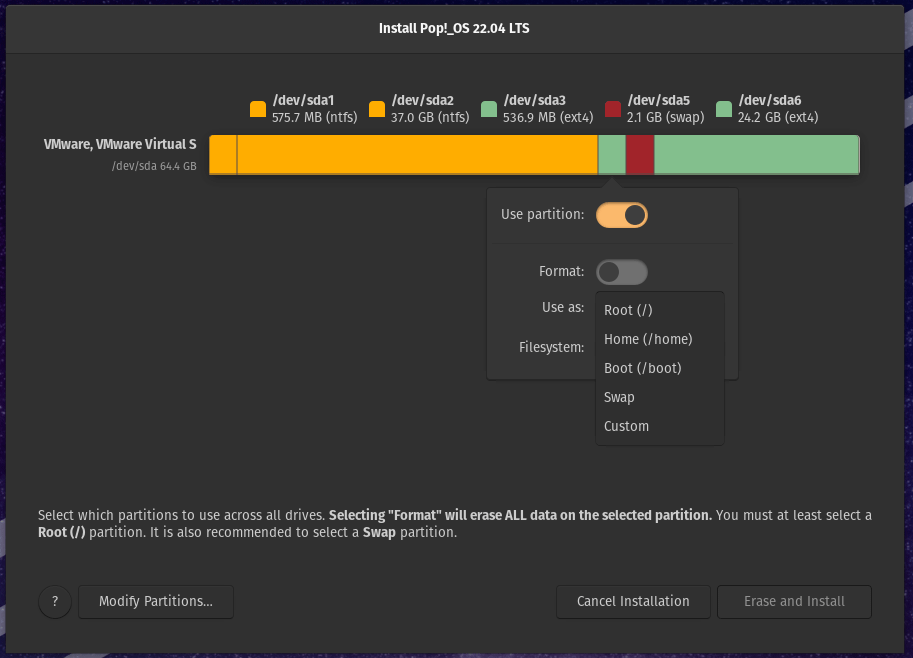
Click the /boot partition, toggle on Use Partition, and use it as Boot (/boot). Use the same way to set the Swap partition and the Root (/) partition. Then, click the Erase and Install button.
Step 4: Now, you can follow the steps described before to complete the Pop OS installation.
Bottom Line
Is this post useful to you? Have you encountered issues when downloading and installing Pop OS? Share them with us in the following comment zone. In addition, if you encounter problems when using MiniTool Partition Wizard, please feel free to contact us via [email protected]. We will get back to you as soon as possible.
About The Author

Position: Columnist
Linda has been an editor at MiniTool for seven years. She continuously learns about computers and puts her knowledge into practice. Moreover, she is particularly knowledgeable in disk management, data recovery, system installation, and PDF editing. Her articles typically reference multiple examples or are based on her own experience, providing users with the most suitable solutions.
User Comments :