About Steam Deck Storage
Valve’s Steam Deck is a handheld gaming computer that was released on February 25, 2022. With it, you are able to play your PC games in the Steam library wherever you are. If you want to store many games on Steam Deck, then you need enough storage. Do you know how much storage your Steam Deck has? In this section, we will discuss Steam Deck storage.
According to the official website, Valve offers three different versions of Steam Deck for you to choose from. The Steam Deck storage capacity, price, and some other features differ from one another.
Base Model
Price: $399
Internal Storage: 64GB, eMMC
Others: Carrying case
Mid Model
Price: $529
Internal Storage: 256GB, NVMe SSD
Others: Carrying case; Exclusive Steam Community profile bundle
Top Model
Price: $649
Internal Storage: 512GB, NVMe SSD
Others: Premium anti-glare etched glass; Exclusive carrying case; Exclusive Steam Community profile bundle; Exclusive virtual keyboard theme
Tip: Click eMMC VS SSD Storage to learn the difference between them.
You can choose the best one according to your own needs.
How Much Steam Deck Storage Do You Need?
It totally depends on what you plan to do with your Steam Deck. If you mainly play puzzle games or other games that take up little space, the 64GB version of Steam Deck is the best. On the other hand, if you enjoy playing AAA titles like Apex Legends and Elden Ring, you’d better choose a Steam Deck with 256GB or 512GB of storage.
However, in some cases, the 512GB of Steam Deck storage might be still insufficient or you just want to buy a 64GB Steam Deck. How can you get more storage space? Does Steam Deck have expandable storage? Go on with the next part and you may find what you want to know.
The Best Steam Deck Games You Can Play in 2022
Does Steam Deck Have Expandable Storage
As we can know above, the largest internal storage available on Steam Deck is 512GB. It’s possible for you to run out of the Steam Deck storage quickly if you install several space-consuming games. When that happens, a question may come out to your mind. That is: Does Steam Deck have expandable storage?
Fortunately, the answer is “Yes”. Each version of this portable gaming PC has a high-speed microSD card slot thanks to the SteamOS 3.0 operating system. You can plug your expandable storage card into your Steam Deck to access games stored on this card via your library.
All in all, the Steam Deck expandable storage is supported no matter which version you own.
[Solved] Get Stuck in Steam Application Load Error 3:0000065432?
How to Add Steam Deck Storage
If you want more space to install your desired games, you should consider adding Steam Deck storage. To do this, you can try the following three methods.
Way 1: Add a MicroSD Card
The best and easiest option to create more space for your games on Steam Deck is to add a microSD card as Steam Deck expandable storage. To execute the operation successfully, you need to format the microSD card to EXT4. Here’re two effective ways for you to finish the formatting process.
With MiniTool Partition Wizard
If you prefer to format the microSD card on the Windows PC before you add it to your Steam Deck, you can try MiniTool Partition Wizard. It’s a comprehensive partition managing program that enables you to perform various operations on your disks and partitions. For example, you can create/format/delete partitions, check disk health, migrate OS to SSD/HDD, etc.
To format the microSD card using MiniTool Partition Wizard, follow the steps below.
Note: The format will delete all the data saved in the SD card. So, you should make a backup in advance to avoid data loss.
Step 1: Connect the SD card to your computer via a card reader.
Step 2: Download and install MiniTool Partition Wizard on your PC. Then launch this app to enter its main interface.
MiniTool Partition Wizard FreeClick to Download100%Clean & Safe
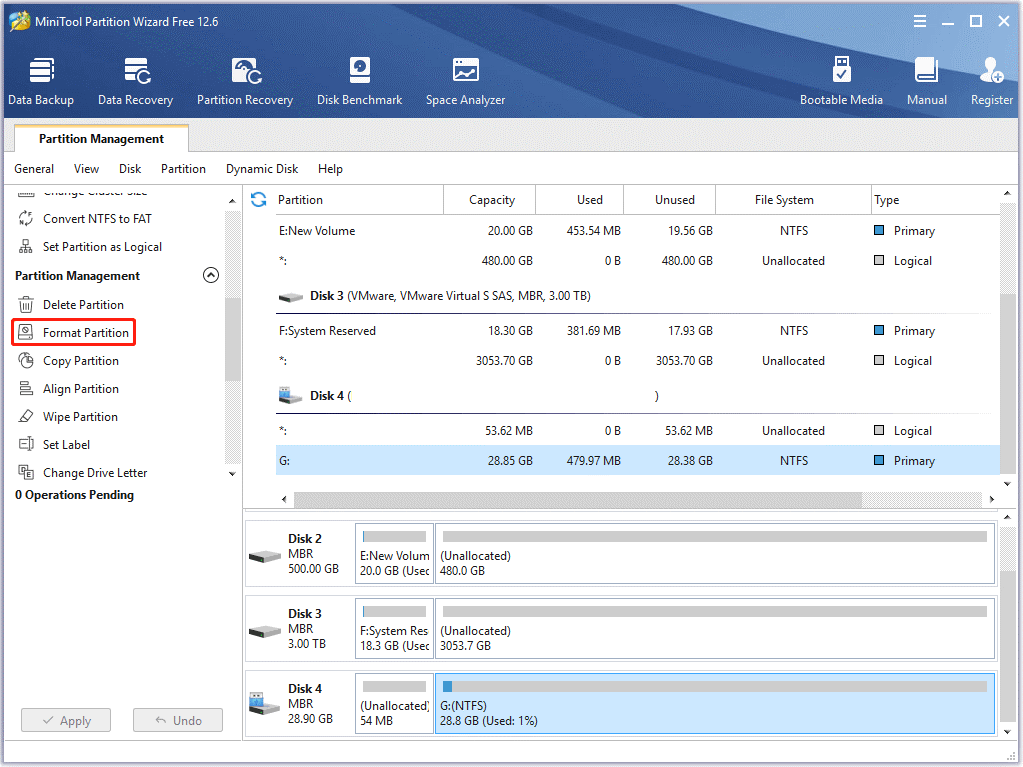
Step 3: Highlight the partition on the SD card and then select Format Partition from the left action panel.
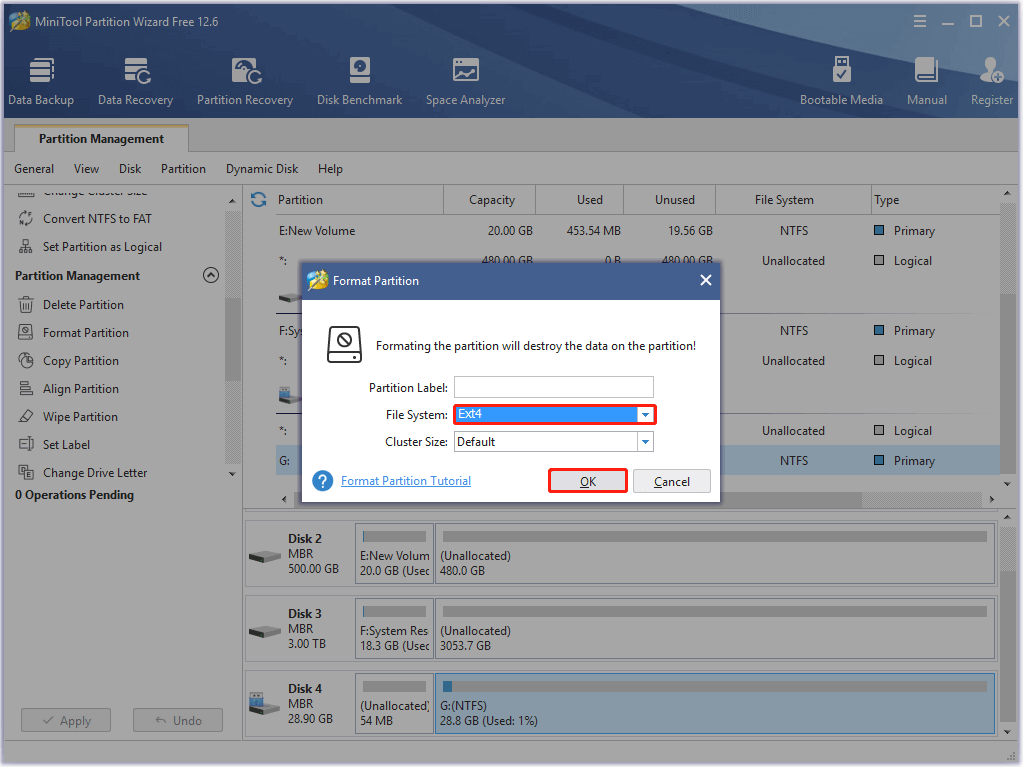
Step 4: In the pop-up window, select Ext4 as the file system and click OK.
Step 5: After that, click Apply to carry out the operation.
Step 6: Once you format the SD card, you can use it as Steam Deck removable storage.
With Your Steam Deck
If you don’t have a computer on hand, you can choose to format the microSD card directly with your Steam Deck.
Step 1: Insert the microSD card you prepare into the microSD card slot. It is on the bottom edge of your Steam Deck.
Step 2: Press the STEAM button to open the main menu.
Step 3: After that, go to Settings > System.
Step 4: Scroll down to find Format SD Card from the right panel. Then hit Format.
Step 5: Hit Confirm when you see the Confirm Format SD Card window pops up. Then Steam Deck will begin testing your SD card and formatting it.
Note: If the SD card doesn’t pass the test, just try inserting it once more. Additionally, you can also try restarting your Steam Deck to see if it works. If both fail, then use another different SD card.
Step 6: Wait patiently until the process is completed.
Way 2: Connect an External USB Drive
You can also try to connect a USB flash drive (via the USB Type C port) to your Steam Deck for more Steam Deck external storage. However, this way is a little more complicated. For instance, you have to enter desktop mode every time you connect the USB drive. Charging your Steam Deck is not allowed while using an external hard drive. In addition, the battery will drain faster.
Here is a complete guide for adding your Steam Deck removable storage with a USB flash drive.
Note: This way requires you to connect a keyboard and mouse to your Steam Deck.
Step 1: Delete all the partitions on the USB flash drive. Then connect the drive to your Steam Deck.
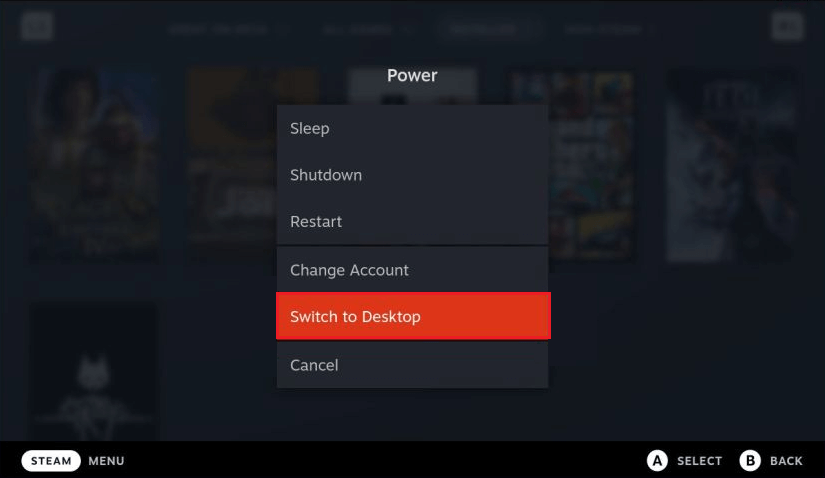
Step 2: Press the STEAM button to open the main menu and then go to Power > Switch to Desktop.
Step 3: Navigate to System > Konsole. Then type password in the terminal and you will be asked to set a password.
Tip: If you have entered the Desktop mode and set a password before, just skip to the next step.
Step 4: Go back to System and select KDE Partition Manager. Then enter your password to get into this partition manager.
Step 5: Right-click the target USB drive and select New.
Step 6: In the prompted window, select ext4 as the file system from the drop-down menu and add a label for the partition. Then click OK.
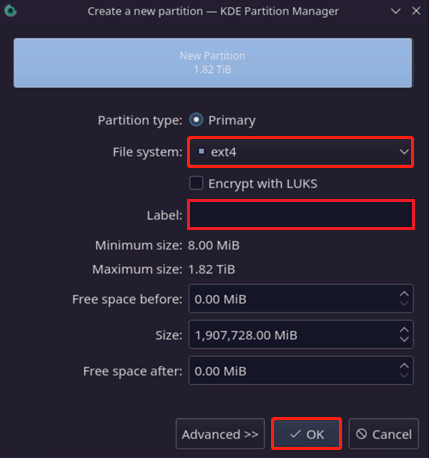
Step 7: Click Apply at the top-left corner to execute the pending operations. Once done, you will see the drive in your taskbar. Click Mount and Open.
Step 8: Go to Konsole again and type sudo chown deck /run/media/deck/[drive label]. Then press Enter. This command will change the ownership of the USB drive from root to deck, allowing SteamOS to access it.
Step 9: Open Steam. Then click Steam at the top-left corner and select Settings.
Step 10: Go to the Downloads tab and click STEAM LIBRARY FOLDERS.
Step 11: Click the “+” icon next to your current storage devices to add the USB drive as Steam Deck external storage.
Way 3: Upgrade Your Steam Deck SSD
Another option for adding Steam Deck storage is to upgrade your SSD with a 2230 M.2 SSD. However, it is a complex method and can cause some unexpected issues. So, you have to be very careful if you decide to perform a Steam Deck storage upgrade.
Note: Before the operation, make sure you turn off your Steam Deck, remove any microSD card, and the battery is drained.
Step 1: Remove the eight screws from the back of your Steam Deck.
Step 2: Pry at the top middle of the case with a plastic tool. Be careful and do not damage the circuit board or any ribbon cables.
Step 3: Once the top separates, start prying at each side.
Step 4: After removing the back of your Steam Deck, remove the screws on the metal shield that covers the battery. Then remove the battery gently.
Step 5: Remove the SSD screw and remove the SSD you are using currently.
Step 6: Move the metal shield from the old SSD to the new one. Then place the new SSD in the socket and screw it down. Now you should reassemble your Steam Deck.
Step 7: After that, download the SteamOS recovery image and create a bootable USB drive (with at least 8GB of storage).
Step 8: Connect the bootable USB drive to your Steam Deck. Then shut down the Steam Deck. Press and hold the Volume Down button and click the Power button until you hear a chime. This will make you enter Boot Manager.
Step 9: After you enter Boot Manager, select EFI USB Device.
Step 10: Wait for about one minute and you will boot into Recovery Environment. Just select Re-image Steam Deck.
After you finish the Steam Deck storage upgrade with the new SSD, you are able to use more storage to install games.
Bottom Line
After reading this post, you may know the original Steam Deck storage and methods to increase extra storage for a better user experience on Steam Deck. If you have any problems with Steam Deck storage, you can leave a message in our comment part. If you get stuck in certain issues while using MiniTool Partition Wizard, you can contact us via [email protected].
