Can I Use Old SSD with a New Laptop
SSDs are popular with users. With fast read & write speeds, SSDs enable you to boot computers with less time, access files more quickly, and load games/applications more smoothly. If you have a good SSD, you should make full use of it.
After a computer ends of life, you can continue to use the old SSD if it is in good condition. Can I use old SSD with a new laptop? You may wonder this question like others. Of course, you can. The old SSD can be used on a framework laptop, a working game console, or other compatible devices.
Among various devices, framework laptops are preferred by users. Being modular and user-upgradeable, framework laptops are designed for easy repair and long-term use. It’s worth noting that framework laptops are customizable.
To be specific, users are allowed to swap out components like the keyboard, touchpad, and ports without using professional tools. In summary, framework laptops are flexible and easy to use.
How to switch an existing SSD to a framework laptop? A lot of users raised the question. Here’s an example from Community Framework.
I have a Western Digital 2TB WD Blue 3D NAND NVME SSD. I was using this on my old laptop. I want to keep Windows 10 and all my programs the same on my new framework laptop DIY 12th gen. How can I achieve this?https://community.frame.work/t/how-to-use-old-nvme-ssd-on-diy-framework-laptop/23601
Are you experiencing the same situation? If so, this post deserves your attention. It illustrates how to switch an existing SSD to a framework laptop. The whole process is divided into 5 parts.
Part 1: Ensure that the Old SSD Can Work on Framework Laptop
Firstly, you should make sure that the old SSD can work on your framework laptop. To be specific, ensure that the old SSD is compatible with the framework laptop. The old SSD should be an NVMe SSD rather than SATA SSD.
To check the SSD type, open Disk Management, right-click the SSD, choose Properties, navigate to the Details tab, and choose Hardware Ids from the Property drop-down menu. The type will be displayed in the Value list.
Besides, the form factor of the SSD should fit the slot of the framework laptop. Otherwise, you can’t install the SSD to the device. On framework laptop 16, there are M.2 SSD slots. One is for a primary M.2 2280-sized NVMe SSD, while the other is for a second for a secondary M.2 2230-sized NVMe SSD.
Check the form factor of your SSD and put it into the correct place. You can check the SSD form factor by inspecting the physical drive or searching online with the SSD’s model number. Here’s the guide on how to pick an SSD of the right form factor for your device.
In addition, if you want to use the old SSD as the primary boot drive, you need to ensure that it’s UEFI bootable and the EFI partition is properly configured. If possible, enter the BIOS on the old computer and disable legacy boot. If there’s no EFI partition, you can create one later.
Part 2: Back up the Data on the Old SSD
After making sure that the old SSD can work on the framework laptop, you should back up the SSD in case anything wrong happens. By doing so, you can avoid data loss due to unexpected errors in the following operation. As professional data backup software, MiniTool ShadowMaker should be an ideal choice for you.
You can back up the whole SSD by creating a backup image of SSD or backing up SSD to another SSD/HDD with this software. Alternatively, you can only back up files and folders on the SSD. According to your preference, select a way to make backups.
Click the button below to download MiniTool ShadowMaker and then run the downloaded setup file to install the software. Run the software and follow the steps below to finish the backup process.
MiniTool ShadowMaker TrialClick to Download100%Clean & Safe
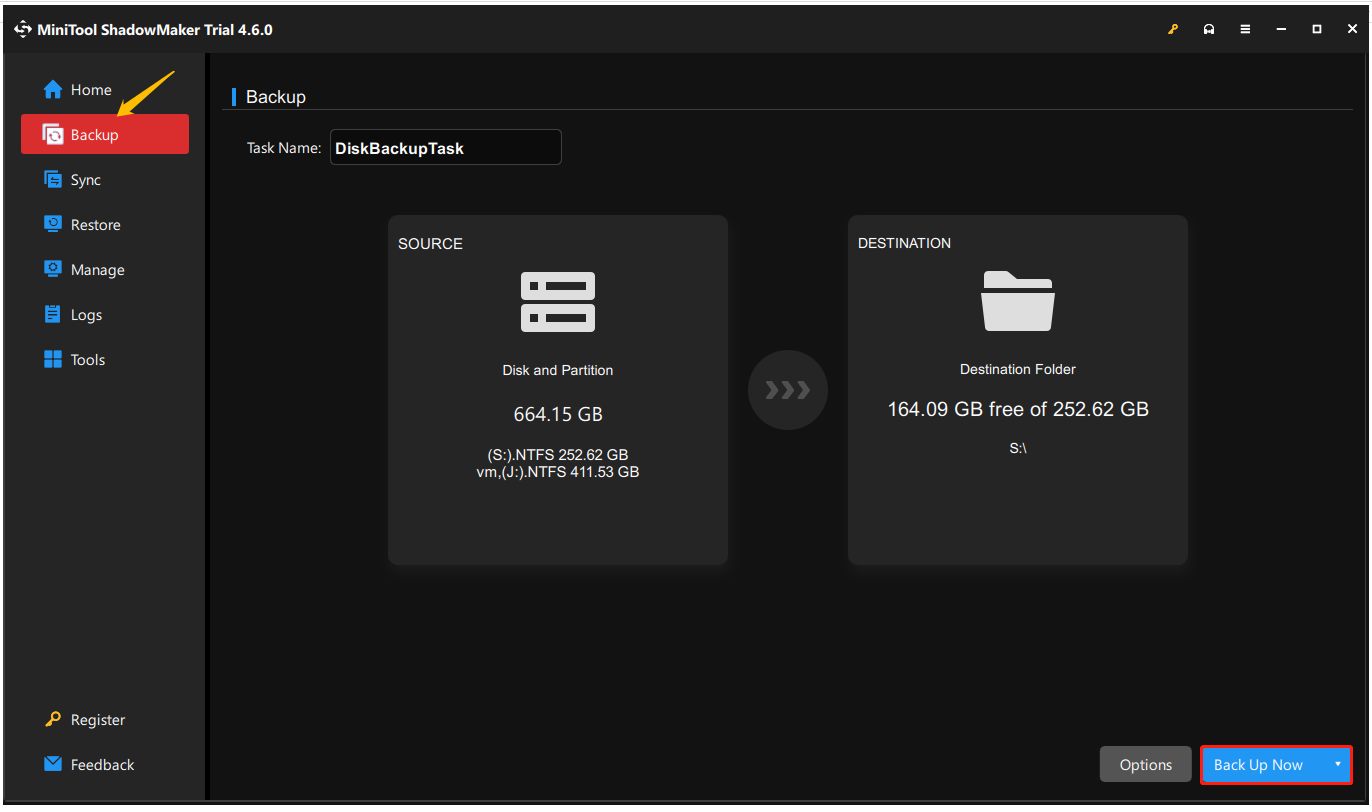
- Click Backup on the home screen.
- Navigate to SOURCE and choose Disk and Partition or Folders and Files according to your needs.
- Select the destination.
- Hit the Back Up Now button to execute the operation.
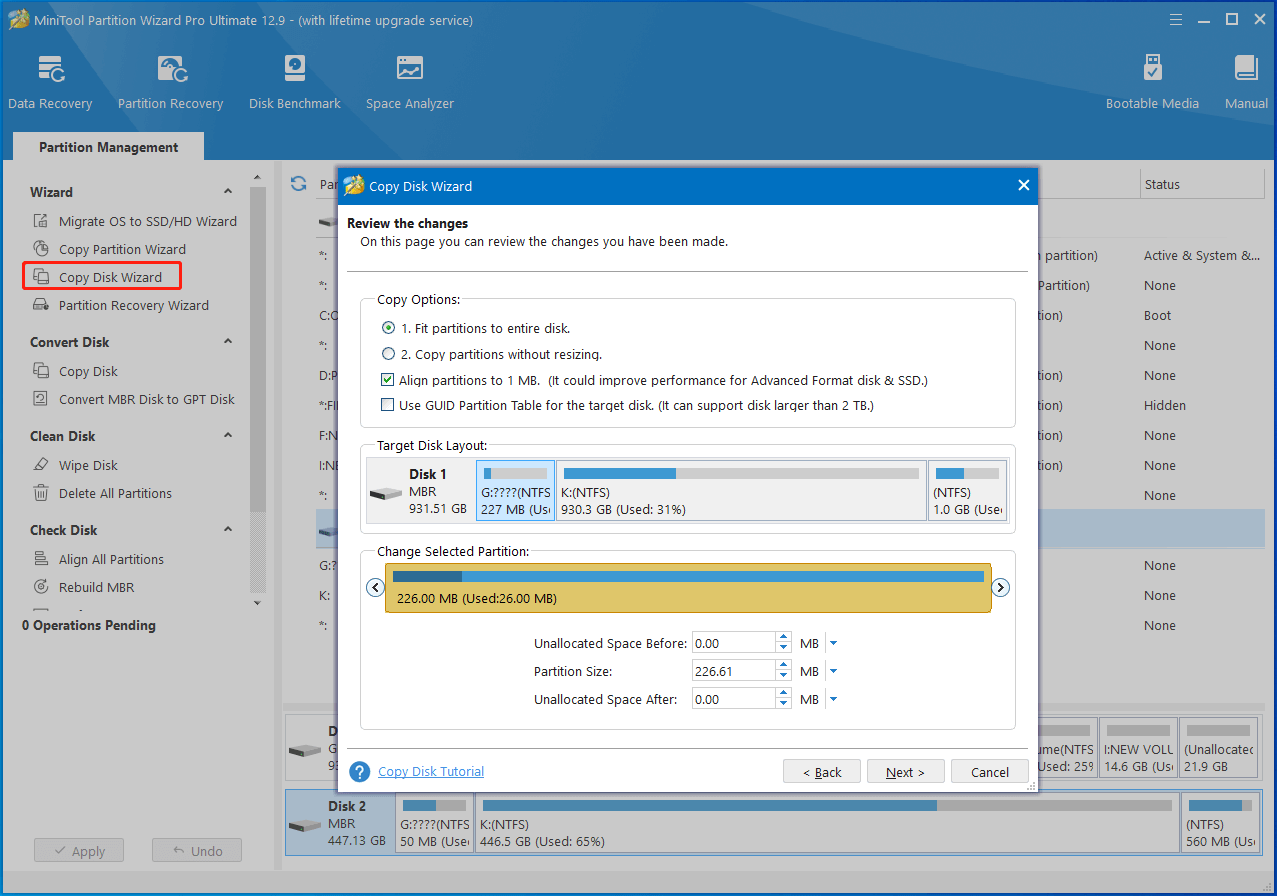
Alternatively, you can use MiniTool Partition Wizard to copy SSD partitions or clone the SSD to another drive. This method maintains data structure and partition layout. If the SSD is a system disk, you need to use Pro or above editions. If the SSD is a data disk, simply use the FREE edition.
MiniTool Partition Wizard DemoClick to Download100%Clean & Safe
Part 3: Install the Old SSD to Framework Laptop
If everything is ready, it’s time to install the old SSD to the framework laptop. How to do that? The following steps show you how to do that in detail.
Step 1: Power off the framework laptop and unplug all cables.
Step 2: Open the bottom cover by flipping the laptop cover and unscrewing the five captive screws. Then flip the input cover.
Step 3: Locate the SSD slot.
Step 4: Insert the old SSD. To do that, align the notch on the SSD with the M.2 slot, insert it at a 30° angle, and then press down and secure it with the retention screw.
Step 5: Reassemble the computer by putting the bottom cover back and screwing it in.
Step 6: Finally, power on the laptop.
Part 4: Convert MBR to GPT
If the old SSD uses MBR partition table, you need to convert it to GPT because framework laptops utilize UEFI (Unified Extensible Firmware Interface) and UEFI booting needs GPT. Otherwise, your framework laptop won’t recognize the old MBR SSD as bootable.
Therefore, you must convert the MBR SSD to GPT to boot the framework laptop from the SSD successfully. Here comes the need for MiniTool Partition Wizard. It allows you to convert MBR to GPT and conversely without data loss.
As a comprehensive partition manager, it also helps you format SSDs, analyze disk space usage, perform disk speed tests, migrate Windows 10, clone hard drives, convert FAT to NTFS, recover data from hard drives, etc. In a word, it allows you to perform various tasks related to storage devices.
Now, download and install MiniTool Partition Wizard on your computer. Then follow the steps below to convert MBR to GPT with this software.
MiniTool Partition Wizard DemoClick to Download100%Clean & Safe
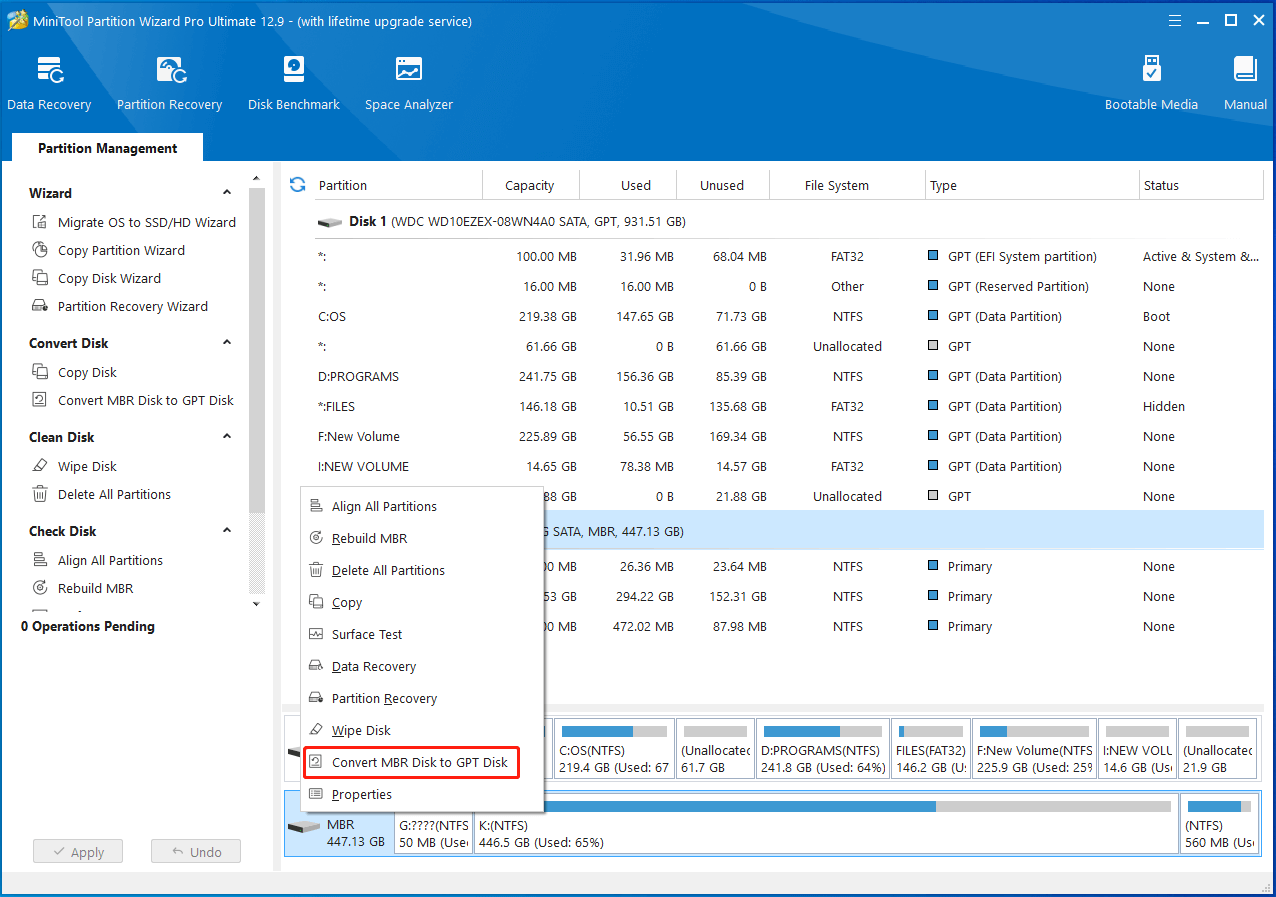
Step 1: Launch MiniTool Partition Wizard to enter its main interface.
Step 2: Right-click the old SSD and choose Convert MBR Disk to GPT Disk.
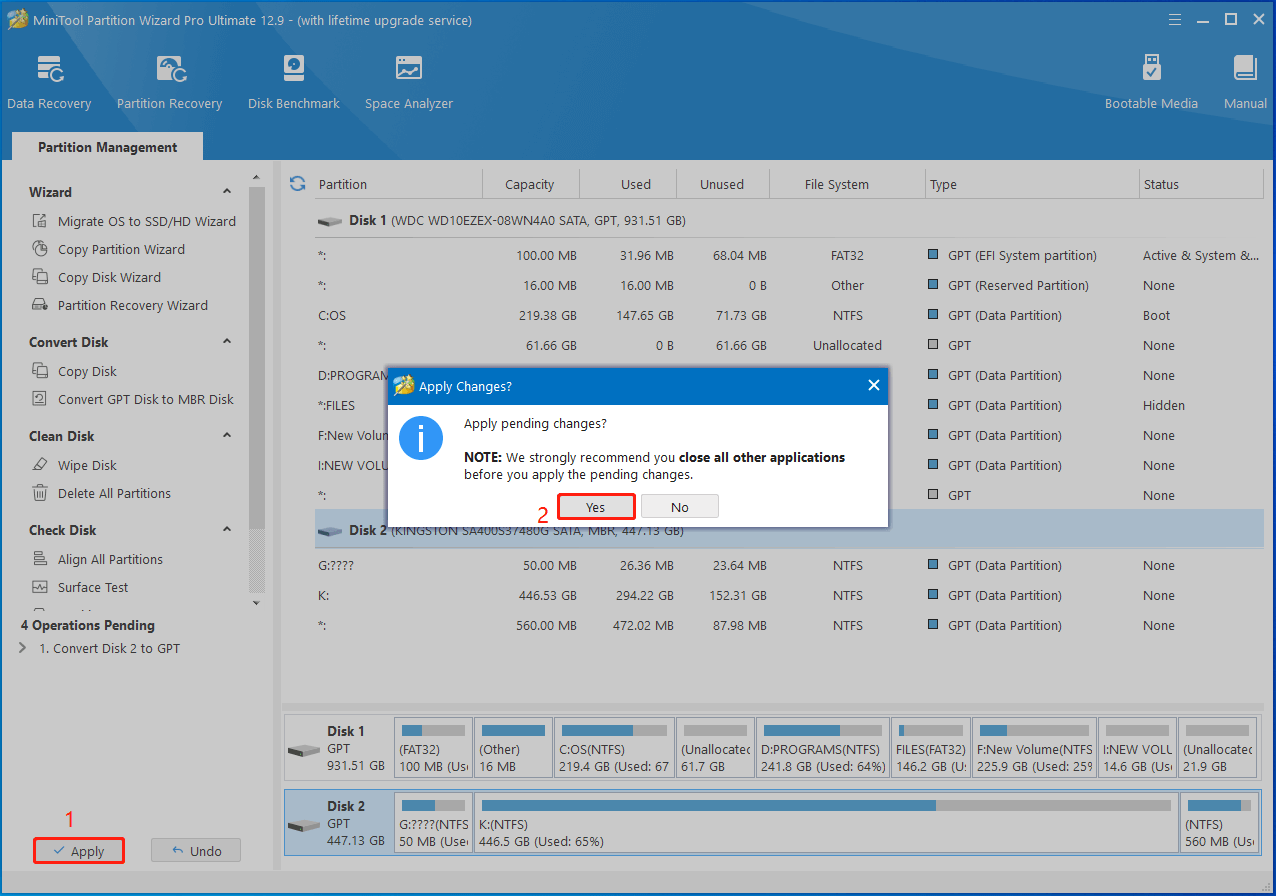
Step 3: Click Apply > Yes to execute the pending operation.
You may be interested in this: How to Make Linux-Formatted NTFS Partition Recognized by Windows
Part 5: Create EFI Partition and Copy Boot Files
As mentioned earlier, an EFI partition is required if the old SSD is used as the primary boot drive. Generally speaking, the EFI partition will be created automatically after you clean install Windows on a GPT disk. Sometimes, you can create it manually.
Step 1: Boot your laptop with a Windows installation media and hold Shift + F10 during the setup. This opens Command Prompt.
Step 2: Input the following commands in order and hit Enter after each.
- diskpart
- list disk
- select disk 0 (replace the 0 with your disk number)
- list partition
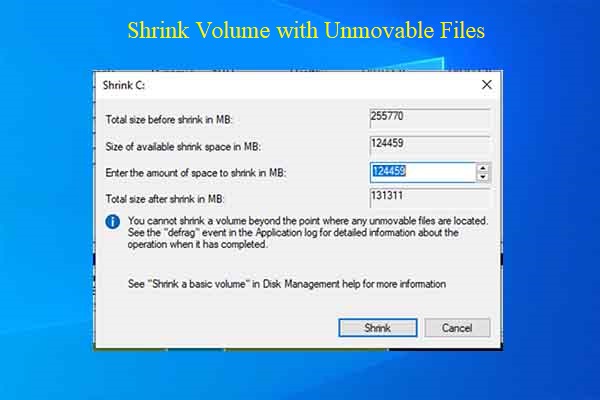
- select partition # (replace # with the partition number to shrink)
- shrink desired=100 (replace 100 with the desired number)
Step 3: After the partition is shrunk successfully, create EFI partition with the commands below.
- create partition efi size=100
- format fs=fat32 quick
- list partition
- exit (close diskpart)
Step 4: Copy the boot files to the EFI partition by running the command: bcdboot C:\Windows /s S: /f UEFI
Step 5: Now, restart the framework laptop and boot it from the old SSD.
The End
Can I use old SSD with a new laptop? Yes, you can. This post shows you the whole process of using old SSD on framework laptop. It explains each part in detail and offers you detailed steps. With this guide, you are able to use old NVMe SSD on DIY framework laptop smoothly.
If you encounter any difficulty while using MiniTool software, feel free to contact us. Just send an email via [email protected]. We will get back to you as soon as possible. Appreciate for any suggestions.
User Comments :