Xbox One is the 8th generation home video game console developed by Microsoft. Released in 2013, the console has gained global popularity — global sales of Xbox One consoles reached over 48.22 million units in August 2020.
However, the game console comes with a small hard drive and lots of users want to upgrade Xbox One hard drive. Scroll down to learn more.
Limited Xbox One Internal Hard Drive Size
How large the Xbox One hard drive is? You can check your Xbox One hard drive space by following the guide below:
- Press the Xbox button on the controller.
- Select the options in order: Profile & systemàSettingsàSystemàStorage.
- Look at the graphic on the Xbox One screen that displays the percentage of space used, the available free space, etc.
Like PS4 (PS4 hard drive size), Xbox One also comes with a 500GB as standard. However, games now become larger and larger — a game can reach up to 110GB even without 4K enhancements. Therefore, a 500GB HDD is simply not enough and will soon fill up.
What to do when your Xbox One hard drive becomes full? In this case, it might be not helpful to remove the game files, while the more helpful solution is to expand the storage of Xbox One. Scroll down to see how to expand the storage.
Two Ways to Increase Xbox One Hard Drive Size
Microsoft allows you to add an external hard drive to store more games and the whole process is far easier — get an external hard drive for Xbox One and plug it into the console over USB. However, the following facts about adding an external hard drive may disappoint you:
- USB always carries some kind of processing overhead that consumes the CPU compared to a native SATA drive.
- The external hard drive is more vulnerable to damage due to the sudden shock or fall.
How about replacing the internal hard drive with a larger one? Microsoft has declared that upgrading the internal hard drive on your Xbox One will ultimately void your warranty. However, upgrading the internal hard drive brings not only more space but also improved gameplay experience, accelerated browsing speed, low possibility of damage to the hard drive, etc.
Which one do you prefer?
Xbox One Hard Drive Upgrade
If you want to add an external hard drive to your Xbox One, follow the tutorial below.
Step 1: Pick an external hard drive (it should be at least 256GB and support USB 3.0 on the console).
Step 2: Connect the external hard drive to an Xbox One USB port.
Step 3: When the external hard drive gets recognized, select the Next option.
Step 4: Name the external hard drive using the on-screen keyboard.
Step 5: Select the Install new things here option.
Step 6: Select the Format storage device button. A few seconds later, you will see a prompt saying external storage ready.
You can save games on the external hard drive.
If you prefer upgrading the internal hard drive, please keep reading.
Upgrading to a larger internal hard drive is difficult and time-consuming and the whole process can be divided into about three stages.
Stage 1: Pick an Internal Hard Drive
What kind of internal hard drive is idealfor Xbox One?SSD is the top choice! In terms of speed, SSD is far better than HDD (SSD vs HDD), which means that the game will start and load faster between levels and maps if you pay for an SSD for your Xbox One.
One user shared his experience of upgrading to an SSD in reddit.com:
I was successful in installing a 1 TB WD Blue SSD. After installing I immediately noticed that the console only took about 10 seconds to boot up. So far, so good! So, I moved on to gaming: With BO4, I immediately noticed how the first start up menu wasn’t a completely black screen (texture loading of characters in background). It loaded the 3D character models _immediately_…
Stage 2: Remove the Original Internal Hard Drive from Xbox One
Note: Upgrading the internal hard drive on your Xbox One will ultimately void your warranty.
There are many tutorials on how to remove the original hard drive from Xbox One. The tutorial offered by iFixit is quite detailed and you can refer to it to complete the task.
Stage 3: Upgrade the Internal Hard Drive
How to upgrade the internal hard drive to a large and powerful one? There are two ways.
Way 1: Use MiniTool Partition Wizard
In this case, it is highly recommended that you try MiniTool Partition Wizard. This software can copy all the partitions on the original internal hard drive to the new internal hard drive without data loss.
But, before showing how to use it, let’s spend little time learning about the layout of the original internal hard drive.
The original internal hard drive of Xbox One adopts GPT partible table and contains 5 partitions and an unallocated space:
#1 Temp Content | B3727DA5-A3AC-4B3D-9FD6-2EA54441011B | 85983232 | 41GB
#2 User Content | 869BB5E0-3356-4BE6-85F7-29323A675CC7 | depending on the hard drive capacity
#3 System Support |C90D7A47-CCB9-4CBA-8C66-0459F6B85724 | 83886080 | 40GB
#4 System Update | 9A056AD7-32ED-4141-AEB1-AFB9BD5565DC | 25165824 | 12GB
#5 System Update 2 | 24B2197C-9D01-45F9-A8E1-DBBCFA161EB2 | 14680064 | 7GB

If the new internal hard drive you want to upgrade to is no more than 2TB, you can partition the hard drive as the above order. If the new internal hard drive is larger than 2TB, the second partition User Content must be placed at the end (like the order below), otherwise, the system will fail to boot.
#1 Temp Content | B3727DA5-A3AC-4B3D-9FD6-2EA54441011B | 85983232 | 41.000
#2 System Support | C90D7A47-CCB9-4CBA-8C66-0459F6B85724 | 83886080 | 40.000
#3 System Update | 9A056AD7-32ED-4141-AEB1-AFB9BD5565DC | 25165824 | 12.000
#4 System Update 2 | 24B2197C-9D01-45F9-A8E1-DBBCFA161EB2 | 14680064 | 7.000
#5 User Content | 869BB5E0-3356-4BE6-85F7-29323A675CC7 | depending on the hard drive capacity
The new internal hard drive is no more than 2TB:
Here is the step-by-step tutorial.
Step 1: Connect the original internal hard drive and the new internal hard drive to a Windows computer.
Step 2: Get MiniTool Partition Wizard. Note that a paid version of the software is required when cloning a system disk.
MiniTool Partition Wizard DemoClick to Download100%Clean & Safe
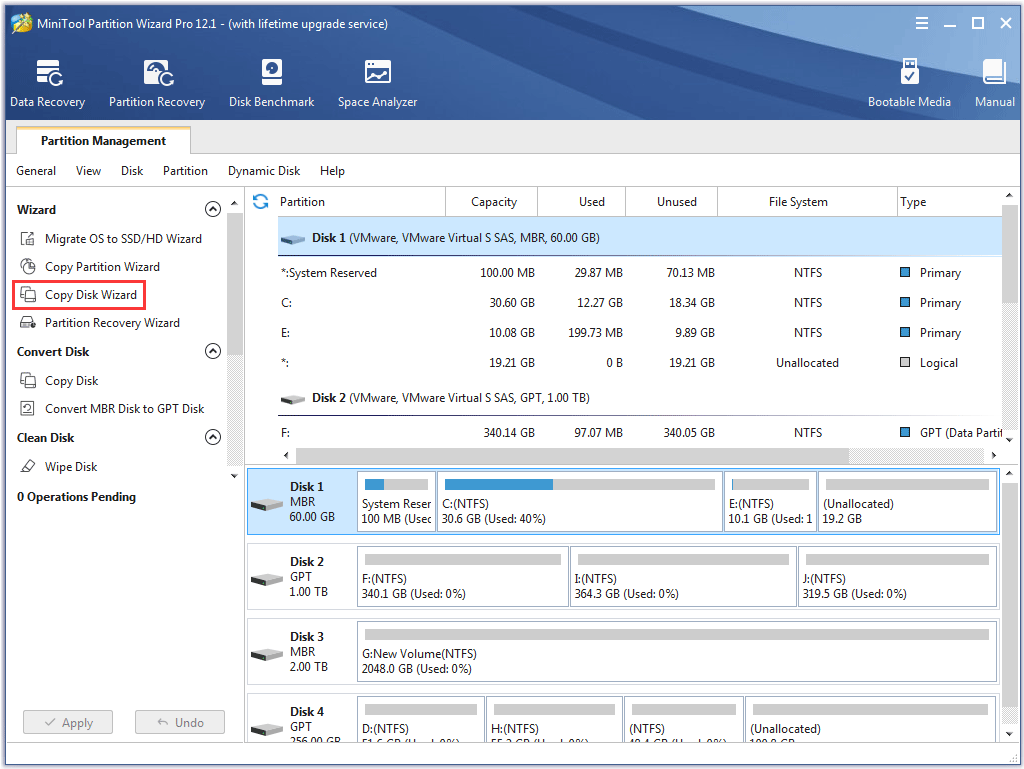
Step 3: Launch MiniTool Partition Wizard to access its main interface and you should see the connected internal hard drives listed in the disk map.
Step 4: Click the Copy Disk Wizard feature from the left panel. Then, click the Next button on the new page.
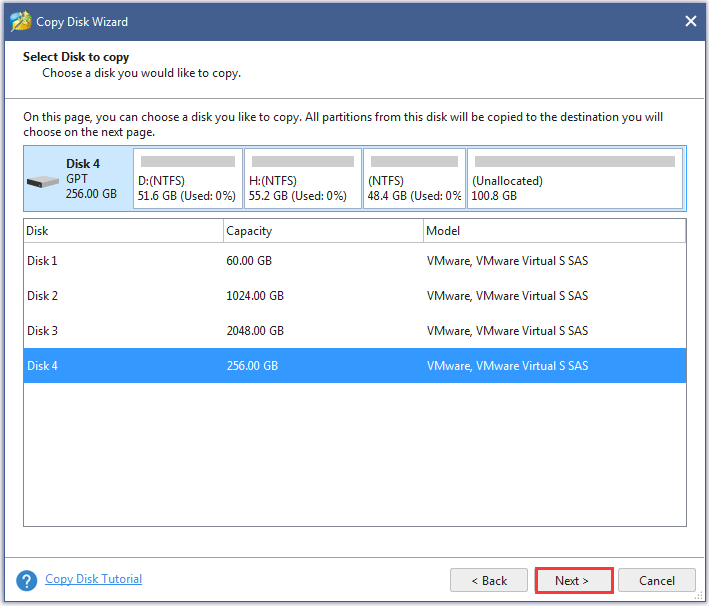
Step 5:Select the original internal hard drive and then click the Next button.
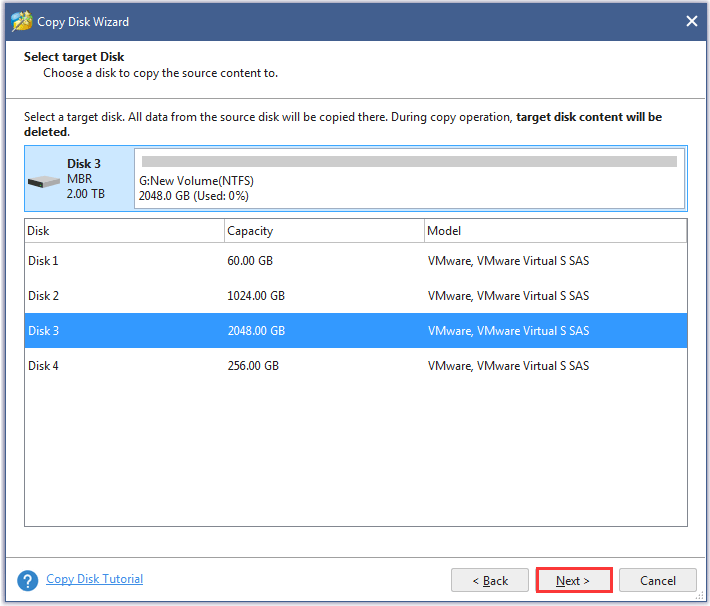
Step 6: Select the new internal hard drive and then click the Next button.
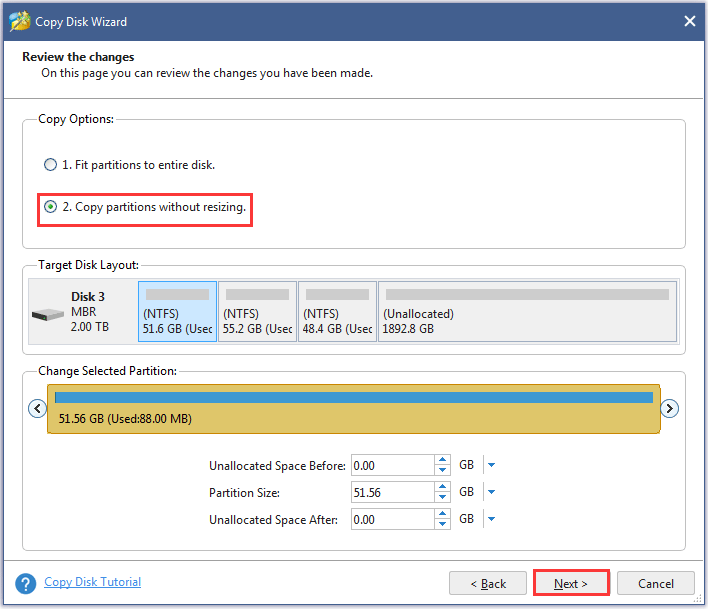
Step 7: Choose the Copy partition without resizing copying method and then click the Next button.
Step 8: Click the Apply button on the main interface and the software will execute the cloning task.
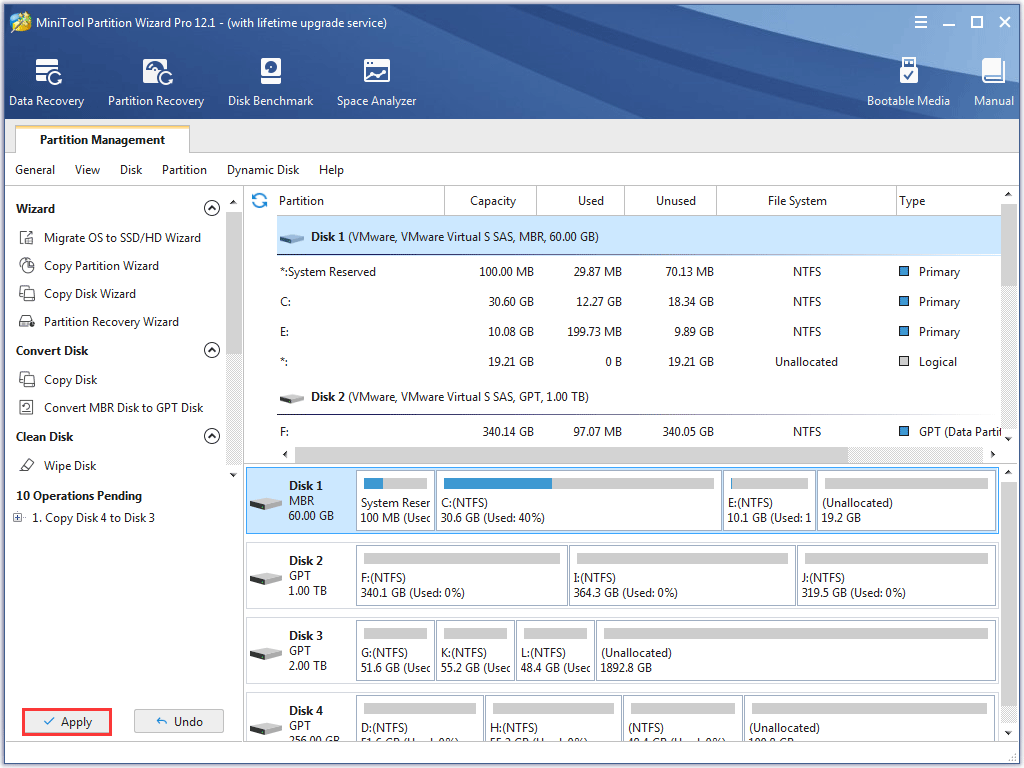
The new internal hard drive is large than 2TB:
In this case, MiniTool Partition Wizard is still helpful:
Step 1: On the main interface of MiniTool Partition Wizard, right-click the Temp Content partition and then choose the Copy feature.
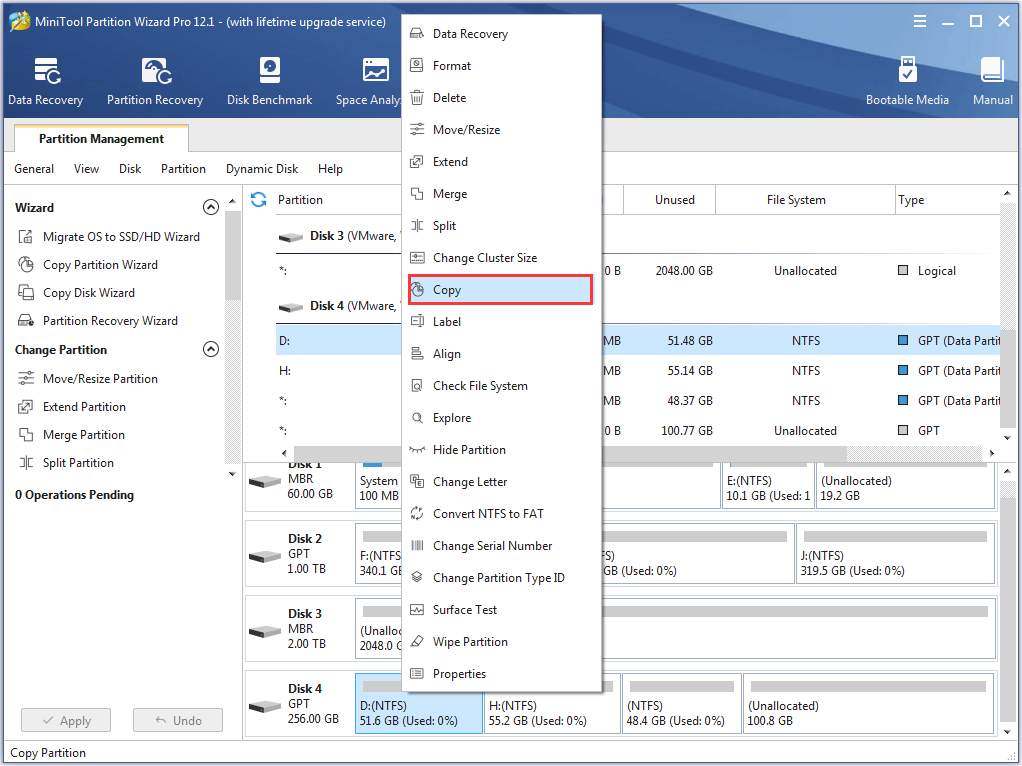
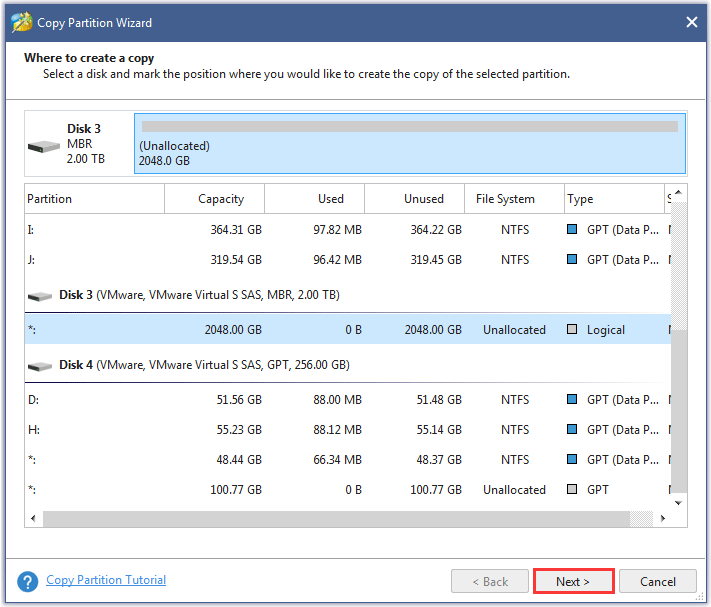
Step 2: Select the unallocated space on the new internal hard drive and then click the Next button.
Step 3: The software will display the partition size and location on the new internal hard drive. Click the Finish button.
Step 4: Repeat the above steps to copy the three partitions System Support, System Update, and System Update 2 to the new internal hard drive.
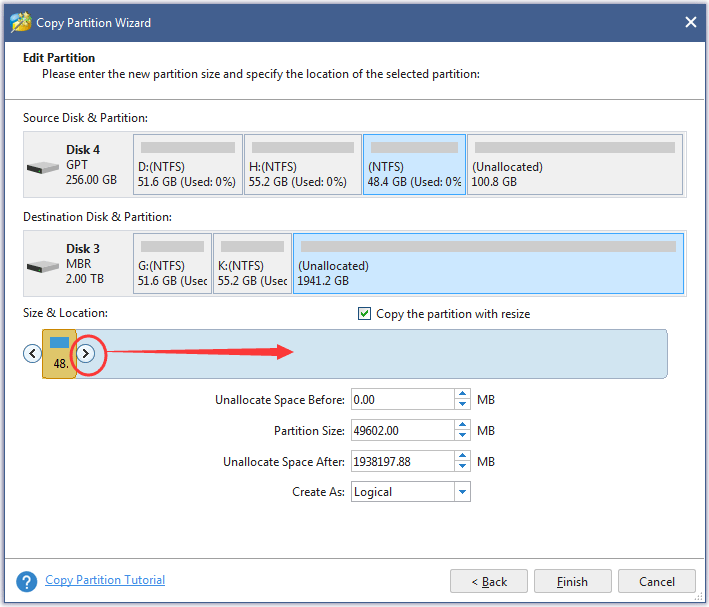
Step 5: Copy the User Content partition to the new internal hard drive.
- Repeat Step 1 – Step 2.
- On the Edit Partition page, drag the bar to the right space to occupy all the unallocated space.
- Click the Finish
Step 6: Click the Apply button on the main interface to execute all pending changes.
After upgrading, perform a test to check if the upgrade is successful.
Step 1: Just put the new internal hard drove into your Xbox One.
Step 2: Start your Xbox One.
Then, you can assemble your Xbox One and you can enjoy your video games on the console.
Way 2: Perform an offline system update (focusing on all Xbox One consoles except original Xbox One)
After removing the original internal hard drive, place the new internal hard drive in your Xbox One and then put removed parts back one by one.
Step 1:Go to the Xbox One offline system update page to download the offline system update files.
Step 2:Prepare a blank USB flash drive with a minimum 6GB of space and then format it to NTFS.
Step 3: Find the downloaded files on your PC and extract the files on the archive.
Step 4: Open the OSU1 folder and then copy the system update folder to the root directory of the USB flash drive.
Step 5: Safely remove the USB flash drive from your computer.
Step 6: Turn on your Xbox One and then use your controller to choose Troubleshoot.
Step 7: Plug the USB flash drive into the B port on the console.
Step 8: Once the Offline system update becomes active, select it.
Step 9: Wait for about ten minutes when the on-screen process comes to end.
Step 10: Follow the on-screen instructions to complete setting up the console.
If there is something unclear in the above tutorial, you can watch the video where a YouTuber details the way.
How to upgrade Xbox One hard drive? This post details two ways.Click to tweet
What to do with the original hard drive? You can format it to exFAT or FAT32 to use it as an external hard drive for your Xbox One. Apart from the way, you can read What to Do with Old Hard Drives? Reuse, Sell, or Destroy Them to learn about other disposal ways.
Bottom Line
What to do to get rid of the limited Xbox One hard drive space? the post has introduced two ways. One is adding an external hard drive. This way is easy but there is no remarkable gameplay performance improved. The other way is replacing the internal hard drive. It overcomes the shortcoming brought by the first way but it is hard and will destroy the warranty.
Which way you have picked? You can share your answer in the following comment zone.
If you have tried the second way and ran into some issues when using MiniTool Partition Wizard, please send an email to [email protected], we will contact you as soon as possible.
User Comments :