
Quick Answer
“An Operating System Wasn’t Found” usually means Windows cannot locate a bootable operating system. The most common causes include an incorrect boot order, damaged boot files (such as BCD or MBR), a disconnected SSD or HDD, or a corrupted system partition.
In most cases, using Startup Repair or rebuilding the boot configuration can resolve the problem without reinstalling Windows.
What Does “An Operating System Wasn’t Found” Mean
This “An Operating System Wasn’t Found” error means your computer firmware (BIOS or UEFI) cannot find a bootable Windows installation. When this error occurs, you can receive the error message below with the black screen:
An operating system wasn’t found. Try disconnecting any drives that don’t contain an operating system. Press Ctrl+Alt+Del to restart
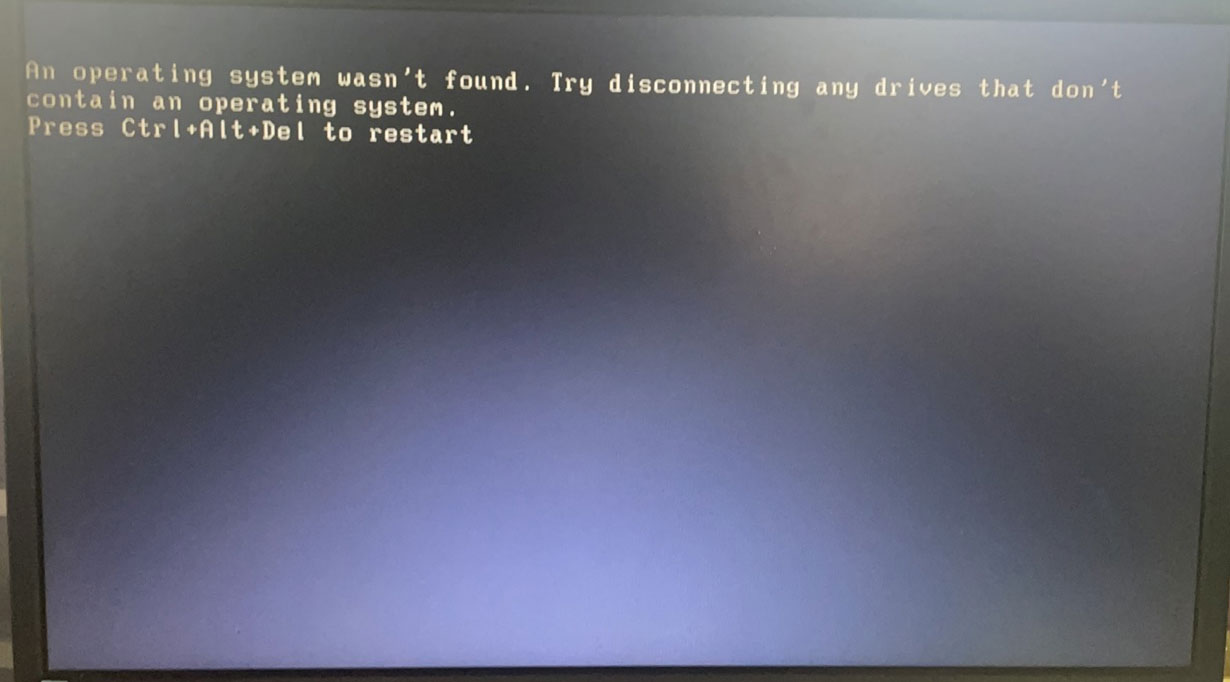
The operating system may still exist on the drive, but corrupted boot records, incorrect BIOS settings, or disk connection issues can prevent Windows from loading.
Common Causes of “An Operating System Wasn’t Found” Error
The error usually indicates that the firmware cannot locate a valid Windows boot partition. Common causes include:
- Corrupted MBR or EFI boot records
- Damaged Boot Configuration Data (BCD)
- Incorrect BIOS/UEFI boot order
- A disconnected or failing HDD/SSD
- An inactive system partition
- File system corruption after an interrupted update or power failure
The solutions below are arranged from the simplest to the most advanced.
How to Fix the “An Operating System Wasn’t Found” Error
Try the following solutions in order, starting with the easiest checks. After completing each method, restart your PC to see whether Windows starts normally before moving on to the next fix.
Fix 1: Disconnect External Storage Devices
External storage devices may prevent your PC from booting from the Windows system drive.
- Turn off your PC.
- Disconnect all external storage devices.
- Restart your PC and check whether Windows boots normally.
If Windows starts, reconnect the device after startup.
Fix 2: Check BIOS/UEFI Boot Order
An incorrect boot order may prevent your computer from finding the Windows installation.
- Restart your PC and enter the BIOS/UEFI setup.
- Open the Boot menu.
- Set Windows Boot Manager or your system drive as the first boot option.
- Save the changes and restart your PC.
Fix 3. Perform a Windows Startup Repair
If the error persists after checking the boot devices and boot order, try Startup Repair. It can automatically diagnose and repair common startup issues caused by damaged boot files or startup configuration.
Before using this method, you need to prepare a Bootable USB installation ready. To create it, you can refer to this post – How to Create Bootable USB from ISO Win10/11 for Clean Install.
Step 1: Now, you need to boot the PC from the USB drive to enter the Windows Recovery Environment.
Step 2: Press any key when the Press any key to boot from CD or DVD message appears on the screen.
Step 3: Select your language preferences in the Windows Setup interface, and click the Next button to continue
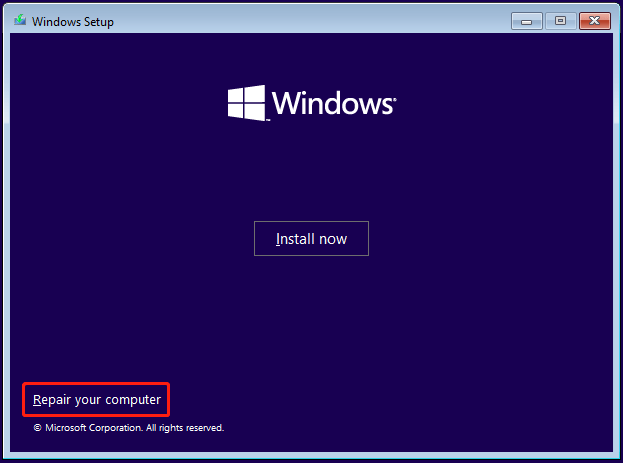
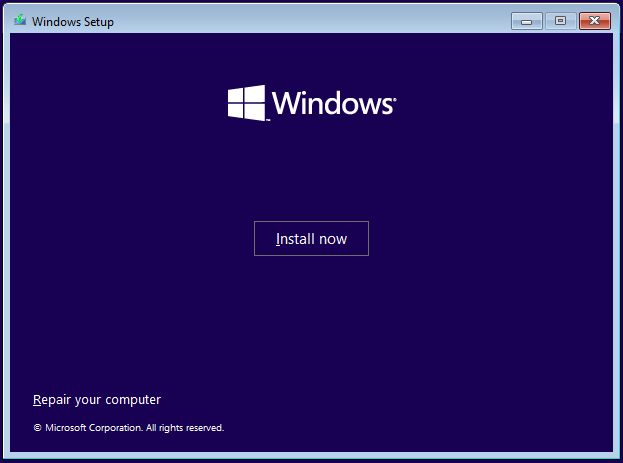
Step 4: In the next step, choose Repair your computer instead of clicking the Install now button.
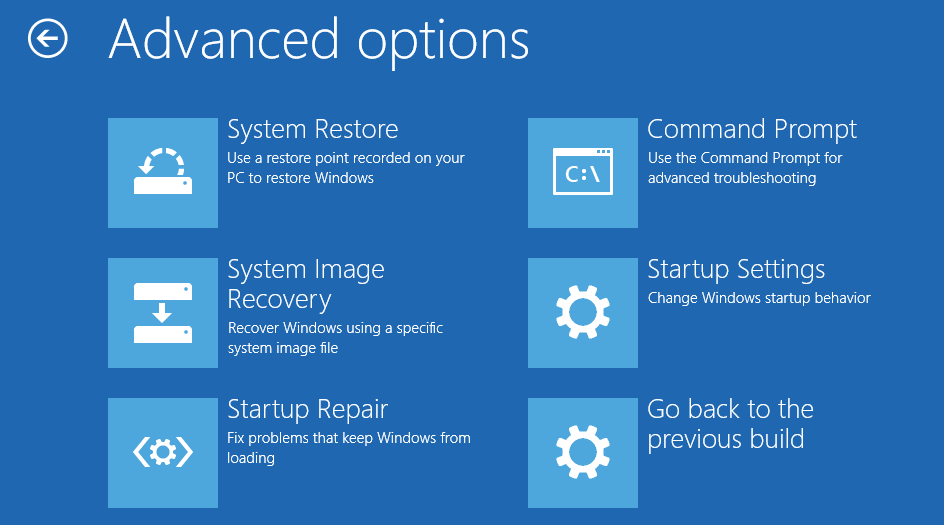
Step 5: Click Troubleshoot > Advanced options > Startup Repair.
Fix 4: Configure and Repair the Boot Files
If the above method doesn’t help fix “an operating system wasn’t found” in Windows 11, you can consider configuring and repairing the boot files. The Windows bootloader on your MBR disk may be damaged.
Step 1: Connect the Windows boot media to the computer and boot from it.
Step 2: Then, choose your language, time, currency, and your keyboard input method and click Next.
Step 3: At the next screen simultaneously press the Shift + F10 keys to open the Command Prompt application.
Step 4: Find out whether your disk is set to GUID Partition Table (GPT) or Master Boot Record (MBR).
- In Command Prompt, type diskpart and press Enter.
- Type list disk and press Enter.
- Look for your disk and see if the GPT column has an asterisk (*) – this will indicate the disk is GPT. If no asterisk is found, then the disk is set as MBR.
- Type exit and press Enter.
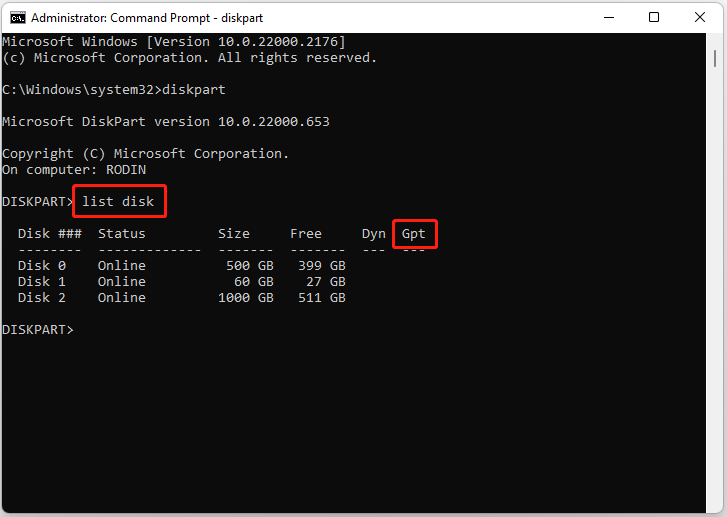
Step 5: Repair the disk. You need to go to the corresponding part based on your disk’s type.
If the type is MBR:
1. Type dir a: and press Enter.
If drive A: is found and a directory is displayed, check for the \Windows folder in the directory. If it is there, that is the System drive. Skip to step 2.
If the drive is not found or it doesn’t contain the \Windows folder, type dir b: and press Enter. Continue through the alphabet until the drive with the \Windows folder is found, but skip the X: drive.
2. Once it is found, type :bcdboot C:\Windows /S C:
In this case, C is the drive where the Windows folder was found. If the Windows folder is on a different drive, use that drive letter instead of C.
3. Type diskpart and press Enter.
4. Type list disk and press Enter.
5. Type select disk C and press Enter.
6. Type list volume and press Enter.
7. Type select volume C and press Enter.
8. Type active and press Enter.
You should get a confirmation that the volume has been successfully set as active.
9. Type exit and press Enter.
10. Reboot the device – you can do this quickly from the command prompt by typing: shutdown -f -r -t 00 and press Enter.
If the type is GPT:
1. Type dir a: and press Enter.
If drive A: is found and a directory is displayed, check for the \Windows folder in the directory. If it is there, that is the System Drive. Skip to step 2.
If the drive is not found or it doesn’t contain the \Windows folder, type dir b: and press Enter. Continue through the alphabet until the drive with the \Windows folder is found, but skip the X: drive.
2. Type diskpart and press Enter.
3. Type list disk and press Enter.
4. Type select disk C and press Enter.
In this case, C is the drive where the Windows folder was found. If the Windows folder is on a different drive, use that drive letter instead of C.
5. Type list part and press Enter.
Look for the partition labeled as System. Once it is found, assign the letter R to the partition. If the letter R is already taken, you can choose any unassigned letter. To assign the letter type assign letter=r: and press Enter.
6. Type the following command and press Enter after each line:
- cd /d r:\EFI\Microsoft\Boot\
- ren BCD BCD.bak
- bcdboot c:\Windows /l en-us /s m: /f UEFI
Fix 5: Rebuild MBR with MiniTool Partition Wizard
In this part, we will show you how to fix the master boot record if you don’t have the Windows installation CD/DVD. To fix MBR Windows 10 without CD, you need the help of an MBR repair tool. Thus, the MBR repair software – MiniTool Partition Wizard is strongly recommended.
MiniTool Partition Wizard can help you to fix MBR with ease on Windows 7/8/8.1/10/11, just requiring a few clicks. Now, you can get MiniTool Partition Wizard immediately.
MiniTool Partition Wizard DemoClick to Download100%Clean & Safe
Step 1: Install MiniTool Partition Wizard on a normal computer.
Tip: If you are running Windows 11, you need to create the bootable media on a normal computer that is also running Windows 11.
Step 2: Launch it to enter its main interface.
Step 3: Click the Bootable Media feature which can help you to boot your computer.
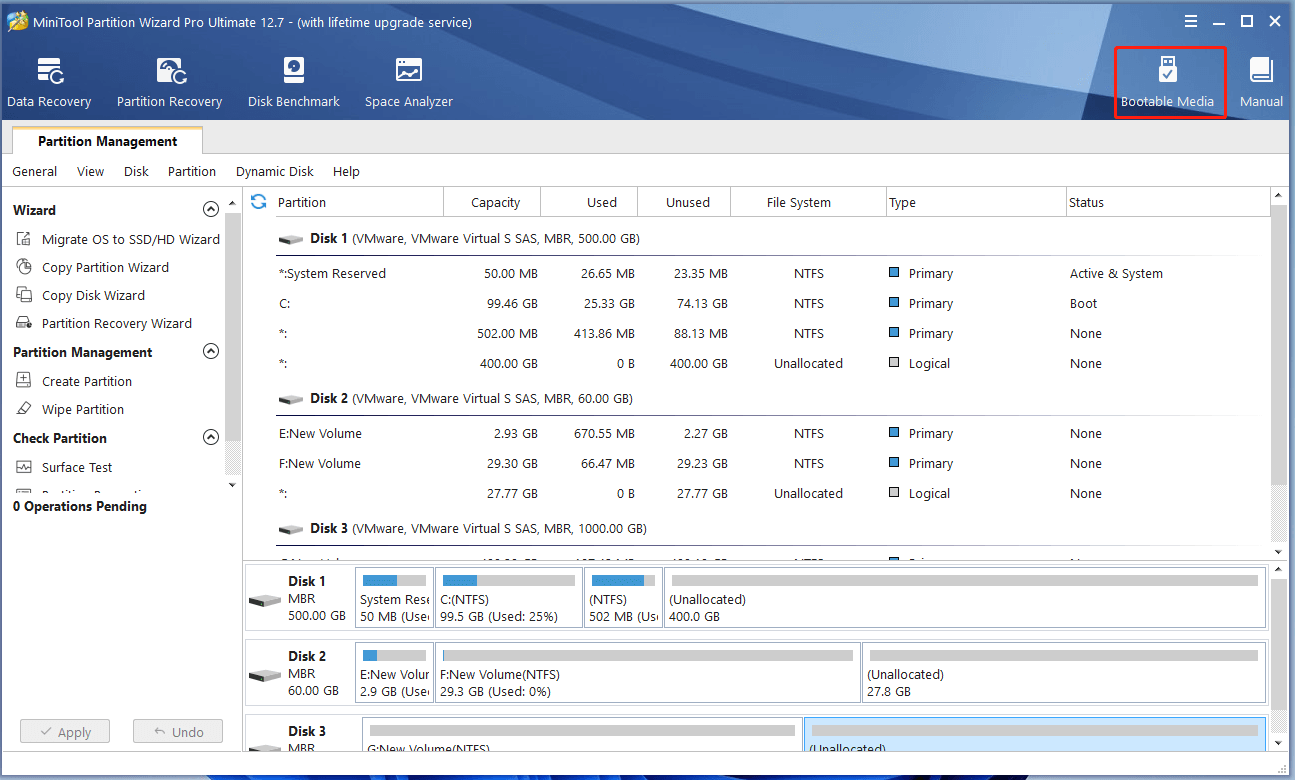
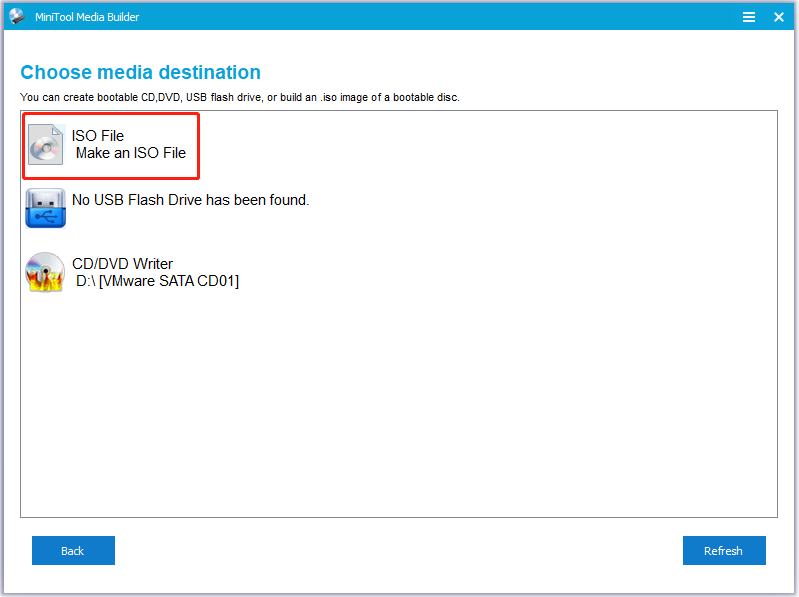
Step 4: Choose WinPE-based media with MiniTool plug-in. Then, choose the media destination. You just need to wait for the creation process to finish.
Step 5: Connect the bootable media to your computer that meets the “an operating system wasn’t found” issue.
Step 6: Change BIOS order and boot the computer from the MiniTool bootable media.
Step 7: Enter MiniTool Recovery Environment. Select the system disk and right-click it to choose Rebuild MBR.
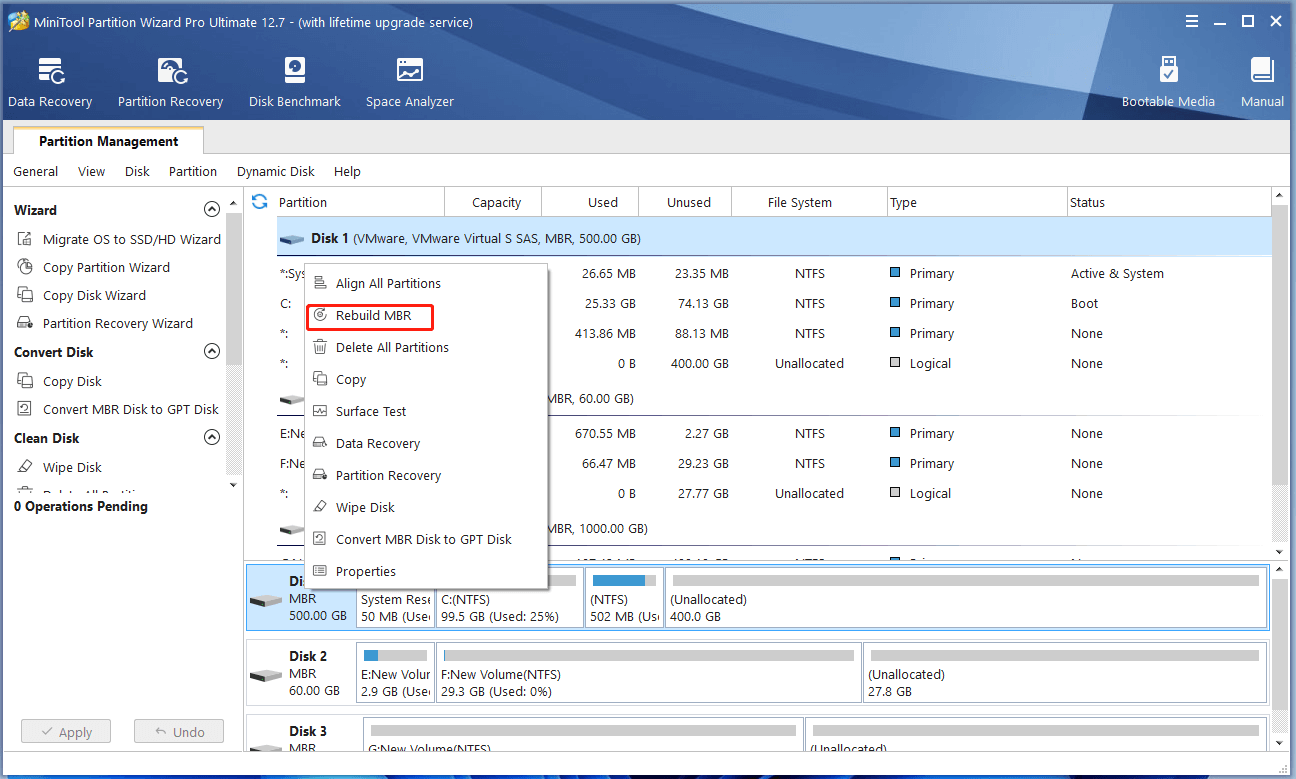
Step 8: Click Apply to confirm the changes. After you have finished all steps, you can reboot your computer to check whether your computer can boot normally.
Fix 6: Reinstall the Windows
The last method for you to fix the “an operating system wasn’t found. Try disconnecting any drives that don’t contain an operating system” issue is reinstalling the Windows.
Tip: We strongly recommend that you should back up your important data in disk C before making this kind of this huge change to your PC since it may cause data loss. To do that, you can try the file backup program – MiniTool ShadowMaker.
MiniTool ShadowMaker TrialClick to Download100%Clean & Safe
Step 1: Create Microsoft’s media creation tool or Windows 11 iSO file on any working computer.
Step 2: Insert the Windows 11 USB drive into the PC that meets the “an operating system wasn’t found” issue.
Step 3: Boot the PC and enter its BIOS menu to set the PC to boot from the USB.
Step 4: When the Windows Setup screen appears, choose your language and keyboard. Then, click Next.
Step 5: On the next page, click Install Now.
Step 6: On the Activate Windows page, click I don’t have a product key.
Step 7: Choose your Windows 11 edition and click Next.
Step 8: Accept the Microsoft software license, and then click Next.
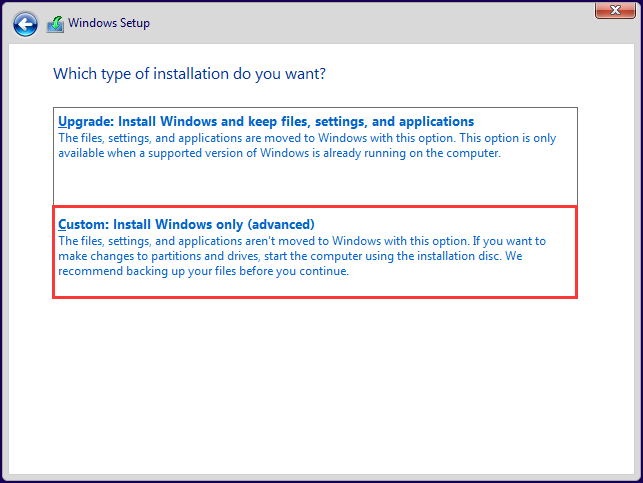
Step 9: Choose which type of installation you want. You can choose the Upgrade option or the Custom: Install Windows only (advanced) option.
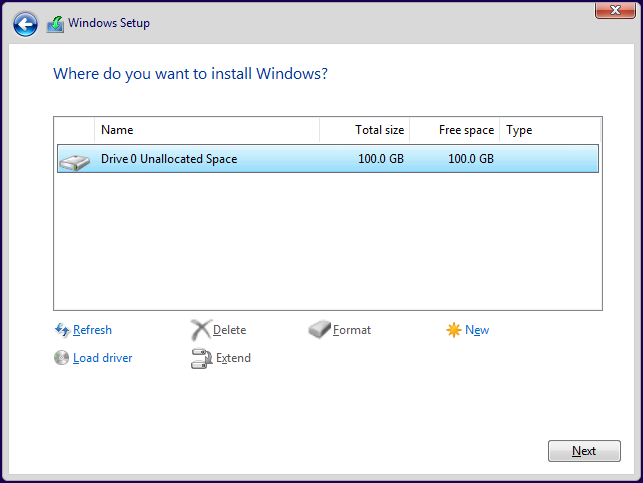
Step 10: Choose the drive partition where you want to install Windows 11.
Situation A: If you only have a new drive connected, you will see a Drive 0 Unallocated Space listed there. To install Windows 11 on a new hard drive, just select it and click Next.
Situation B: If you have got more than one hard drive connected to your PC, you’ll be shown a screen with several drives called Drive 0, Drive 1, etc. And if a drive is already partitioned, you will see Drive 0 Partition 1, Drive 0 Partition 2, Drive 0 Unallocated Space, etc.
In Situation B, you have 2 options, which are to install Windows 11 on the original system partition or to delete all partitions (by selecting each one and clicking the Delete option). This will erase all data on the partitions, so double-check that you’re deleting partitions from the correct drive and make sure you have already backed up everything you need.
Step 11: Just follow the remaining instructions on the screen.
If reinstalling Windows does not resolve the error, the system drive may have hardware issues. In this case, check the drive’s health or consider replacing it if necessary.
Back Up Your System to Prevent Future Boot Issues
After resolving the “An Operating System Wasn’t Found“ error, it’s a good idea to create a system image. If the problem occurs again, you can restore Windows much faster instead of repeating the troubleshooting process.
To do that, it is highly recommended to use MiniTool ShadowMaker. This software enables you to back up files and keep them safe from an unbootable computer. Besides this, it can also back up disks, partitions, and even the operating system.
Now, download MiniTool ShadowMaker Trial from the following button or choose to purchase an advanced edition.
MiniTool ShadowMaker TrialClick to Download100%Clean & Safe
Step 1: After downloading and installing MiniTool ShadowMaker, launch it.
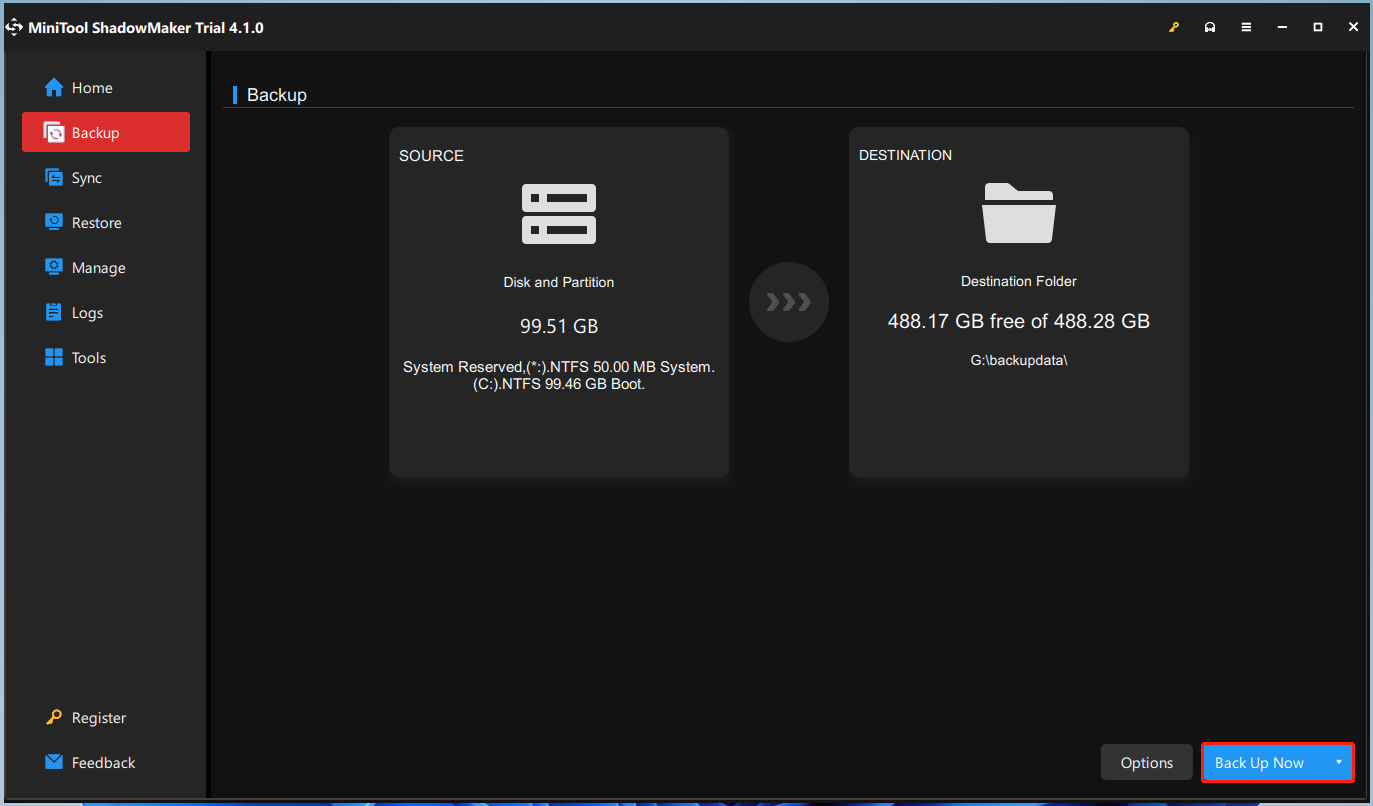
Step 2: Go to the Backup tab and you can find that system partitions have been selected by default.
Step 3: Then, click the DESTINATION part to choose a location to store the system image file.
Step 4: At last, click the Back Up Now button to start the backup task right now.
If Windows becomes unbootable again, simply boot from the recovery media and restore the previously created system image.
How to Prevent This Error in the Future
To reduce the chance of seeing this error again:
- Create regular system backups.
- Avoid interrupting Windows updates.
- Check your SSD or HDD health periodically.
- Verify the boot order after replacing hardware.
- Keep Windows installation media or a recovery drive available.
An Operating System Wasn’t Found FAQ
Summary
The “An Operating System Wasn’t Found” error often results from incorrect boot settings, damaged boot files, or storage issues. First, disconnect external drives and check the boot order. If needed, use Startup Repair or other advanced repairs.
Consider creating a system backup for quicker recovery in the future. For MiniTool ShadowMaker issues, contact [email protected].
About The Author

Position: Columnist
Charlotte is a technology columnist with a strong focus on the Windows operating system, specializing in disk management, backup, and data recovery. She is passionate about analyzing computer errors, identifying root causes, and delivering practical solutions. In her free time, she stays updated on the latest developments in computer systems and hardware while continuously learning new technologies to broaden her expertise. Her writing style is clear and easy to understand, making complex technical topics accessible even to users with limited computer knowledge.
User Comments :