Do you want to clone Dell XPS SSD to another SSD for more space or a hardware upgrade? This guide from MiniTool provides step-by-step instructions for two tools - Dell SupportAssist OS Recovery and MiniTool ShadowMaker.
Hey guys, I have an XPS 8900 with a 1 T hard drive that's maxed out, I am getting a "Samsung - 860 QVO 2TB Internal SATA Solid State Drive" to replace it, I want to just clone my original to the new SSD, Can someone point me in the right direction on how this is done and the best way to do it?Dell
Currently, the Dell XPS series includes Dell XPS 12, Dell XPS 13 (9360, 9370, 9380, 7390, etc.), Dell XPS 15 (7590, 9570, 9560, etc.), and so on. Some Dell XPS computers come with a built-in 128 GB or 256 GB SSD. Users want to clone Dell XPS SSD to another SSD for the following reasons:
1. For better performance: Over time, your Dell XPS computer may become very slow. Replacing the Dell XPS SSD with another SSD can gain better performance and faster speed.
2. Replace a failed Dell XPS SSD: You may receive a message from Windows – “Windows has detected a hard drive problem. Back up your files now to prevent information loss.” You should replace it.
What to Do Before Cloning
There are some things you need to notice before cloning Dell XPS SSD to another SSD.
1. Choose the suitable SSD compatible with your Dell XPS PC/laptop.
2. Back up the important data in the old SSD to avoid data loss during cloning.
How to Clone Dell XPS SSD to Another SSD
How to clone Dell XPS SSD to another SSD? There are 2 tools for you – Dell SupportAssist OS Recovery and MiniTool ShadowMaker.
Tool 1: Dell SupportAssist OS Recovery
To clone Dell XPS SSD to another SSD Windows, Dell SupportAssist OS Recovery is a great tool. It is a piece of Dell built-in software that provides a recovery environment that consists of tools to diagnose and fix issues occurring on your computer when you boot into the operating system. The following are the basic requirements for using its disk cloning feature:
- The primary drive must be bootable to Windows.
- BitLocker must be disabled.
- The secondary SSD must have more disk space than the original SSD.
- The power adapter is connected throughout.
1. Boot your Dell PC/laptop, and press the F12 key continuously during the boot to open One-Time Boot Settings. Then, click SupportAssist OS Recovery.
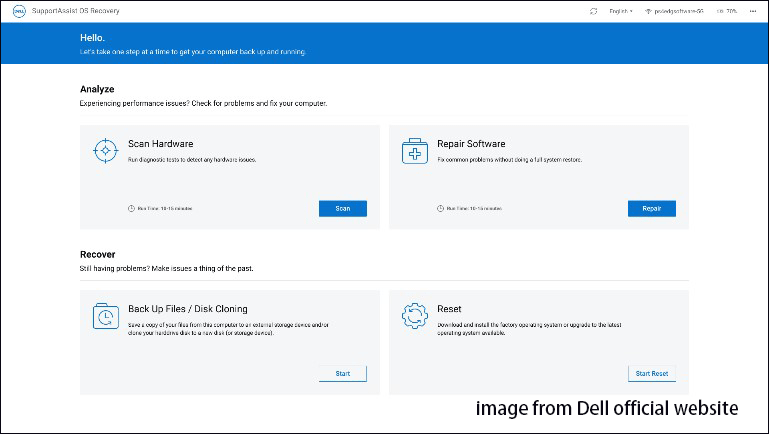
2. Under the Recover part, choose Back Up Files / Disk Cloning. Click Start to continue.

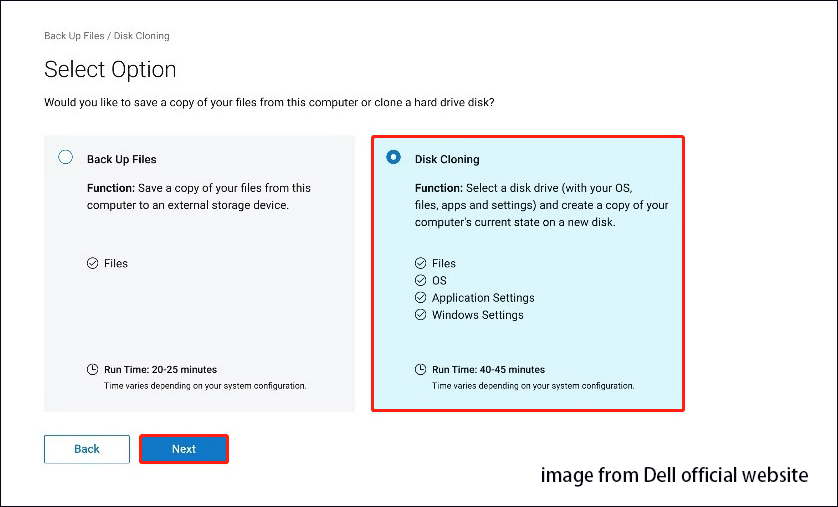
3. Select Disk Cloning and click Next.

4. Select one of the following options based on your needs and click Next.
- Hard drive that is already installed: This option should be selected when cloning an internal hard drive or SDD to a secondary internal computer hard drive or SDD.
- Hard drive in a USB housing: This option should be selected when cloning an internal hard drive to an external USB enclosure that contains a hard drive or SDD.
- USB storage device: This option should be selected when cloning from an internal hard drive or SDD to an external USB drive.
5. Select the new SSD as the destination drive and then click Next.
6. Click Next to confirm the disk cloning information. Once the cloning process is complete, click Continue to turn off the computer.
7. After that, replace the original SSD with the new SSD manually.
Tool 2: MiniTool ShadowMaker
The second tool that can be used to clone Dell XPS SSD to larger SSD is MiniTool ShadowMaker. It is professional PC backup software that supports data migration with multiple SSD brands including Dell, Crucial, Samsung, Western Digital, etc. It not only allows you to clone SSD to larger SSD, but also supports system backup. Now, let’s see how to use its Disk Clone feature.
Note: If you want to perform the system disk cloning, MiniTool ShadowMaker requires you to buy a license key to register this software.
MiniTool ShadowMaker TrialClick to Download100%Clean & Safe
1. Launch MiniTool ShadowMaker and click Keep Trial.
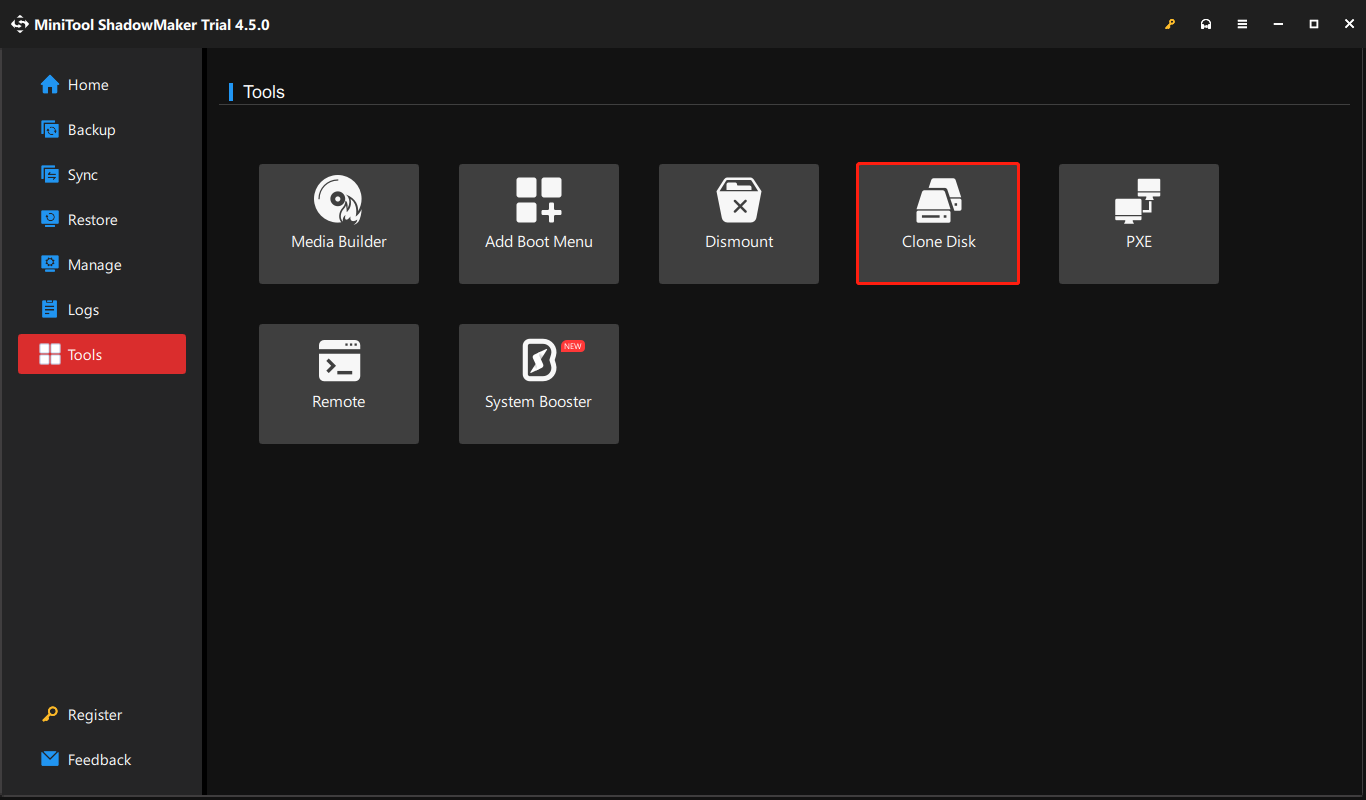
2. Go to the Tools page and click the Clone Disk tab to continue.

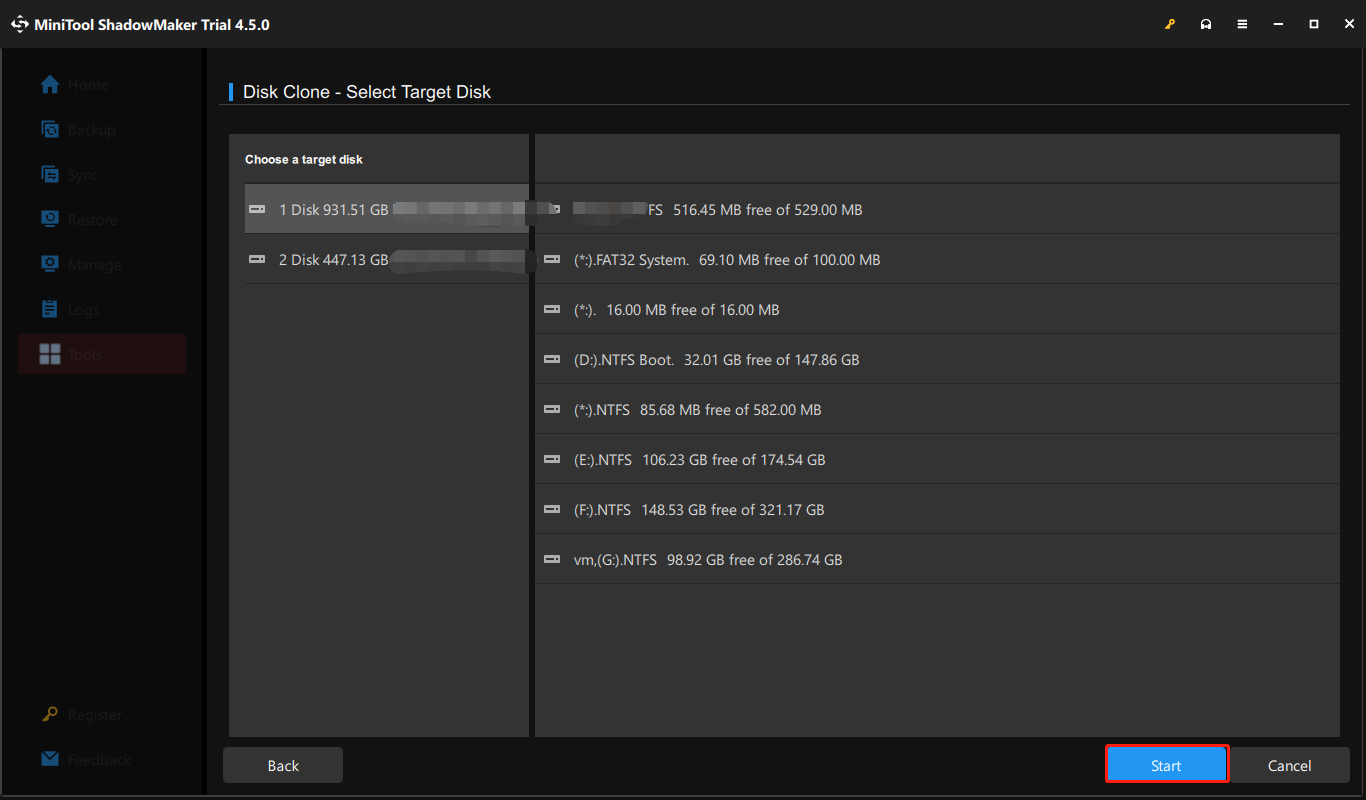
3. Next, you are required to choose the source disk and the target disk for cloning. Please set the Dell XPS SSD as the source disk and another SSD as the target disk.
4. Click Start to continue. You just need to wait patiently.

5. After the cloning, you need to replace the original SSD with the new SSD manually.
Related posts:
- How to Install SSD in PC? A Detailed Guide Is Here for You!
- What to Do After Installing New SSD on Windows 10/11? [7 Steps]
Bottom Line
As time goes on, your Dell XPS PC/laptop’s speed may slow down or its storage may fill up. Thus, to increase its speed and gain more storage space, replacing its original HDD or SSD is a great choice. This tutorial has introduced how to clone Dell XPS SSD to another SSD without losing data.
User Comments :