
Quick Answer
Driver signature enforcement is a built-in Windows security feature to block the installation of unverified, unsigned drivers. If you need to install unsigned drivers in Windows 11/10, you can disable driver signature enforcement.
The following are the temporary and permanent methods:
- Change the startup settings (temporary)
- Modify local group policy
- Enable test signing mode via BCDEdit
What Is Driver Signature Enforcement
Driver signature enforcement is a built-in security feature in Windows 11/10/8.1/8/7 that ensures only digitally signed drivers load at startup.
It verifies the integrity and authenticity of device drivers and checks if they are digitally signed by Microsoft or a trusted developer. If not, Windows blocks the installation of those drivers and prevents them from running.
When Should You Disable Driver Signature Enforcement
Although driver signature enforcement improves system security, you may need to disable it in some situations.
- Install legacy essential or older hardware drivers that are no longer digitally signed.
- Install and test custom or self-developed drivers.
- Use specialized enterprise or industrial devices that rely on community-maintained drivers.
- Install unsigned drivers for discontinued hardware that is no longer supported by the manufacturer.
Back Up Your PC Before Making System Changes
Disabling driver signature enforcement can change the way Windows starts up. Although the process is generally safe, a mistake can prevent the system from loading properly.
Before proceeding, create a system image with MiniTool ShadowMaker. It is dedicated backup software, allowing you to create backups of systems, files, folders, disks, and partitions. If something goes wrong, you can perform a quick system recovery.
MiniTool ShadowMaker TrialClick to Download100%Clean & Safe
Step 1: Connect an external hard drive to your PC.
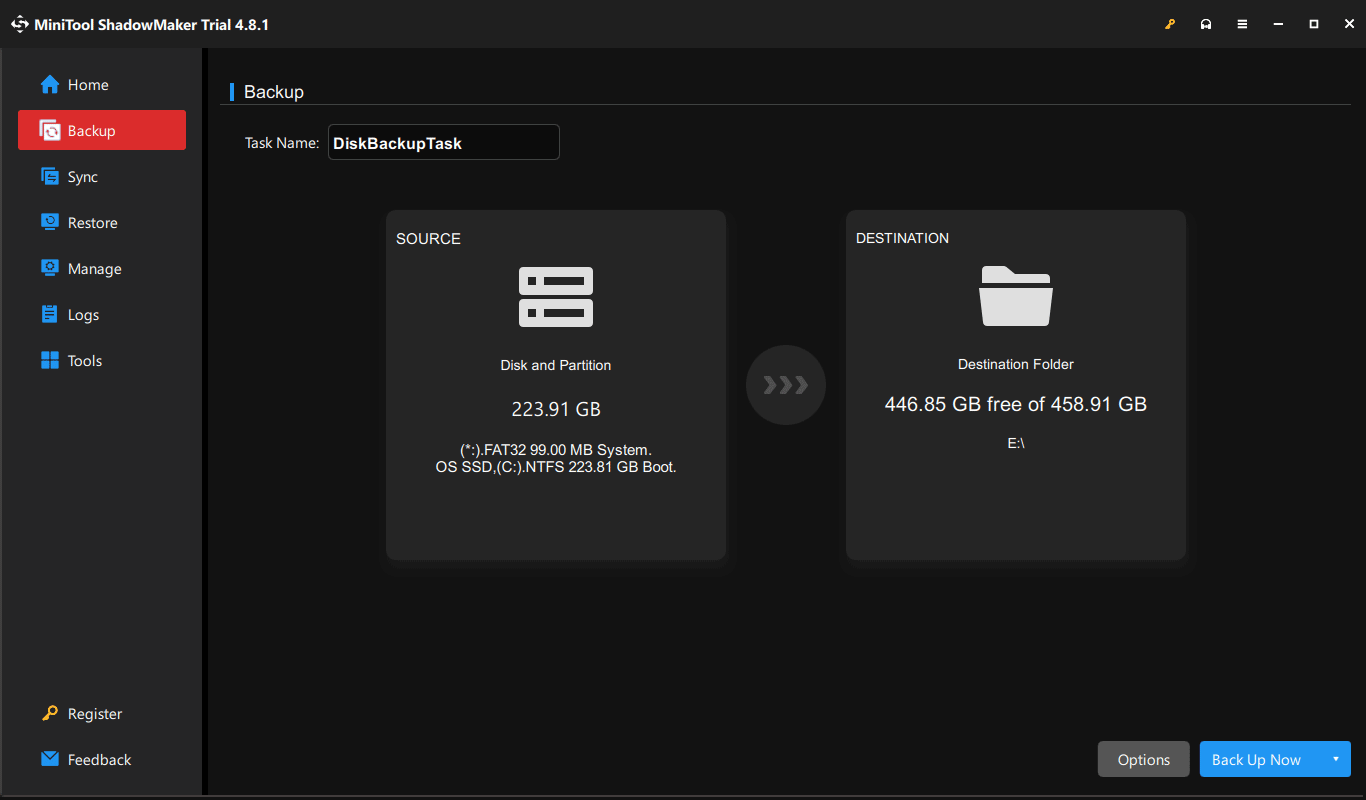
Step 2: Launch MiniTool ShadowMaker and go to Backup.
Step 3: System drives are automatically selected as the backup source. Click DESTINATION and choose the external drive to save the system image.
Step 4: Click Back Up Now to start system backup.
After backup, disable driver signature enforcement to install unsigned drivers.
Best Methods to Disable Driver Signature Enforcement Windows 11/10
Driver signature enforcement can be disabled either temporarily or permanently, depending on your needs. The table below compares each method to help you choose the right one.
| Method | Temporary or Permanent | Difficulty | Best for |
| Change startup settings | Temporary | Easy | Installing an unsigned driver |
| Edit local group policy | Permanent | Medium | Professional and Enterprise editions |
| Enable test mode via BCDEdit | Permanent until disabled | Medium | Driver developers and testing |
How to Disable Driver Signature Enforcement Temporarily via Startup Settings
Best for: Installing a single unsigned driver.
Changing the startup settings is the easiest way to disable driver signature enforcement.
However, this change is temporary and only applies to the current startup session. After you restart your computer, Windows will automatically enable this security feature.
Follow these steps:
Step 1: Click Restart from the Start menu and hold down the Shift key on your keyboard at the same time.
Step 2: Once the computer has rebooted, choose the Troubleshoot option when a new window pops up and then choose Advanced options > Startup Settings.
Step 3: Click the Restart button to restart your computer one last time to modify boot time configuration settings.
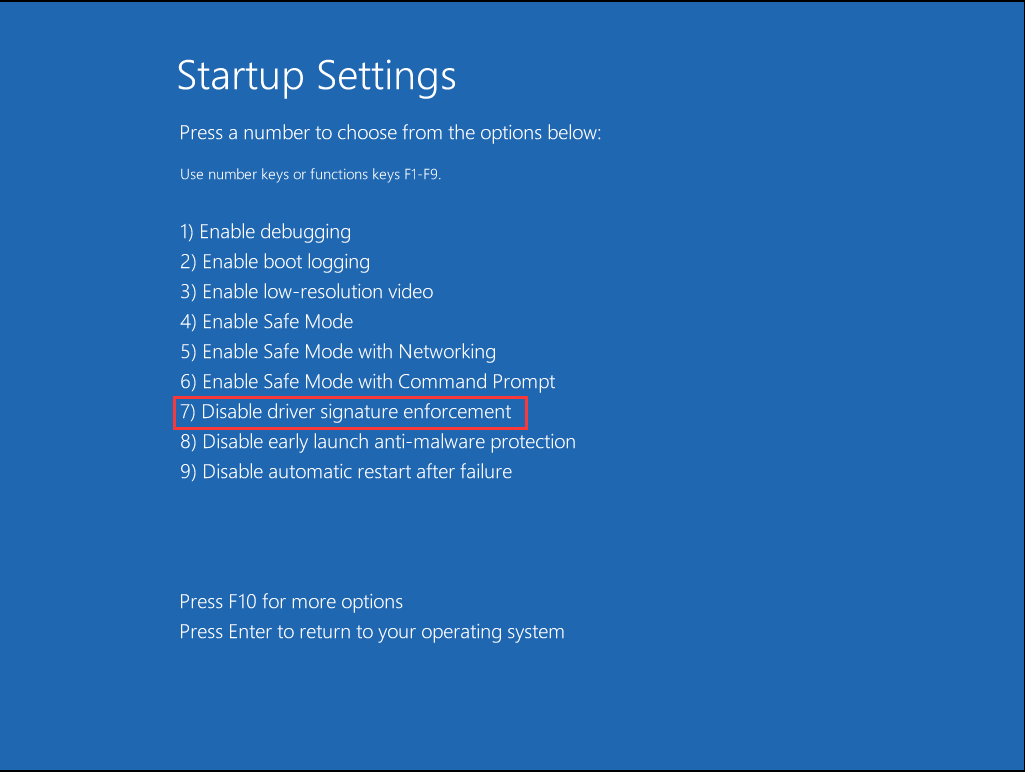
Step 4: A list of options will show up. Press F7 on your keyboard to choose Disable driver signature enforcement.
How to Permanently Disable Driver Signature Enforcement Windows 11/10
If you want to permanently disable driver signature enforcement, use these two methods:
- Modify local group policy
- Enable test signing mode
Method 1: Use Local Group Policy
Best for: Windows Pro, Enterprise, or Education editions.
Step 1: Press the Windows key + R key at the same time to open the Run dialog box. Next, type gpedit.msc in the Run box and press Enter to open Local Group Policy Editor.
Step 2: Once in the Local Group Policy Editor window, navigate to User Configuration > Administrative Templates > System > Driver Installation from the left panel.
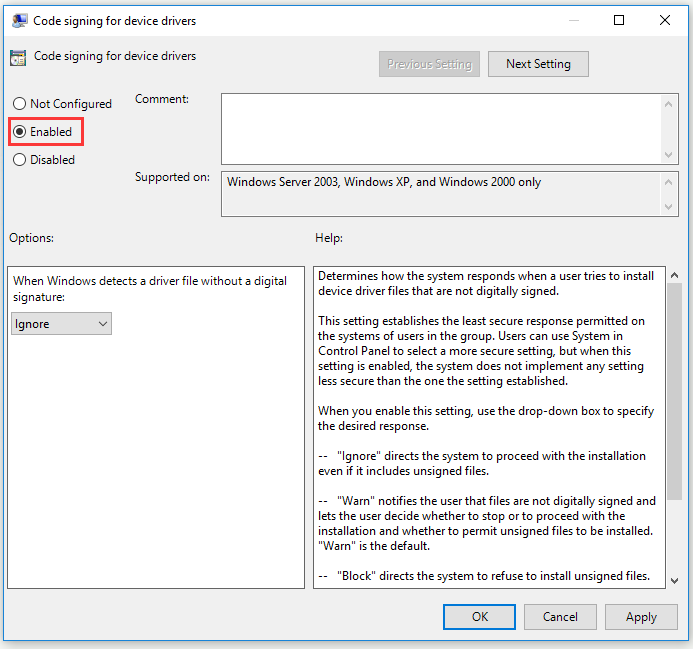
Step 3: Right-click the Code signing for device drivers entry and then select Edit.
Step 4: Now check Enabled and then choose Ignore from the drop-down list under Options.
Step 5: Click OK and then click Apply to perform all the changes.
Step 6: Restart your Windows 10 system in the end.
Now you should disable driver signature enforcement successfully and you can install the unsigned drivers.
Method 2: Enable Test Mode
Best for: Driver developers, software testing, and long-term testing environments.
Windows test mode allows developers to install and test hardware drivers that are not digitally signed. In this mode, driver signature enforcement is disabled.
Step 1: Type cmd in the Search bar, right-click Command Prompt and then choose Run as administrator to open it with administrator privileges.
Step 2: Type the command: bcdedit /set testsigning on and then press Enter to run the command.
Step 3: Close the Command Prompt window and restart your computer.
Then, you can install any unsigned drivers without encountering problems.
After testing, open Command Prompt as administrator and run the bcdedit /set testsigning off command to exit this mode.
Conclusion
Driver signature enforcement blocks unsigned drivers to keep Windows secure. However, if you need to install one, choose the proper method to disable it. Ensure you re-enable this feature after the installation to avoid online threats.
Before disabling it, use MiniTool ShadowMaker to create a system image backup. If you have issues with this software, contact us at [email protected].
Disable Driver Signature Enforcement FAQ
About The Author

Position: Columnist
Vera has been working at the MiniTool Team for over 10 years as a technical editor and content writer. She mainly focuses on disk and partition management, data recovery, Windows backup and restore, and PC troubleshooting. Through in-depth software testing and hands-on experience, she has helped users solve a wide range of computer problems and better protect their data on Windows devices.
User Comments :