NVR/DVR hard drive replacement is feasible when videos use up the storage space. This guide from MiniTool focuses on how to easily upgrade and install/replace the hard drive in your DVR or NVR from various brands such as Lorex, Night Owl, CCTV, Swann, Hikvision, etc.
In nowadays society, video surveillance is increasingly important for public safety, crime prevention, and traffic management. For example, security cameras have evolved as significant tools to keep away any activities including break-ins, theft, and vandalism. Those cameras offer real-time monitoring, facilitating businesses, the community, and individuals.
Reliable and efficient video storage plays a crucial role in video surveillance systems. On the market, DVR and NVR are two popular options. Speaking of famous brands, you may have heard of Lorex, Night Owl, CCTV, Swann, Hikvision and more.

If you are such a user, you may wonder about DVR hard drive replacement or NVR hard drive replacement. Let’s take a look at the comprehensive guide to find everything you want, not limited to how to replace/install a hard drive in DVR/NVR.
Why Need NVR/DVR Hard Drive Replacement
Typically, most DVRs (Digital Video Recorders) come with built-in hard drives to offer storage space for video recording. However, the storage capacity is usually limited, for example, Lorex 1080p (8 Camera Capable) 1TB Wired DVR System, Night Owl 1080p HD Wired Home Security DVR with 1TB Hard Drive, etc.
For NVRs, there are two storage solutions – an internal hard drive built into the on-prem hardware or NAS (Network Attached Storage) connected to the NVR system.
The internal hard drive in a DVR or NVR is enough for home to use but it cannot satisfy the needs of businesses when considering recording a multitude of videos. Sometimes, the internal disk goes wrong and stops working sooner or later. This is why you choose NVR/DVR hard drive replacement – upgrading your disk or backing up disk data to avoid loss.
Recommended NVR/DVR Hard Drives
Before elaborating on how to replace a hard drive in your DVR or NVR, let’s spotlight on some recommended NVR/DVR hard drives.
Seagate SkyHawk Surveillance Hard Drives
The SATA hard drive series offers various storage capacities, including 1TB, 2TB, 3TB, 4TB, 6TB, and 8TB. They are optimized for DVRs and NVRs and tuned for 24×7 workloads to ensure seamless video footage capture.
WD Purple Surveillance CCTV NVR & DVR Hard Drives
The WD Purple SATA Hard Drive series also offers 1TB, 2TB, 3TB, 4TB, 6TB, and 8TB storage capacity. They are designed to meet 24×7, always-on, and high-definition video surveillance recording. The exclusive AllFrame technology greatly reduces errors, frame loss, and video interruptions in a video recorder system and improves overall video playback.
WD Purple Pro Surveillance Hard Drives
WD Purple Pro drives are mainly designed for new generations of high-end AI-enabled recorders, deep-learning servers, and video analytics appliances. They offer fairly large storage space, such as 8TB, 10TB, 12TB, 14TB, 18TB, 22TB, and 24TB. They feature the AllFrame AI technology to reduce frame loss and improve overall video playback.
In addition to these drive series, Seagate SkyHawk AI NVR/DVR hard drives are recommended. Besides, you can search for one surveillance hard drive on Amazon. Choose the proper one that should be compatible with your recorders. Next, it is time to implement Lorex hard drive replacement, Night Owl hard drive replacement, or disk replacement in other DVRs or NVRs.
Clone DVR Hard Drive to a Larger One
Your old DVR or NVR hard drive may be filled with videos but you want to still keep them and store them on another hard drive rather than deletion. In this case, prepare a larger surveillance hard drive and clone the old disk to the new one.
Or you decide to transfer all the disk data from the old hard drive in your DVR/NVR to an external hard drive for backup when the old disk is faulty. At this time, cloning will be ideal.
Speaking of cloning a DVR hard drive to another hard drive, we recommend running the hard drive cloning software, MiniTool ShadowMaker. Aside from system backup, disk backup, partition backup, and file backup, this program features disk cloning, allowing cloning HDD to SSD, cloning a hard drive to another such as HDD/SSD/external hard drive, cloning an SD card to another, cloning a USB flash drive, etc.
How can you clone DVR hard drive/clone NVR hard drive? Here are the instructions.
Step 1: Download MiniTool ShadowMaker and install it on your Windows 10/11 computer.
MiniTool ShadowMaker TrialClick to Download100%Clean & Safe
Step 2: Connect your NVR/DVR hard drive to your PC. If you don’t know the detailed steps, find details from this guide on DVR hard drive. Also, connect the large hard drive you have prepared to the same computer.
Step 3: Launch MiniTool ShadowMaker and click Keep Trial to proceed.
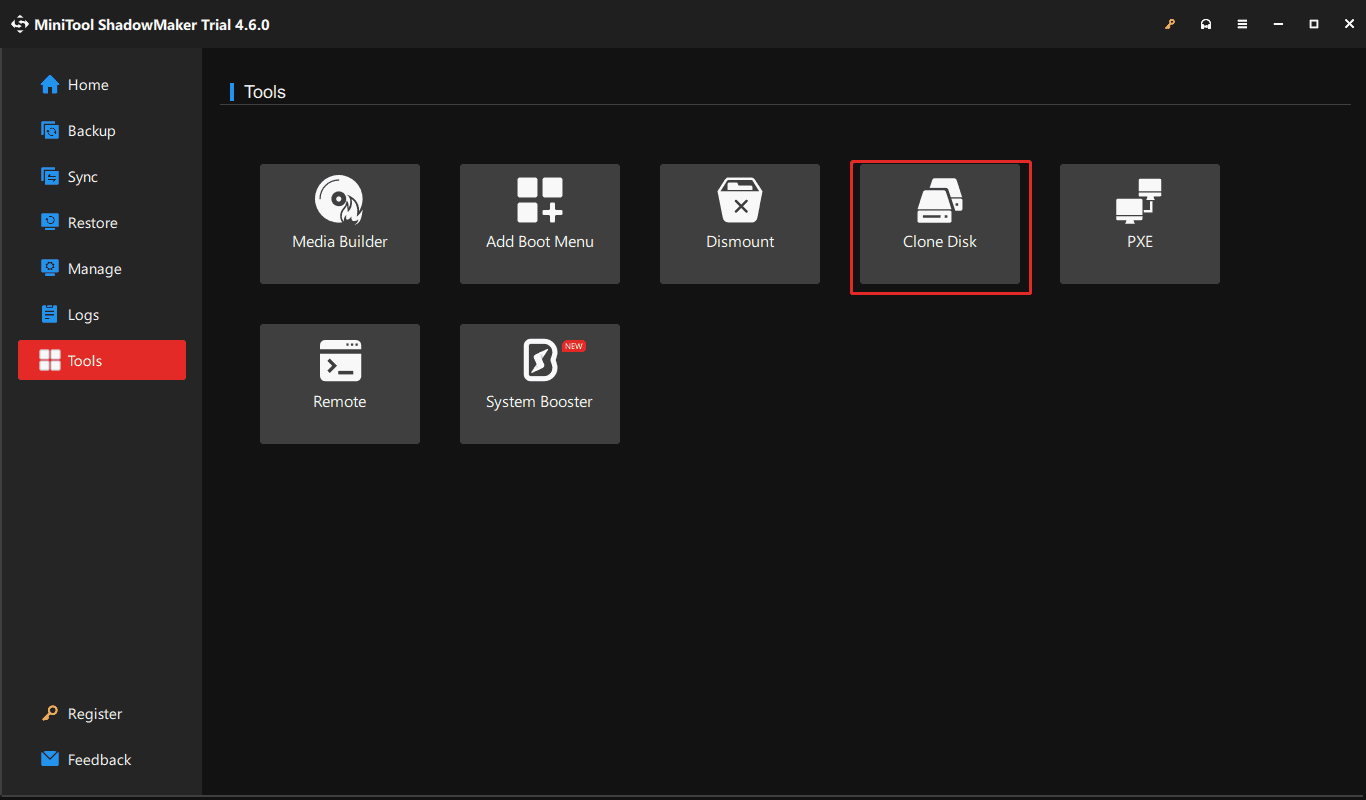
Step 4: Navigate to Tools on the left side and choose Clone Disk to continue.
Step 5: In the new windows, select the original DVR/NVR hard disk as the source drive while choose the new connected hard drive as the target drive.
Step 6: Finally, click Start to begin the cloning process. Depending on the data size, the cloning time varies. The option of Shut down the computer when the operation is completed is useful if you don’t want to wait in front of the computer.
Now you have an exact copy of the original hard drive for backup or upgrade.
After accomplishing disk cloning, you should install a hard drive to your DVR or NVR.
Install HDD in DVR/NVR
Some steps below involve removing the old surveillance hard drive and installing a new one in the original place. Follow the instructions as per your cases. If you have removed the disk before cloning and connected it to your PC, now you only need to install another one. Skip to the steps you need.
Remove NVR/DVR Hard Drive
Step 1: Before starting, power off your recorder and make sure to disconnect all the power cables and unplug the power outlet.
Step 2: Put your DVR/NVR on a stable and flat surface for easy operation.
Step 3: Prepare a Phillips head screwdriver and remove the screws on the side/back of the recorder.
Step 4: Carefully lift the lid or remove the case if possible to access the hard drive.
Step 5: Unplug the power and SATA cables that are connected to the pre-installed hard drive. Find the screws that hold the hard disk in place and remove them. Hold the disk to avoid dropping it while unscrewing.
Install: NVR/DVR Hard Drive Replacement
After removing the pre-installed hard drive from your recorder, you need to install a new disk for replacement.
Step 1: Put the cloned hard drive into the original place and insert the screws to tighten them.
Step 2: Connect the power and SATA cables to this new disk.
Step 3: Install the cover of the DVR/NVR back into place.
Now everything gets ready and boot your recorder to finish configuration.
Also read: How to Upgrade to Replace Reolink HDD Step by Step
Back up Data in Your Recorder
In addition to cloning the hard drive to another disk for replacement in the event of the original DVR/NVR disk failing, you can choose to back up recordings to another drive via the disk imaging method, offered by MiniTool ShadowMaker. This backup tool supports file backup and folder backup, so get it for a trial.
MiniTool ShadowMaker TrialClick to Download100%Clean & Safe
Step 1: Connect your hard drive in the recorder to a PC and also connect an external hard drive.
Step 2: Launch MiniTool ShadowMaker Trial Edition.
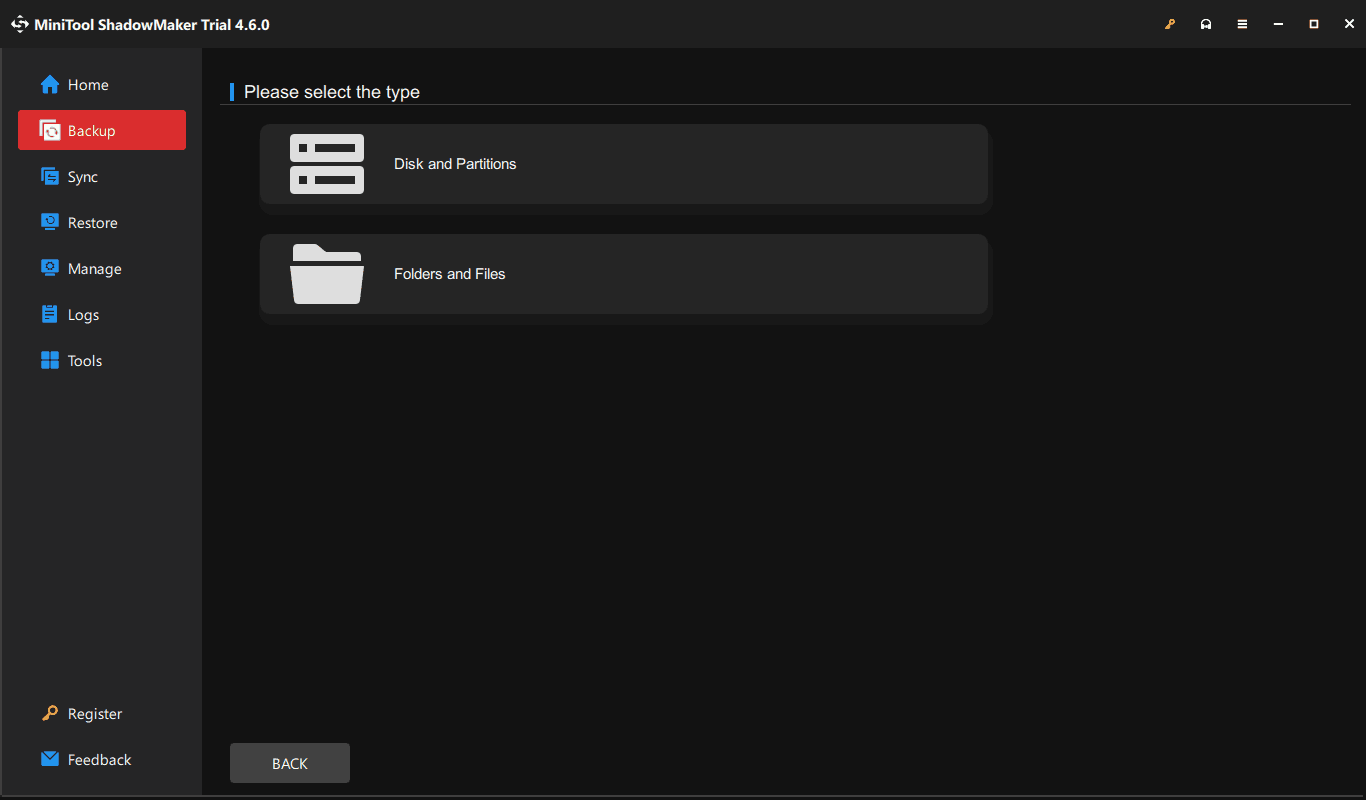
Step 3: Under Backup, head to SOURCE > Folders and Files, choose the recordings you want to backup, and click OK. Then, hit DESTINATION to choose an external drive.
Step 4: At last, begin the backup.
DVR VS NVR
You have learned a lot of information about NVR/DVR hard drive replacement. For some of you, you may wonder which one to choose when shopping for a home or business security system. Here let’s explore the additional knowledge – DVR vs NVR.
Overview of DVR & NVR
DVRs and NVRs are two different recorders.
A DVR, called Digital Video Recorder, uses a specialized encoding and processing chip to convert video data from analog cameras to a digital format for storage. DVR systems use a traditional security system technology.
An NVR refers to a Network Video Recorder, that uses relatively new technology. In detail, NVR systems use IP (Internet Protocol) cameras to capture high-quality digital video streams. They can process video data before relaying it to the recorder and offer an efficient and organized manner for storage.
DVR VS NVR: Image and Audio Quality
An NVR leaves a DVR in image and audio quality because of its high-resolution feature offered by IP cameras, ranging from 2MP to 12MP, even higher. While a DVR offers a significantly lower video quality that is supported by analog cameras.
NVR VS DVR: Scalability
Thanks to IP network connectivity, you can seamlessly add IP cameras to an NVR system as long as they are on the same network. While DVRs are limited in scalability and flexibility.
DVR VS NVR: Cost
For small-scale installations, DVRs are more cost-effective. If you have a tight budget, consider using a DVR. But for NVRs, they are usually more expensive but offer better features.
Comparison in Other Aspects
| Factors | DVR | NVR |
| Installation | Separate coax cables for each camera are required | Uses a single Ethernet cable to connect a power source and the camera network |
| Remote Access | No remote access support | Allows remote access from any location with an Internet connection |
| Storage Capacity | Limited by the on-premise storage | Supports extension with additional hard drives or network storage devices |
Wrapping Up
That’s all the information about NVR/DVR hard drive replacement. If you need to upgrade your hard drive to a larger one or replace the faulty hard drive, this comprehensive guide is helpful. Do as it says – choose a proper hard drive, clone the old disk to another one, and install the new disk to your recorder.
Moreover, some additional information on how to back up NVR/DVR disk data and DVR vs NVR is introduced. You can find everything you want to know in this tutorial. Hope it is of help.
In terms of suggestions when using MiniTool ShadowMaker, tell us by contacting [email protected]. Much appreciated!
DVR Hard Drive Replacement FAQ
About The Author

Position: Columnist
Vera has been working at the MiniTool Team for over 10 years as a technical editor and content writer. She mainly focuses on disk and partition management, data recovery, Windows backup and restore, and PC troubleshooting. Through in-depth software testing and hands-on experience, she has helped users solve a wide range of computer problems and better protect their data on Windows devices.
User Comments :