The option of encrypt contents to secure data greyed out may stem from the disabled feature, format issues, Windows editions, etc. From this post on MiniTool, learn how to fix this issue by enabling that option via 4 ways, running SFC, etc.
As cyberattacks and other threats are increasing daily, it is crucial to keep data secure. Encryption is a foundational method in cybersecurity, preventing data breaches and unauthorized access. Or else, your data will be vulnerable to online attacks from third-party vendors or partners.
Fortunately, the Windows operating system comes with the option of encrypt contents to secure data.
Let’s explore this feature and the issue of encrypt contents to secure data greyed out.
About Encrypt Contents to Secure Data
What Is It?
Encrypt contents to secure data is designed to be available for files & folders, rather than a drive. This feature uses the Encrypting File System (EFS) to encrypt individual folders and files. That way, the encrypted data is unreadable to unauthorized users.
EFS uses a combination of symmetric (encrypt the file) and asymmetric (protect the symmetric key) encryption. The asymmetric key pair uses a public key (encrypt) and a private key (decrypt).
Even if one person gets your file or folder, he cannot decrypt it without the private key.
In short, the Encrypting File System adds an extra layer of security to protect confidential data.
2 Tips to Note:
- The feature is only available in Windows Pro, Enterprise, and Education, except for the Home edition.
- It is essential to back up your encryption key. Losing it means permanent data loss.
How to Use Encrypt Contents to Secure Data
To encrypt a file or folder using this feature, take these steps:
Step 1: Right-click on the item you wish to encrypt and choose Properties.
Step 2: In the General tab, hit Advanced to open the Advanced Attributes window.
Step 3: Tick Encrypt contents to secure data and click OK.
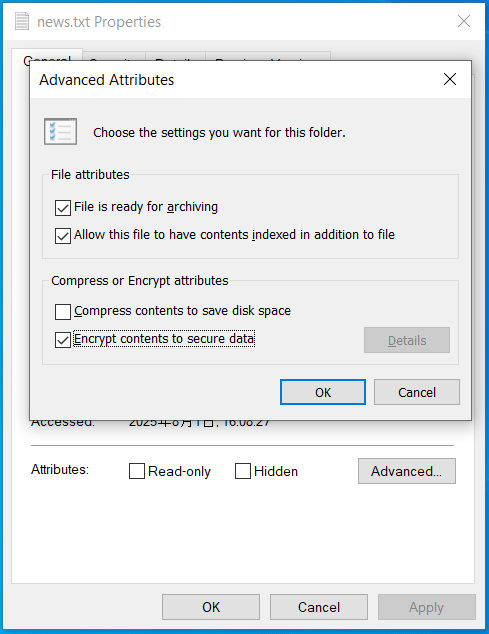
Step 4: After clicking Apply or OK, an encryption warning prompts you to choose an option.
It is recommended to:
- Encrypt the file and its parent folder
- Apply changes to this folder, subfolders and files
After the encryption, you can notice the lock icon displayed on the folder or file.
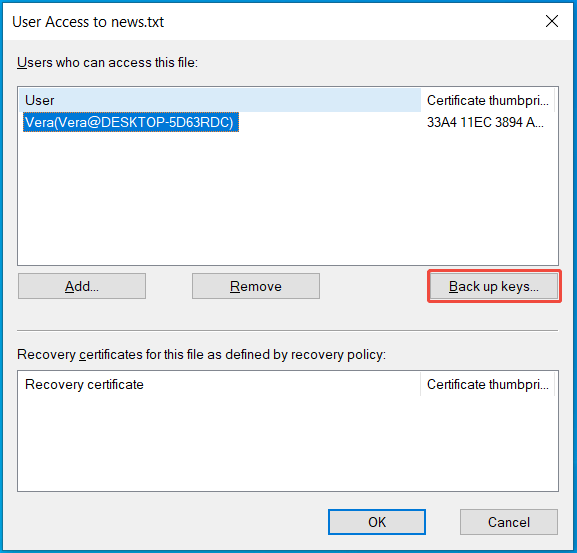
Step 5: Hit Details in Advanced Attributes, choose the user who can access this file/folder, and click Back up keys. Then, follow the on-screen instructions to complete the key backup.

Why Is Encrypt Contents to Secure Data Greyed Out
Sometimes you follow the above guide to access the encryption feature, but encounter the greyed-out encrypt contents to secure data option.
Why is the encrypt option greyed out?
Check out the list below to know what is going on.
- EFS disabled: In Windows 11/10/8/7, you disable encrypt contents to secure data. You should check for system configurations to manually enable it.
- Windows edition limitation: You are using the Home edition of Windows, resulting in encrypt contents to secure data grayed out.
- Corrupted system files: If system files, especially those regarding EFS, are damaged or missing, the encryption feature doesn’t work.
- File system is not NTFS: That feature is only available for NTFS drives in older OS versions (before Windows 10 version 1607 and Server 2016). So if you use another format like FAT32 or exFAT, you can’t use the option.
How to Fix Encrypt Contents to Secure Data Grayed Out Windows 11/10
There are several methods you can try to address the issue. Just go to enable EFS, check the Windows edition and upgrade to Pro, repair system files, and convert to NTFS.
Method 1: Enable EFS
As stated above, the disabled Encrypting File System triggers encrypt option greyed out.
Learn how to enable encrypt contents to secure data in Services, Registry Editor, Group Policy Editor, or Command Prompt.
Option 1: Set Encrypting File System to Automatic
By default, the Encrypting File System service starts up manually. Try to set it to automatic via these steps:
Step 1: Launch the Run dialog box by pressing Win + R.
Step 2: Type services.msc and click OK to open Services.
Step 3: Scroll down to locate Encrypting File System (EFS). Then, double-click on this service.
Step 4: In its Properties window, choose Automatic from the drop-down menu of Startup type.
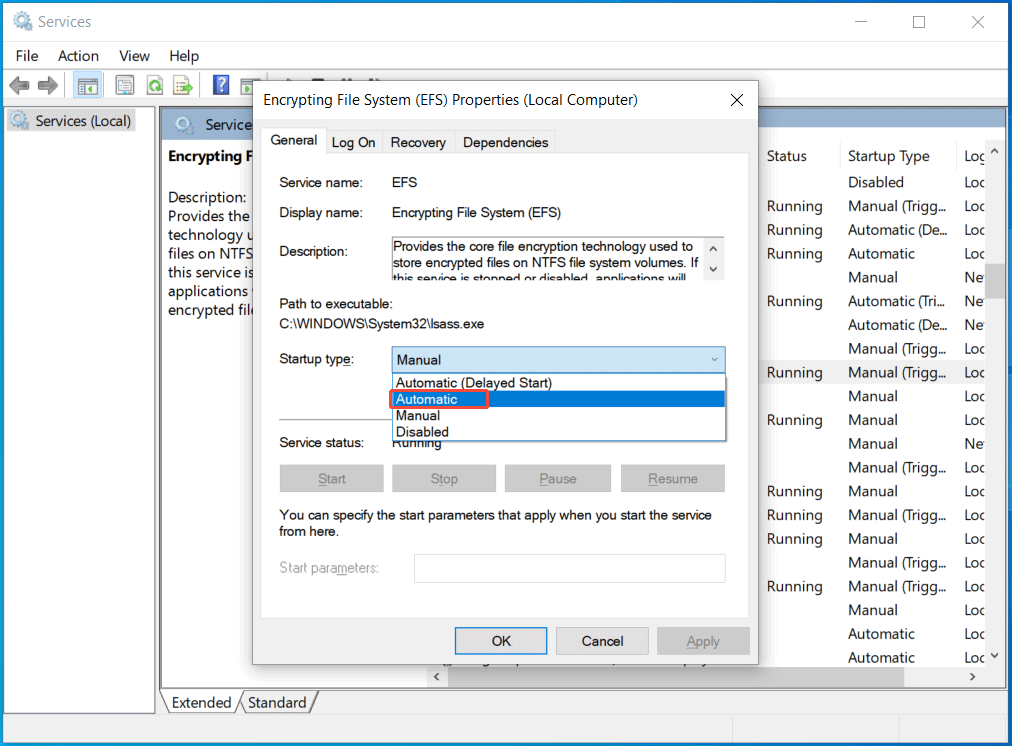
Step 5: Apply the change by clicking Apply > OK.
Option 2: Change a Key in Registry Editor
The Windows Registry stores all settings for the OS and apps. It lets you change these settings for customization. To fix Windows 11/10 encrypt contents to secure data greyed out, modify some keys.
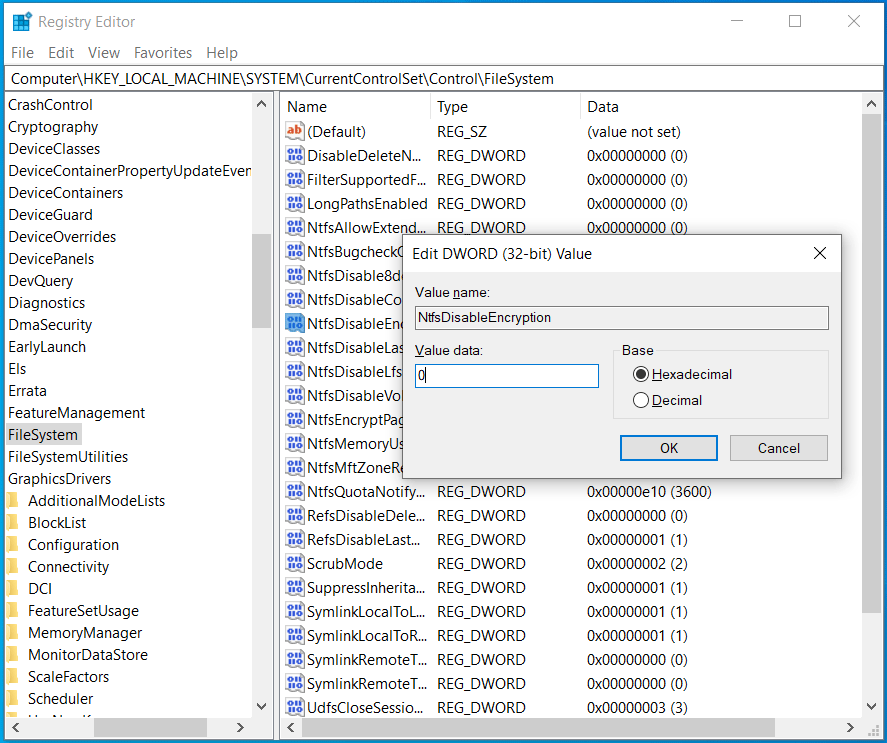
Step 1: In the Run window, type regedit and press Enter.
Step 2: Navigate to this path:
HKEY_LOCAL_MACHINE\System\CurrentControlSet\Control\FileSystem
Step 3: Find the NtfsDisableEncryption key on the right side and double-click on it.
Step 4: Set Value data to 0 and click OK. Then, restart the system to activate EFS.
Option 3: Check for Group Policy
When the option of encrypt contents to secure data is greyed out, also check if the feature is disabled in Local Group Policy Editor.
Step 1: In Windows 11/10 Search, type gpedit.msc and press Enter.
Step 2: Head to Computer Configuration > Administrative Templates > System > Filesystem > NTFS.
Step 3: Double-click on Do not allow encryption on all NTFS volumes. To enable encrypt contents to secure data, tick Disabled. Or, you can check Not Configured.

Step 4: Finally, save the change.
Option 4: Enable EFS in Command Prompt
To fix Windows 10/Windows 11 encrypt contents to secure data greyed out, you can directly enable EFS in Command Prompt.
Here is how to do that:
Step 1: Search for Command Prompt in Search and click Run as administrator.
Step 2: In the CMD window, type fsutil behavior set disableencryption 0 and press Enter.
Step 3: Reboot the system. Then, check if the file encryption option is still greyed out.
Method 2: Run SFC and DISM
The encrypt contents to secure data feature may not be available due to corrupted system files. So, try to repair the corruption in system files via SFC and DISM.
SFC (System File Checker) verifies and replaces damaged files with a cached copy. DISM (Deployment Image Servicing Management) scans and repairs issues with the Windows image (.wim files).
Step 1: Launch Command Prompt with admin permissions.
Step 2: Enter the sfc /scannow command and press Enter.
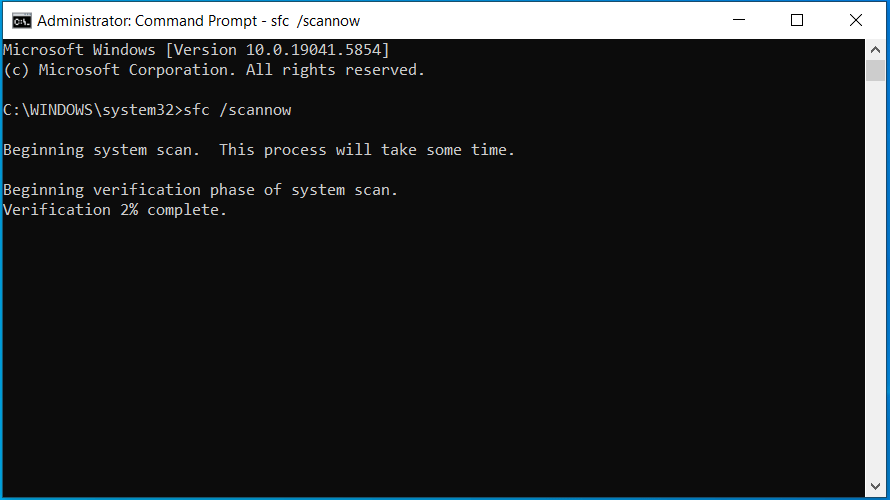
Once verification finishes, see if you can encrypt your files or folders with EFS.
In case encrypt contents to secure data is still greyed out, run DISM. Just execute these commands one by one:
- DISM /Online /Cleanup-Image /CheckHealth
- DISM /Online /Cleanup-Image /ScanHealth
- DISM /Online /Cleanup-Image /RestoreHealth
Method 3: Verify Windows Edition
Typically, encrypt contents to secure data only works in Windows Pro, Enterprise, and Education. If the encryption option is greyed out, check the Windows edition.
Step 1: Go to Windows 11/10 Settings > System > About.
Step 2: Under Windows specifications, you can find the edition you use.
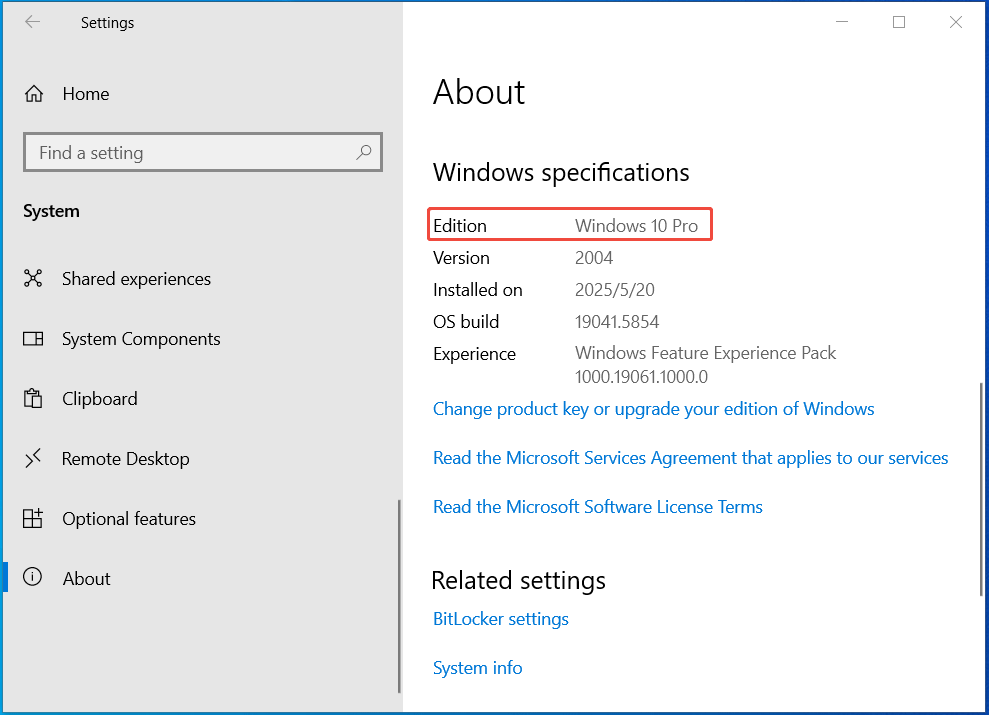
Alternatively, open the Run command, type winver, and click OK. The About Windows pop-up shows you which edition you are running.
If it is Home, it is not available to encrypt data. The only option you can try is to upgrade Home to Pro/Education/Enterprise.
Method 4: Convert FAT32 to NTFS
The encryption feature requires the drive to use the NTFS file system. To solve encrypt contents to secure data grayed out, try to convert to NTFS if you use a FAT32 partition.
Step 1: Launch Command Prompt as an administrator.
Step 2: Execute the command: convert J: /fs:ntfs. Replace J: with your drive letter.
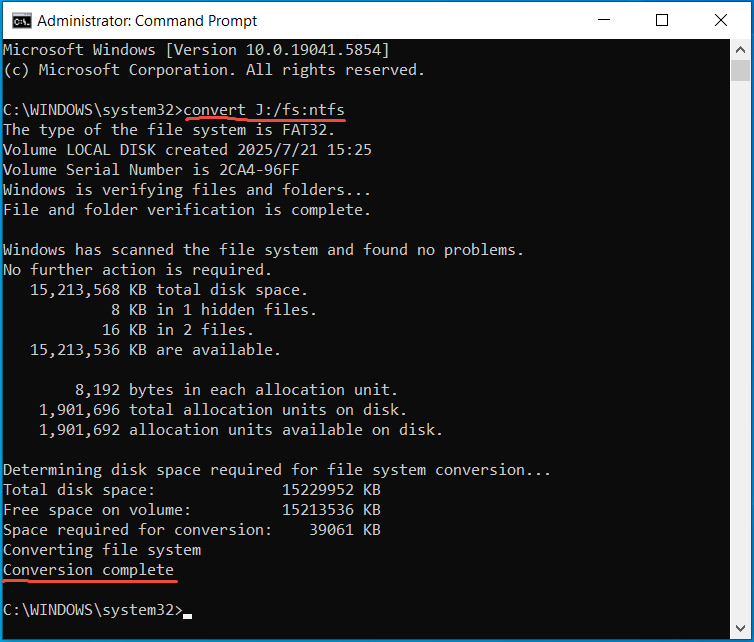
If you need to convert exFAT to NTFS, there is no direct command. You can only run the format J: /fs:ntfs command. However, formatting will delete all the disk data.
So, back up the important files beforehand to avoid losing data. The free backup software, MiniTool ShadowMaker, comes in handy. Install it and begin data backup.
MiniTool ShadowMaker TrialClick to Download100%Clean & Safe
How to Encrypt a Folder
In addition to the encrypt contents to secure data option, you can encrypt a folder or file using another method. For instance, try a professional third-party encryption tool such as AxCrypt.
Besides, Windows 10 and 11 come with the BitLocker feature. It can be used to encrypt the entire drive instead of individual files or folders.
Choose the proper one as per your needs.
Run MiniTool ShadowMaker to Secure Your Data
In addition to data encryption, you can try another way to keep your crucial data safe. That is running MiniTool ShadowMaker to back up precious pictures, documents, videos, etc.
This backup software for Windows 11/10/8/7 allows you to backup files, folders, systems, partitions, and disks. By scheduling a backup plan, you can easily create automatic backups. What’s more, you are allowed to choose a backup scheme to make incremental and differential backups.
Importantly, MiniTool ShadowMaker supports data encryption with a password to secure your backups. Learn how to secure your data with this tool.
Step 1: Connect a USB drive or external hard drive to your PC.
Step 2: Download, install, and launch MiniTool ShadowMaker Trial Edition.
MiniTool ShadowMaker TrialClick to Download100%Clean & Safe
Step 3: On the Backup page, choose the files or folders you wish to back up by going to SOURCE > Folders and Files. Besides, hit DESTINATION to select the external drive as the target path.
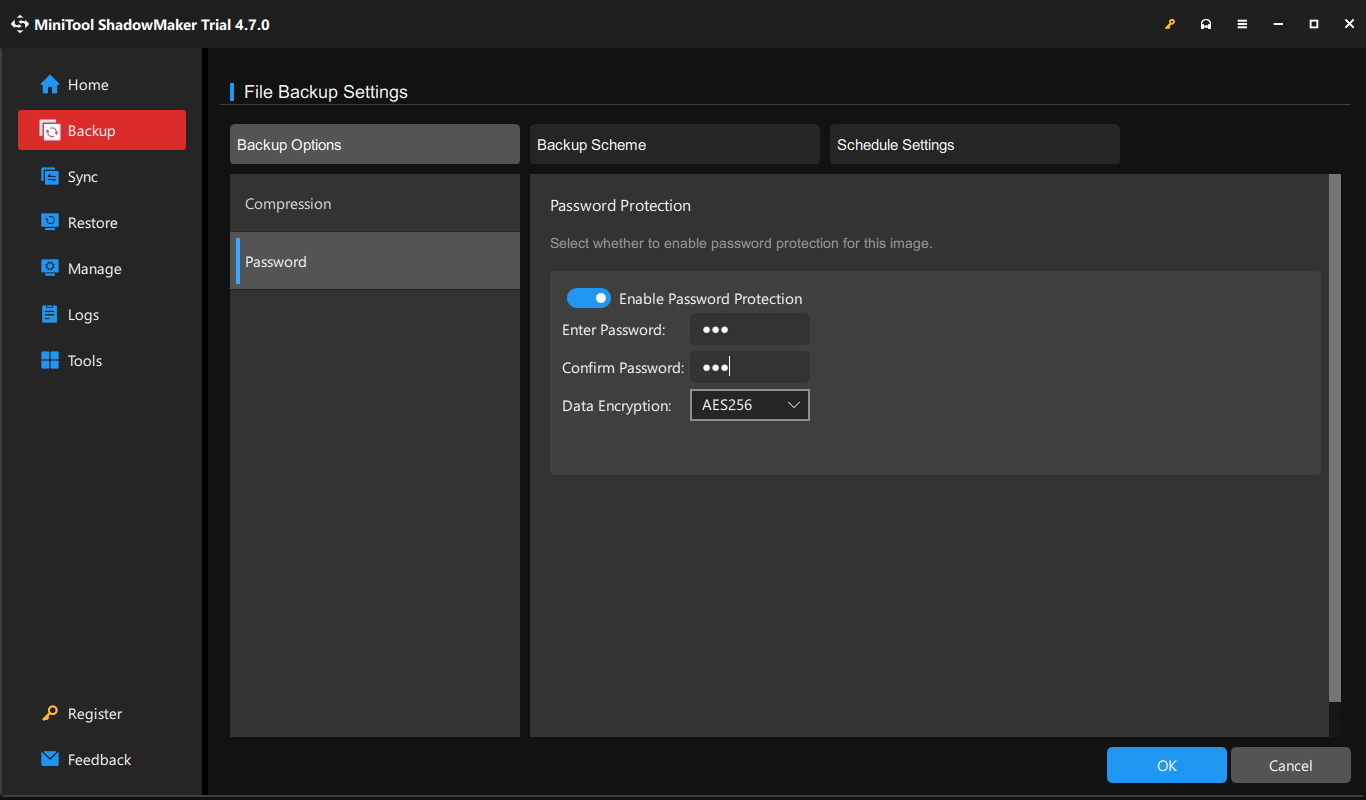
Step 4: To encrypt backups:
1. Go back to Backup and hit Options > Backup Options > Password.
2. Enable password protection and choose a data encryption option like AES256.
3. Enter a password & confirm it, and click OK.
Step 5: Begin the backup by clicking Back Up Now with this backup software.
Bottom Line
Why is encrypt contents to secure data greyed out? How to fix this issue in Windows 11/10/8/7? In this post, you can find the answers.
Try to enable encrypt contents to secure data, run SFC & DISM, check Windows edition, and convert to NTFS if you are struggling with this annoying issue.
Besides, you should run MiniTool ShadowMaker to back up important data, while encrypting backups to secure data.
Encrypt Contents to Secure Data Greyed Out FAQ
2. EFS is disabled
3. You run the Home edition of Windows
4. System files are corrupt
About The Author

Position: Columnist
Vera has been working at the MiniTool Team for over 10 years as a technical editor and content writer. She mainly focuses on disk and partition management, data recovery, Windows backup and restore, and PC troubleshooting. Through in-depth software testing and hands-on experience, she has helped users solve a wide range of computer problems and better protect their data on Windows devices.
User Comments :