How do you clone your old disk to a new Gigabyte SSD, especially when Windows doesn’t come with a snap-in disk cloning software? Now, this informative guide from MiniTool will recommend several good Gigabyte clone software for your reference.
Why Do You Need Gigabyte Clone Software?
Aorus, under Gigabyte Technology, specializes in gaming related products such as graphics cards, SSDs, CPU coolers, etc. Many of you may tend to replace your current HDD or SSD with an Aorus SSD due to its high performance, durability, and large capacity.
When it comes to hard drive replacement, you may wonder how to transfer your data and operating system from one disk to another. In this post, we will introduce several Gigabyte cloning software to help you perform complete disk migration without losing data.
With it, you can migrate all the contents on the aging hard disk drive to the new one. Additionally, if the disk you plan to clone is a system-related disk, then you can boot your computer from the cloned disk directly without reinstalling the operating system or setting up the PC from the ground up.
Optimal Gigabyte Clone Software for Windows PCs
Option 1. MiniTool ShadowMaker
When you need to clone your disk to a new Aorus SSD, MiniTool ShadowMaker must be worth considering. As a piece of PC backup software, it is compatible with almost all the Windows systems including Windows 11/10/8.1/8/7 and Server 2012/2016/2019/2022/2025. It can satisfy the needs of folder backup, file backup, partition backup, system backup, and disk backup.
In addition, you can also perform a disk cloning with MiniTool ShadowMaker. It has a Clone Disk feature, enabling you to either clone HDD to SSD or clone SSD to larger SSD. Now, let me demonstrate how this feature works:
Step 1. Click the download button below to download, install MiniTool ShadowMaker on your PC.
MiniTool ShadowMaker TrialClick to Download100%Clean & Safe
Step 2. Launch it and click on Keep Trial to enter the main interface.
Step 3. Head over to the Tools page and select Clone Disk in the right pane.

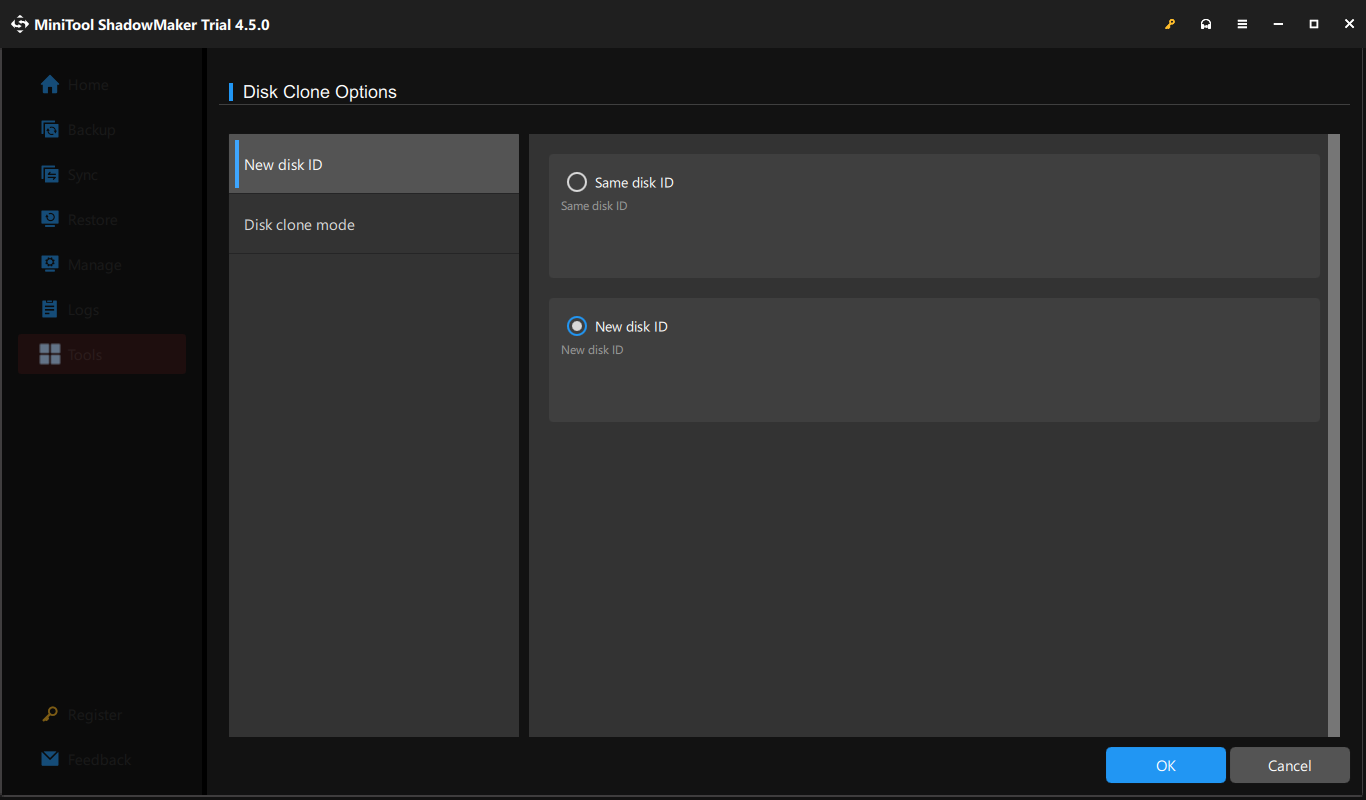
Step 4. Click on Options in the left corner to customize disk ID and clone mode. Usually, if you have no idea or you don’t want to make any changes to disk clone, it’s highly advised to keep the default settings.
Step 5. Select the old HDD or SSD as the source disk and the new SSD as the destination disk.
Step 6. When everything is arranged, click on Start to register the software and begin the cloning process immediately.
# Advantages
- Easy to Use: Graphical user interface (GUI) suitable for beginners, with guided operation.
- System Backup and Cloning: Supports full/incremental/differential backup, saving storage space.
- Compatibility: Supports Windows PE boot (for recovery after crashes).
- Best Scenarios: Ordinary users need to quickly back up/clone the system without complex partition operations.
Option 2. MiniTool Partition Wizard
The second Gigabyte clone software is MiniTool Partition Wizard. With this all-around free partition manager, you can manage partitions and disks such as copying a disk, extending partitions, rebuilding the MBR, migrating OS to SSD/HD, and so forth.
MiniTool Partition Wizard allows you to clone the entire data disk or system disk to another hard drive. It can work with most SSDs, hard drives, USB flash drives, and SD cards in the market. Next, we’re going to show you how to clone a disk with this Gigabyte data migration software:
Step 1. Download, install, and open MiniTool Partition Wizard.
MiniTool Partition Wizard FreeClick to Download100%Clean & Safe
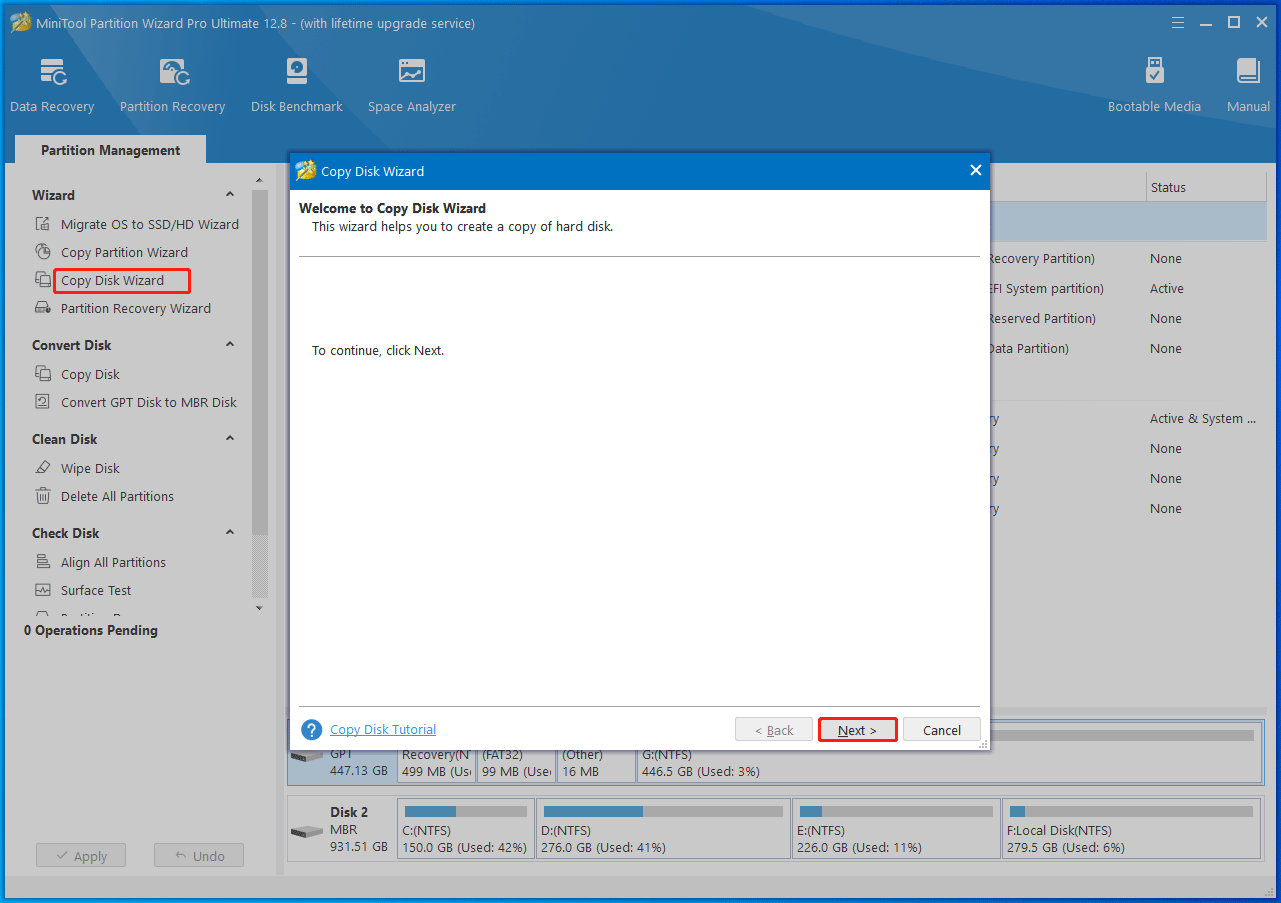
Step 2. In the home page, select Copy Disk Wizard from the left pane and then click Next.
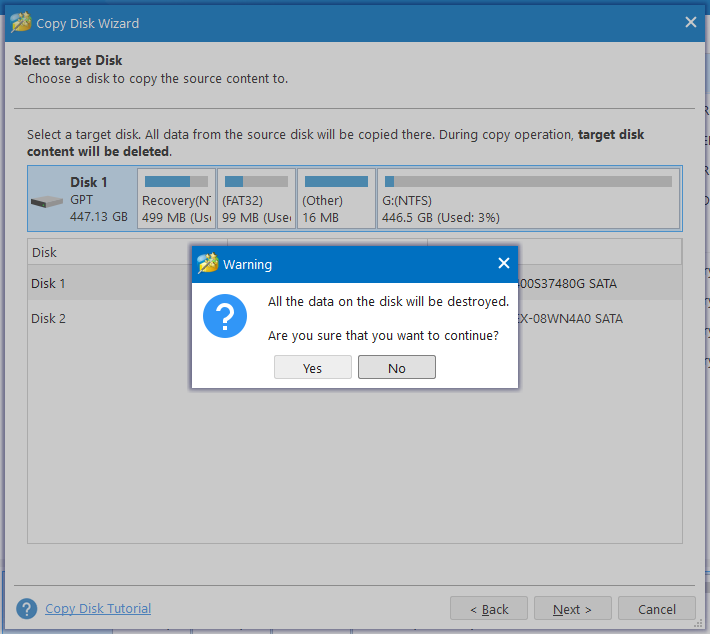
Step 3. Next up, you need to specify the source disk and the target disk. And it will prompt you with a warning message saying that all the data on the disk will be destroyed. Click on Yes to confirm this operation.
Step 4. Select a copy option based on your needs and hit Next.
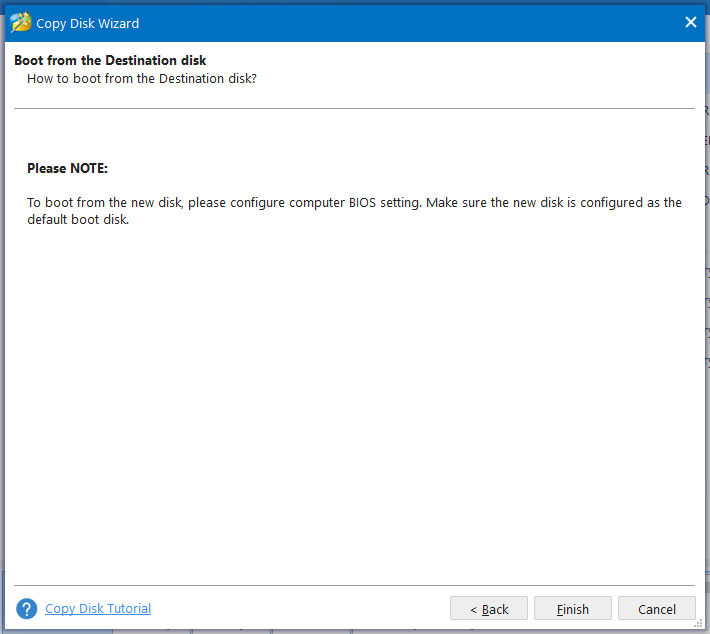
Step 5. Then, this tool will tell you how to boot from the destination disk after cloning. Just follow the instructions to set up.
Step 6. Click on Apply to carry out all the changes and wait for its completion. The time the cloning process takes depends on the amount of data you transfer.
# Advantages
- Partition Management: Adjustable partition size, merge/split partitions, and clone.
- Disk Cloning Optimization: Supports SSD alignment, enhancing performance.
- Visual Operations: Intuitive preview of partition layout to prevent mistakes.
- Free Functionality: Basic partition cloning is free (advanced features require payment).
- Best Scenarios: When partition structure needs adjustment before cloning (e.g., migration to a smaller SSD).
![[Full Fixed!] Disk Clone Slow on Windows 10/11](https://images.minitool.com/minitool.com/images/uploads/2023/05/disk-clone-slow-thumbnail.png)
Option 3. Macrium Reflect
The third Gigabyte clone software – Macrium Reflect – is a robust backup solution for both home and business users, and it is also a valuable disk cloning tool. It has many functions for backup and disk cloning, including deleting & shrinking & expanding partitions, imaging of individual and multiple partitions, disk cloning, and file backup.
Although Macrium Reflect is now a paid software, it also offers a free version. When you replace your old hard disk or small SSD with a new or larger SSD, you can use the trial edition to migrate the current installation with all current settings, applications and files without the need of reinstallation and reconfiguration.
Now, let’s see how to clone a hard drive to an SSD using Macrium Reflect:
Step 1. Download and install Macrium Reflect on your computer and connect the new SSD to your PC.
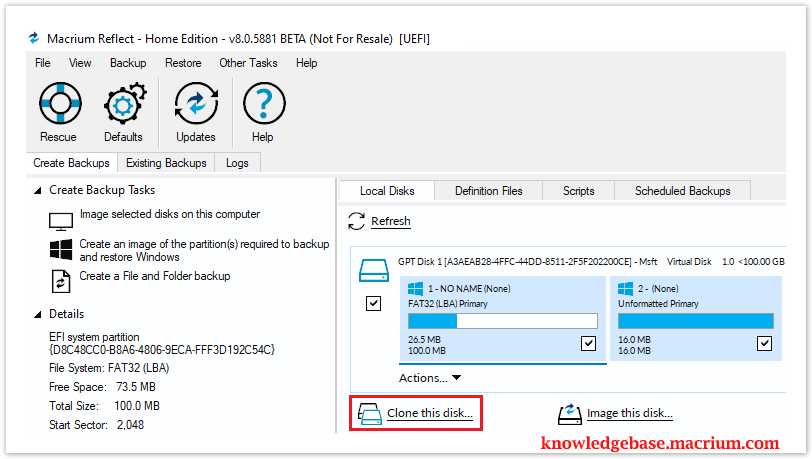
Step 2. Open Macrium Reflect and go to Create Backups.
Step 3. Select the disk you want to clone from the list of local disks and click Clone this disk.
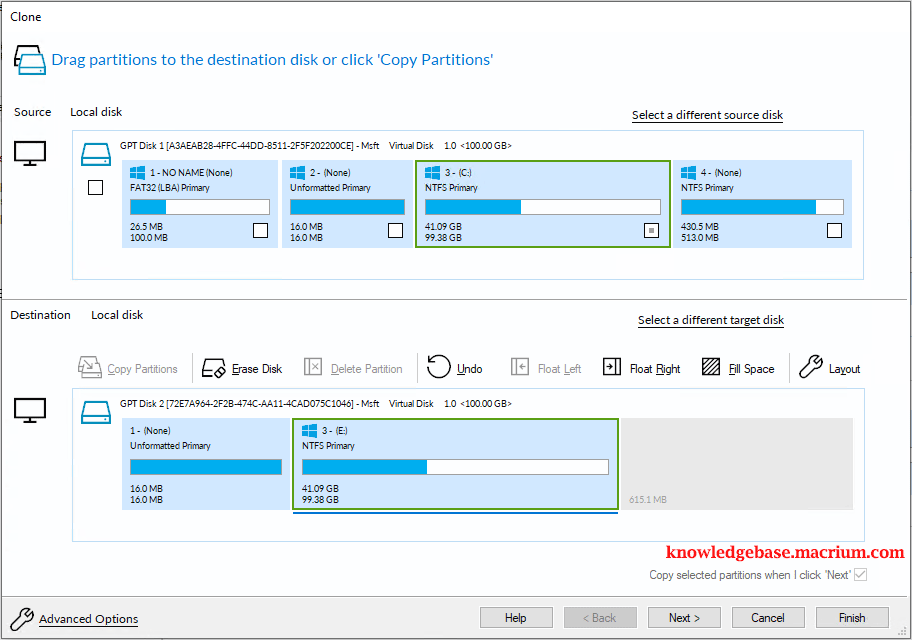
Step 4. In the newly opened the Clone window, click Select a disk to clone to… to choose a clone target disk.
Step 5. Click on Next to skip the Schedule this clone option.
Step 6. Review the settings to make sure you have selected the correct source disk and target disk for cloning, and tap on Finish.
Step 7. Verify the settings in Backup Save Option, and if appropriate, click on OK.
Step 8. In the WARNING box, hit Continue to start the cloning process.
Up to now, Macrium Reflect seems a good choice for users who look forward to excellent Gigabyte SSD clone software. Actually, the challenging steps to perform the disk cloning and the complicated user interface could deter beginners from trying.
# Advantages
- Professional-level Backup: Supports incremental backup and cross-machine restoration (restoration on different hardware).
- High-speed Cloning: Multi-threaded processing for high efficiency in large file transfer.
- RAID Compatibility: Compatible with cloning of hardware RAID arrays.
- Strong Reliability: Enterprise-level data protection with comprehensive logging.
- Best Scenarios: IT administrators, enterprise users, or those requiring long-term version control for backups.
Option 4. Clonezilla
The fourth Gigabyte cloning software is an open-source software called Clonezilla, which means it is free to use. Support for Windows, Linux, and MacOS, this freeware is an excellent tool for disk cloning, system imaging, backups, and restores.
Clonezilla boasts many advanced features that make it stands out from the competition. Those features include:
- Support for both MBR and GPT partition schemes.
- Ability to reinstall various corrupted bootloaders, such as GRUB.
- Restoring one image to multiple devices.
- An enterprise-grade cryptographic encryption mode for system images.
- Extremely minimal system requirements because of a very basic GUI.
- Support for various file systems and ability to work with Windows, MacOS, and Linux operating system.
- Multicast options for massive cloning tasks.
- Unattended mode, where you can customize your disk cloning needs with boot parameters.
However, these features are also where the problem lies with using Clonezilla. Even advanced users find it challenging, let alone beginners.
In the following paragraphs, we will demonstrate how to clone Windows 11 or 10 with Clonezilla for you.
Step 1. Download the software from Clonezilla’s website and create a bootable USB or DVD with your downloaded ISO file.
Step 2. Restart your computer and boot it from the USB to enter Clonezilla’s LiveBoot.
Step 3. Select the Clonezilla version to boot to. Here, we choose Other modes of Clonezilla live.
Step 4. In the following page, select Clonezilla live (To RAM…) and then configure your language and keyboard layout.
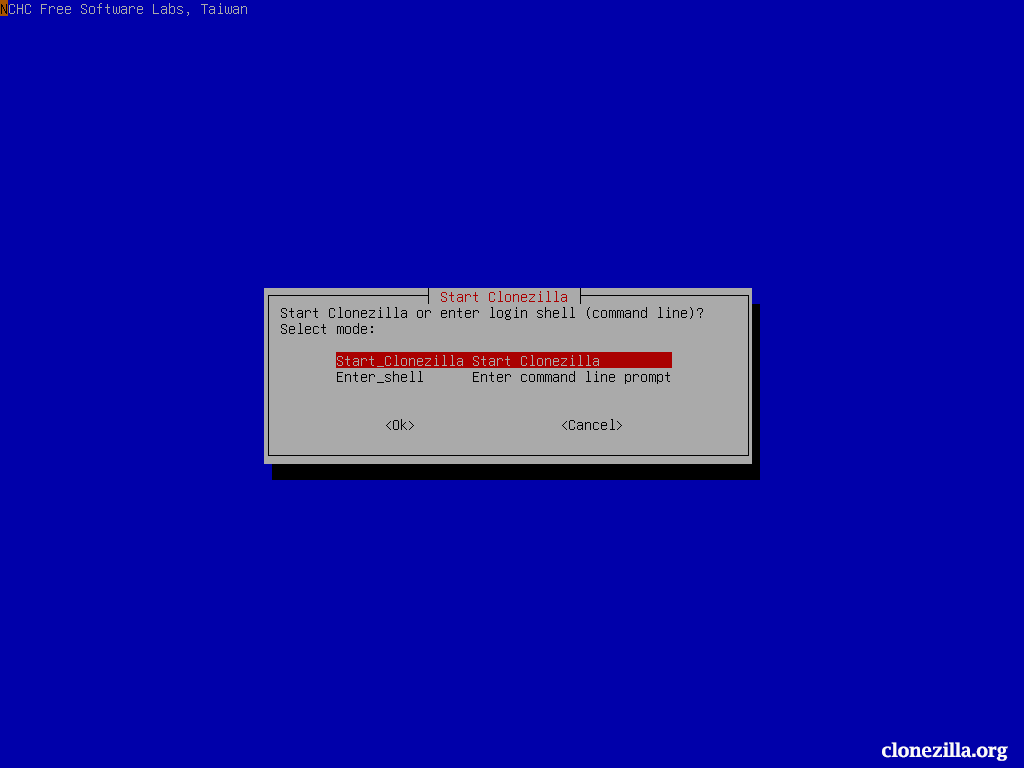
Step 5. Choose Start_Clonezilla and click OK to start Clonezilla.
Step 6. Next up, select the device-device option > Beginner > disk_to_local_disk.
Step 7. Pick the source disk you want to clone and the target disk to clone to. After making choices, click on OK to confirm.
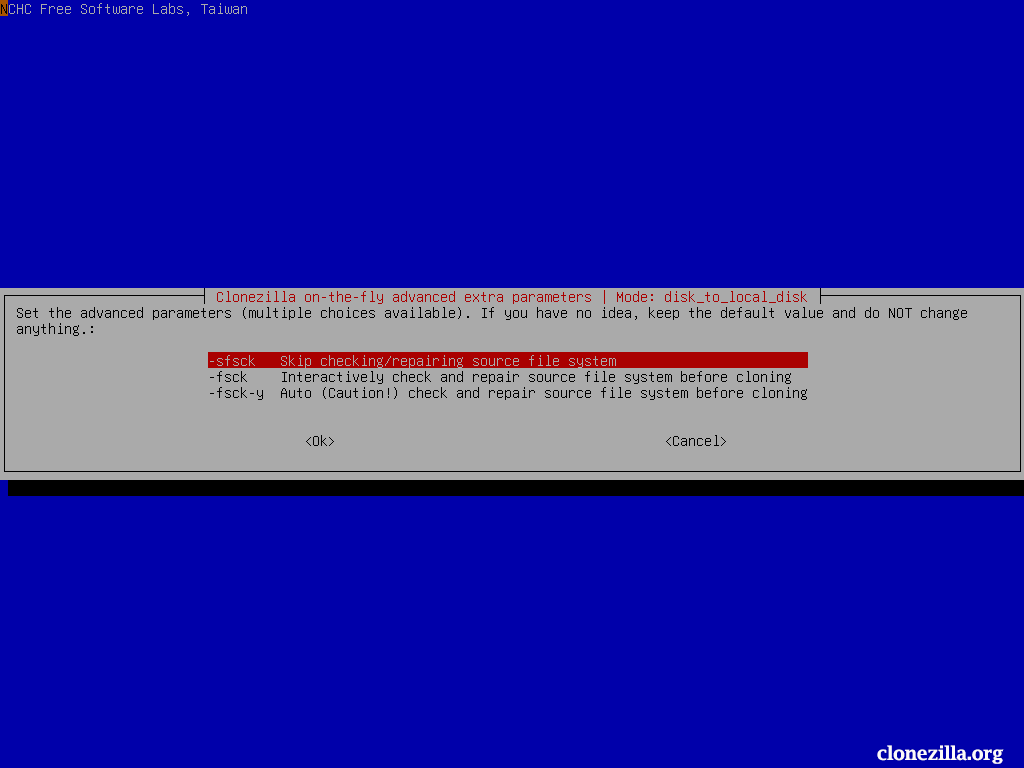
Step 8. In the following steps, it will ask if you need to set some advanced parameters. If you have no idea, just keep the default value and do not change anything.
Step 9. Select the way to create the partition table on the destination disk. Here choose -k0. Then select the mode you want after the disk cloning is done.
Step 10. Before doing the real cloning, Clonezilla will ask for confirmation repeatedly. Hit Y and then Enter on the keyboard to continue to execute the cloning operation. During the process, you can watch the progress, and you’ll be asked several times to continue the cloning.
As you can see from the steps above, using Clonezilla isn’t beginner-friendly or straightforward. It requires advanced knowledge, a lot of preparation.
# Advantages
- Completely Free and Open Source: No functional limitations, suitable for budget-sensitive users.
- Cross-platform Support: Clones Linux, macOS, and Windows.
- Batch Deployment: Supports PXE network booting to clone multiple devices simultaneously.
- Lightweight: No GUI overhead, extremely fast cloning speed.
- Best Scenarios: For tech-savvy users who need to clone Linux systems, servers, or for large-scale deployments.
How to Choose Among the Four Gigabyte Cloning Software?
Now, you should have known how to use the four Gigabyte clone software – MiniTool ShadowMaker, MiniTool Partition Wizard, Macrium Reflect, and Clonezilla. Which one should you choose? You can make your choice by referring to the following aspects:
| MiniTool ShadowMaker | MiniTool Partition Wizard | Macrium Reflect | Clonezilla | |
| Price | 30-day free trial | free | 30-day free trial | free |
| Simplicity | user-friendly interface; wizard-based operation | intuitive interface; requires a certain technical foundation | professional interface; for advanced users | command-line operation; no graphical interface; for technical expert |
| Supported disk type | simple disks dynamic disks (only contain simple disks) | simple disks dynamic disks | simple disks dynamic disks | simple disks dynamic disks |
| Items to clone | the entire disk (not free for system disk) | the entire disk/OS only/other partitions (not free for system disk) | the entire disk/partition | the entire disk/partition |
| Technical support | support | support | support | not support (only community) |
Final Words
In this comprehensive guide, we introduce the 4 best Gigabyte clone software and walk you through how to clone a disk with them respectively.
Which one is suitable for you? Due to its simple operation and low cost, MiniTool ShadowMaker is suitable for ordinary users who have simple cloning needs, while MiniTool Partition Wizard is more for users who need to adjust partitions before cloning. Clearly, Macrium Reflect and Clonezilla are better suited for professional users or technical experts.
Do you have any problems while using our products? Please don’t hesitate to share your worries with our support team via [email protected]. We will reply to you as soon as possible.
Gigabyte Clone Software FAQ
As for the clone software, you can use MiniTool ShadowMaker, MiniTool Partition Wizard, or Macrium Reflect for the best results. After cloning, set the new SSD as the boot drive in BIOS and then start your computer from it.
User Comments :