
Install error - 0x80070103 indicates Windows Update attempted to install an already present, incompatible, or outdated driver. To fix it, try resuming updates, hiding the problematic update, running Windows Update Troubleshooter, resetting update components, or uninstalling and reinstalling drivers.
What Does Install Error – 0x80070103 Means
The install error – 0x80070103 often means that Windows Update tried to install a driver on your PC, but it found that the driver is already installed or incompatible.
It is not a serious problem. It’s safe to ignore it if your computer is working fine.
What Causes Install Error – 0x80070103 in Windows 10/11
Various reasons may cause the error, including:
| Cause | Description |
| Duplicate driver installation | Windows Update tries to install a driver version that is already installed. |
| Incompatible driver | The offered driver doesn’t match your current hardware. |
| Driver conflicts | A custom or third-party manufacturer driver interferes with the generic update. |
| Corrupted update cache | Update files stored on your PC are damaged. |
| Damaged system files | System file corruption affects the update process. |
Suggestion: Back Up Important Data Before Fixing the Error
Backing up files is crucial because it protects your vital digital files from permanent loss due to hardware failure, ransomware, viruses, or simple human error, such as accidental deletion.
It serves as a safety net to restore data and ensure business continuity, saving time, money, and irreplaceable memories or work.
For data backup, use the PC backup software, such as MiniTool ShadowMaker. Here is how to back up files:
Step 1. Download and install MiniTool ShadowMaker on your computer.
MiniTool ShadowMaker TrialClick to Download100%Clean & Safe
Step 2. Launch this software and select Backup from the left panel.
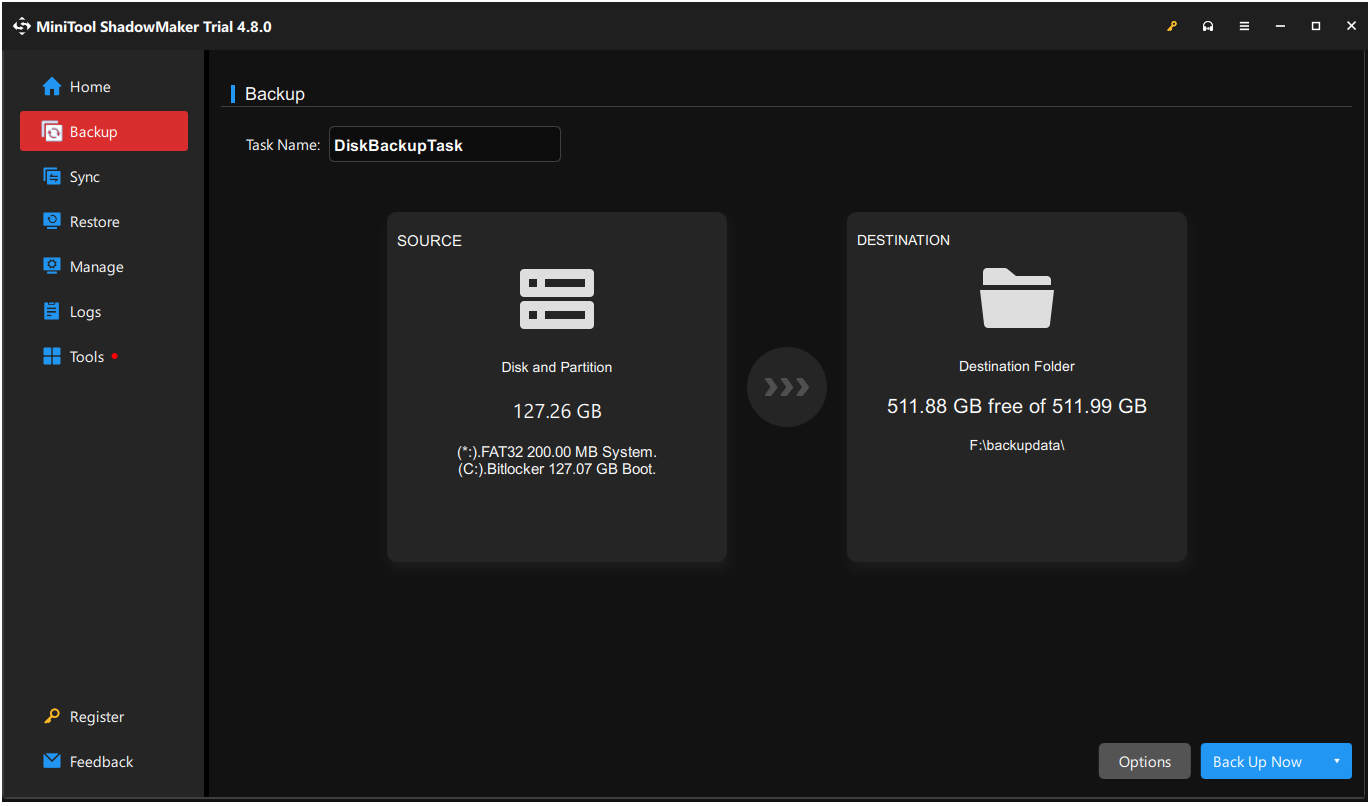
Step 3. Go to SOURCE and select Folders and Files. Next, tick the boxes next to the files that you want to back up and click OK to proceed.
Step 4. Enter the DESTINATION section, choose a preferred location to store backup files, and then click OK.
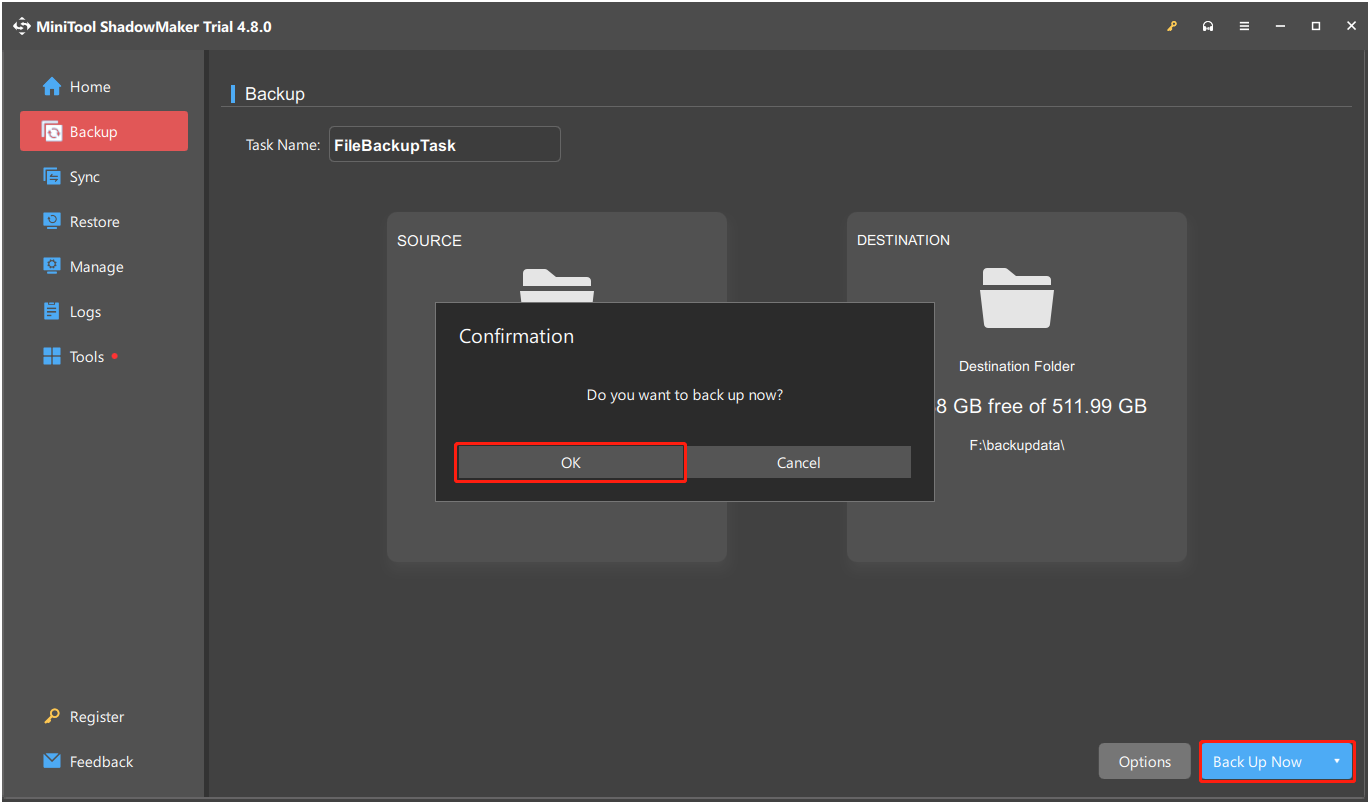
Step 5. Click Back Up Now and OK to confirm.
How to Troubleshoot Install Error – 0x80070103 in Windows 10/11
To fix the install error 0x80070103, try blocking automatic driver updates, running Windows Update Troubleshooter, manually installing/hiding the update, and using the Windows Media Creation tool to reinstall Windows.
Solution 1. Pause & Resume Updates
Sometimes, pausing and resuming updates may force Windows to refresh the update and might remove incompatible or corrupted data. Here’s the guide:
Step 1. Press Win + I to open Settings.
Step 2. Navigate to Windows Update and find Pause updates in the More options section.
Step 3. Expand the drop-down menu to select a preferred time.
- Pause for 1 week
- Pause for 2 weeks
- Pause for 3 weeks
- Pause for 4 weeks
- Pause for 5 weeks
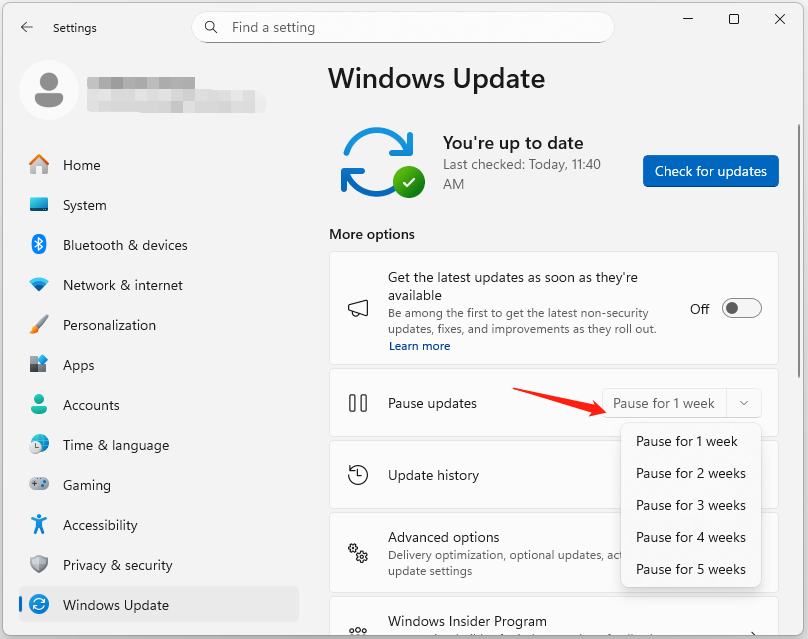
Step 4. Now, the window will show a message like “Updates paused until x/x/x”. Then, click Resume updates next to this sentence.
Step 5. Wait for Windows to check for updates. Next, it should no longer display the problematic driver update.
Solution 2: Hide the Problematic Update
If Windows keeps trying to install a driver that is already up-to-date, consider blocking this specific update from installing.
Step 1. Download and install the Microsoft Show or Hide Updates utility.
Step 2. Run the wushowhide.diagcab file to open this tool.
Step 3. Click Next, and it begins detecting problems.
Step 4. Select Hide updates.
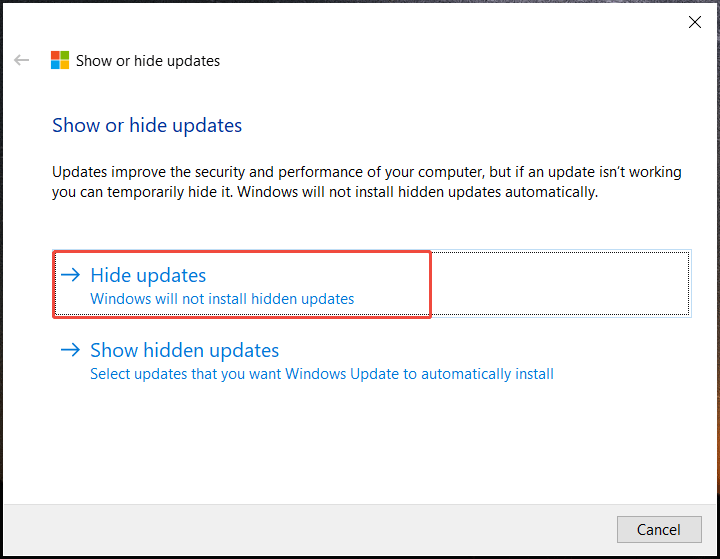
Step 5. Choose the driver update causing the 0x80070103 error and click Next to apply the change.
Solution 3. Run Windows Update Troubleshooter
Windows Update Troubleshooter is a built-in Windows tool that can help you to find and fix common issues that prevent updates from installing. In this circumstance, try running this tool to troubleshoot Windows update error 0x80070103. Here’s the tutorial:
Step 1. Press Win + X to open Settings.
Step 2. Go to System. Then, in the right panel, scroll down and select Troubleshoot.
Step 3. Choose Other troubleshooter, find Windows Update under the Most frequent section, and then click the Run button next to it.
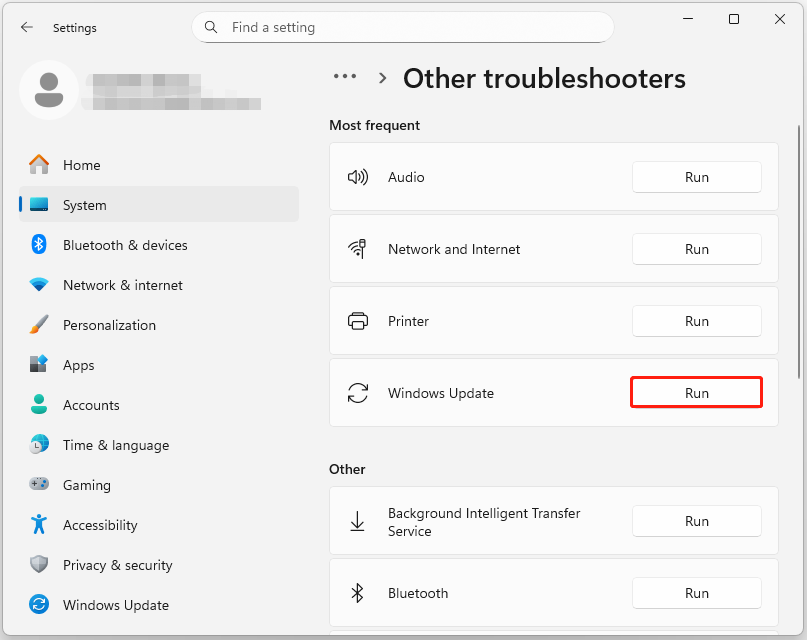
Step 4. Follow any further on-screen instructions. After the process finishes, restart your PC and check if the error is fixed.
Solution 4. Reinstall the Problematic Driver
Device Manager is a built-in Windows tool that provides a central view of all hardware connected to your computer, allowing you to view and manage drivers. To resolve the error, reinstall the problematic drivers. Here’s how to do that:
Step 1. Open Settings and go to Windows Update > Update history.
Step 2. Find and note the driver that is causing the 0x80070103 error.
Step 3. Press Win + X to open Quick Link and select Device Manager from the menu.
Step 4. Locate the driver you previously noted, right-click it, and then select Uninstall device.
Step 5. Follow the on-screen instructions to complete the process. Then, reboot the computer, and Windows will reinstall the driver automatically.
Solution 5. Reset Update Components
Windows Update components on the PC are responsible for downloading and installing updates. If any of these components have become damaged or corrupted, it is easy to encounter various errors, including the Windows update install error 0x80070103.
To resolve the issue, run a few commands in an elevated Command Prompt to reset Windows Update components.
Step 1. Open Command Prompt as administrator.
Step 2. Run the following commands one by one to stop all update-related services:
- net stop wuauserv
- net stop cryptSvc
- net stop bits
- net stop msiserver
Step 3. Type Ren C:\Windows\SoftwareDistribution SoftwareDistribution.old and press Enter to recreate the folder.
Step 4. Execute the command Ren C:\Windows\System32\atroot2 Catroot2.old to recreate the folder.
Step 5. Continue with the following commands to restart Windows update-related services.
- net start wuauserv
- net start cryptSvc
- net start bits
- net start msiserver
Now, run Windows Update again and check if the install error 0x80070103 appears again.
Solution 6. Run DISM and SFC
Corrupted system files or a damaged Windows image can prevent your computer from installing driver updates or Windows updates properly, leading to install error – 0x80070103.
SFC and DISM scans can repair corrupted system files and restore the health of the Windows image. Here are the steps:
Step 1. Press Win + S to open Search and type cmd.
Step 2. Find Command Prompt under Best Match, right-click it, and select Run as administrator.
Step 3. In the elevated Command Prompt window, run the command below to perform a DISM scan:
DISM.exe /Online /Cleanup-Image /RestoreHealth
Step 4. Once finished, type sfc /scannow and press Enter.
To Sum Up
In conclusion, this post offers several methods to fix install error – 0x80070103. Try the mentioned solutions one by one until you fix the error successfully.
Additionally, remember to back up your data with MiniTool ShadowMaker before trying these fixes to avoid data loss.
If you encounter any issues or have any suggestions while using this software, contact us by sending an email to [email protected].
Install Error – 0x80070103 FAQ
1. Go to Settings > Windows Update > Update history.
2. Check the failed update under Driver updates to identify the problematic driver.
About The Author

Position: Columnist
Vera has been working at the MiniTool Team for over 10 years as a technical editor and content writer. She mainly focuses on disk and partition management, data recovery, Windows backup and restore, and PC troubleshooting. Through in-depth software testing and hands-on experience, she has helped users solve a wide range of computer problems and better protect their data on Windows devices.
User Comments :