Reimage computer is a topic that many people may be curious about. When the operating system is old, damaged, or infected by viruses, a reimage PC repair is necessary. So, how to reimage a computer in Windows 11/10/7 without data loss? From this post of MiniTool, you can find multiple ways including recovery partition, PC resetting, system image recovery, etc.
Reimage Computer Meaning
When it comes to PC reimaging, here is a question asked by many people: what does it mean to reimage a computer? Does reimaging delete data?
Reimaging a computer refers to the process of removing all programs and reinstalling everything on your computer. It can wipe the hard drive entirely, restore the PC to factory setting and install a fresh operating system. All the data on the hard drive of the PC is deleted. Sometimes the word “reinstall” is used in place of “reimage”.
In many cases, it is necessary to reimage computer.
- the operating system gets damaged or corrupted
- your system is plagued with virus attacks and spyware problems
- Windows is unable to load
- the PC isn’t running as well as it should be.
By reimaging your computer, all these problems caused by software issues can be repaired.
When searching for the related topic on Google, you will find "reimage VS reformat" is also asked. What's the difference between them? See this forum to learn some information now.
What to Do Before You Reimage Computer
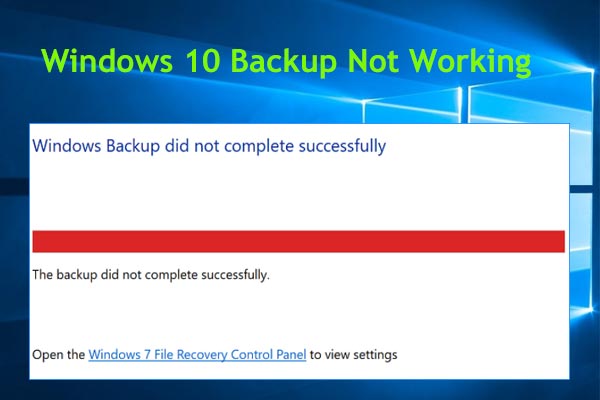
As mentioned above, reimaging Windows 10/11/7 is a permanent process. It can lead to data loss and files, photos, music, videos, etc. are unrecoverable after you reimage your computer. Thus, it is very important to back up your hard drive data before a reimage PC repair.
To do this thing, you may consider the built-in backup tool – Backup and Restore. This tool may not work properly and the backup is not flexible. In view of this, we strongly suggest backing up the disk data with a professional backup program. MiniTool ShadowMaker, a free backup software, will be your good assistant.
This backup tool can run on Windows 11/10/8/7 and helps you create a backup for the operating system, files, folders, the entire hard drive, and selected partitions with ease. It supports multiple backup types – full, incremental, and differential backups.
Besides, you can run it to set scheduled backups to greatly keep data secure. Additionally, MiniTool ShadowMaker allows you to sync files for backup and clone the entire hard drive for disk backup.
Right now, free download this backup software via the following button and then install it on your PC. Next, start a data backup before you reimage computer.
MiniTool ShadowMaker TrialClick to Download100%Clean & Safe
If the PC cannot start up properly, use the Media Builder feature to create a bootable USB drive or CD/DVD and boot the PC to the MiniTool recovery environment. Then start a backup. To know details, refer to our previous post - How to Back up Data without Booting Windows? Easy Ways Are Here.
See how to back up disk data before you reimage Windows 10/11/7:
Step 1: Load MiniTool ShadowMaker and tap on Keep Trial to enter its main interface.
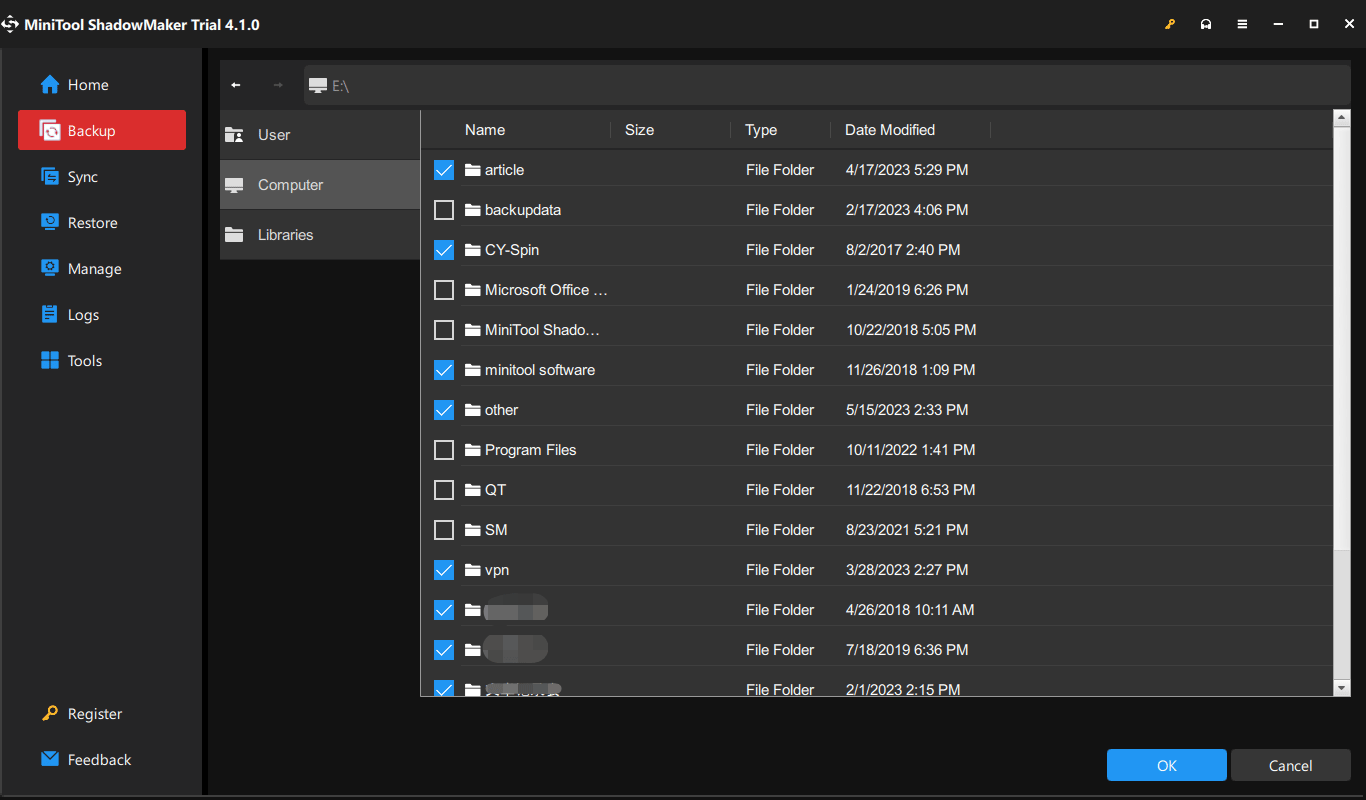
Step 2: Move to the Backup window, tap on SOURCE > Folders and Files > Computer, choose all the files or folders you want to back up, and then click OK.
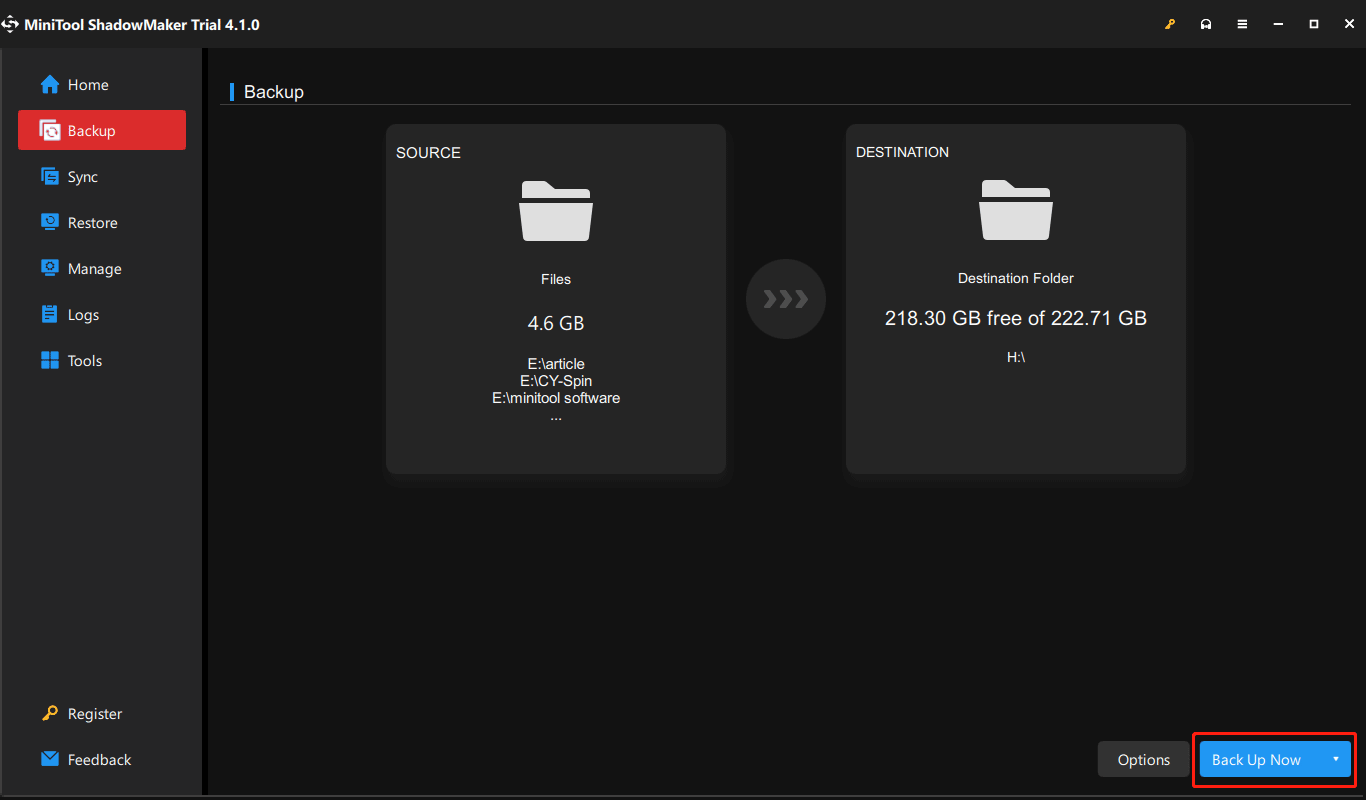
Step 3: Tap on DESTINATION, go to Computer, and choose a drive of your external hard disk.
Step 4: Click Back Up Now finally to start data backup at once.

After backing up your computer, now it is time for you to take measures to reimage computer. Well then, how to reimage a computer? Multiple ways can be found in the following part. Let’s get started.
How to Reimage a Computer Windows 11/10/7
While searching for this topic online, you can find out 3 aspects, and let’s see the detailed ways in different situations.
How to Reimage a Computer Without Disc
How can you reimage your computer if there is no bootable disc? There are 3 possible ways.
#1. Use Recovery Partition
A recovery partition, a special drive on your hard drive, is helpful to reimage your computer to its factory settings when the system crashed.
Some computer manufacturers like Dell, Lenovo, HP, etc. offer a recovery partition on the hard disk of new computers. Besides, if your system disk uses the GPT partition style, you will find a snap-in Windows recovery partition in Disk Management.
To use a recovery partition to reimage your computer, restart the PC, and press a special key to boot the machine to its recovery environment. Then restore the computer to the state when it was new via the recovery partition.
The key may be: Dell-F8, Acer- Alt+F10, HP-F11, Asus-F9, Lenovo-F11, Toshiba-0, etc. Based on different vendors, the steps are a bit different and you can search for the detailed instructions online.
#2. Reimage Computer by Reset This PC
What if there is no recovery partition on your computer? In Windows 10/11, Microsoft offers a feature called Reset this PC that enables you to reset your PC and you can reimage your PC using it.
See how to reimage a computer Windows 11/10:
Case 1: If the PC can run to the desktop
Step 1: In Windows 11, go to Settings > System > Recovery > Reset PC. In Windows 10, go to Settings > Update & Security > Recovery and click Get started under Reset this PC.
Step 2: Click Remove everything to go on.
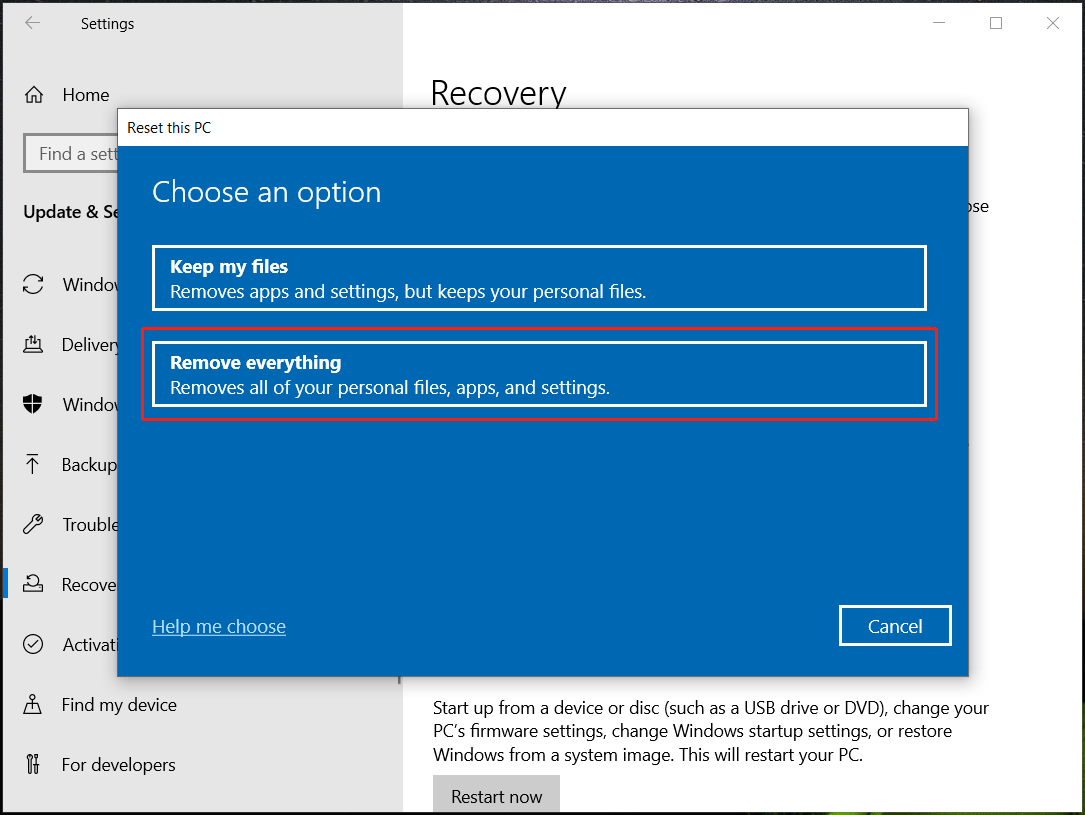
Step 3: Choose Cloud download or Local reinstall to continue.

Step 4: Follow the on-screen instructions to configure the resetting settings and start the resetting process. This process will take a few minutes and your PC will restart.
Sometimes, your computer may get stuck on resetting this PC. If so, go to this post - 3 Ways to Fix Windows 10 Reset Stuck at 1/66/99 % Black Screen.
Case 2: If the PC fails to boot properly
How to reimage computer via resetting your PC in this case? Restart your computer three times when seeing the Windows logo and it can enter WinRE. Then, reimage Windows 10/11 by following the guide:
Step 1: Navigate to Choose an option > Troubleshoot > Rest this PC.
Step 2: Choose Remove everything to continue.
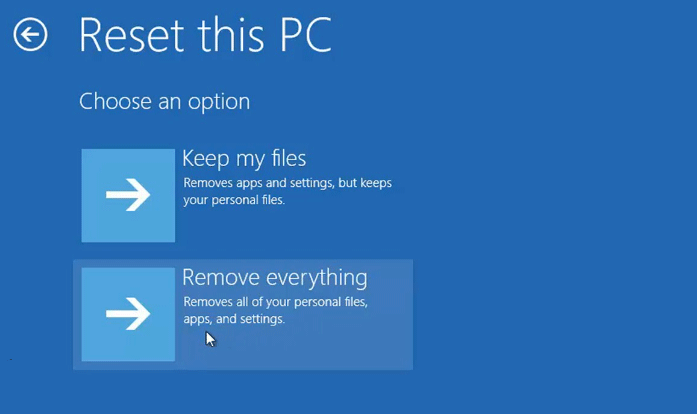
Step 3: Finish the reimaging computer process by following the instructions on the screen.
#3. Reimage Computer via System Image Recovery Windows 10/11
If you have created a system image using Backup and Restore before the system crashes, you can reimage the PC via system image recovery in Windows 11/10.
Don’t know how to create a system image? Go to Control Panel > Backup and Restore (Windows 7). Then, tap on Create a system image and start the backup by following the wizards on the screen.
Step 1: Boot your PC to WinRE. If your PC can boot, press Shift and choose Restart from the power menu to enter WinRE. If the machine cannot run, restart it three times to WinRE.
Step 2: Go to Choose an option > Troubleshoot.
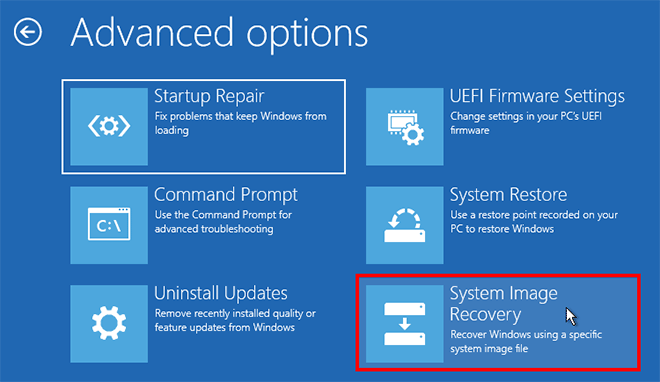
Step 3: Click Advanced options and choose System Image Recovery.
Step 4: Choose a target operating system to continue.
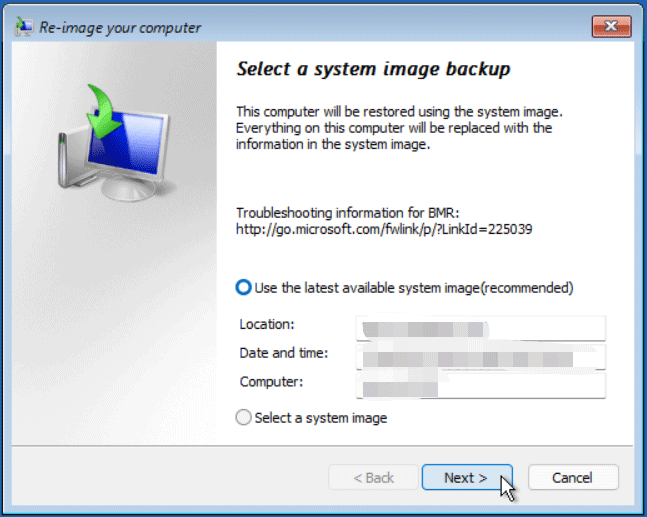
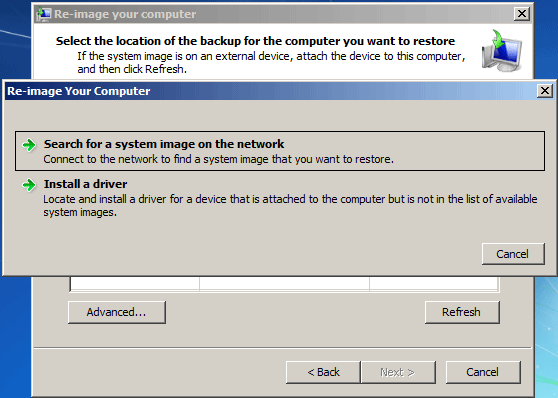
Step 5: On the Re-image your computer window, you can see Windows lists the latest available system image and click Next. Also, you can check Select a system image to manually select one to start system image recovery.
Step 6: Then you don’t need to choose Format and repartition disks, just click Next.
Step 7: Click Finish. Then, the recovery process starts.
How to Reimage Computer from Network
If you don’t have a recovery partition, how to reimage your computer in Windows 7? Some of you choose to reimage a computer from the network.
Step 1: Boot your PC and press the F8 key to access Advanced Boot Options.
Step 2: Click Repair Your Computer.
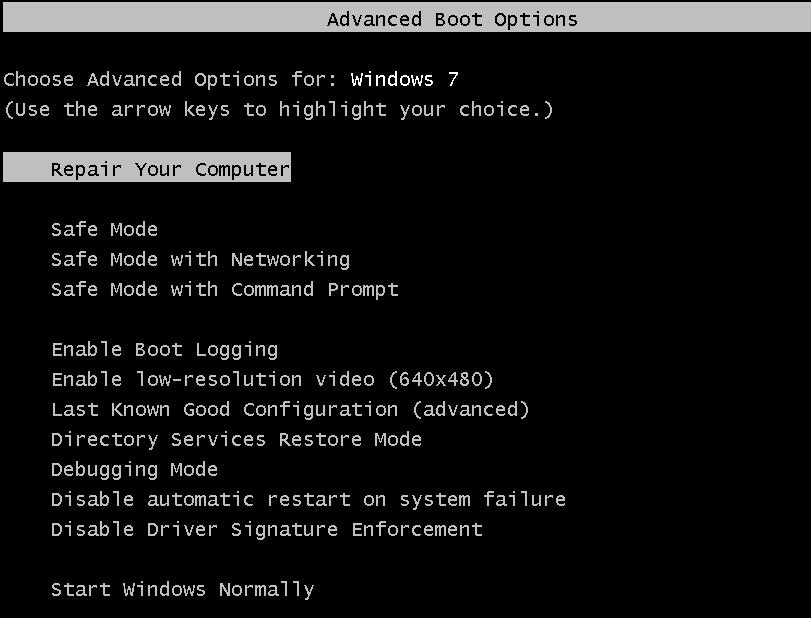
Step 3: Go to the System Recovery Options window, choose System Image Recovery, and check Select a system image.
Step 4: Click Advanced, and click Search for a system image on the network. Then follow the wizard to do the reimage PC repair.
How to Reimage Computer from USB
Besides, you can directly reinstall Windows using a USB flash drive. See the guide on how to reimage a computer Windows 10/11/7 with USB:
Step 1: Get an ISO file of Windows 7/10/11 online.
Note that Microsoft removes the official Windows 7 ISO download links and you can only get an ISO via some third-party webpages. Windows 10/11 ISO files are available to download from Microsoft. See two related posts:
1. How to Download Windows 11 Pro ISO and Install It on Your PC
2. How to Free Download Windows 10 Pro ISO and Install It on a PC?
Step 2: Burn the ISO file to a USB flash drive using Rufus to create your own Windows installation drive.
Step 3: Change the boot order in BIOS to boot your computer from this USB drive you have created.
Step 4: Windows Setup will begin loading. Choose the Windows setup options like language, time & currency format, and keyboard type. Then, click Next.
Step 5: Click the Install now button.
Step 6: Accept the Windows license agreement and choose an edition to install.
Step 7: Decide where to install Windows and then the reimaging process will start.
How long does it take to reimage a computer? Perhaps you will ask us. Actually, this operation will cost you 20 minutes to 1 hour. Please wait patiently.
Verdict
What does reimage a computer mean? How to reimage a computer in Windows 11/10/7? After reading this post, you know much information about this topic – reimage computer. Before you reimage your computer, remember to back up your important data with MiniTool ShadowMaker (get it via the following download button) and then choose a proper way for this task without losing any data.
MiniTool ShadowMaker TrialClick to Download100%Clean & Safe
If you find out some other effective ways to reimage Windows 10/11/7, leave them in the comment below. Thanks a lot.
Reimage Computer FAQ
You can reimage your computer without disc – using a recovery partition, resetting PC and performing a system image recovery in WinRE, reimage your PC from USB or over network.
If your current OS is bogged down in old files and programs, and runs slowly, you can choose to reimage the PC to improve the performance. Besides, it can be used to remove viruses & malware and fix some PC issues.
Everything on your PC is deleted and you can get a brand new operating system after you reimage Windows 11/10/7.
About The Author

Position: Columnist
Vera has been working at the MiniTool Team for over 10 years as a technical editor and content writer. She mainly focuses on disk and partition management, data recovery, Windows backup and restore, and PC troubleshooting. Through in-depth software testing and hands-on experience, she has helped users solve a wide range of computer problems and better protect their data on Windows devices.
User Comments :