What Is Synology Drive Server?
What is Synology Drive Server?
To make the definition easy to understand, Synology Drive Server, the package includs three components – Synology Drive Admin Console, Synology Drive, and Synology Drive ShareSync.
It can help upload files to your Synology Drive, share files, create documents, sync files between your computer and Synology Drive, and back up files from your computer to your Synology Drive.
With the enabled Synology Drive Server feature, you can access it from web browsers, desktop applications, and mobile apps.
There are some major available features that you may be interested in after the Synology Drive Server feature has been enabled.
- You can use a NAS device for sharing or syncing files.
- Synology Drive Server allows the backup feature to prevent data loss.
- better compatibility with different devices, such as computers and mobile phones.
- Synology Drive Server provides higher-level security protection to keep your data from hackers and viruses.
- With Synology Drive Server, you can easily manage your files according to its intuitive user interface.
For more Synology Driver Server functions and features, you can refer to these articles:
- How to Do the Synology Backup? Here Is a Full Guide!
- [Answer] Synology Cloud Sync – What Is It and How to Set Up It?
Then to set up Synology Drive Server, you can go to the next part for some details.
How to Set Up Synology Drive Server?
Since Synology Drive Server has different versions for mobile and desktop devices, there are three major versions you may need most – Synology Drive Client for desktop, Synology Drive for cloud, and Synology Drive app for mobile devices.
Set Up Synology Drive Server
First of all, you need to do some preparations as below, and then please set up your Synology Drive Server by doing the following things.
Preparations:
- Make sure your NAS has been updated to the latest version.
- Make sure you have installed Universal Search and Synology Application Service; you can do that in the Synology Package Centre.
To set up Synology Drive Server
Step 1: Log in to your Synology NAS and open Synology Package Center.
Step 2: In All Packages, search for Synology Drive Server and click Install to gain the tool.
Step 3: When the download finishes, open it to install Synology Drive and Drive Admin Console server.
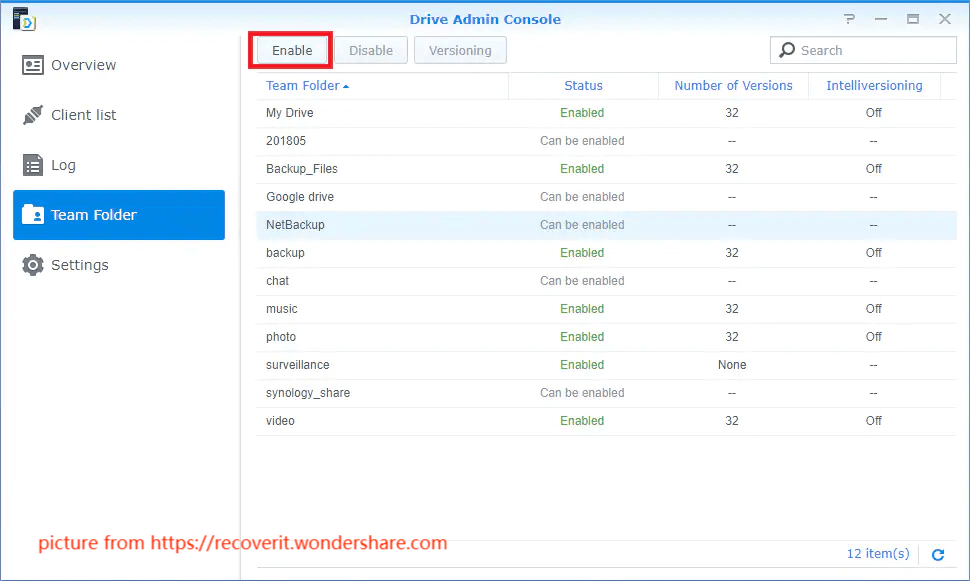
Step 4: Open Synology Drive Admin Console on your Synology NAS and go to the Team Folder tab where you need to enable the My Drive option and the other folder you want to sync.
Step 5: When a prompt pop up, click Yes and you will be redirected to another page. Just check the options of Enable user home service and Enable Recycle Bin.
Step 6: Then in Synology Drive Admin Console, click Versioning to customize the settings as you want.
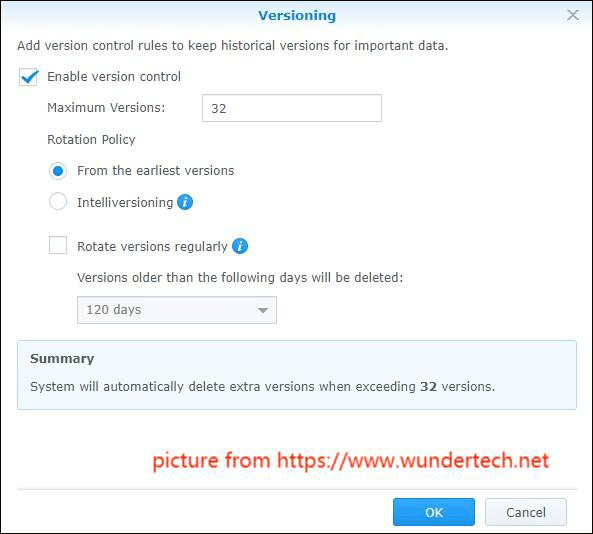
Step 7: Then click OK to save your choice and you will get a notification that you should keep in mind and follow the on-screen instruction to change the settings.
Step 8: Then open Synology Drive Admin Console again and choose Team Folder.
Step 9: Here, you can choose the folder that you hope to allow it to be used on clients and choose Enable.
Note: It is highly recommended to enable version control and customize the settings.
Then after the set-up, now you can sync files via Synology Drive Server. Of course, there are some choices for you – Synology Drive ShareSync and Synology Drive Client.
So, how to use Synology Drive ShareSync and Synology Drive Client? These two articles will be helpful for you:
- Resolved! What Is Synology Drive ShareSync? How to Set Up It?
- What is Synology Drive Client? How to Back up/Sync Data with It?
Synology Driver Server Alternative: MiniTool ShadowMaker
You may think the process to set up Synology Drive Server is complicated. There is another sync tool with intuitive interface and easy-to-learn operations for you – MiniTool ShadowMaker. MiniTool ShadowMaker allows you to sync files to User, Computer, Libraries, and Shared.
The whole process won’t take you much time and with the simple steps, you can easily get your files shared among different location.
Download and install the program and get this 30-day free trial version.
MiniTool ShadowMaker TrialClick to Download100%Clean & Safe
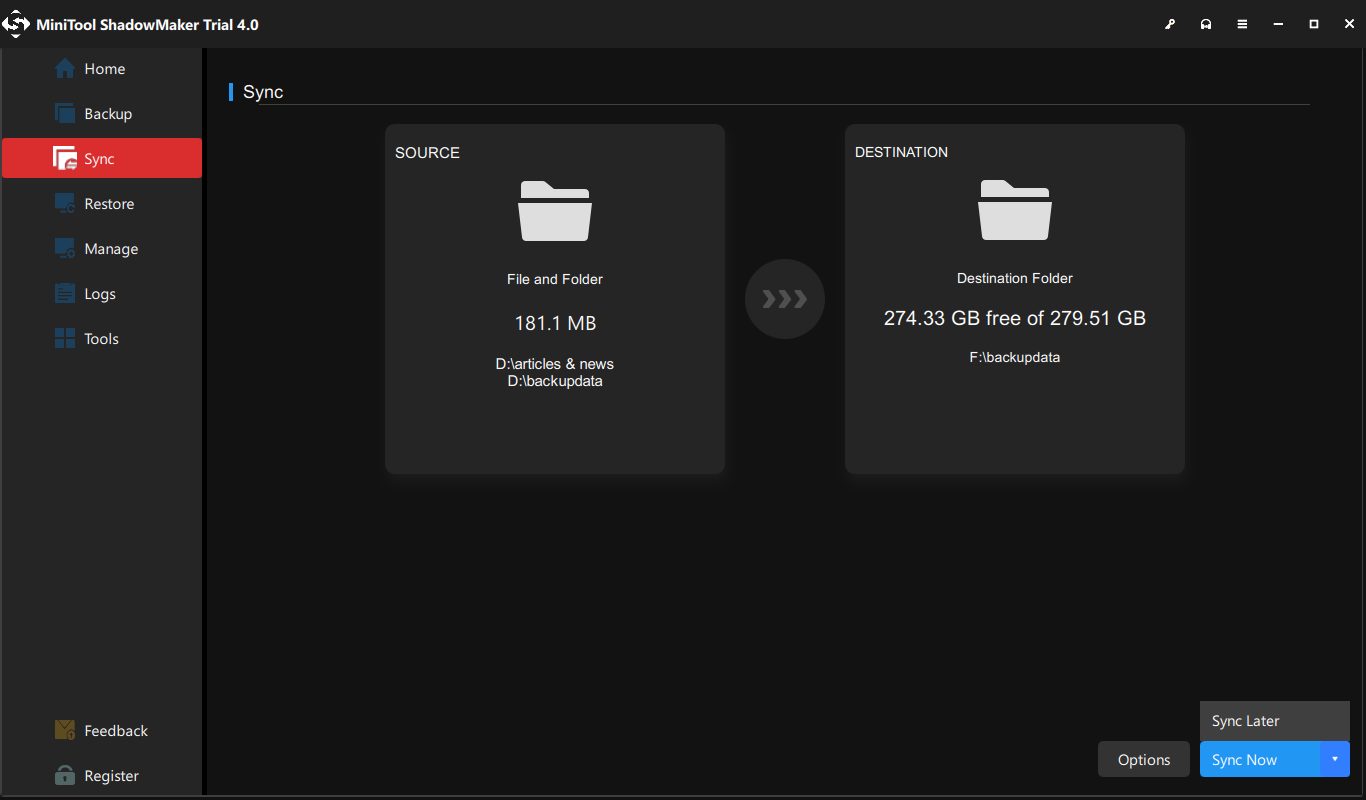
Step 1: Open the program and click Keep Trial.
Step 2: In the Sync tab, choose your desired files from SOURCE and choose the location you want to sync to from DESTINATION. The sync destination includes User, Computer, Libraries, and Shared.
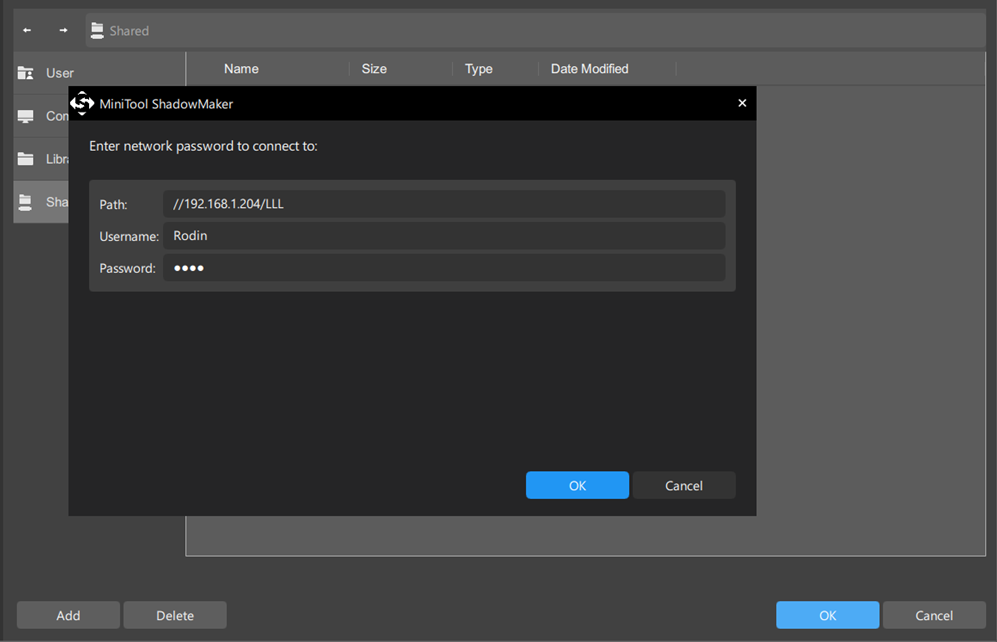
If you want to perform a NAS sync, you can click Shared and then Add to input the IP (or the folder path), Username, and Password. Then open the folder and sub-folder as the storage place and hit OK.
Step 3: Choose Sync Now or Sync Later to perform the task.
Wrapping It Up
Sinology Driver Server is popularly applied in Synology NAS drives and plays an important role in data storing, sync, and backup. Users can use this application on different devices and make their data transferred more easily.
Now, this article has an overall introduction to Sinology Driver Server. Hope this article can be useful for you.
If you have encountered any issues when using MiniTool ShadowMaker, you can leave a message in the following comment zone and we will reply as soon as possible. If you need any help when using MiniTool software, you may contact us via [email protected].
User Comments :