
“The media is write protected” means Windows cannot write, modify, or delete data on a hard drive, USB flash drive, or SD card. To fix it, check the physical lock switch, remove the read-only attribute, edit the registry, run CHKDSK, or format the drive.
What Causes The Media Is Write Protected Windows 10/11
Some of you might be bothered by the operation did not complete because the media is write protected (ERROR_WRITE_PROTECT) when you attempt to edit, copy, or delete files on a hard drive, USB flash drive, SD card, or other storage devices.
This indicates that your Windows device refuses to work with this drive and you are unable to make any changes on it.
The following are common causes for this error:
- The file system is corrupted.
- Your storage device is infected with viruses or malware.
- The disk is corrupted or damaged.
- Some system files are faulty, damaged or missing.
- The registry key is set to enable write protection.
- The drive is marked as read-only in Windows.
- The USB flash drive, SD card, or other external storage devices are pushed into the write protection position.
In this article, we will offer you clear and easy instructions about how to get rid of the media is write protected both on internal drives and external storage devices. Without wasting more time, let’s jump into it.
How to Fix the Media Is Write Protected
Check the following table to identify your case and choose a suitable solution.
| Situation | Recommended Fix |
| USB drive or SD card has a physical lock. | Check the physical switch |
| Drive is marked as read-only. | Use DiskPart to clear the read-only attribute |
| The drive has file system errors. | Run CHKDSK for file system errors |
| Write protection persists after basic fixes. | Check the StorageDevicePolicies registry setting |
| The drive is corrupted, and data is backed up. | Format the drive |
Fix 1: Check the Physical Switch
There is a physical write protection switch on the USB flash drive or SD card. If the switch is pushed into the write protection position, the media will be unable to write or read. To check the physical switch, you need to:
Step 1. Eject the drive from your computer.
Step 2. Find the physical write protection switch on the device. Usually, it is located on the side or bottom of the storage device. If the switch is on, move it to the off position.
Fix 2: Use DiskPart to Clear Write Protection
If your hard drive, USB drive, or SD card is marked as read-only, you can remove the attribute via DiskPart.
Ensure you select the correct disk by checking its size.
Step 1. Launch Command Prompt as an administrator.
Step 2. Type diskpart and hit Enter.
Step 3. Type list disk and press Enter to see a list of disks. You can recognize the external or USB drive according to their size. Note down the disk number of your removable disk.
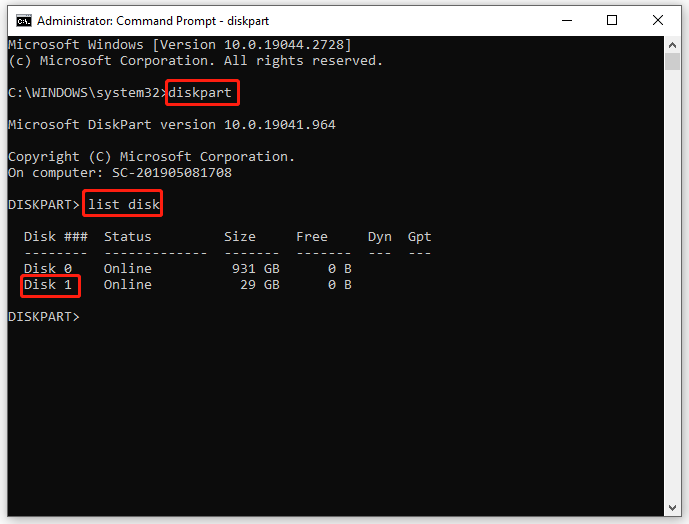
Step 4. Type select disk 1 (replace 1 with the disk number you noted down in the last step) and hit Enter.
Step 5. Type attributes disk clear readonly and hit Enter.
Step 6. After receiving Disk attributes cleared successfully, type exit and hit Enter.
Fix 3: Modify the StorageDevicePolicies Key
You will get the media is write protected when the WriteProtect registry key is disabled.
Try tweaking the StorageDevicePolicies setting. If this key doesn’t exist, you need to create it first.
In case something goes wrong with the registry, please back up the registry database in advance. See this guide - How to Backup and Restore Registry in Windows 10.
Step 1. Press Win + R to evoke the Run dialog.
Step 2. Type regedit and tap on Enter to open Registry Editor.
Step 3. Navigate to the following path:
HKEY_LOCAL_MACHINE\SYSTEM\CurrentControlSet\Control
Step 4. Right-click on Control > select New > hit Key > rename the new key as StorageDevicePolicies.
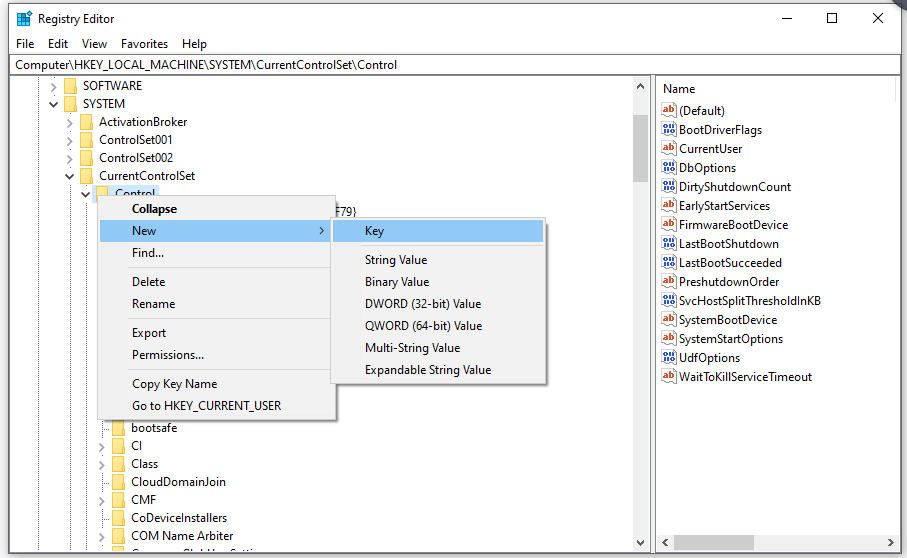
Step 5. Right-click on the StorageDevicePolicies folder > select New > hit DWORD (32-bit) Value > rename it as WriteProtect.
Step 6. Right-click on WriteProtect > select Modify > change the value data to 0.
Step 7. Quit Registry Editor and reboot the computer to make the changes effective.
Fix 4: Check the Disk for Errors
The media may be write-protected due to file system errors. To resolve this issue, run Windows disk-checking tools.
Way 1: Run a Disk Scan in Windows Properties
Step 1. Press Win + E to open File Explorer.
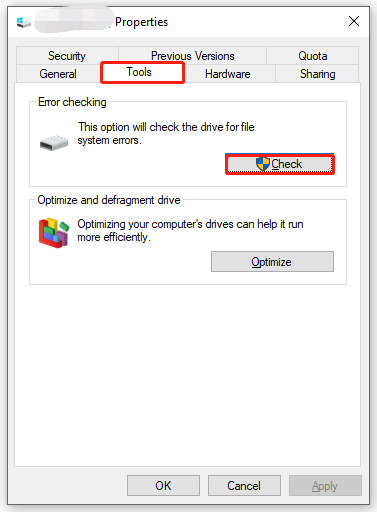
Step 2. Right-click on the drive you want to scan and select Properties.
Step 3. Under the Tools section, click on Check > Scan and Repair Drive. Then, the scan will detect and repair any problem on the drive.
Way 2: Run CHKDSK Scan in Command Prompt
Step 1. Type cmd in the search bar to locate Command Prompt and right-click on it to choose Run as administrator.
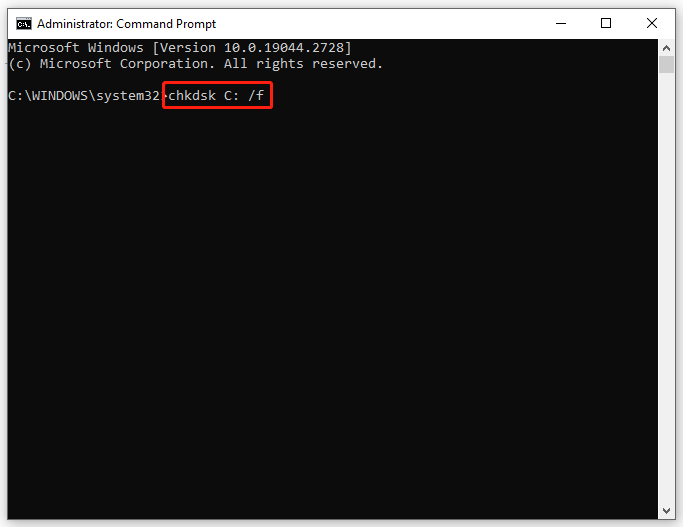
Step 2. Type chkdsk C: /f and tap on Enter. Remember to replace C: with the letter of your target partition.
Fix 5: Run DISM & SFC
Corrupted system files can also be a potential culprit of the media is write protected. You can use DISM to repair the corrupted system image and run SFC to check & fix the damaged system files. Here’s how to do it:
Step 1. Run Command Prompt as an administrator.
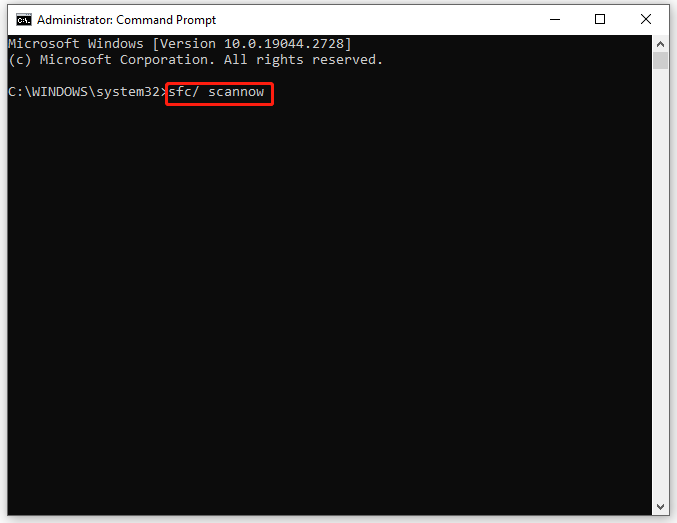
Step 2. Run SFC to check & fix the damaged system files and then
Step 3. Type sfc/ scannow followed by Enter.
Fix 6: Scan for Malware
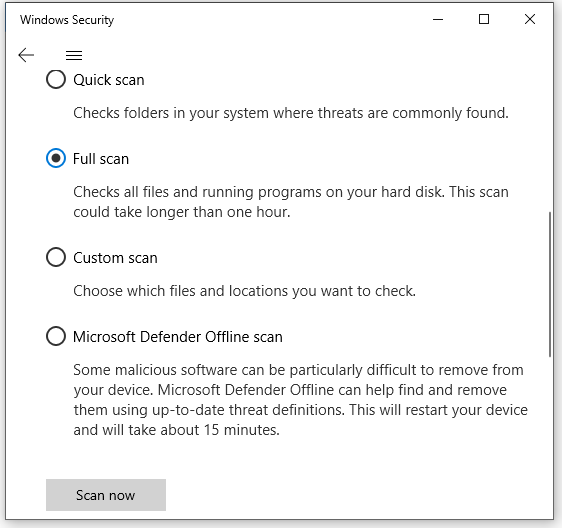
Maybe your device is infected by malware or viruses, causing issues like the media is write protected. In this case, you can perform a full scan to detect any malware running on your computer.
Step 1. Press Win + I to launch Windows Settings.
Step 2. In the settings menu, scroll down to find Update & Security and press it.
Step 3. In Windows Security, go to Virus & threat protection > Scan options.
Step 4. Windows Defender offers you 4 types of scans: Quick scan, Full scan, Custom scan, and Microsoft Defender Offline Scan. Here, we check Full scan and then hit Scan now to start scanning.
Fix 7: Format the Drive
If the previous methods fail and the drive is still write-protected, formatting may resolve the problem.
Drive formatting erases the files stored on the selected drive. Back up important data before proceeding to avoid data loss. For file backup, MiniTool ShadowMaker can help. Designed for Windows, this backup software allows you to back up disks, partitions, systems, folders, and files.
MiniTool ShadowMaker TrialClick to Download100%Clean & Safe
Step 1. Run MiniTool ShadowMaker and move to the Backup page.
Step 2. Go to SOURCE > Folders and Files, and then you can choose the files you want to back up (checking several files or folders at one time is permitted).
As for selecting a storage path for the backup image files, go to DESTINATION (an external hard drive or USB flash disk is preferred).
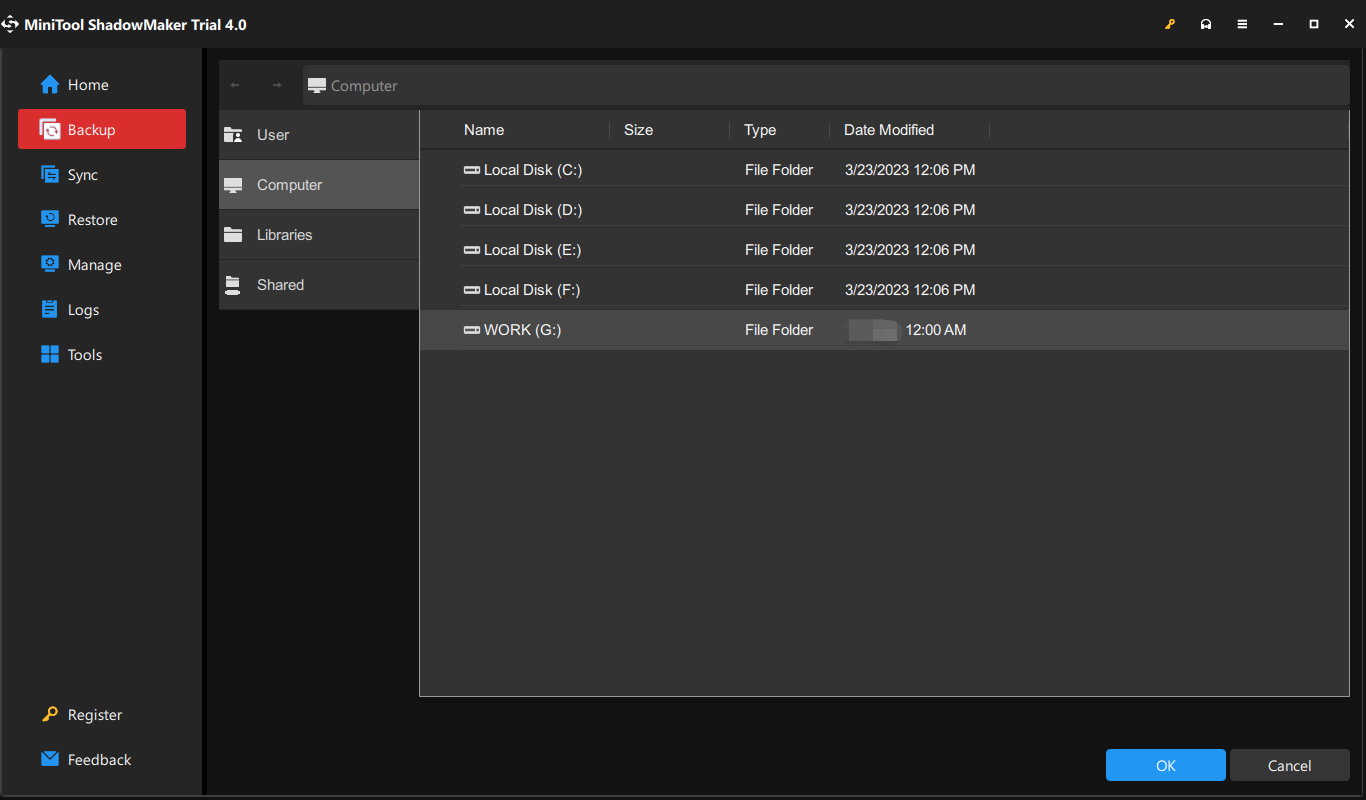
Step 3. Click on Back Up Now to start the backup right now.
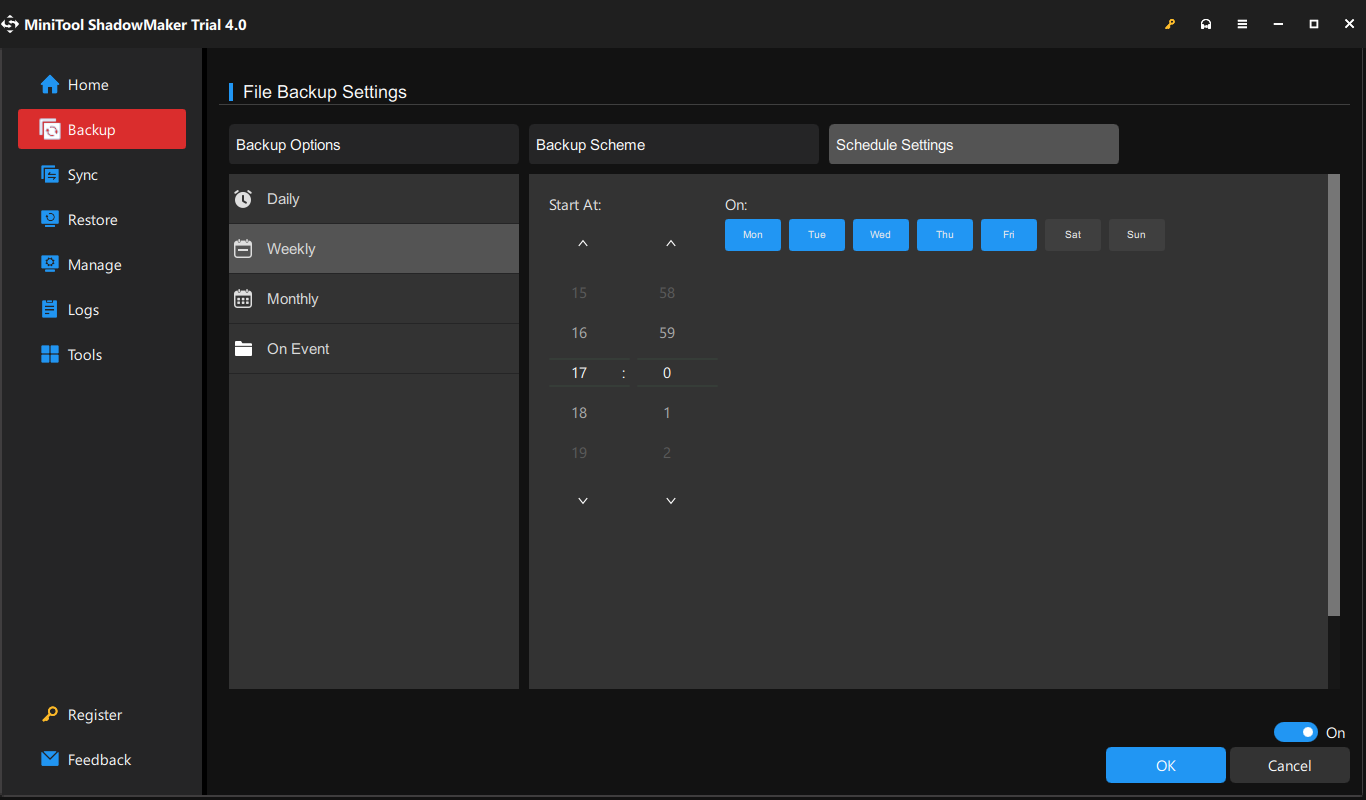
It is highly recommended to develop a habit of backing up regularly. If you desire to do that, you can click on Options > Schedule Settings > turn it on manually to customize to back up your files automatically at a specific time point of a day, week, or month.
After the backup, follow these steps to format your drive.
Step 1. Right-click on the target drive in File Explorer and choose Format.
Step 2. Click Start to begin formatting.
# Related Error: The Backup Failed, The Media Is Write Protected
If you encounter The backup failed. The media is write protected. (0x80070013) while creating a system image, try the following fixes.
Fix 1: Optimize Drives for Better Performance
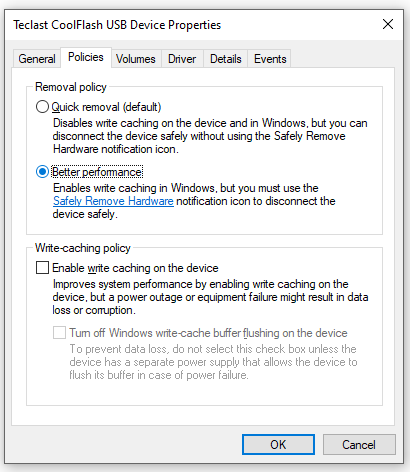
Starting with Windows 10 version 1809, Quick Removal is the default removal policy for external storage devices. To address The backup failed. The media is write protected, you can switch to the Better Performance option.
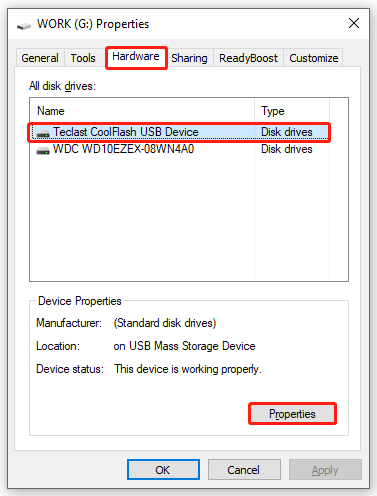
Step 1. Open File Explorer and right-click on your USB flash drive or external hard drive to select Properties.
Step 2. Under the Hardware tab, select your target drive and click on Properties.
Step 3. In General, press Change settings.
Step 4. Go to the Policies tab, tick Better performance or Optimize for performance and then hit OK.
Before unplugging the external storage device, you need to use the Safely Remove Hardware option, or else it may lead to data loss.
Fix 2: Clear Read-Only Attributes via DiskPart
To remove the write-protected error, you can also run DiskPart to clear read-only attributes.
Refer to the steps above for details.
Conclusion
When Windows 11/10 reports “the media is write protected,” start with the simplest ways such as checking the physical lock switch and clearing read-only attributes. If the issue still occurs, check for disk errors or Windows registry settings, or format the drive.
Before formatting, ensure you back up important files to prevent data loss. If you encounter issues with our software, contact us at [email protected].
The Media Is Write Protected FAQ
About The Author

Position: Columnist
Vera has been working at the MiniTool Team for over 10 years as a technical editor and content writer. She mainly focuses on disk and partition management, data recovery, Windows backup and restore, and PC troubleshooting. Through in-depth software testing and hands-on experience, she has helped users solve a wide range of computer problems and better protect their data on Windows devices.
User Comments :