Can You Upgrade Motherboard and CPU without Reinstalling Windows
Sometimes, your hardware such as a motherboard, CPU, etc. may become defective and cause start up issues in your Windows 10/8/7 OS. Or, you may be not be satisfied with your current motherboard and CPU and want to upgrade or replace them.
For most home & office users nowadays, completing a fresh install is not a problem after the motherboard and CPU update, but keeping this tedious job away is still necessary. Besides, you will have to reinstall all the previously installed applications, configure system settings, and transfer data since the clean install will remove them, not to mention some of the programs need re-activating.
Thus, like most other people, you probably also want to upgrade your hardware without reinstalling Windows.
Then, here comes a question: can I upgrade my motherboard and CPU without reinstalling Windows 10/8/7?
The answer is Yes!
This article is targeted to you – it introduces how to replace dead motherboard without reinstalling Windows in detail. Once the process is correctly completed, the Windows OS will be able to boot after the motherboard upgrade.
How to Upgrade Motherboard and CPU without Reinstalling Windows
To ensure the system can run properly after the hardware change, here are 3 available ways for you to easily replace a dead motherboard and CPU without reinstalling Windows.
Method 1: Use MiniTool ShadowMaker for Universal Restore
MiniTool ShadowMaker, one of the best Windows backup software, is designed to help Windows 10/8/7 users to back up files, the OS, partition and the entire disk for data protection. If anything in the computer goes wrong, you can perform a quick disaster recovery.
Additionally, its Universal Restore feature allows you to restore Windows OS to a computer with different hardware. Thus, it is exactly what you need if you try replacing the motherboard and changing CPU without reinstalling Windows 10/8/7. No changes will be made to the previous system settings that you are accustomed to.
Above all, it offers a Media Builder to create a bootable disc or USB drive to boot the PC when it is unbootable. With this tool, you can restore the system to the PC with different hardware.
Now, try out this tool by downloading its Trial Edition for free from the following button. Note that this edition only offers a 30-day free trial. If you like this software, upgrade to its Pro Edition.
MiniTool ShadowMaker TrialClick to Download100%Clean & Safe
After downloading, start the hardware upgrade. And here, we will take “replace motherboard without reinstalling Windows 7” as an example.
Operation 1: Back up the Windows OS before Upgrade
Before the upgrade, change, or replacement of the motherboard and CPU, we strongly suggest creating a system image backup to avoid any accidents. Of course, you can skip this process to the next one if you find it unnecessary.
Let’s see how to back up Windows 7 OS.
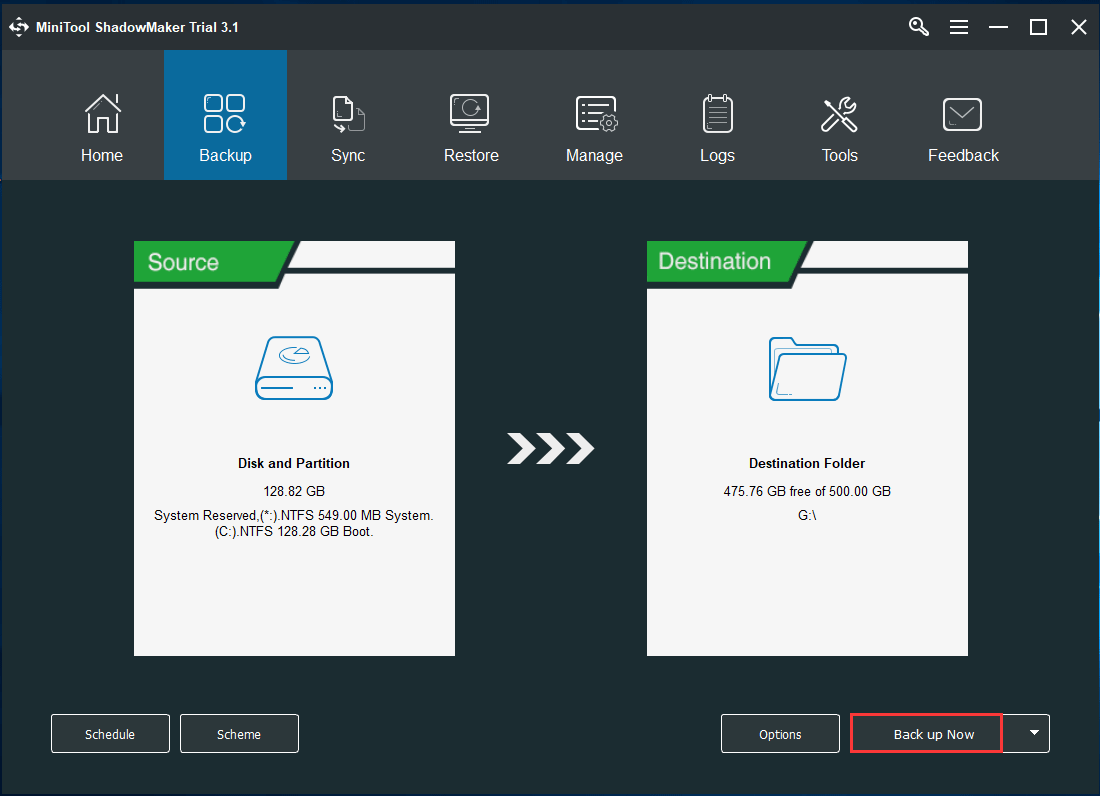
Step 1: Launch MiniTool ShadowMaker Trial Edition.
Step 2: You will be directed to the Home page to set up a backup if no previous backup was created. Just follow the tip to go to the Backup tab.
Step 3: Take a look at this following interface! You will find that all system-related partitions have been chosen as the backup source by default, as well as a destination folder. Just click Back up Now in the Manage tab to perform the task
Operation 2: Create a Bootable Disc or Drive for Universal Restore after Hardware Upgrade
After changing motherboard and CPU, your Windows 7 will very likely fail to run. Thus, to upgrade motherboard and CPU without reinstalling Windows, you need to create a bootable CD/DVD disc or USB flash drive with the Media Builder feature of MiniTool ShadowMaker for universal restore.
MiniTool ShadowMaker TrialClick to Download100%Clean & Safe
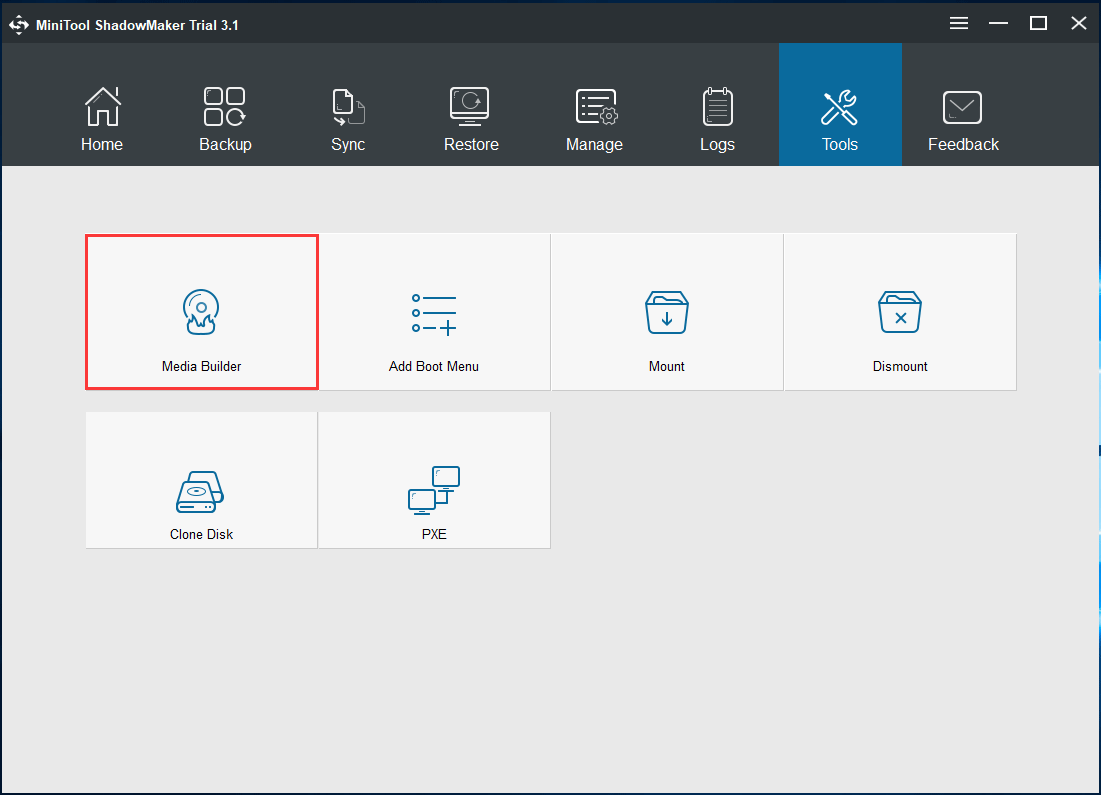
Step 1: Open MiniTool ShadowMaker Trial Edition, choose Keep Trial and local backup.
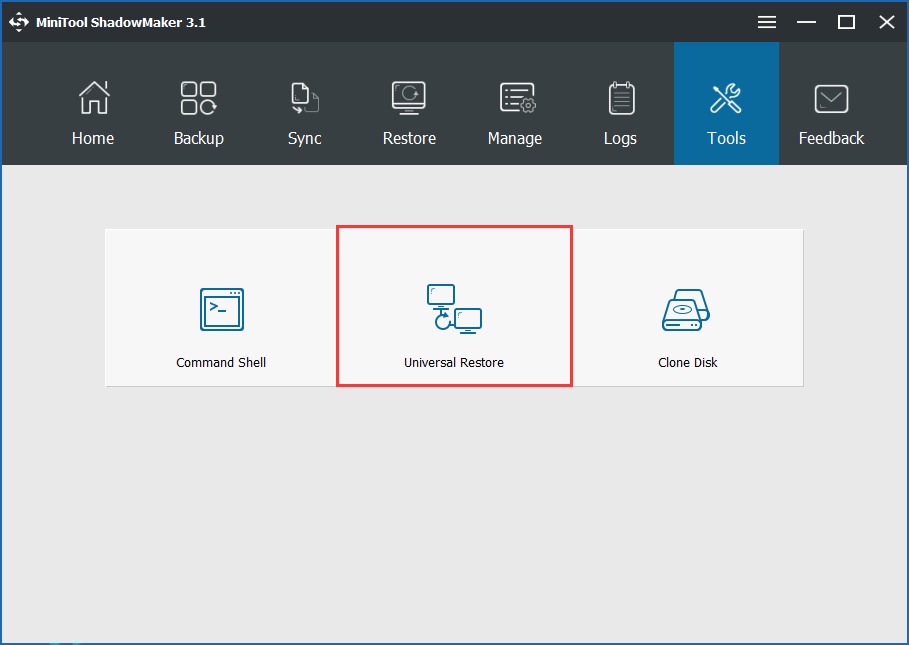
Step 2: Under the Tools tab, choose Media Builder feature.
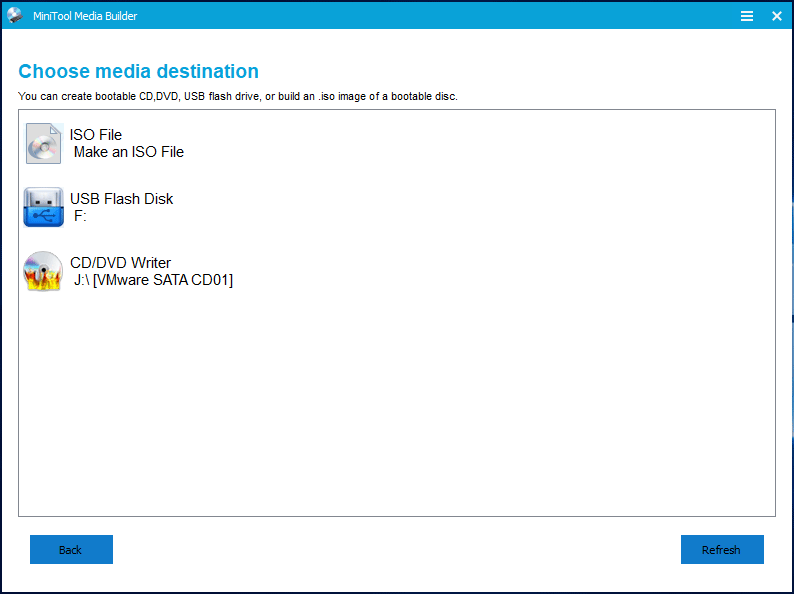
Step 3: Click the WinPE-based media with MiniTool plug-in section to continue.

Step 4: Choose media destination, which can be ISO file, USB hard drive, USB flash drive, and CD/DVD disc. Then, start the creation.
In the end, you will have a recovery drive with system backup.
With the created bootable media, you can boot your PC from the bootable disc or USB drive after installing a new motherboard in Windows 7.
Operation 3: Upgrade Your Motherboard and CPU
After creating a bootable USB drive or CD/DVD disc with a system backup, now you can start changing the motherboard and CPU.
To replace the dead motherboard and install a new motherboard in Windows 7, you should ensure the motherboard you choose can be installed in the computer case and pay attention to the motherboard’s port.
Additionally, the CPU should be selected according to the motherboard’s model and performance parameter. In short, choose proper motherboard and CPU.
After completing the selection, take measure to upgrade them. This post – How to Upgrade and Install a New CPU or Motherboard (or Both) is helpful for you to do this work.
Operation 4: Important – Restore System to Dissimilar Motherboard
If you have changed your motherboard and CPU, Windows 7 will be not working. It is likely that you need to do a clean install of Windows and restore OS since the installed Windows chipset drivers may be incompatible.
Don’t worry. MiniTool ShadowMaker has a feature called Universal Restore, enabling you to restore the system to the computer with dissimilar hardware. Here, you can use it to perform a restore after changing CPU and motherboard without reinstalling Windows 7/8/10.
Step 1: Change your boot order and boot your Windows using the bootable media you have created in Operation 2.
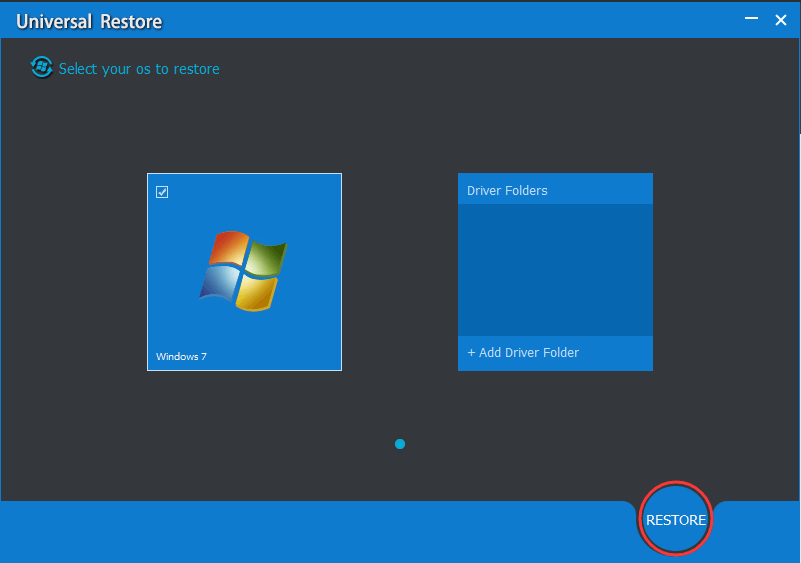
Step 2: A few seconds later, MiniTool ShadowMaker Bootable Edition will launch. Just go to the Tools tab to choose the Universal Restore feature.
Step 3: Then, this software will automatically detect and list the operating system installed on the hard drive. Choose Windows 7 and click Restore to repair the unbootable OS after replacing or upgrading the motherboard and CPU.
With MiniTool ShadowMaker, you can easily upgrade motherboard and CPU without reinstalling Windows 10/8/7. Now, download and install it on your PC for this work. You can share this freeware with your friends that need it.
MiniTool ShadowMaker TrialClick to Download100%Clean & Safe
Method 2: Change Registry
This way is a bit complicated. Here, we will walk you through two cases about how to replace motherboard without reinstalling Windows 7 by changing the registry.
Case 1: Modify Registry before Replacing Motherboard and CPU
This method needs to be completed before you replace your motherboard and CPU. If you haven’t replaced your motherboard and CPU yet, Windows can start up normally. In this case, you have to change the registry in the current working Windows before proceeding motherboard and CPU upgrade.
Step 1: Press Win + R to bring up the Run dialog, input regedit in the textbox and click OK to launch Registry Editor.
Step 2: In the following window, navigate to this path:
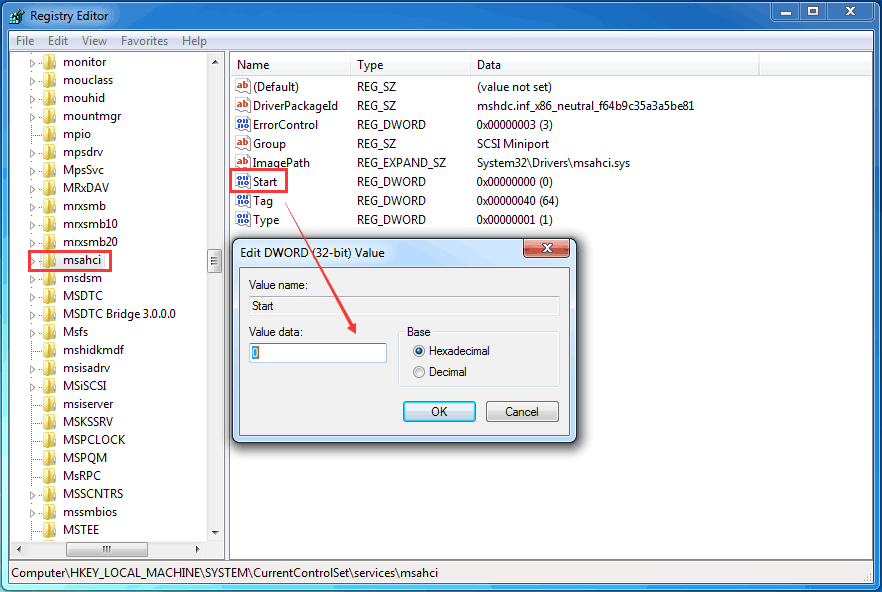
HKEY_LOCAL_MACHINE\SYSTEM\CurrentControlSet\services\msahci
Step 3: Double-click the Start DWORD and change its value data to 0. Click OK to go on.
Step 4: Then, change the following key’s DWORD value data to 0:
HKEY_LOCAL_MACHINE\SYSTEM\CurrentControlSet\services\pciide
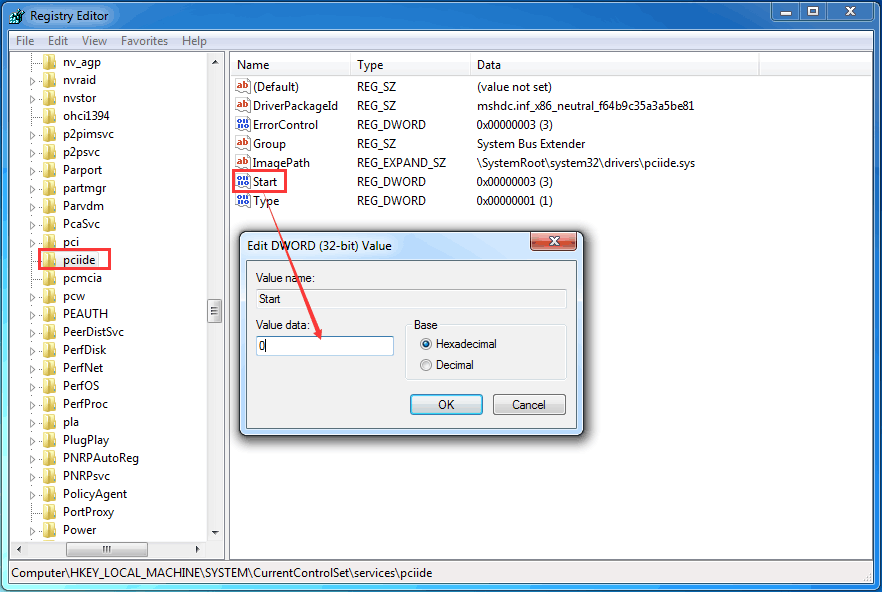
After modifying the registry, you can shut down your computer and then start installing a new motherboard and CPU. After that, your Windows OS should be able to boot normally.
This method is quite helpful for replacing the motherboard and changing the CPU without a fresh install. Please remember to complete this method before you upgrade the motherboard and CPU.
Case 2: Modify Registry Using an Offline Registry Editor after Motherboard Update
Perhaps you have replaced your motherboard and CPU but forgot to change the registry beforehand, then Windows OS failed to boot.
In this case, in addition to using MiniTool ShadowMaker to perform a universal restore (mentioned in Operation 4), you can choose to use an offline Registry Editor to modify the Windows Registry to upgrade motherboard and CPU without reinstalling Windows.
To do this, you are required to boot the non-working PC from a Windows 7 installation disc, and then start the following operations.
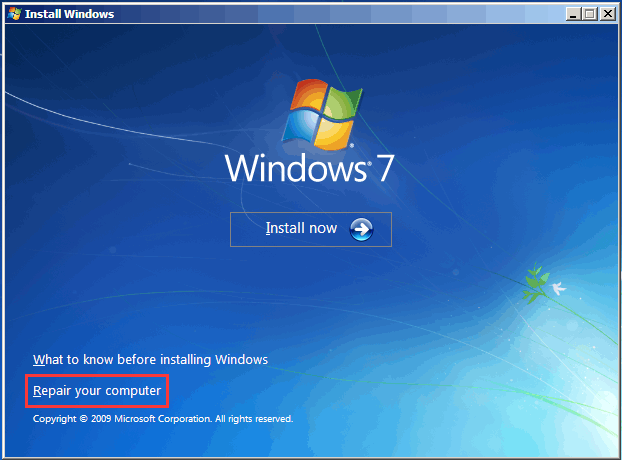
Step 1: After computer boot, configure the language, time and format, keyboard or input method.
Step 2: In the following screen, click Repair your computer.
Step 3: In the System Recovery Options screen, choose Command Prompt.
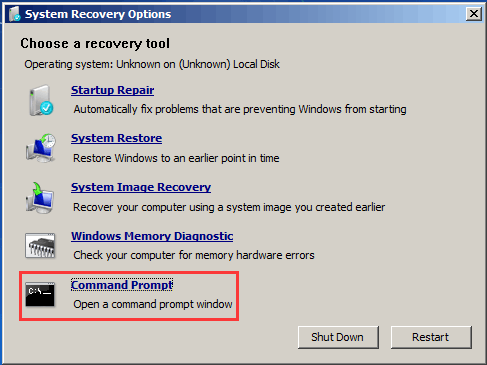
Step 4: In the CMD window, type regedit command and press Enter to launch Registry Editor.

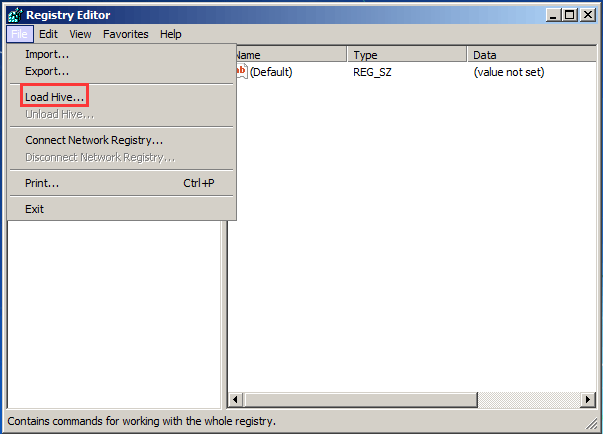
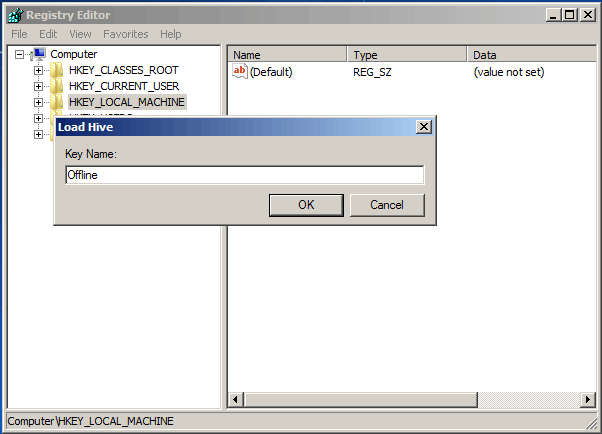
Step 5: Highlight the HKEY_LOCAL_MACHINE key.

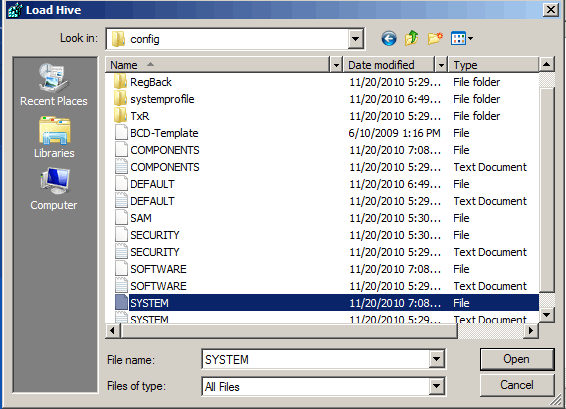
Step 6: Choose Load Hive from the File menu to load the offline registry.
Step 7: Go to the drive where Windows is installed and choose system file. Usually it is the path: C:\Windows\system32\config\system. Then click the Open button.
Step 8: Type a key name, for example, Offline.
Step 9: Go to HKEY_LOCAL_MACHINE\Offline\ControlSet001\services\msahci and double-click Start to change the value data to 0.
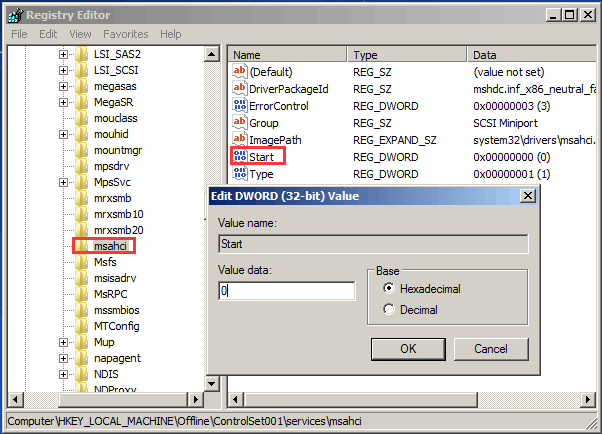
Step 10: Then, perform the same modification to this key:
HKEY_LOCAL_MACHINE\Offline\ControlSet001\services\pciide

Step 11: After finishing the modifications, highlight Offline and choose Unload Hive from the File menu to write back the changes you have made to the offline Registry.
Step 12: Restart your PC, specify the SATA mode (IDE-ATA, AHCI or RAID) according to your needs or leave the default settings in BIOS, exit BIOS, remove the Windows 7 installation disc, let the OS run properly and install required hard disk controller drivers.
By this way, you can upgrade motherboard and CPU without reinstalling Windows.
If you want to replace motherboard without reinstalling Windows 7 when it is dead, change the registry based on the actual situations.
Activate Your Windows 7 for Motherboard and CPU Update
After you finish upgrading your motherboard and CPU, you may be required to reactivate Windows. If your OS is Windows 7, there is nothing to worry about. Windows will most likely reactivate by itself. If it doesn’t, call Microsoft for help.
For Windows 10, Microsoft gives a help tutorial – Reactivating Windows 10 after a hardware change. Alternatively, you can reactivate it by following the tips.
Step 1: Before the upgrade, go to the Settings tab, and change the account to a Microsoft Account rather than Local Account.
Step 2: Upgrade the motherboard & CPU. After Windows 10 boots again, it will tell Windows 10 to reactivate:
Go to Settings > Update & security > Troubleshoot > I changed hardware on this device recently.
Next, sign in your Microsoft Account again and click the Activate button. Then, Windows 10 will grab the activation key from your online Microsoft account and re-link it to your computer with its freshly-upgraded hardware.
Step 3: If you prefer a local account instead of a Microsoft account, you can change the account back.
With these three steps, you now know how to upgrade motherboard and CPU without reinstalling Windows 10, and how to reactivate the OS as well.
Bottom Line
After finishing reading this post, you should know how to replace motherboard and CPU without reinstalling Windows 10/8/7. Follow the methods above if you need to upgrade motherboard and CPU without fresh install.
If you have any questions regarding MiniTool ShadowMaker or any suggestions of hardware update, please feel free to contact [email protected] or leave a message in the comment part below.
About The Author

Position: Columnist
Vera has been working at the MiniTool Team for over 10 years as a technical editor and content writer. She mainly focuses on disk and partition management, data recovery, Windows backup and restore, and PC troubleshooting. Through in-depth software testing and hands-on experience, she has helped users solve a wide range of computer problems and better protect their data on Windows devices.
User Comments :