
Windows Server 2016 to 2022 upgrade can significantly improve system security and performance. In this guide, you can discover how to upgrade without data loss through an in-place upgrade or a clean installation.
Quick Answer: Can You Upgrade Windows Server 2016 to 2022
Yes, you can upgrade Server 2016 to 2022 safely through 2 options:
- In-place upgrade: Keeps files, settings, and apps
- Clean installation: Installs a fresh copy of Windows
Before upgrading, use MiniTool ShadowMaker to back up important files to avoid data loss caused by errors during the upgrade process.
Why Upgrade Windows Server 2016 to 2022
The main reasons for the Windows Server 2016 upgrade to 2022 include:
- Extended lifecycle and support: Windows Server 2016 will reach the end of support on January 12, 2027, while Windows Server 2022 will remain supported until October 14, 2031. Upgrading can help extend the system lifecycle and ensure continued security updates.
- Enhanced security: Server 2022 offers advanced security features to protect against modern security threats, including Secure-core server, HTTPS, TLS 1.3, TPM, and UEFI secure boot.
- Hybrid cloud capabilities: New Azure Edition helps keep VMs up to date using cloud benefits while reducing downtime.
Next, let’s explore some things to do before an update and how to do the upgrade task.
Before You Upgrade Windows Server 2016 to 2022: Checklist
Before upgrading Windows Server 2016 to 2022, it is important to complete essential checks and data backup to ensure a smooth and safe upgrade.
#1. Check System Requirements
It is necessary to evaluate the compatibility and know if the computer hardware meets Windows Server 2022’s system requirements.
These minimum requirements include:
- CPU: 1.4 GHz 64-bit processor that is compatible with x64 instruction set and supports NX, DEP, CMPXCHG16b, LAHF/SAHF, PrefetchW, and Second Level Address Translation (EPT or NPT)
- RAM: 512 MB for Server Core or 2 GB for Server with Desktop Experience
- Storage: 32GB of space
- Network: An Ethernet adapter that can achieve a throughput of at least 1 gigabit per second; compliant with the PCI Express architecture specification
For certain features, some requirements are necessary:
- Trusted Platform Module (TPM)
- UEFI 2.3.1c-based system and firmware that supports secure boot
- Super VGA (1024 x 768) or higher-resolution
You can confirm these specifications by visiting the official documentation from Microsoft.
#2. Back up Your Data
Data backup is a task of primary importance. Before you upgrade Windows Server 2016 to 2022, make sure you create a backup for your crucial files and folders. This is primarily because data loss is a significant risk during any Windows upgrade. Besides, if you do the upgrade task via a clean install, files on the Desktop will be also deleted, and having a backup is necessary.
What’s more, you can also back up Windows configurations to avoid potential system instability, which can easily restore your system to its previous state when any issues arise during the upgrade process.
To ensure the safety of your critical information, we recommend using a reliable solution for data backup. MiniTool ShadowMaker, a piece of professional and comprehensive backup software, plays a great role in file backup, folder backup, system backup, disk backup, and partition backup.
Step 1: Click the button below to download MiniTool ShadowMaker Trial Edition and use the .exe file to install it on your computer.
MiniTool ShadowMaker TrialClick to Download100%Clean & Safe
Step 2: Connect a USB drive or external drive to your machine and then launch MiniTool ShadowMaker, and click Keep Trial to continue.
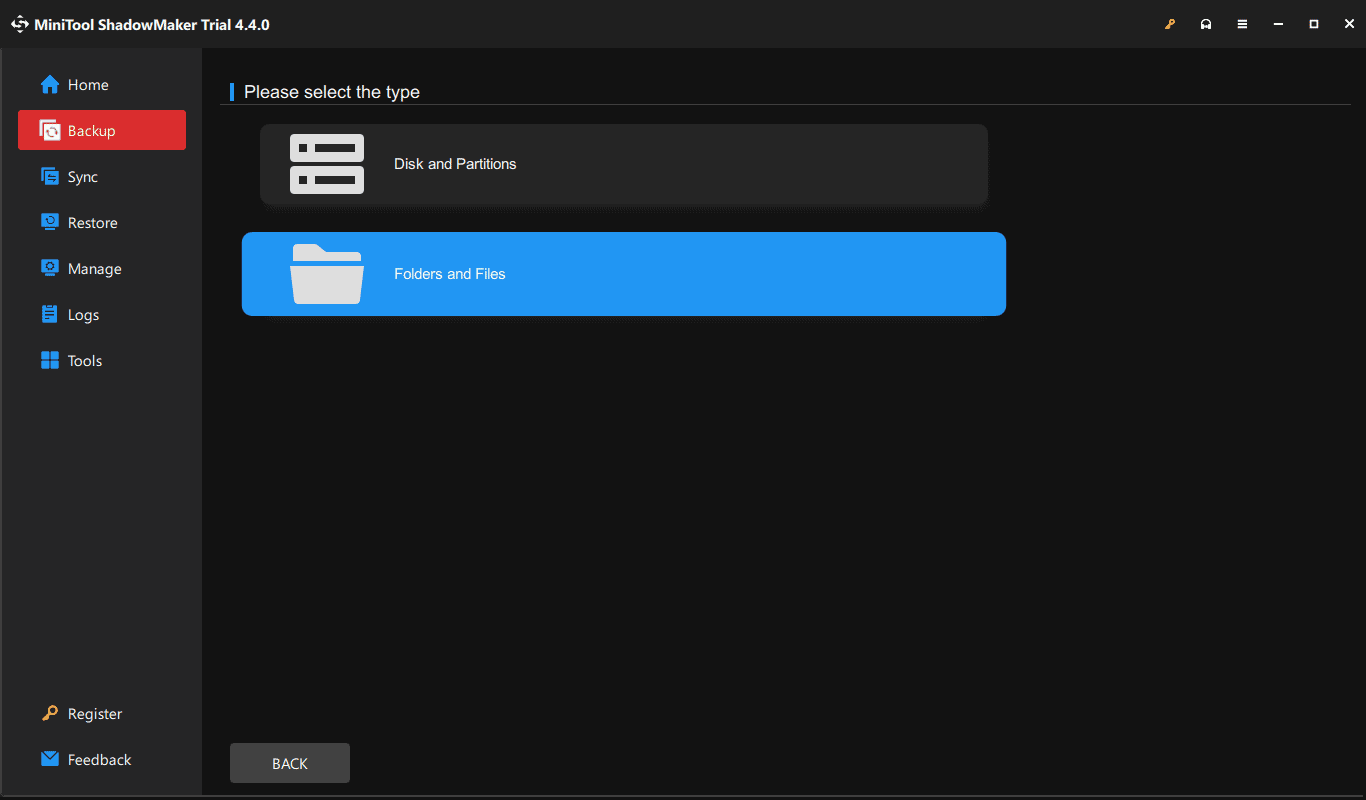
Step 3: Click Backup in the left pane, tap on SOURCE, click Folders and Files, then go to Computer to find and check the items you want to back up and click OK.
Step 4: Choose a drive to save the backup under DESTINATION.
Step 5: At last, click Back Up Now to begin data backup. Based on data size, the backup time is different.
Other Things to Notice Before Proceed
- Make sure you have a valid product key and activation method. The method varies depending on the distribution channel you got Windows Server media from (OEM, Retail, Commercial Licensing program)
- Check any third-party application vendor support requirements
- Review Microsoft server application compatibility
In the next moment, it is time to upgrade Server 2016 to 2022. To install Windows Server 2022 on your Windows 2016 computer, you can try two options: an in-place upgrade and a clean install. Follow the step-by-step guide now.
In-place Upgrade vs Clean Install
Once everything is ready, select the appropriate method to upgrade Server 2016 to 2022. The comparison table below helps you make the right choice.
| Feature | In-Place Upgrade | Clean Install |
| Data retention | Keeps files, apps, and settings | Erases the entire system drive |
| Complexity | Easy | Complex |
| Downtime | Lower (Requires server downtime only during the update and restart process) | Higher (Requires time to install the OS, configure roles, and migrate workloads.) |
| Best for | Fast upgrade | Production-critical systems requiring maximum stability |
How to Upgrade Windows Server 2016 to 2022
Method 1: Run an In-Place Upgrade
An in-place upgrade allows you to go from an older OS to a newer one while keeping the server roles, settings, and data intact.
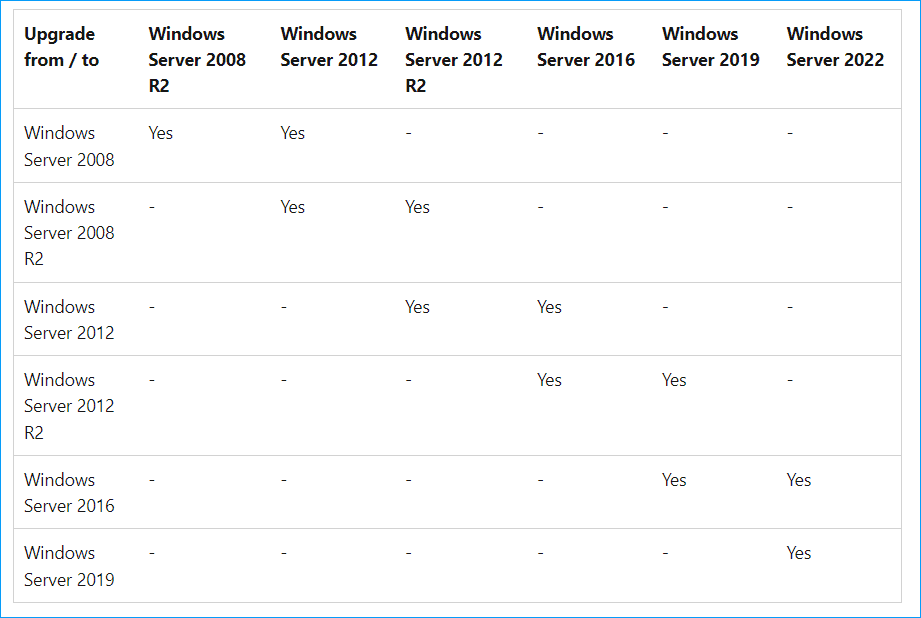
Follow the steps to perform Server 2016 to 2022 in-place upgrade:
Step 1: Download Windows Server 2022 from Microsoft
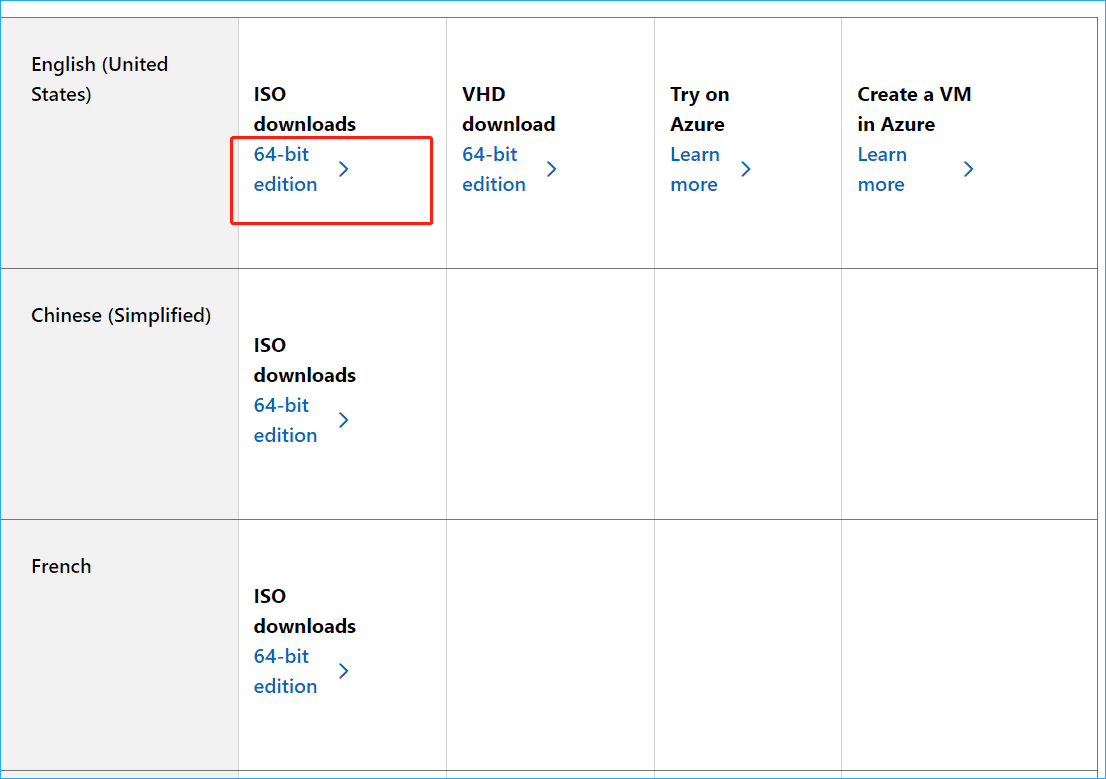
- In a web browser, access this link: https://www.microsoft.com/en-us/evalcenter/download-windows-server-2022.
- Then, click the proper link as per your language to begin downloading Server 2022 ISO. This can take some time if your download speed is slow.
Step 2: Mount the Windows Server 2022 ISO file to run setup.
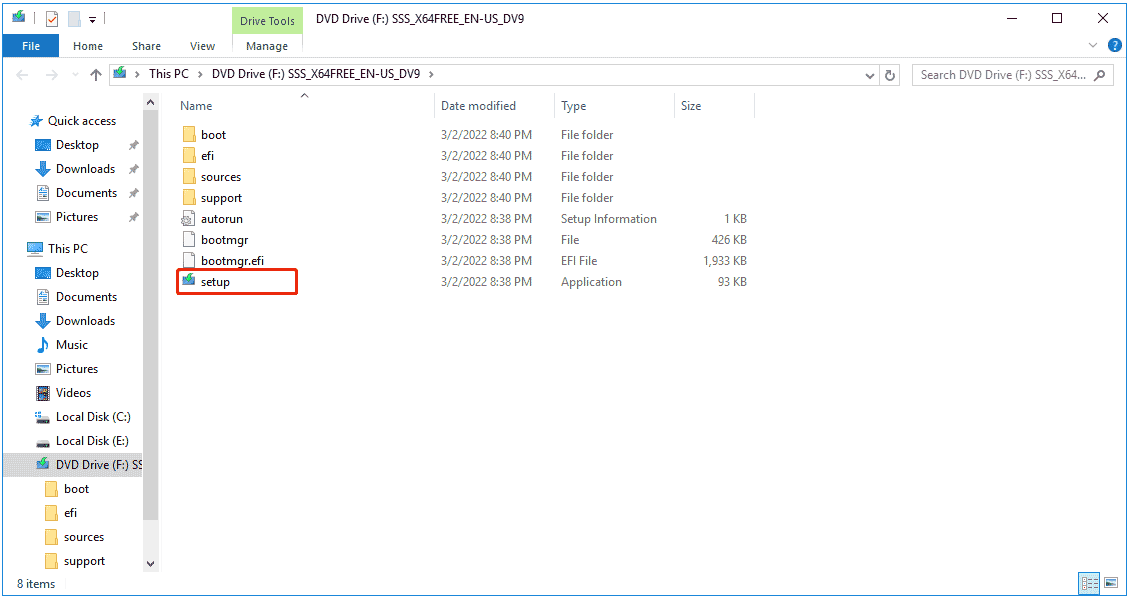
- Right-click the downloaded ISO file and choose Mount.
- Open the virtual drive and double-click on the setup file.
Step 3: Choose an upgrade option.
- Check I want to help make the installation better, and click Next.
- Click I don’t have a product key.
- Choose an edition that you want to install on the Select Image interface.
- Select Keep files, settings, and apps to preserve your data.
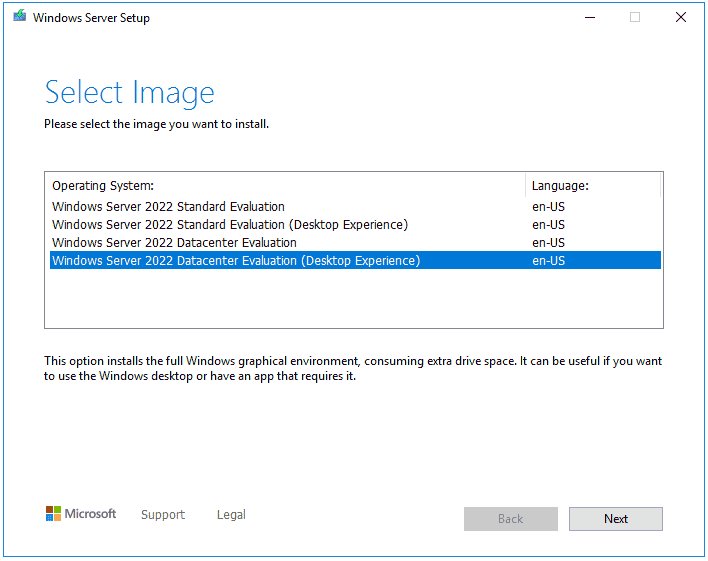
Step 4: Click the Install button to begin the upgrade process.
After completing Server 2016 to 2022 in-place upgrade, log in to Server 2022 and check if applications and services are running as expected.
Besides, you can run PowerShell and execute the command – Get-ComputerInfo -Property WindowsProductName to verify that the edition matches the media and values you selected during the setup.
Method 2: Upgrade to Windows Server 2022 via Clean Install
For maximum stability and performance, perform a clean installation of Windows Server 2022.
Step 1: Create a Bootable Windows Server USB drive.
1. Prepare an ISO image file of Windows Server 2022.
2. Download Rufus, open it, connect your USB flash drive to the Server, and choose this USB drive.
3. Click SELECT to choose the ISO you have downloaded, configure some options, and click the START button.
4. Customize Windows installation as per your needs and click OK to begin burning Windows Server 2022 to the USB drive.
Step 2: Boot the system from USB.
1. Shut down your computer.
2. Reboot it, press a key like Del, F2, etc. (it varies from computer brand) to access the BIOS menu.
3. Change the boot order to start up the system from the bootable USB drive.
Step 3: Install Windows Server 2022 from scratch.
1. Configure your language and other preferences.
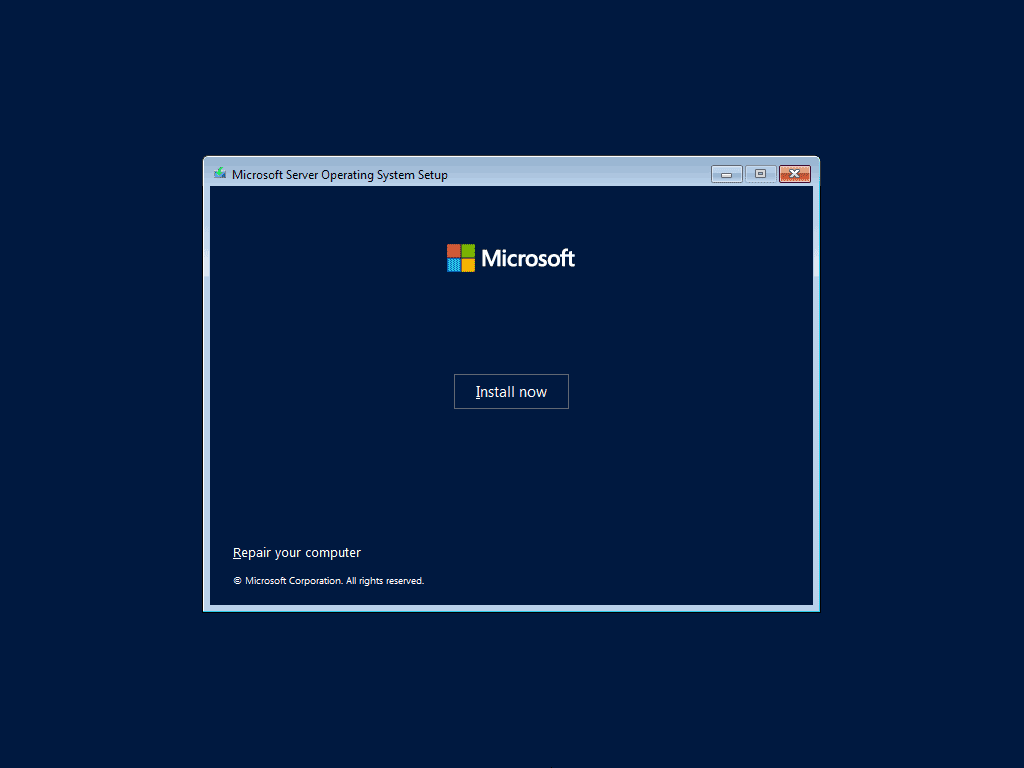
2. Click the Install now button.
3. Choose the operating system you want to install.
4. Accept applicable notice and license terms.
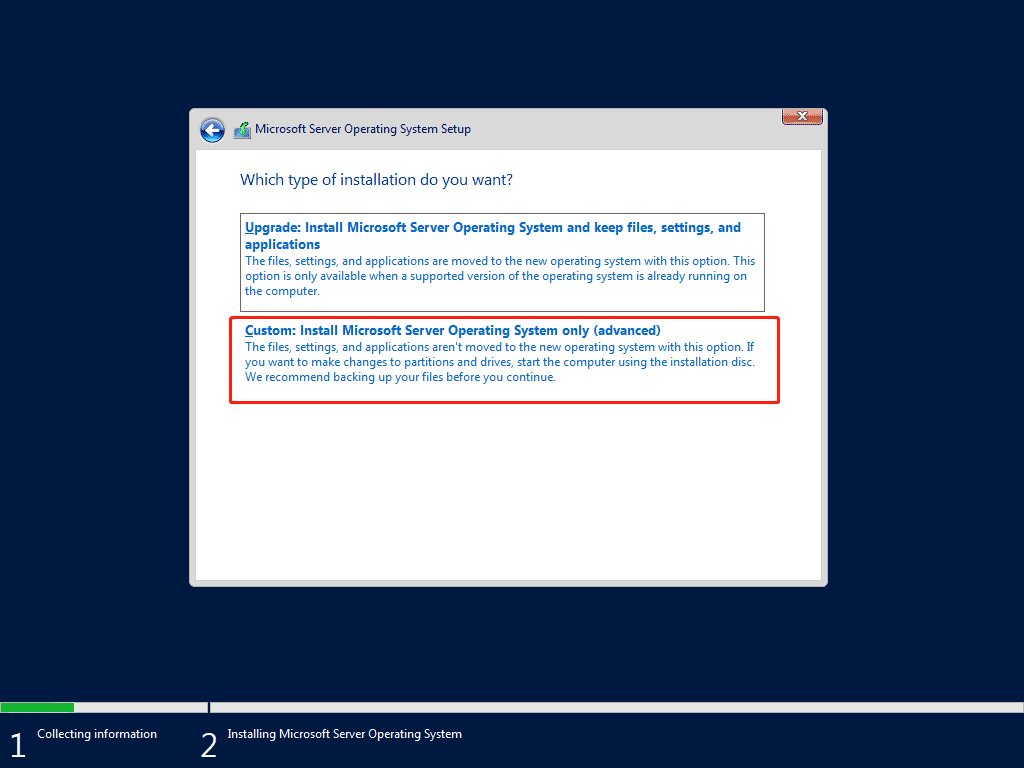
5. Choose to install the Server OS only.
6. Decide which drive to install the operating system on.
7. Start the installation process.
Once done, configure Windows Server 2022 as per your preferences. If you want to know details on how to set up and configure it, refer to our previous post – How to Install, Set up, and Configure Windows Server 2022.
What to Do After Windows Server 2016 Upgrade
Currently, you have upgraded your system to Windows Server 2022 from Server 2016 via an in-place upgrade or clean install. After getting the new system, you should take some measures to keep the OS more reliable and secure.
- Install the latest Windows updates for Server 2022: access Settings by pressing Win + I, navigate to Update & Security > Windows Update, check for available updates, and download & install them.
- Update your apps to the latest version
- Update device drivers in Device Manager
- Back up your PC regularly/automatically using MiniTool ShadowMaker

Wrap Things up
It is necessary to upgrade Windows Server 2016 to 2022 to ensure reliability, security, and improved system performance. You can perform a Server 2016 to 2022 in-place upgrade or install Windows Server 2022 from USB. Try one way depending on your needs.
Before you proceed, don’t forget to create a backup for your important files using MiniTool ShadowMaker. Or else, nothing is more frustrating than data loss. You can’t be too careful.
If you have issues with our software, contact us at [email protected].
Upgrade Windows Server 2016 to 2022 FAQ
About The Author

Position: Columnist
Vera has been working at the MiniTool Team for over 10 years as a technical editor and content writer. She mainly focuses on disk and partition management, data recovery, Windows backup and restore, and PC troubleshooting. Through in-depth software testing and hands-on experience, she has helped users solve a wide range of computer problems and better protect their data on Windows devices.
User Comments :