When your Western Digital hard drive has some errors or bad sectors, what can you do? Focus on this MiniTool’s guide to Western Digital hard drive repair to know some essential tips & tricks, as well as how to rescue your important data in the event of disk issues.
Western Digital (WD) hard drives are one of the most popular disks, widely used in laptops and desktops to store critical data. Although they have a deserved reputation for reliability, those hard drives may have various errors and issues due to viruses, mistaken operations, system malfunction, hardware issues, etc. This is why many users focus on Western Digital hard drive repair.

Back up Files First
In the modern world, data is priceless and data loss may be disastrous. Don’t be a daredevil and backing up your important files first is crucial before you begin to repair your Western Digital disk. This is primarily because some errors or the repair process may result in data loss. For security, use the backup software, MiniTool ShadowMaker to perform data backup.
This utility focuses on backing up files, folders, disks, partitions, & Windows systems, syncing files/folders, and cloning HDD to SSD/cloning a hard drive to another drive. Importantly, you are allowed to use this tool to regularly/automatically a large amount of data and create incremental & differential backups.
To avoid data loss caused by WD disk issues, download & install MiniTool ShadowMaker immediately and then get started.
MiniTool ShadowMaker TrialClick to Download100%Clean & Safe
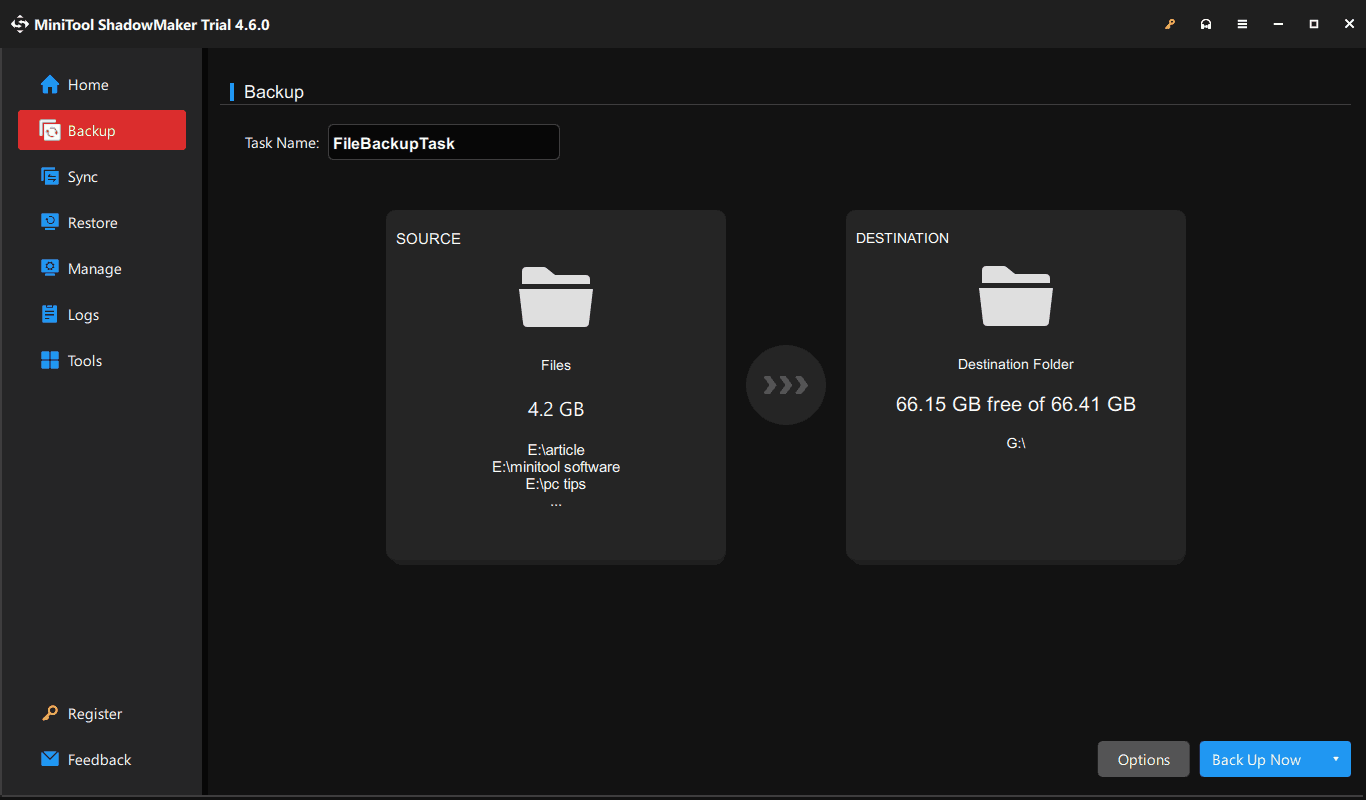
Step 1: Connect an external hard drive or USB drive to your computer.
Step 2: Launch MiniTool ShadowMaker Trial Edition.
Step 3: For data backup, navigate to Backup > Folders and Files, open your WD hard drive, and choose the files you wish to back up. Then, hit DESTINATION to choose the connected external drive as the storage path.
Step 4: Execute the file backup task by clicking Back Up Now.
Now you can take measures to implement Western Digital hard drive repair according to your situation, without worrying about losing precious data.
Common Western Digital Hard Disk Errors
Disk errors are multitudinous, and here let’s explore some common errors on Western Digital hard drives, as well as the essential tips for WD hard disk repair in different situations.
#1. Error Code BIOHD-8
When using the HP SMART diagnostic tool to check your WD hard drive, BIOHD-8 may be identified, indicating your disk is failing. The reasons behind this error cover overheating, damaged connections, bad sectors, and firmware issues.
To solve this error code:
- Make sure you properly connect the WD disk to your PC.
- Run a CHKDSK (Windows built-in tool) scan to repair some errors.
- Replace your old hard drive if necessary.
For detailed fixes, see this tutorial focusing on Hard Drive SMART Error BIOHD-8.
#2. Western Digital Fatal Error
Fatal error is a very common issue on Western Digital hard drives. Usually, it manifests that this disk has a serious issue and needs to be replaced. Several factors could trigger the WD fatal error, for example, corrupted files, outdated firmware, a loose connection, bad sectors, etc.
Quick WD hard disk repair tips:
- First, check if the fatal error is caused by a faulty connection. You can use different cables and USB ports to connect your WD disk for a test.
- Use your WD disk on another laptop and see if it works to know if this error is in connection with the computer.
- Test your hard drive using a tool. If the disk is damaged and cannot fixed, back up your important data and replace it with a new one.
#3. I/O Device Error
When your Windows operating system cannot communicate with your Western Digital hard drive, the I/O device error may appear. On the screen, the message shows “The request could not be performed because of an I/O device error”.
Common factors include hard drive malfunction, incompatibility issues, outdated device drivers, loose connections, etc.
To repair WD I/O device error:
- Make sure you correctly connect your disk and computer. If the cable is corrupt, replace one to solve the issue.
- Download and install new device drivers.
- Change the transfer mode for the drive in the IDE channel properties.
- Perform a clean boot to check if any driver or other software is causing the error.
- If none works, you may need to replace the disk. Before further actions, rescue your disk data first.
#4. CRC Error
If you get the message saying “Data error (cyclic redundancy check)” on your Western Digital disk, it indicates that the disk may have a bad spot. CRC error may come down to corrupt Windows registry, misconfigured files, and a cluttered hard drive. Once you suffer from this issue, data loss is inevitable.
Western Digital hard drive repair:
- Perform a CHKDSK scan to fix logical file system errors.
- Use another disk scan program such as HDDScan to determine and repair corrupted files.
- If two ways fail, consider recovering or saving your data and then replacing the WD disk.
#5. Disk Read Error
Another common error is the disk read error. You can see the message “A disk read error occurred” on the screen, meaning Windows fails to access and read your Western Digital hard drive. Incorrect boot order, IDE cable failure, incorrect MBR configuration, BIOS issue, faulty hard drive, and more lead to this issue.
The possible WD hard drive repair tips contain:
- Enter the BIOS menu and set the correct boot order.
- Restore BIOS to default settings.
- Rebuild MBR to repair this disk issue.
- Test RAM and ensure that the disk error is related to a faulty RAM stick or slot.
- Check the disk cables for any corruption.
- Save data and replace your WD drive.
In addition to these errors, Western Digital disks may have other issues, for example, error code 43, format error, slow transfer rate, connection issue or disk not recognized. For details, refer to the guide on Western Digital Hard Disk Errors to find corresponding Western Digital hard drive repair tips & tricks.
Check Western Digital Hard Drive Health
Constantly monitoring the health of a WD disk is crucial as it helps anticipate issues so that you have a chance to rescue your important data before things get worse.
Use a Western Digital Product
Western Digital offers several tools to check your WD disk health, such as Western Digital Data LifeGuard Diagnostics, Western Digital Dashboard, and Western Digital Kitfox.
The former two products are no longer supported but currently, you can still download and use Western Digital Dashboard. Or use the latest Western Digital Kitfox (assist in testing WD drives and monitoring temperature) and here we take it as an example.
Step 1: Download Western Digital Kitfox from the official website, install and launch it.
Step 2: Connect a supported WD drive to your PC and click it from My Devices.
Step 3: Under Device Diagnostics, decide to run a short test or extended test.
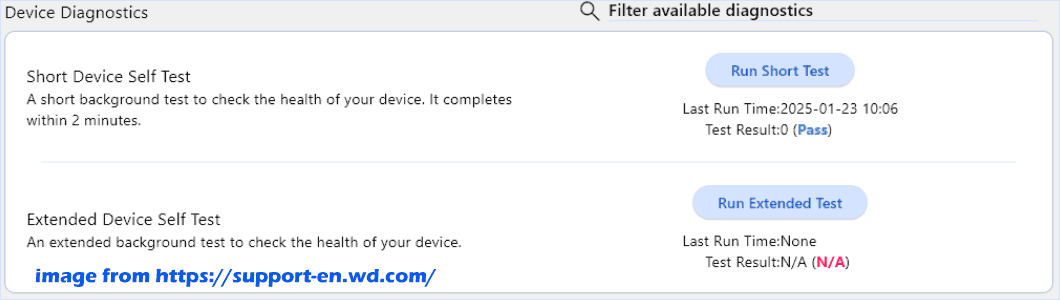
Step 4: When finishing the test, you will get a result showing Pass or Fail.
“Fail” means your disk goes wrong and WD hard drive repair is essential.
Run MiniTool Partition Wizard
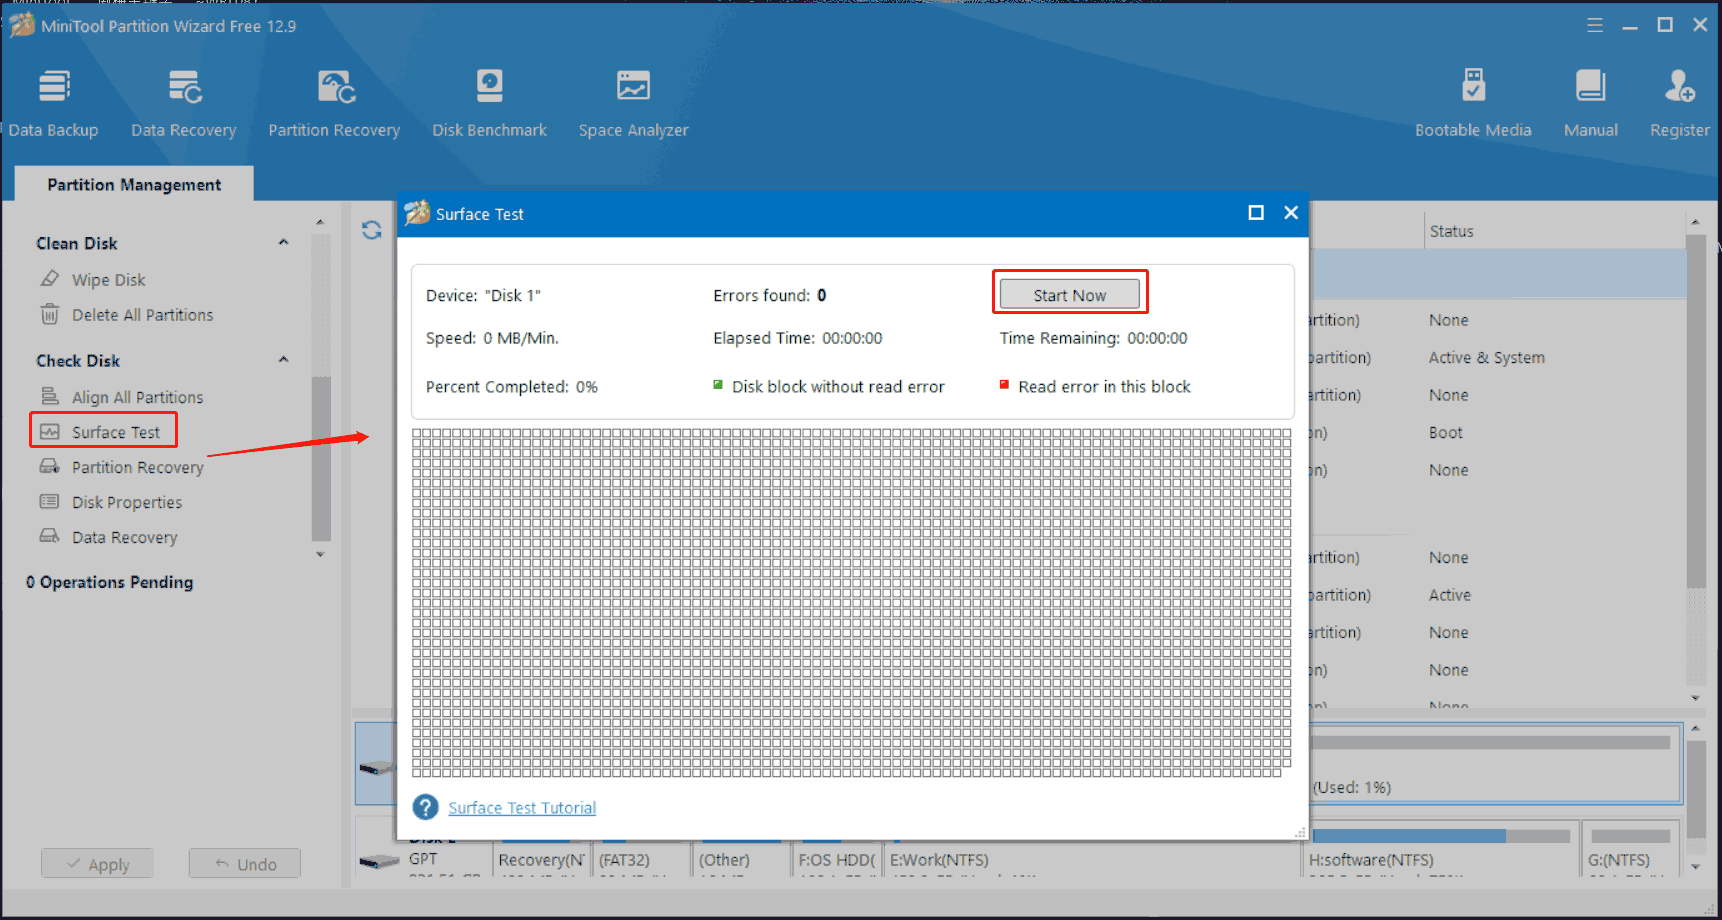
Besides Western Digital disk check tools, MiniTool Partition Wizard, a free partition manager, offers you a feature to test your hard drives that are not limited to WD. The Surface Test tool helps scan all the sectors of your hard disk and mark disk blocks without read error blue while marking blocks with errors red.
Step 1: Download, install, and launch MiniTool Partition Wizard Free Edition.
MiniTool Partition Wizard FreeClick to Download100%Clean & Safe
Step 2: In the main interface, choose your Western Digital hard disk and select Surface Test from the right pane under Check Disk.
Step 3: Click Start Now to begin the disk test.
In case there are many bad blocks on the disk, it indicates you need to take actions for Western Digital hard drive repair, especially repairing bad sectors and saving your disk data via backup or recovery, then replacing the bad disk before things become more serious.

WD Hard Drive Repair Bad Sectors
For logical file system errors on a WD disk, fixing it is very easy via Check File System in MiniTool Partition Wizard. But for logical bad sectors, this product doesn’t offer a feature. For hard bad sectors (physical damage), it is impossible to fix them.
To repair Western Digital hard drive soft bad sectors, fortunately, CHKDSK can help. This WD HDD repair tool attempts to locate bad sectors and recover readable information.
Step 1: Open Command Prompt with admin rights via Windows Search.
Step 2: Type chkdsk x: /f /r and press Enter. Replace x with the drive letter of your WD disk. This tool will fix errors in the file system and repair bad sectors.
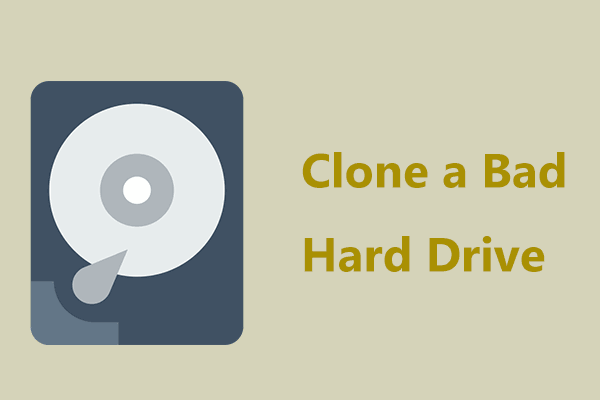
Replace Faulty WD Hard Drive
In the Common Western Digital Hard Disk Errors part above, we have mentioned the last resort you should try to fix your issue is replacing the bad drive. Besides, too many bad sectors could lead to data loss and you need to replace the disk eventually.
Before the replacement, make sure you have backed up important files. For this thing, MiniTool ShadowMaker helps a lot and you can find the detailed steps in the first part of this post.
Alternatively, you can consider recovering important files from the dead disk using a tool like MiniTool Power Data Recovery. It comes with powerful features to retrieve files, photos, documents, and other data in various cases. Get it for a trial.
MiniTool Power Data Recovery FreeClick to Download100%Clean & Safe
If you don’t want to reinstall the Windows operating system, disk cloning is ideal. Everything including the entire Windows system and data is transferred to a new disk, then you can replace the bad disk directly. To clone a hard drive to another, MiniTool ShadowMaker also comes in handy.
Its Clone Disk feature makes it easy to clone a disk, SD card, USB drive, etc. to another one. In cloning HDD to SSD and sector by sector cloning, this disk cloning software works wonders. The cloned disk is bootable, meaning you can boot the PC from that drive without reinstalling OS and apps, saving time and effort.
MiniTool ShadowMaker TrialClick to Download100%Clean & Safe
Step 1: Connect a new disk to the PC and run MiniTool ShadowMaker.
Step 2: Click Clone Disk under Tools to continue.
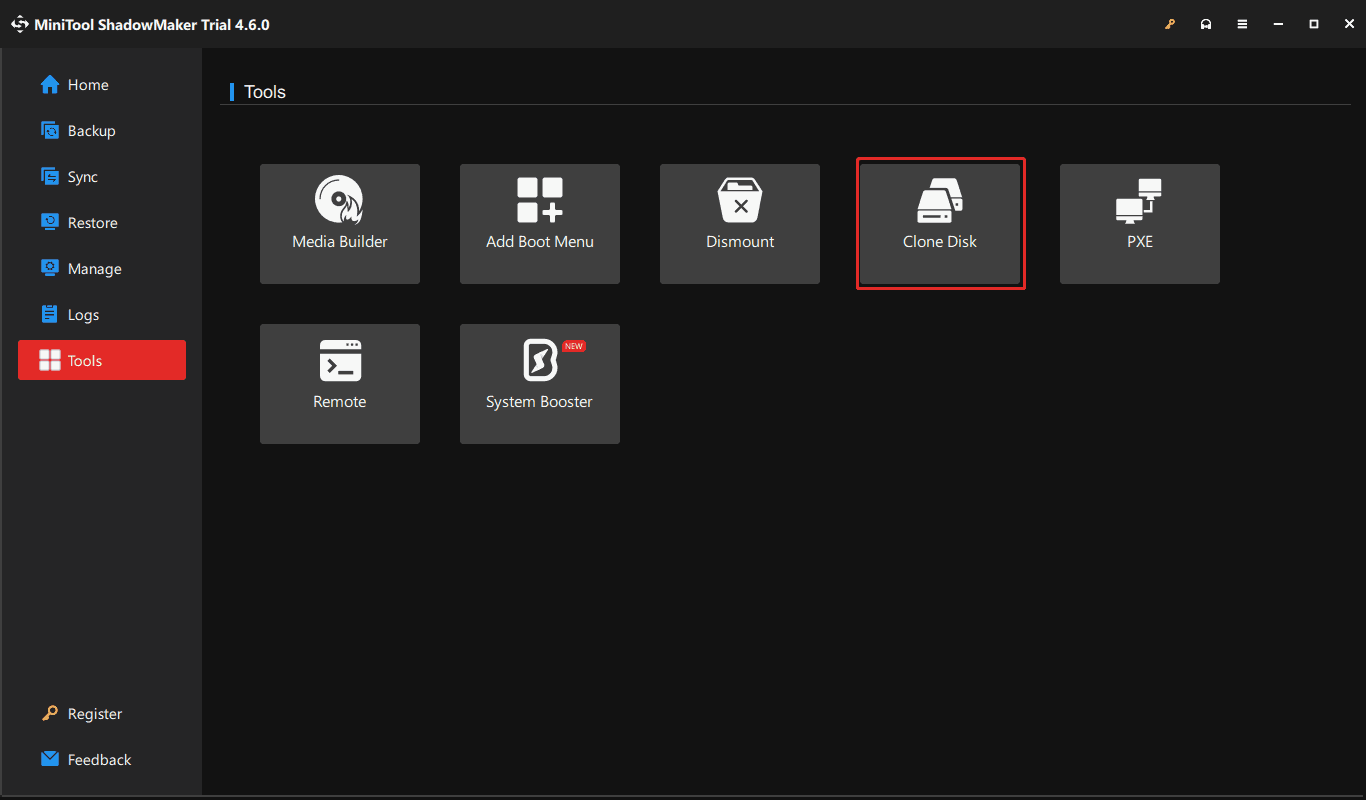
Step 3: Choose your Western Digital hard drive as the source disk and the new disk as the target disk. Then, click Start to begin cloning.
Now your new disk contains all the contents of the original WD disk. Remove the bad WD disk and put the new one in the original place on the PC. The last step for WD hard disk repair is done.
Wrapping Things Up
Western Digital hard drive repair is not a hard thing. This ultimate guide covers much information you want – data backup first, common WD disk errors & corresponding repair tips, WD disk health check, how to repair bad sectors, and the final repair tip (replace failed drive). Follow the instructions depending on your situation.
Contact us via [email protected] if you have any suggestions or questions when using MiniTool products.
About The Author

Position: Columnist
Vera has been working at the MiniTool Team for over 10 years as a technical editor and content writer. She mainly focuses on disk and partition management, data recovery, Windows backup and restore, and PC troubleshooting. Through in-depth software testing and hands-on experience, she has helped users solve a wide range of computer problems and better protect their data on Windows devices.
User Comments :