
Quick Answer
Windows 10 Update Assistant is Microsoft’s official utility for manually installing Windows 10 feature updates. It is useful when Windows Update fails or doesn’t offer the latest version. Since Windows 10 has reached the end of mainstream support, users should also consider Windows 11 or other supported update options.
What Is Windows 10 Update Assistant
Windows 10 Update Assistant is a Microsoft utility that allows users to download and install Windows feature updates manually.
It checks device compatibility, downloads required files, and guides users through the upgrade process. The upgrade process is designed to keep personal files and installed applications.
However, unexpected issues such as update failures, system errors, or hardware compatibility problems may still occur. Creating a system backup before updating can help restore the computer if something goes wrong.
How to Use Windows 10 Update Assistant to Upgrade Your PC
Windows 10 feature updates include the latest security improvements, bug fixes, and performance enhancements to help keep your PC secure and up to date.
There are several ways to install the latest Windows 10 feature update. For most users, the easiest option is to use Windows Update in the Settings app.
However, if Windows Update doesn’t detect the latest feature update or repeatedly fails to install it, you can use Windows 10 Update Assistant to perform the upgrade manually.
Simply download Windows 10 Update Assistant from Microsoft’s official download page and follow the on-screen instructions to complete the upgrade. The steps below show you how to use the tool safely and successfully.
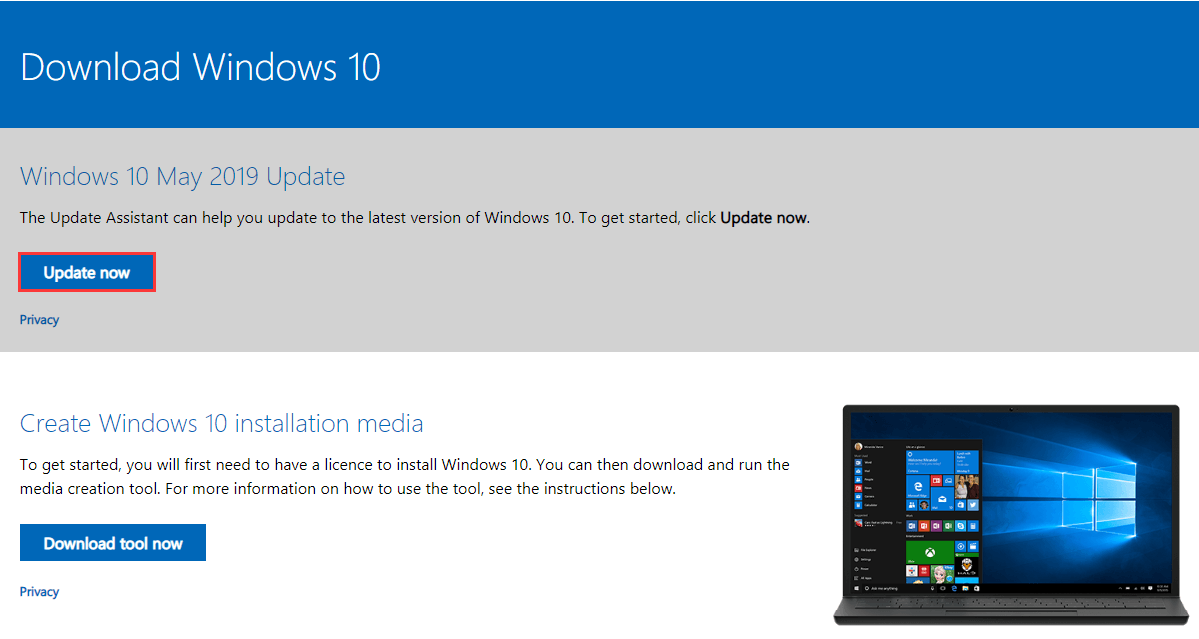
Step 1: You need to visit the official website and click the Update now button on the page. Then the 719-bytes exe file will be downloaded to your computer.
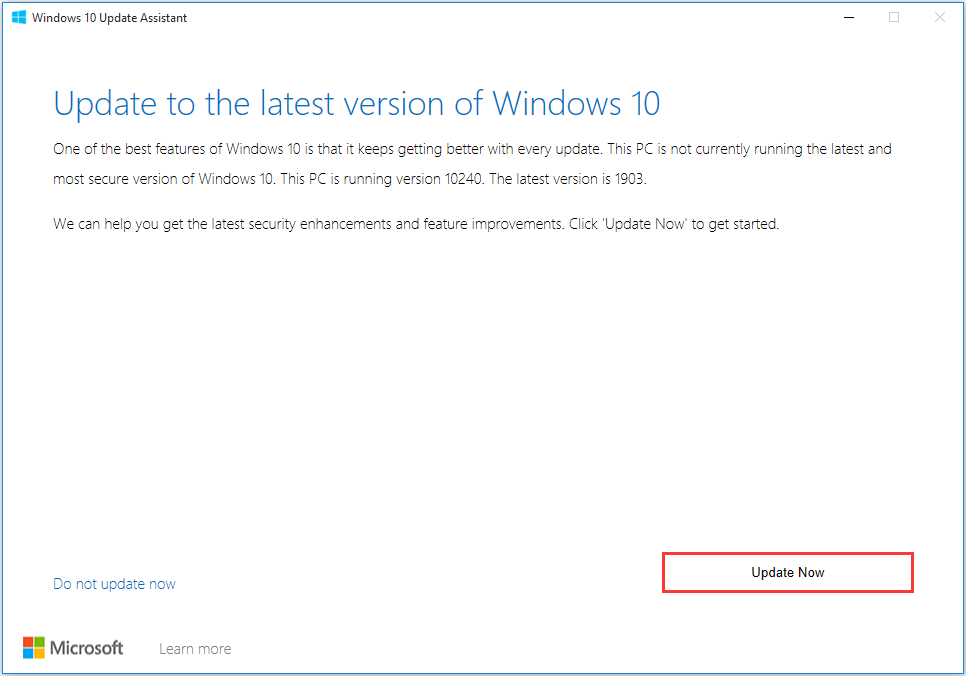
Step 2: When you run the tool, you will see the main screen of the tool. It will check for updates automatically and then you can click Update Now to start the process.
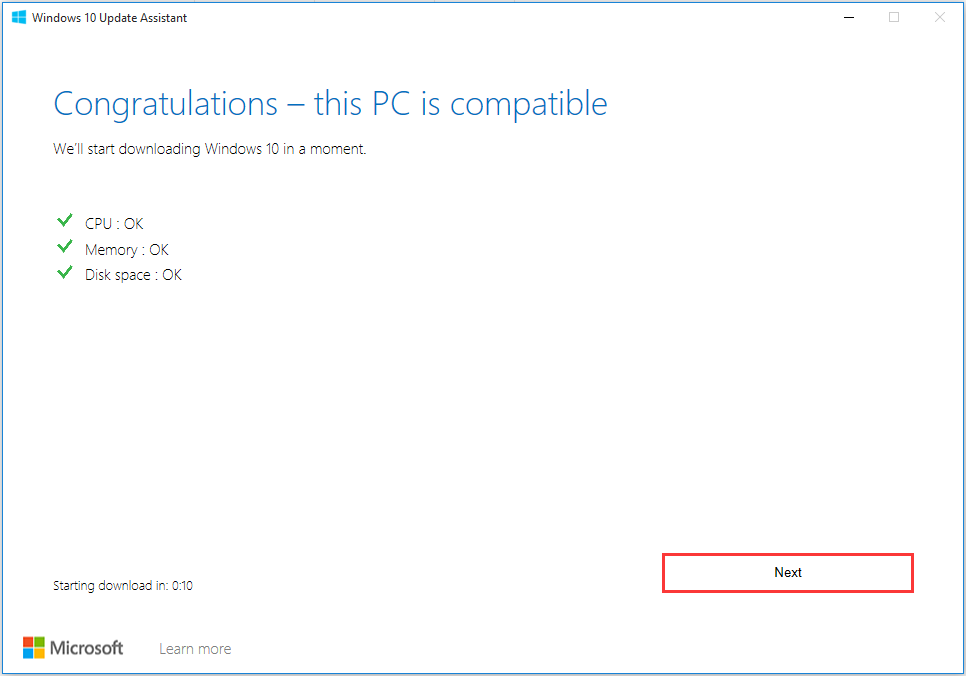
Step 3: Then there will be some requirements test for your device, which means it will check if the CPU and memory configuration is up to par and if there is enough available disk space. If all appears well, you can click Next to continue.
Step 4: Then Windows 10 Update Assistant will start to download files. Since this installation will take some time, you can click Minimise and continue to do your own work.
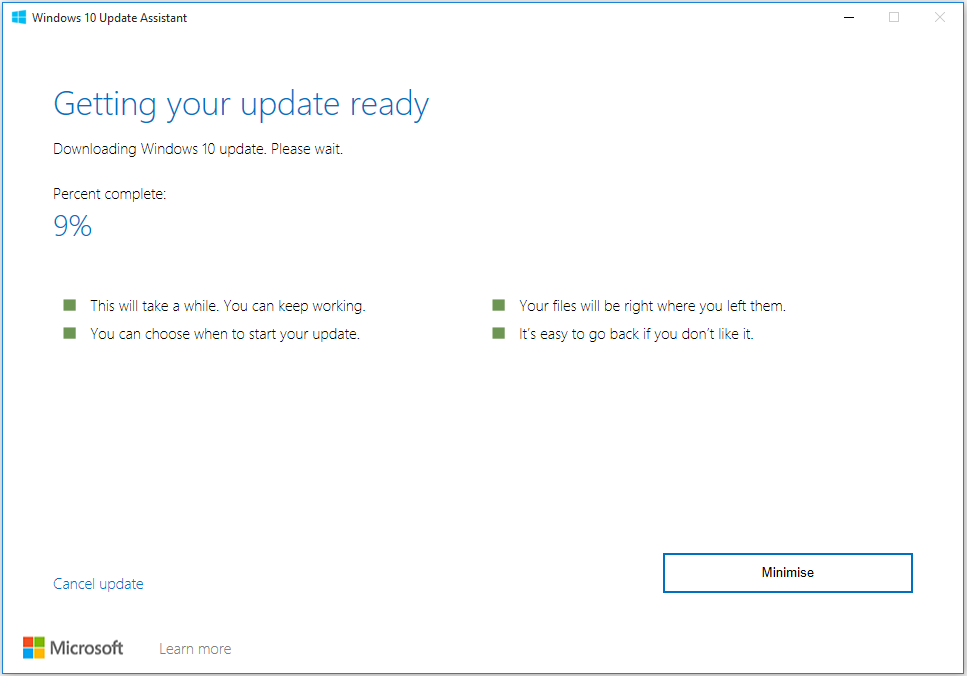
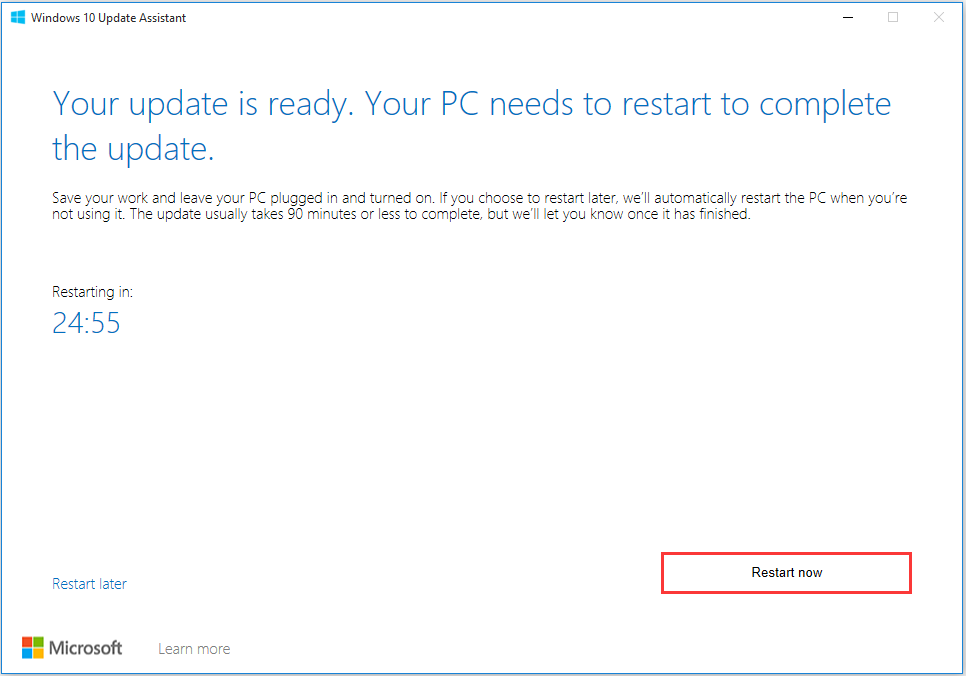
Step 5: When the update process is completed, you will be prompted to click Restart now to allow the changes to take effect. If everything goes well, your computer should be running the latest available Windows 10 version after the reboot.
Further Reading:
What Happens After Updating Windows 10?
Windows 10 feature updates are designed to improve your PC’s security, stability, and overall performance. Although the exact changes depend on the Windows version you install, most updates include the following improvements:
- The latest security patches to help protect your PC.
- Bug fixes that improve system stability and reliability.
- Performance optimizations for smoother daily use.
- New Windows features or interface enhancements, depending on the installed version.
- Better compatibility with newer applications and hardware.
Since installing a feature update can significantly change your system, it’s recommended to back up important files or create a system image before upgrading. This allows you to restore your system quickly if the update doesn’t go as planned.

Back Up Windows Before Using Update Assistant
To create a backup easily, you can use MiniTool ShadowMaker. It is a Windows backup solution that helps you back up your operating system, disks, partitions, files, and folders.
It also supports scheduled, incremental, and differential backups, allowing you to protect important data before installing Windows updates.
Now, let’s see how to back up your Windows system after you upgrade to Windows 10 latest version.
Step 1: Launch MiniTool ShadowMaker
- Launch MiniTool ShadowMaker.
- Keep using the trial edition.
Step 2: Choose Backup Source
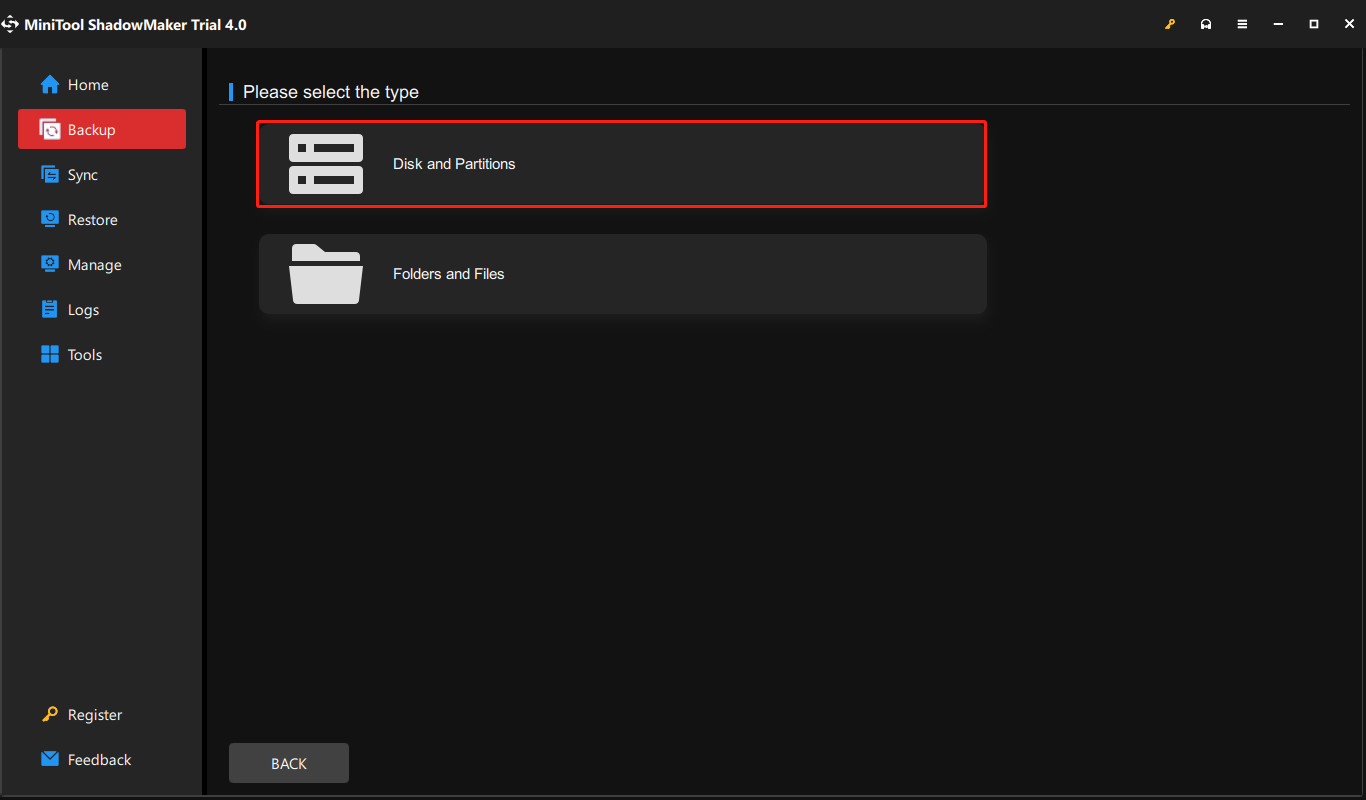
- Click SOURCE in the Backup page and then select the source type – Disk and Partitions.
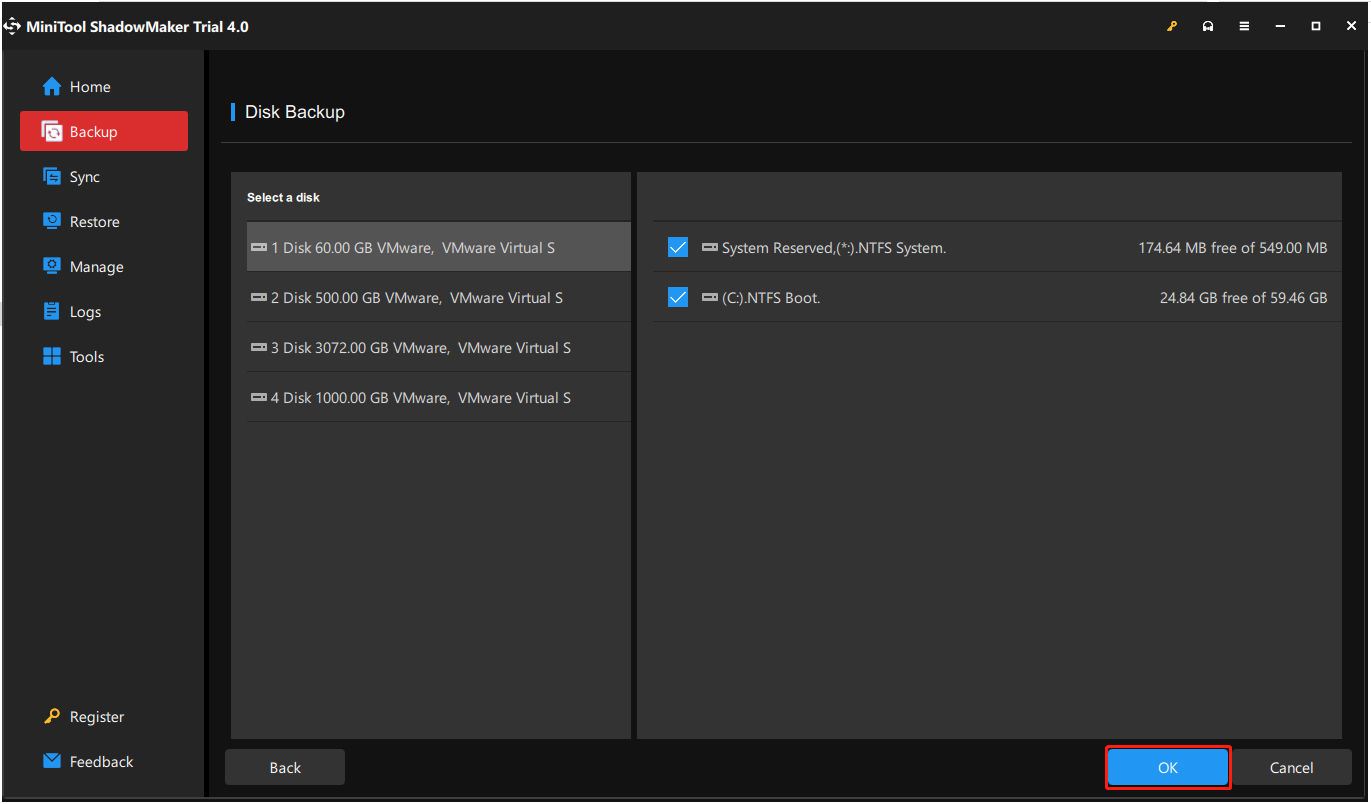
- Select the system disk where Windows 10 is installed from the following combo box and check all the partitions, click OK.
Step 3: Choose a Destination Path
- MiniTool ShadowMaker allows you to back up your system to an external hard drive, USB flash drive, NAS, and more.
- Choose one destination path to store your system based on your needs and click OK.
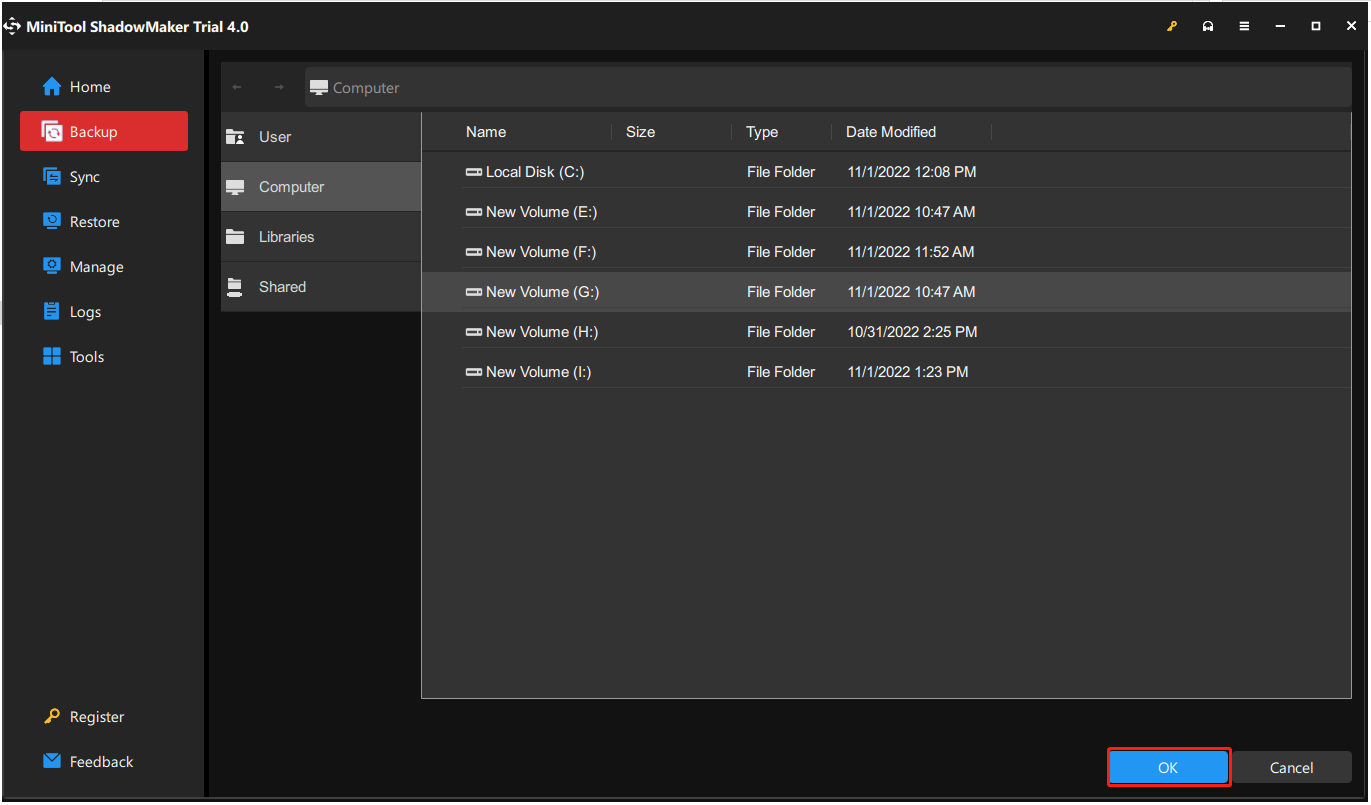
Step 4: Start to Back up
- Go back to the following interface.
- You have two options: start the backup process immediately by clicking Back Up Now or delay the backup by choosing Back Up Later.
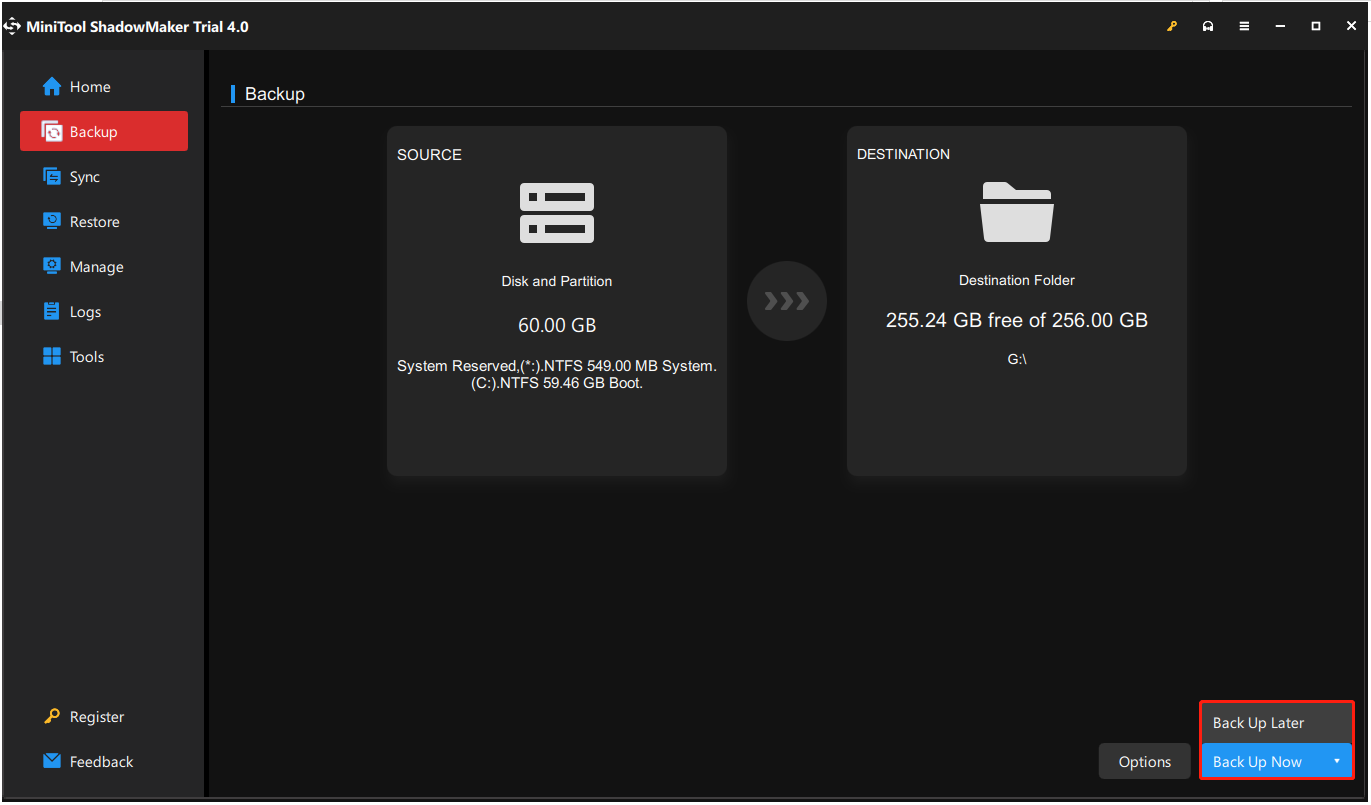
Here are all the steps of how to back up system by MiniTool ShadowMaker.
Further Reading
In addition to the method mentioned above, here is another method to back up disk data by using MiniTool ShadowMaker, which is to Clone Disk.
You can also use it to back up the entire computer to the flash drive via disk cloning. This feature allows you to transfer everything to another drive, such as Windows system, files, settings, applications, and data.
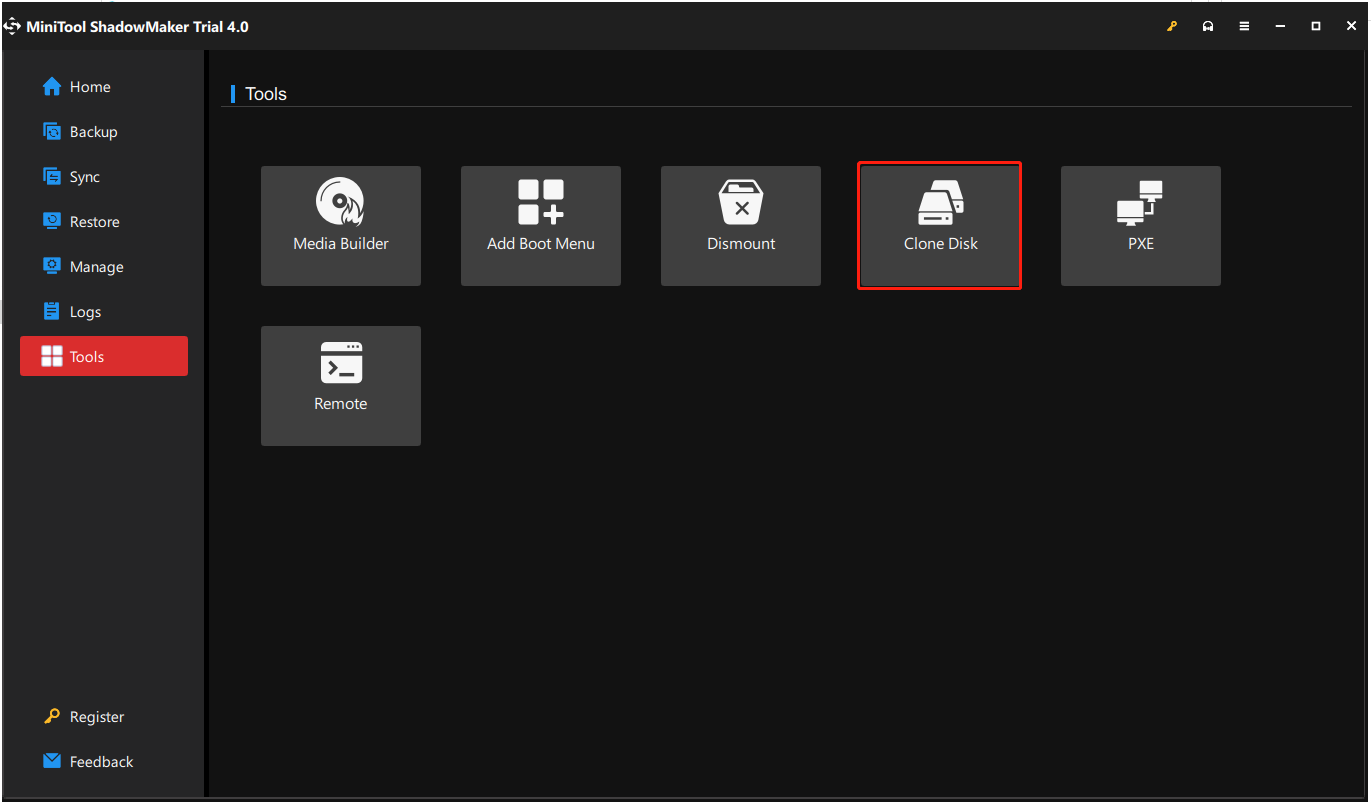
Here are the steps for cloning the disk. It’s also easy to operate you just need to click some steps.
Step 1: Connect the USB flash drive to your computer. Please click the Clone Disk feature on the Tools page to continue after launching MiniTool ShadowMaker.
Step 2: You need to choose the system disk where Windows 10 is installed as the source disk and choose a USB drive as a target disk.
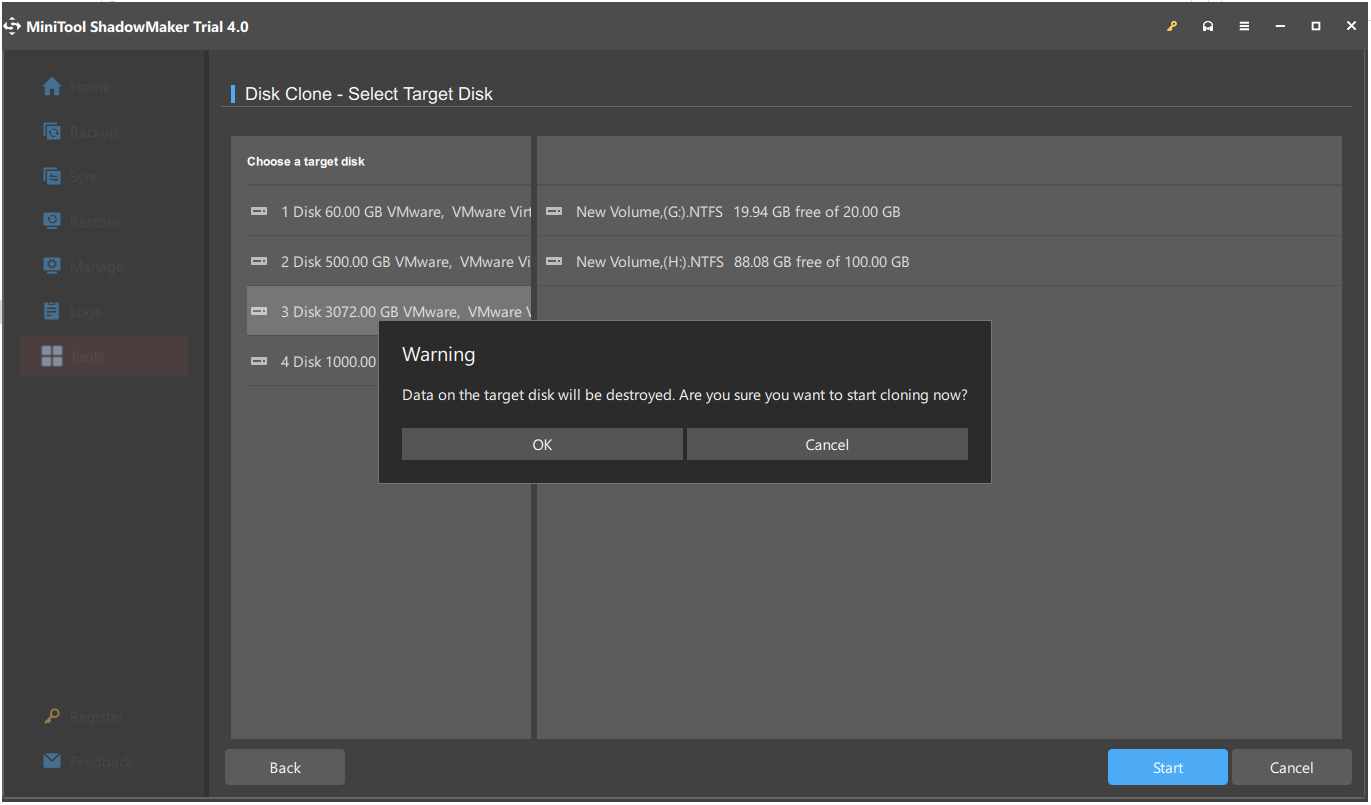
1. The process of cloning the disk will destroy data on the target disk, so please make sure that no important files are saved on it.
2. The USB flash drive should have enough space to save all the information and data on the cloned system disk.
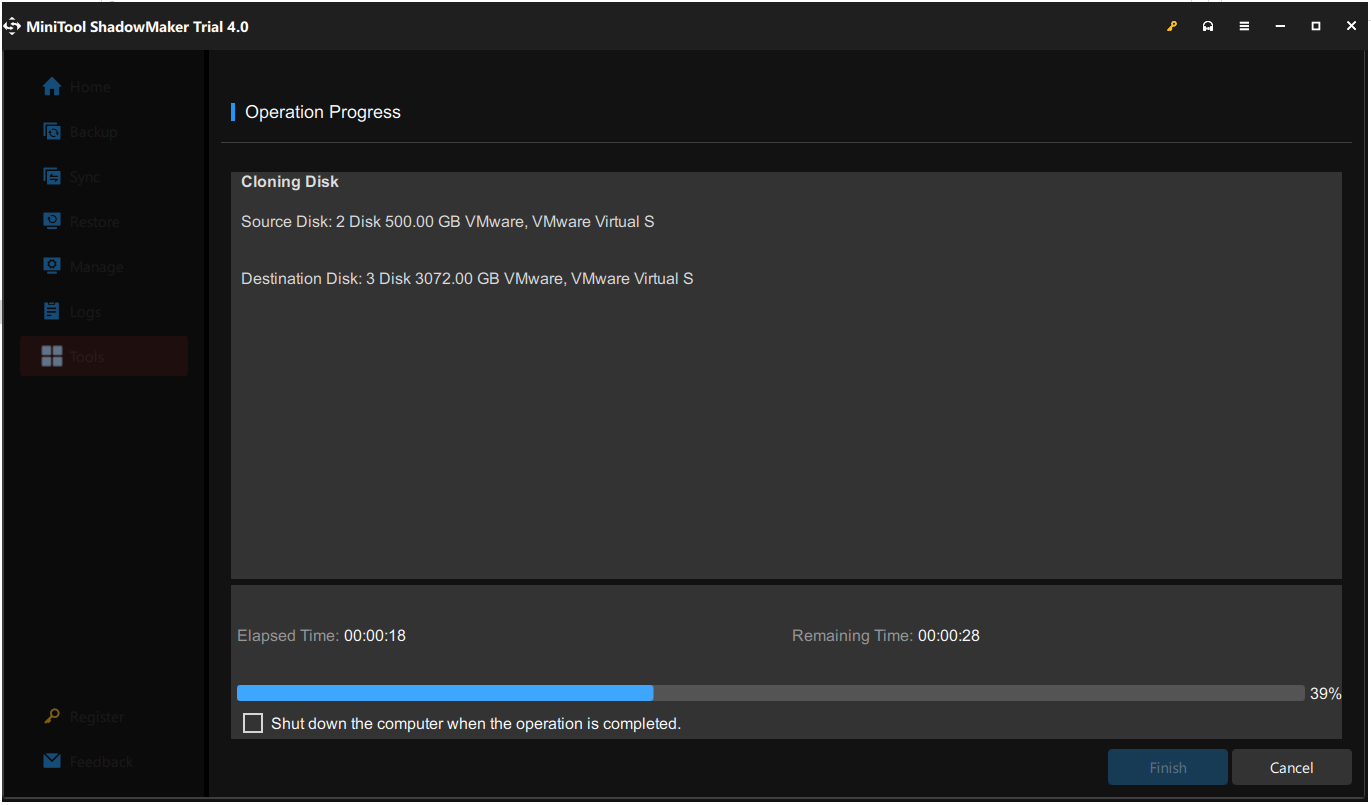
Step 3: Now this backup software is cloning Windows 10 system disk to the USB flash drive. You can plug the USB drive into the computer after the cloning process is completed. By this way, all the system disk data is backed up to the USB drive.
How to Download and Use Windows 10 Update AssistantClick to Tweet
Windows 10 Update Assistant Not Working? Try These Fixes
Although Windows 10 Update Assistant usually upgrades automatically, it can sometimes fail, get stuck, or not open. Here are some common issues and possible solutions.
Windows 10 Update Assistant Stuck
If the update process gets stuck:
- Wait for a while to confirm it is not still running.
- Restart your PC and try the upgrade again.
- Check your internet connection and available disk space.
Windows 10 Update Assistant Not Working
If Update Assistant does not open or respond:
- Download the latest version from Microsoft’s official website.
- Run the tool as an administrator.
- Temporarily disable third-party antivirus software and close unnecessary apps.
Windows 10 Update Assistant Failed to Install Updates
If the upgrade fails:
- Check whether your PC meets Windows 10 requirements.
- Make sure enough storage space is available.
- Run Windows Update Troubleshooter or use SFC to repair system files.
Windows 10 Update Assistant Error
For update errors caused by system issues:
- Restart Windows Update services.
- Clear temporary update files.
- Restart your PC and try again.
If Windows 10 Update Assistant still fails, try using Windows Media Creation Tool or Windows Update instead.
Windows 10 Update Assistant FAQ
Use Update Assistant for a simple upgrade and Media Creation Tool for installation or recovery needs.
Conclusion
Windows 10 Update Assistant provides an easy way to manually install Windows feature updates when Windows Update isn’t available or doesn’t work properly.
Before upgrading, creating a backup with MiniTool ShadowMaker can help protect your files and reduce the risk of data loss if unexpected problems occur during the installation.
If you have any questions or suggestions while using this MiniTool software, please contact us via [email protected].
About The Author

Position: Columnist
Charlotte is a technology columnist with a strong focus on the Windows operating system, specializing in disk management, backup, and data recovery. She is passionate about analyzing computer errors, identifying root causes, and delivering practical solutions. In her free time, she stays updated on the latest developments in computer systems and hardware while continuously learning new technologies to broaden her expertise. Her writing style is clear and easy to understand, making complex technical topics accessible even to users with limited computer knowledge.
User Comments :