Issue: External Hard Drive Not Working on Windows 10/11
I’ve had this external hard drive for about 5 months now, and it stopped working after doing a clean of my PC. The hard drive is on, indicated by the light, and is making noises, but no drive is showing up in File Explorer.www.reddit.com
Common Symptoms
If your external hard drive isn’t working, you may encounter one of the following common situations.
Case 1: External hard drive not showing up
This means the hard drive does not appear in File Explorer or Disk Management. The key point is that it is not visible at the user interface level.
Case 2: External hard drive not detected
This means the system does not recognize the hard drive at the underlying level, not even at the hardware level. The key point is that it is not recognized by the system components.
Case 3: External hard drive not accessible
The system can detect the hard drive, and it is visible in Disk Management, but it cannot be opened or its contents read. Clicking it may display error messages, such as “Drive is not accessible”, which is a software-level problem.
To repair the faulty external hard drive, it is best to try some basic checks first to avoid further complications.
Early Check
This section provides two basic troubleshooting methods.
Check 1: Inspect for physical damage
Check the hard drive casing for obvious physical damage such as cracks, deformation, or burn marks. Also, check the ports, data cables, and power cables for bends or obstructions.
If your hard drive has suffered physical damage, seek professional service as soon as possible.
Check 2: Verify the connection
When an external hard drive malfunctions, try using a different USB port or data cable to rule out connection issues between the disk and the PC.
Alternatively, try connecting the hard drive to another computer to determine if the issue is with the drive itself or the original computer.
If basic operations don’t work, figure out other possible causes to find an effective solution.
Why Is the External Hard Drive Not Working
Here are some causes that can lead to the problem of an external hard drive not working.
- Disabled hard drive channel in the BIOS
- Outdated disk firmware
- Partition table corruption (MBR/GPT)
- Corrupted or outdated disk drivers
- A missing drive letter
- Limited access permissions
- File system corruption
- …
Do You Need to Ensure Data Security in Advance? – Yes
The external hard drive repair operations may result in permanent data loss. Therefore, recovering data in advance is necessary.
What Is the Best External Hard Drive Recovery Software
To recover data from a malfunctioning external hard drive, MiniTool Power Data Recovery is the best choice.
This software can scan external drives with corrupted partitions or file systems, including drives in a RAW or inaccessible state, and recover data from them.
Moreover, it is fully compatible with Windows 11/10/8/8.1 and can recover various types of data, such as pictures, videos, audios, and documents.
In addition, the interface is intuitive and easy to use. This enables you to complete the recovery process in just a few steps.
How to Recover Data from a Malfunctioning Disk
The free edition of this software allows you recover 1 GB of files for free. Now, download and install MiniTool Power Data Recovery Free to get ready.
MiniTool Power Data Recovery FreeClick to Download100%Clean & Safe
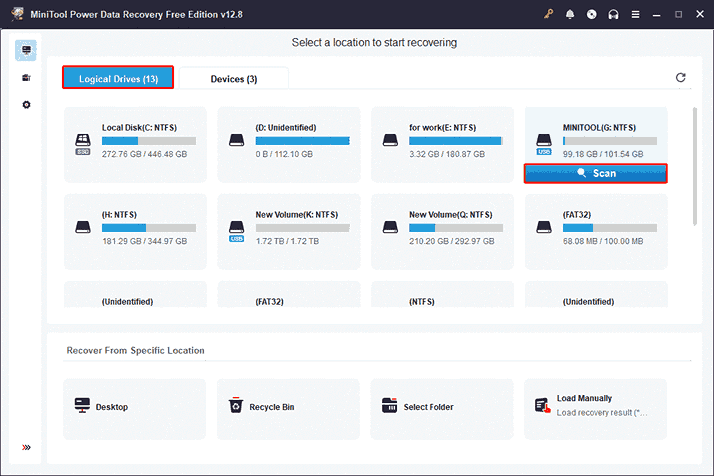
Step 1: Scan the external hard drive
Launch the software. Under the Logical Drives tab, find the partition, select it, and click Scan. Alternatively, switch to the Devices tab, select the whole disk, and click Scan.
Wait for the scan process to complete.
Step 2: Find the target files in the scan results
When the process ends, search for the target files using Path, Type, Filter, and Search.
- Path: Displays scan results by the original folder path.
- Type: Categorizes files by type (e.g., document, picture, video, audio).
- Filter: Filters results according to file type, modification date, file size, and file category.
- Search: Allows precise searching by full filenames or keywords.

When you find the files you want, double-click them to preview.
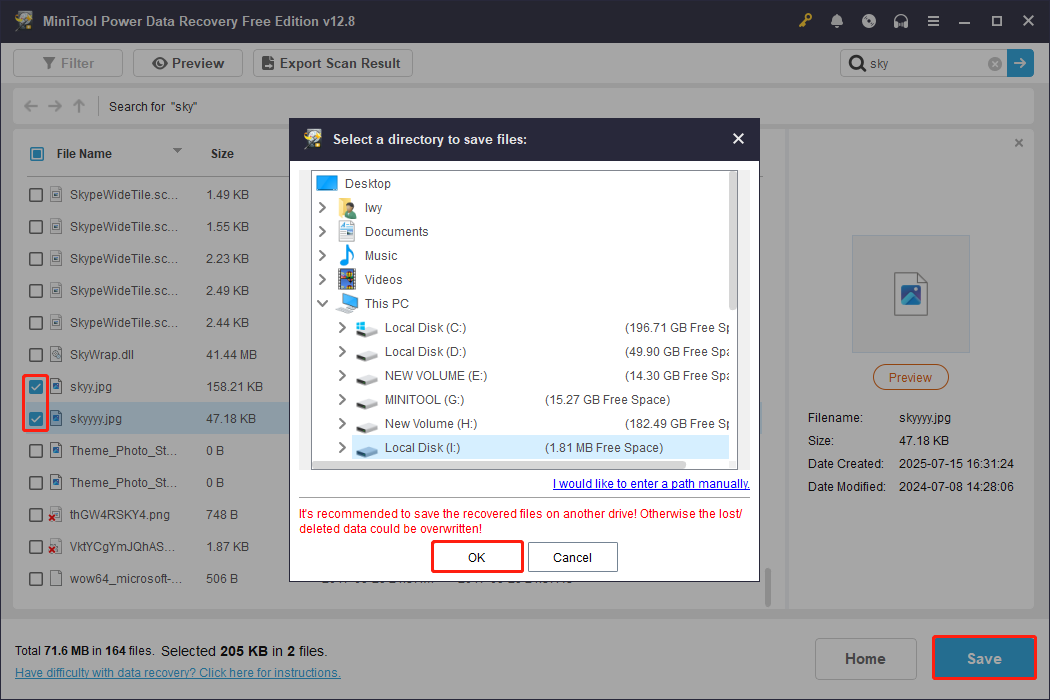
Step 3: Recover files to a safe location
After confirming all the files, select them and click Save. There will be a window prompting you to choose a path for the recovered files. Choose one and click OK to start recovery.
When the Recovery Completed window shows, click the View Recovered button to check the recovered files.
When the data is safe, the next step is to fix the problem of an external hard drive not working.
How to Fix “External Hard Drive Not Detected”
This section explains how to fix the problem of an external hard drive not detected.
Fix 1: Access BIOS to Check if the Drive Is Detected
If this hard drive’s channel is disabled in the BIOS, the disk cannot be detected. To resolve it, the channel needs to be enabled.
Step 1: Restart your computer. During startup, press the corresponding BIOS shortcut key (usually F2, F12, Esc, or Delete) to access BIOS.
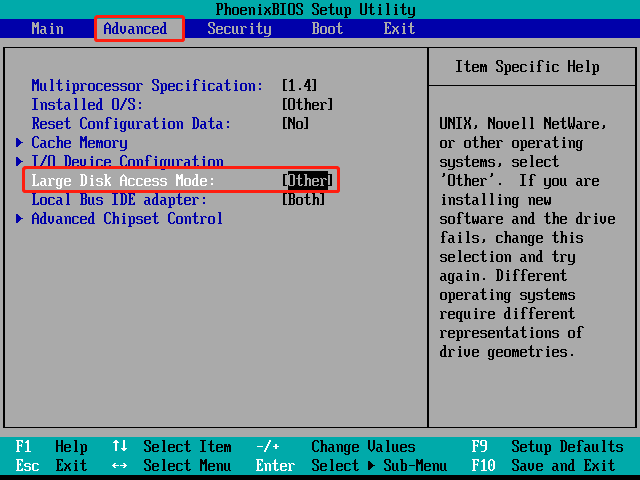
Step 2: Switch to the Advanced tab and go to the Large Disk Access Mode option.
Step 3: Press the space key to change DOS to Other to enable the hard drive channel.
Step 4: Finally, press the F10 key to save the settings and restart.
After restarting, check if the external hard drive is now detected normally.
Fix 2: Update the Disk Firmware
Old firmware may cause the hard drive to fail to boot properly or freeze during wake-up, resulting in the computer not being able to detect it. Updating it may help restore the drive to normal.
Step 1: Press Win + X and choose Device Manager.
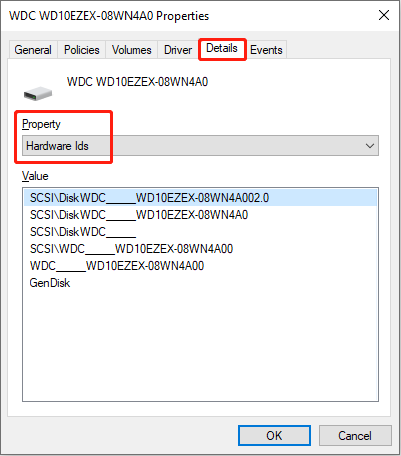
Step 2: Expand Disk drives, right-click the target drive, and select Properties.
Step 3: Go to the Details tab, and select Hardware Ids in the Property drop-down menu to confirm the firmware version.
Step 4: After confirming the firmware version, go to the manufacturer’s website to find the corresponding firmware update package for your model.
Download and run the official firmware update tool, and follow the instructions to complete the update process.
How to Fix “External Hard Drive Not Showing Up”
This section provides several methods to make your external hard drive appear in File Explorer.
Fix 1: Initialize the External Hard Drive
Uninitialized is one of the signs that the disk is not showing up in File Explorer. In this case, initialization can rebuild the partition table of the external hard drive and allow the system to re-recognize it.
Step 1: Press Win + X and choose Disk Management.
Step 2: Right-click the uninitialized disk and select Initialize Disk.
Step 3: Choose the partition table type: MBR or GPT. Generally, GPT is recommended for external hard drives.
- MBR (suitable for older devices): Owns best compatibility, but does not support partitions larger than 2TB.
- GPT (recommended): Supports large capacities (> 2TB) and is more stable.
After initialization, the disk will become Unallocated.
Step 4: Right-click the unallocated area and select New Simple Volume, then set the volume size, drive letter, and file system, and format the drive.
After completion, the disk will become available.
Fix 2: Scan for Hardware Changes
Scanning for hardware changes forces the system to re-detect the external hard drive and reload the driver, thus eliminating recognition failures.
Step 1: Right-click the Windows icon and choose Device Manager.
Step 2: Click the Scan for hardware changes icon in the top toolbar.
The system will immediately re-detect all hardware, identify new devices, reload drivers, or attempt to repair missing devices.
If the drive still doesn’t appear, move on to the next method.
Fix 3: Unhide the Drive
Some disk management software, like MiniTool Partition Wizard, offers a partition hiding feature for protection against unauthorized access.
If you have used such software to hide the external hard drive, it will not show up in File Explorer.
In this case, you need to use the corresponding tool to unhide the disk partition. Here, we will show you how to unhide a partition using MiniTool Partition Wizard.
MiniTool Partition Wizard FreeClick to Download100%Clean & Safe
Step 1. Open the software. On its main interface, find and select the external hard disk partition, and then click Unhide Partition from the left action panel.
Step 2. Choose an available drive letter and click OK.
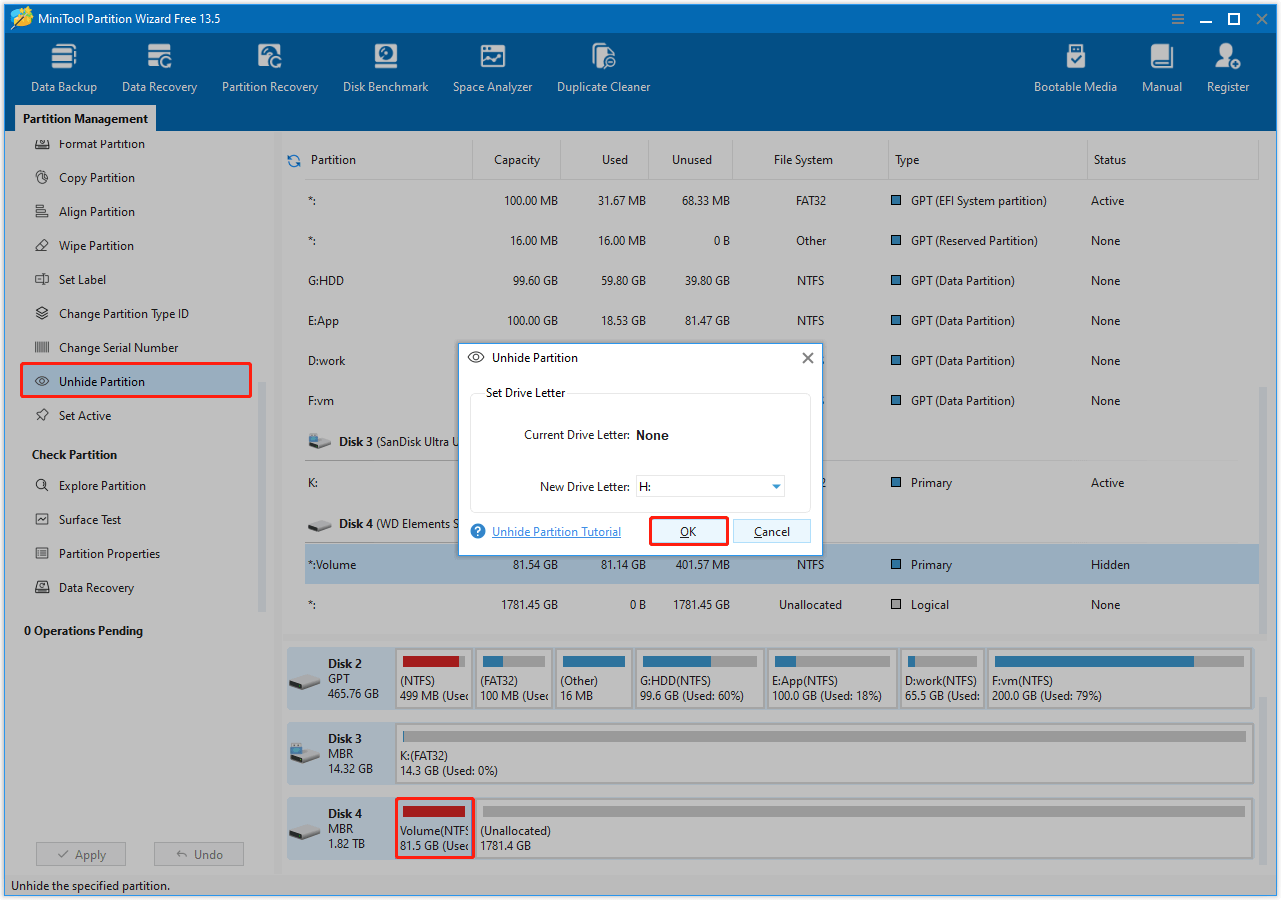
Step 3. Click Apply to confirm the change.
Fix 4: Reinstall the Disk Driver
Damaged or outdated disk drives cannot communicate correctly with the operating system, causing external hard drives not to show up. Reinstalling the driver may resolve it.
Step 1: Open Device Manager, expand Disk drives, right-click the drive, and select Uninstall device.

Step 2: Restart your computer. After that, unplug the external hard drive, wait 5 seconds, and then plug it back in.
Windows will re-detect the hard drive and automatically install the latest driver for you.
Fix 5: Assign a Drive Letter
Without a drive letter, even if the hard drive is recognized, it cannot be displayed or used in File Explorer.
Therefore, assigning a drive letter is feasible, as it allows the system to establish an access path for the external hard drive.
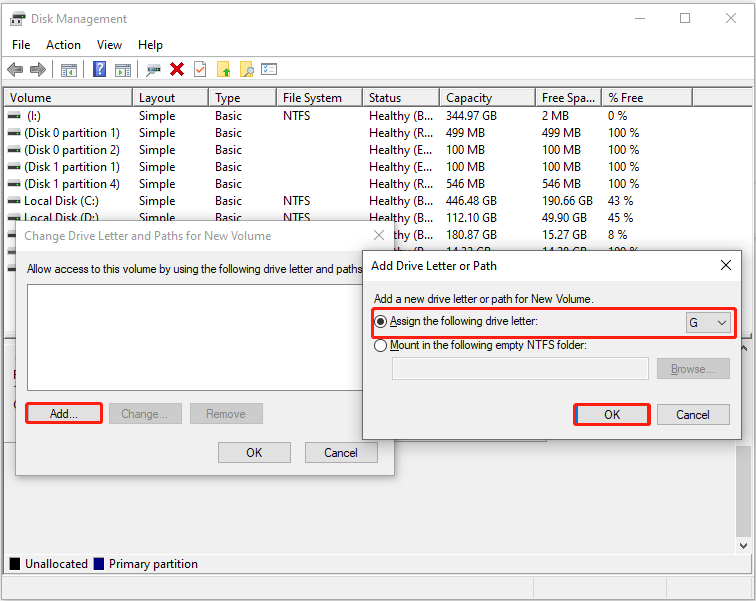
Step 1: In Disk Management, right-click the target disk and choose Change Drive Letter and Paths.
Step 2: Click the Add button to choose an unused letter and click OK.
If the problem persists, go ahead with the next option.
Fix 6: Repartition the External Hard Drive
One cause of this problem is a corrupted partition table or file system. Repartitioning can repair the partition table or file system of an external hard drive. This allows the system to recognize the hard drive again.
Step 1: Open Disk Management and locate your external hard drive in the list.
Step 2: Right-click the disk and select Delete Volume.
Step 3: Right-click on the unallocated space that appears and select New Simple Volume.
Step 4: Set the partition size, drive letter, file system, and complete the wizard.
Repeat the process to create multiple partitions.
How to Fix “External Hard Drive Not Accessible”
This section teaches you to fix the access denied error.
Fix 1: Create a New User and Give Full Control
Insufficient control permissions can cause access problems. Creating a new user and giving it full control permissions allows the system to regain read and write access to the drive.
Step 1: Press Win + E to open File Explorer.
Step 2: Right-click the external hard drive and select Properties.
Step 3: Switch to the Sharing tab and click the Advanced Sharing button.
Step 4: Check the box for Share this folder and click Permissions.
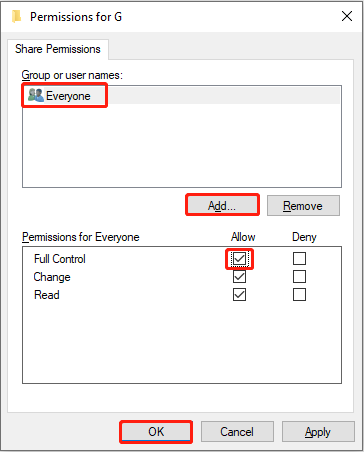
Step 5: Click the Add button and type Everyone to create a new user.
Step 6: Check the box for Full Control under the Allow column, and then click OK.
If it already has sufficient permissions, try the next method.
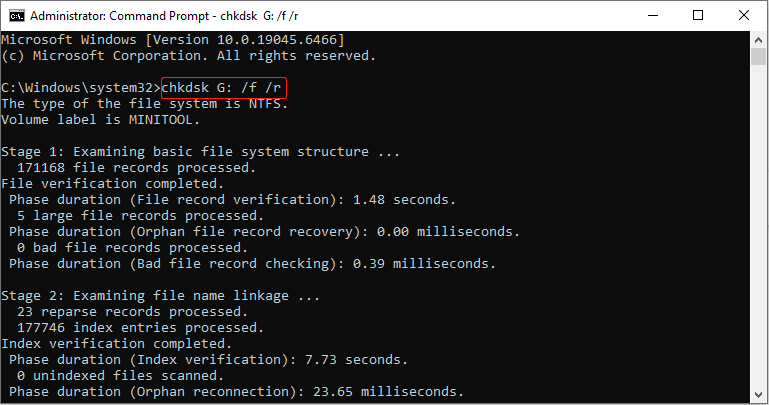
Fix 2: Execute the CHKDSK Command
File system corruption can cause read/write errors. CHKDSK can scan external hard drives for file system errors and bad sectors and attempt to repair or block them.
Step 1: Type cmd in the Windows search bar, right-click Command Prompt, and select Run as administrator.
Step 2: Input chkdsk G: /f /r and press Enter. Replace the letter G with the actual drive letter of yours.
If all the above methods fail, try formatting the drive.
Fix 3: Format the Hard Drive to Normal
Formatting can rebuild the file system of the external hard drive and clear any damaged structures that are causing read/write errors. This will restore the hard drive to a usable state.
Step 1: Open Disk Management, right-click the disk, and choose Format.
Step 2: Type a volume label, choose a file system, and click OK to confirm the change.
In Summary
In a word, here are two steps to fix the problem of an external hard drive not working. Recover data from your drive using MiniTool Power Data Recovery first, then repair the issue.
- When it is not detected, access the BIOS to enable its drive access or update the disk firmware.
- When it is not showing up in File Explorer, initialize it, scan for hardware changes, unhide it, reinstall the disk driver, assign a drive letter, or repartition it.
- When it is not accessible, create a new user and give full control, run CHKDSK, or format the disk.
For any MiniTool product-related inquiries, contact us anytime at [email protected].
About The Author

Position: Columnist
Chelsea graduated from university with a major in English. She has a strong interest in English writing. It is this passion for writing that led her to become an English editor. Her articles mainly focus on data recovery and other computer industry news. As an energetic and outgoing girl, Chelsea enjoys listening to music, singing, riding bikes, and eating in her spare time.
User Comments :