The Trash folder on Mac is very important: it keeps all the recently deleted files, folders, and programs temporarily. Users can open Trash and recover the accidentally deleted data easily. However, to free up disk space on Mac, you should go to empty the Trash further. This page on MiniTool shows you how to empty Trash on Mac in different ways.
As everyone knows, either Trash or Recycle Bin is a special location on your drive to keep deleted (removed) files or folders temporarily. All these items will be marked for deletion unless you put them back from the Trash can. In short, Trash is to Mac what Recycle Bin is to Windows. The reason why you can recover data deleted by mistake easily by using Trash is that the real content still remains on the drive, though the entries to the files or folders are cleared.
Because of this, the items kept in Mac Trash still occupy some disk space. So people are wondering how to empty Trash on Mac to free up disk space and remove the files completely.
How to Delete Files on Mac
As mentioned earlier, the files and folders will be sent to Mac Trash by default after they were deleted by the following methods.
- Locate the files that you don’t need anymore -> select them all -> drag the files and drop them to the trash icon in the Dock.
- Locate the files on your Mac -> select them -> right click on any selected file -> choose Move to Trash from the context menu -> click Move to Trash again in the prompt window to confirm.
- Look for the target files and folders -> select them -> press Command + Delete on the keyboard.

[SOLVED] How To Recover Deleted Files On Mac | Complete Guide.
How to Recover Files from Mac Trash
If you find any data are deleted by mistake, you should open Trash to put them back or drag them out directly.
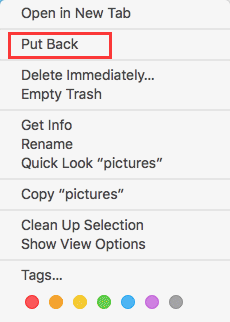
- Open Mac Trash -> select the files you need -> right-click on the highlighted area -> choose Put Back to restore them to the original location.
- Open Mac Trash -> select the files you need -> drag them out of the Trash directly.
5 Ways to Empty Trash Mac
However, if you’d like to delete the data in Trash permanently or release more free space on the disk, you should go to empty Trash. How to empty Trash? Please turn to the following ways.
#1. Delete All Items in Trash
As you can restore files from Trash easily, you can also delete files and folders kept there to empty Trash can.
- Click on the Trash icon in the Dock.
- Press Command + A to select all the items in Trash.
- Right click on any selected items.
- Choose Delete Immediately from the pop-up menu.
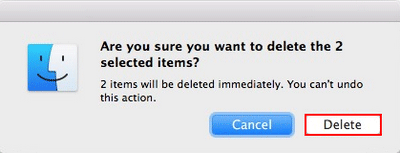
- A prompt window will appear saying that the items will be deleted immediately. You can’t undo this action.
- You should click Delete to confirm and continue.
#2. Empty Trash on Mac
In general, there are four different methods for Mac empty Trash.
One:
- Open Trash on your Mac.
- Click on the Empty button located in the upper right corner.
- You’ll get a confirmation dialog box unless your Mac is not configured to Show warning before emptying the Trash.
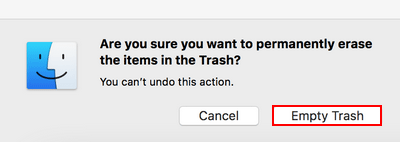
- Please click on the Empty Trash button in the pop-up window to confirm your action.
Two:
- Open Trash on Mac.
- Right click any blank area or click while holding the Control key.
- Select Empty Trash from the context menu.
- Click Empty Trash again in a prompt window.
Three:
- Look for the Trash icon in your Dock.
- Right click on the icon or click it while holding the Control key.
- Choose Empty Trash from the menu that appeared.
- Click Empty Trash again to confirm.
Four:
- Navigate to the menu bar of your Mac.
- Click on the Finder menu on the right side of the Apple icon.
- Select Empty Trash from its submenu.
- Click Empty Trash again to continue.
You may also press Shift + Command + Delete simultaneously to Empty Trash.
#3. Mac Securely Empty Trash
- Click on the Trash icon in your Dock and hold it.
- Press the Command key and click on the Trash icon.
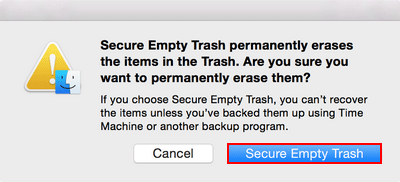
- The Secure Empty Trash option will appear in the pop-up menu. Please select it.
- Click on the Secure Empty Trash button again in the prompt window to confirm your choice.
If you want your Mac to delete files securely every time you try to empty your Trash, please follow this guide:
- Click Finder from the menu bar.
- Select Preferences from its submenu.
- Shift to the Advanced tab.
- Check the Empty Trash securely option.
#4. Use Terminal to Empty Trash
You can force empty Trash Mac by using the Terminal when your Trash can’t be emptied using the ways above. Other fixes when you can’t empty Trash on Mac will be given in the next part.
- Click Go from the menu bar.
- Choose Utilities.
- You may also click Applications and Utilities from the Dock.
- Select Terminal.
- Type this command: sudo rm –R. Please note that there’s a space after the letter R.
- Open Trash from the Dock and then select all the files and folders.
- Drag and drop them into the Terminal window.
- The corresponding file name(s) will be listed when you release your finger.
- Press Enter.
- Type the Mac user password and press Enter.
Here’s another way to force empty Trash on a Mac:
- Click on the Trash icon in the Dock and hold it until the menu pops up.
- Press and hold the Option key or the Shift + Alt (Option) keys.
- Select Empty Trash from the menu and release the key(s).
#5. Empty Trash Automatically
Also, you can set your Mac to empty Trash for you automatically by following two ways.
One:
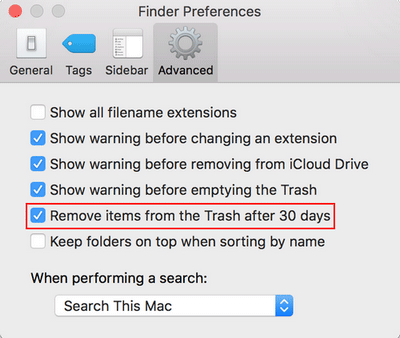
- Select Finder from the menu bar.
- Choose Preferences.
- Go to the Advanced tab at the top.
- Look for the Remove items from the Trash after 30 days option and check it.
Two:
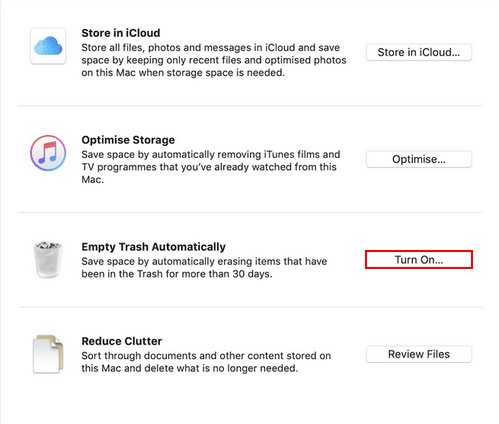
- Click on the Apple menu at the top.
- Choose About this Mac.
- Go to the Storage tab.
- Click on the Manage button.
- Look for the Empty Trash Automatically option.
- Click on the Turn On button.
- It will save space by automatically erasing items that have been in the Trash for more than 30 days.
How to Recover Data after Empty Trash Mac
Users may want to recover files or folders sometimes after they got emptied. Is that possible? Of course, yes. The space occupied by the deleted files and folders will be marked as usable again, but the real content still remains on the disk until it’s overwritten by new data.
You need a professional and reliable data recovery tool that works for Mac. The Stellar Data Recovery for Mac, jointly designed by MiniTool and Stellar, is a good choice.
How to Recover Deleted Files from an Emptied Trash on Mac
Step 1: get Stellar Data Recovery for Mac.
Download the data recovery software from its official website. Then, launch the software on your Mac.
Data Recovery for MacClick to Download100%Clean & Safe
Step 2: please Select What To Recover.
You can choose Recover Everything or recover certain types of files – Documents, Emails, Videos, Audio, and Photos. Then, click Next to continue.
Please choose Documents if you want to recover lost Word files on Mac.
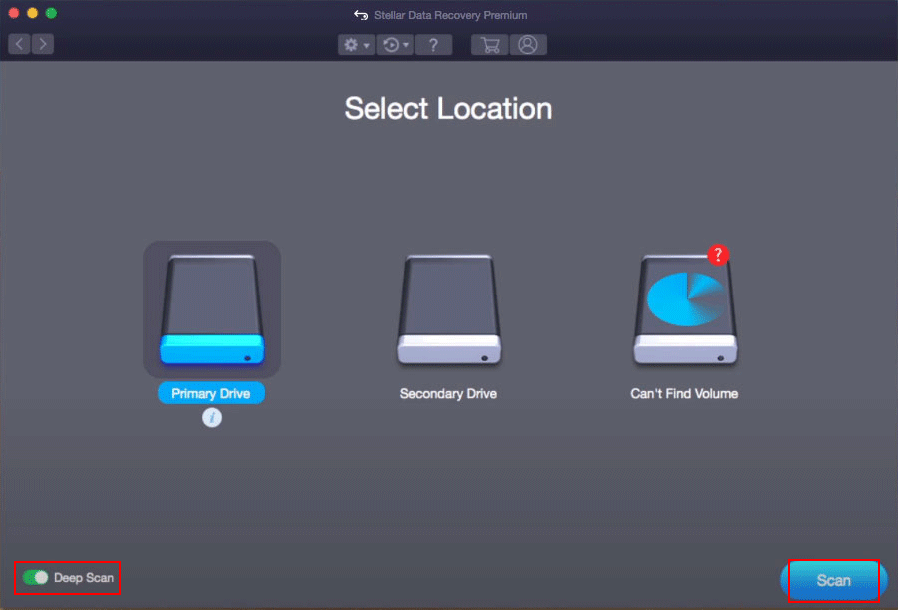
Step 3: please Select Location.
You should choose the drive that contains your files and folders emptied from Trash. Then, click on the Scan button to search for missing files. You’d better enable Deep Scan to find more items.
Step 4: select items to recover.
Please wait for the scan to finish. Then, browse the scan results and select the files and folders you need.
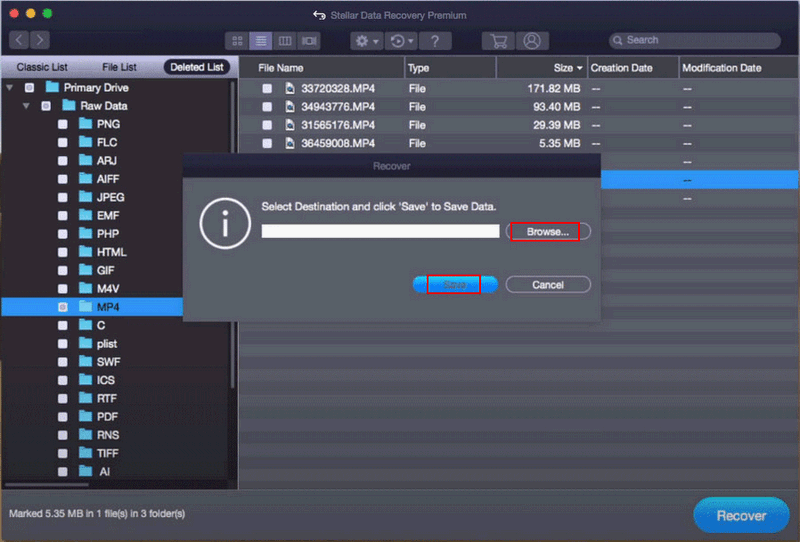
Step 5: recover data to a safe location.
You should click on the Recover button at the bottom right. Then, click Browse to select a destination click Save to start recovering lost data. Then, you should wait until the recovery is finished.
You should also follow the steps above if you need to get files off failing hard drive on Mac. But you need to create a recovery drive first if you want to recover data from dead MacBook.
8 Ways to Force Empty Trash Mac
Sometimes, Mac will tell you that you can’t delete certain files or folders due to different reasons. But you definitely want to force empty Trash Mac when you’re told that your Mac Trash can’t be emptied. There are several ways you should try to delete data.
How to Delete Files That Won’t Delete on Mac
- Restart Mac and try to Empty Trash again.
- Boot into Safe Mode to try to Empty Trash.
- Empty Trash using Terminal.
- Press Option or Shift + Alt/Option.
- Remove files bypassing Trash.
- Repair disk before empting Trash.
- Close apps and then Empty Trash.
- Delete locked files to Empty Trash Mac.
#1. Empty Trash after Restarting Mac
- Select Apple from the top menu bar.
- Choose Restart from the drop-down menu.
- Wait for the process to finish.
- Try to Empty Trash on Mac again.
#2. How to Empty Trash Mac in Safe Mode
- Shut down Mac and wait for a while.
- Turn on Mac again and hole the Shift key immediately.
- Release the key when the login window appears. Then, you’ll enter the Safe Mode.
- Navigate to the file (or folder) that can’t be deleted.
- Try to delete it by using the methods mentioned above.
- Restart your Mac again to go back to the normal mode.
#3. How to Empty Trash Using Terminal
Though it’s an effective way to delete any files using Terminal, you should think twice before deleting and be careful enough during the process. That is because the wrong command or other reasons could lead to huge problems.
- Click Go.
- Choose Utilities.
- Select Terminal.
- Type sudo rm –R. There must be a space after the letter R.
- Open Trash to select all the files and folders.
- Drag and drop them into the Terminal window.
- Release your finger when the file names are listed.
- Press Enter.
- Type the Mac user password and press Enter.
#4. How to Force Empty Trash on a Mac Using the Option Key
- Click on the Trash icon in the Dock and hold it until the menu pops up.
- Press & hold the Option key or the Shift + Alt/Option keys.
- Select Empty Trash and then release the key(s).
#5. How to Delete Files Directly, Bypassing the Trash
- Browse your drive to select the files you don’t need.
- Select them all.
- Press Command + Option/Alt + Delete.
- Click on the Delete button in the prompt window to confirm.
#6. How to Repair Disk before Emptying Trash
- Click on the Finder icon in the Dock.
- Select Applications from the left sidebar.
- Choose Utilities from the list.
- Select Disk Utility.
- Choose your disk in the left pane.
- Click on the First Aid button at the top of the right pane.
- Click Run to confirm and follow the on-screen instructions to complete the rest steps.
You may find your external hard drive doesn’t show up in step 4, right? Please read this page to know what you should do:
#7. How to Delete Files in Use
- Make sure the file/folder you are trying to delete is not opening.
- Close any programs that may use the files.
- Try to delete the files.
- If this still failed, please restart your Mac and try again.
- If it still didn’t work, please go to check whether the files are used by a startup program -> stop the program -> try to delete again.
- Also, you can boot your Mac into Safe Mode to try to Empty Trash.
#8. How to Delete Locked Files
You should click on the Continue button in the prompt window to try to delete the selected files. Besides, you can unlock them before deleting: right click on the files you want to delete -> choose to Get Info -> uncheck Locked.
Conclusion
Deleting files and emptying Trash are supposed to be very common and easy actions. Anyone can perform these operations on Mac. However, people may be told by the system that they can’t delete some files or Mac Trash won’t empty. This post shows the common ways to Empty Trash on Mac and the effective ways to fix it when Mac Trash can’t be emptied.
User Comments :