If you are desperate to recover unsaved Word document, you can follow this MiniTool post, which provides several feasible solutions. It introduces how to recover deleted saved Word documents and lost unsaved documents on Windows by using a powerful data recovery software, search for files, use the AutoRecover feature, etc.
We’ve all experienced that moment: A sudden shutdown when you do not save your document, or a frantic search for a document you’re confident you saved but can’t find. Similar to the user below:
“I had to force quit Microsoft Word and the unsaved changes that I had made were lost. How can I recover the document in its latest version?”quora.com
What a terrible situation it is! Right?
However, don’t worry, Microsoft Word offers some excellent data recovery methods that can frequently recover unsaved/saved documents, even after they’ve been deleted.
Moreover, we have explored some successful Word document recovery methods, including using professional data recovery software and restoring from the Recycle Bin. You can give them a shot.
Before jumping into the main methods, you may wonder: What causes the Word document loss? Let’s take a closer look.
Why Does My Word Document Get Lost?
Word document loss generally falls into two categories: saved documents that were lost or deleted, and documents that were never saved.
>> For Saved Word Document Loss:
If you can’t find your saved Word document, it might be due to several possible factors. Here are the most frequent reasons:
- Saved to the Incorrect Location: You might have accidentally saved the document in a different directory or drive.
- File Was Overwritten or Deleted: It’s possible that another version has replaced it, or it was mistakenly deleted.
- Saved on an External Drive That Was Removed: If you saved to a USB or external hard drive and detached it too soon, the file might not have been saved correctly.
- User Account or Permissions Problem: When using multiple accounts or having restricted permissions, files may be stored in unexpected places or become inaccessible.
>> For Unsaved Word Document Loss:
Common reasons for losing unsaved Word documents include unexpected power failures, accidental restarts, system failures, or other issues like Windows system errors.
In more detail, the causes include:
User error.
Unintentional closure and sporadic saving can lead to issues. Perhaps you accidentally clicked “Don’t Save” or closed the file too quickly without thinking.
Word or computer crashed before saving.
A power outage, forced shutdown, or unexpected crash of Word can prevent AutoRecover from functioning properly.
AutoRecover was turned off or not working.
If AutoRecover is disabled, set to a long interval (e.g., every 10 minutes instead of every 1 minute), or fails, your unsaved Word document won’t be saved.
Temporary files were deleted.
Word stores unsaved documents in temp folders, but they may be cleared when restarting your PC.
The file was never named or saved once.
If you never saved the file even once, there may be no backup created. Once you close it and don’t click the Save button, the unsaved document will be lost.
Is It Possible to Recover a Word Document: Saved & Unsaved
Let’s now explore the available recovery methods for both saved and unsaved Word documents.
Situation 1. Lost/Deleted Saved Work Documents.
If you have saved your documents before it is lost, it is possible to recover the saved files in the Recycle Bin, Word backup files, or using professional data recovery software.
Situation 2. Lost/Deleted Unsaved Work Documents.
The good news is that you can recover the unsaved Word documents. Surprise, right? Microsoft offers various integrated recovery methods you can try, like the Temporary files and AutoRecover files.
However, your likelihood of success in Word file recovery will be influenced by multiple factors, such as:
- Presence of backups: If you have activated Windows File History, Word AutoRecover, or another backup solution, there may be a saved version of your lost/deleted document.
- TRIM on SSDs: If your Word document was located on a solid-state drive (SSD), the TRIM command could complicate recovery since it designates deleted data as free space to enhance the SSD’s performance.
- Duration since deletion: The longer you delay, the greater the chance that new data could overwrite your deleted file.
Therefore, you must take quick action to rescue your unsaved/saved Word docx files, as any new data saved on your storage device may overwrite the old one and make it impossible to recover.
Does Word Keep Backup Files?
Similar to many other programs, Microsoft Word includes a built-in “auto-save” feature that automatically saves your work periodically. The default location for these auto-saved files is the AppData folder.
Moreover, if you use the native Windows option, your documents will be uploaded to OneDrive.
How to Recover a Deleted Saved Word Document
After learning the reasons and other information about your lost saved/unsaved documents, you may have the confidence to recover your document files.
In this part, let’s break down the saved document recovery solutions in detail.
Want a quick tutorial? Check out this short video:
Solution 1. Search for the Document
Sometimes, your files may not really be lost. In this case, you can perform an extensive search throughout your complete digital environment of your system drive.
Step 1. Launch File Explorer by pressing the Windows key + E.
Step 2. Click on the Search field located in the upper-right corner.
Step 3. To limit your search to Word files specifically, type one of these file extensions:
- .doc (for older Microsoft Word documents)
- .docx (for more recent Word files)
- .asd (for AutoRecover documents)
If you can recall the file name or part of it, include that in your search.
Step 4. If you locate your lost Word document, double-click it to open it in Microsoft Word. Make sure to immediately save it using Save As to prevent losing it again.
Solution 2. Check the Recycle Bin
The Recycle Bin is typically the easiest place to check for recovering Word documents that were accidentally deleted.
In the situations below, it is helpful for you to recover deleted documents from the Recycle Bin:
- Use the Delete key or the right-click delete option to remove the Word document.
- The file was deleted recently, and the Recycle Bin has not been cleared since that time.
- The file size is within the storage limit of the Recycle Bin (generally 5-10% of your drive’s capacity).
- The file was deleted from your internal hard drive or an external HDD/SSD.
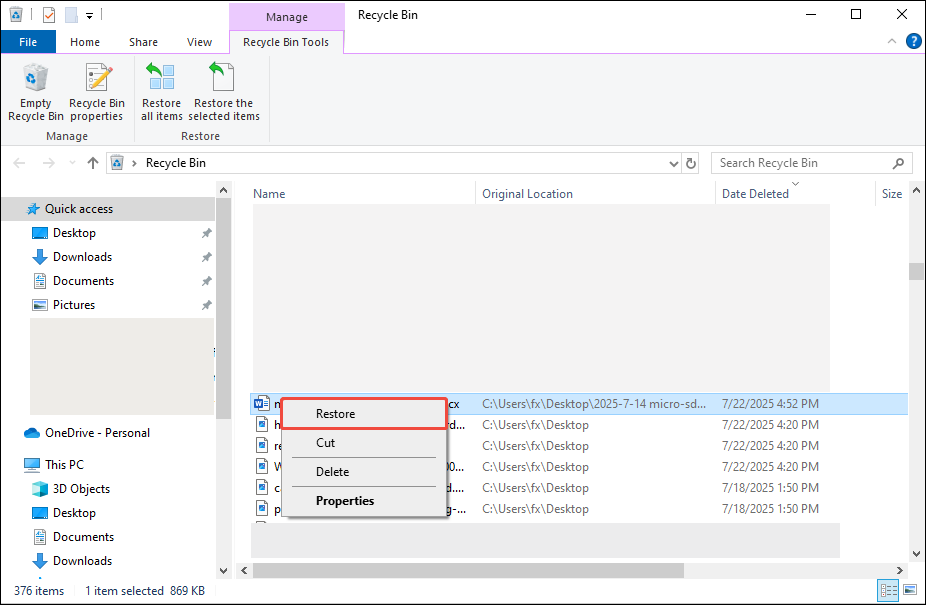
Here’s how to recover Word files from the Recycle Bin:
Step 1. Click on the Recycle Bin icon located on the desktop.
Step 2. Locate the file you wish to recover. You can search for file extensions like .doc, .docx, and .dot.
Step 3. Select the file, right-click on it, and choose the Restore option.
In some cases, you will not find your missing Word documents in the Recycle Bin if any of the following occurred:
- Delete the file using Shift + Delete.
- Accidentally empty the Recycle Bin after deletion.
- The file was deleted from a USB flash drive or SD card.
- Enabled the “Do not move deleted files to Recycle Bin” option before.
- The file surpassed the maximum size limit for the Recycle Bin.
- Deleting files via the command line or a third-party application.
Solution 3. Use MiniTool Power Data Recovery
As you can see, there are so many circumstances that you can’t recover your Word documents from the Recycle Bin. Consider using a reliable data recovery tool to get your deleted Word documents back.
MiniTool Power Data Recovery makes the saved/unsaved Word document recovery more possible and easier. It not only allows you to recover documents, but also photos, videos, and audio files.
This free data recovery software supports you in recovering data from SD cards, USB flash drives, internal hard drives, and more.
How to use MiniTool Power Data Recovery to rescue your documents?
- Scan the partition where your lost/deleted documents are saved.
- Find and preview the desired files.
- Save the wanted document files in a safe location.
Now, follow the detailed breakdown:
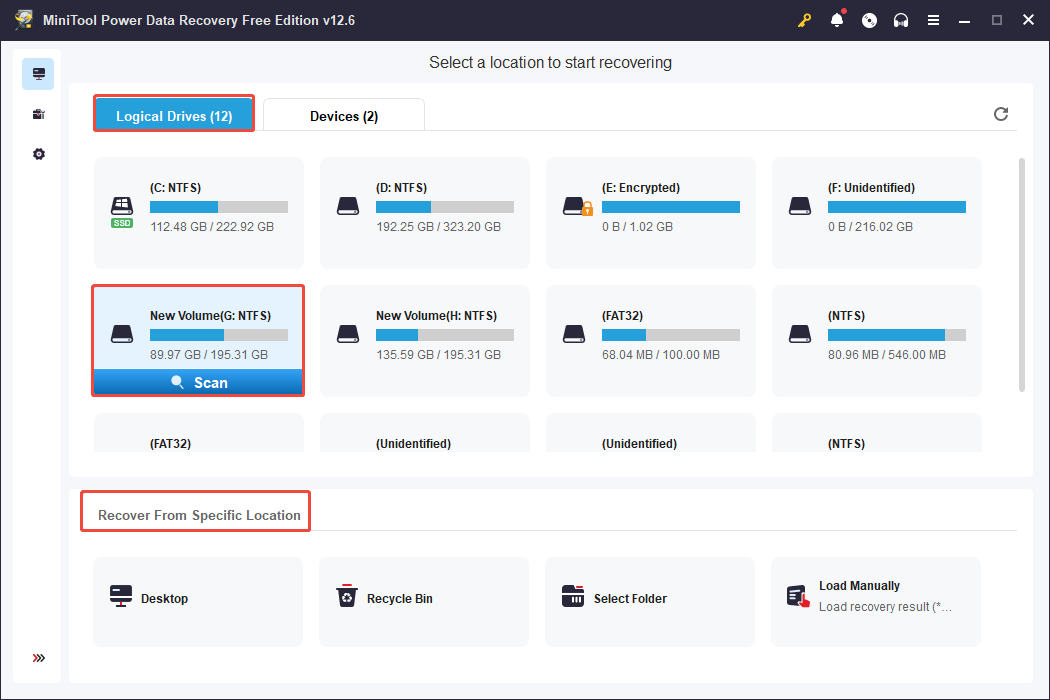
Step 1. Launch the software and scan the target partition.
Download and install this data restore tool on your PC.
MiniTool Power Data Recovery FreeClick to Download100%Clean & Safe
Once done, launch it to enter its home page. On the main interface, you will locate the Logical Drives tab by default.
Move your cursor to the partition where your deleted or lost documents are saved and click Scan.
Additionally, you can go to the Recover From Specific Location section and choose to scan the desktop, Recycle Bin, or a specific folder.
Step 2. Locate the needed document files by using the features.
After scanning, browse the found files and tick the ones you need under Path or Type.
- Path: Organizes files by the original folder structure.
- Type: Classifies files by file type.
This tool offers two more functions to help you find desired files faster.
- Filter: Filters files by file type, modification date, file size, and file category.
- Search: Searches for a certain file by using a partial or complete file name.
For instance, to locate the document file, you can go to the Type tab and choose All File Types > Document.
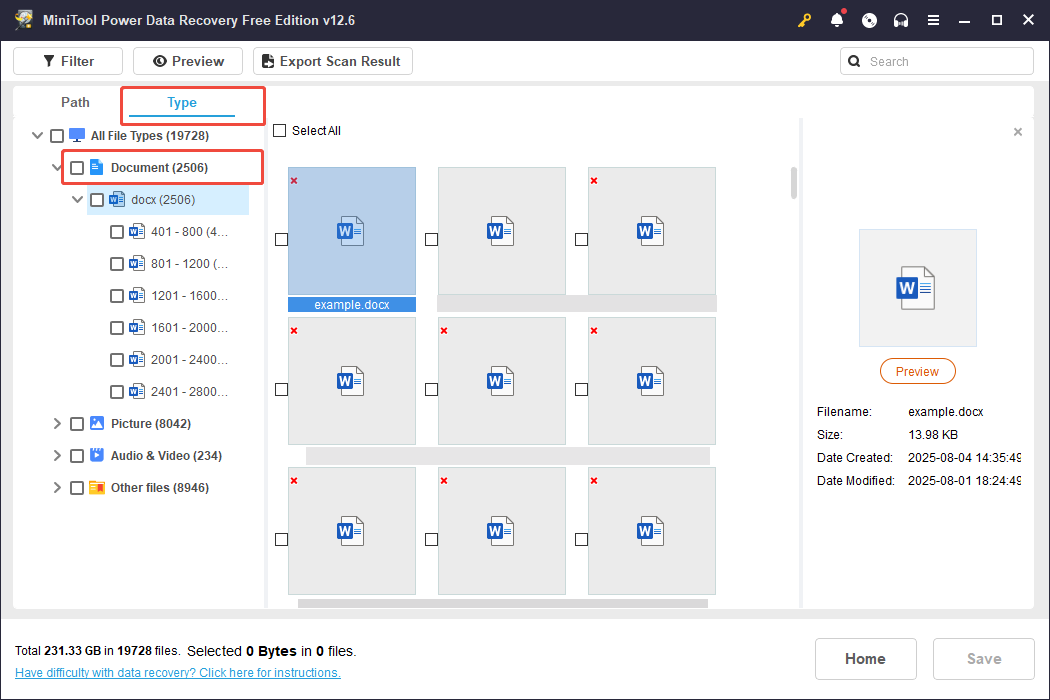
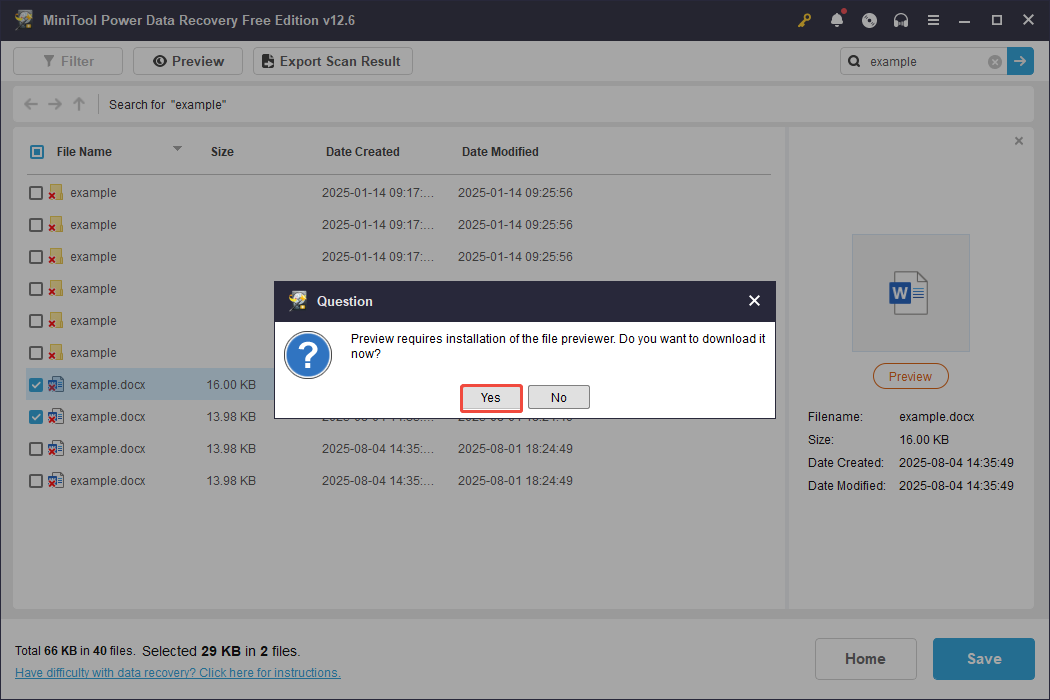
Not sure if the ticked files are the right ones? Just double-click on each of them to preview.
For document files, it will pop up a window asking to download the file when you double-click to preview. Click the Yes button to confirm.
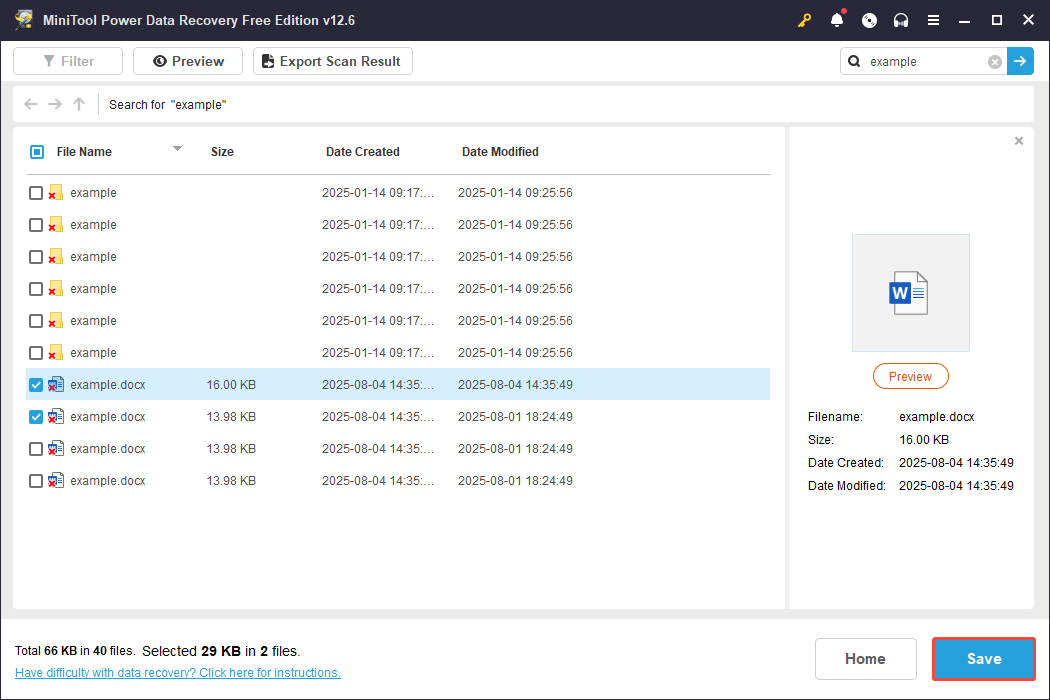
Step 3. Save the wanted files in a different location.
Finally, click the Save button in the scan results window and choose a different and safe file directory to store the recovered files.
Solution 4. Check the OneDrive
Microsoft 365 allows users to seamlessly integrate with OneDrive, Microsoft’s cloud storage solution that automatically synchronizes files across devices.
OneDrive offers two effective methods for recovering Word documents: via OneDrive’s Recycle Bin and through the version history feature.
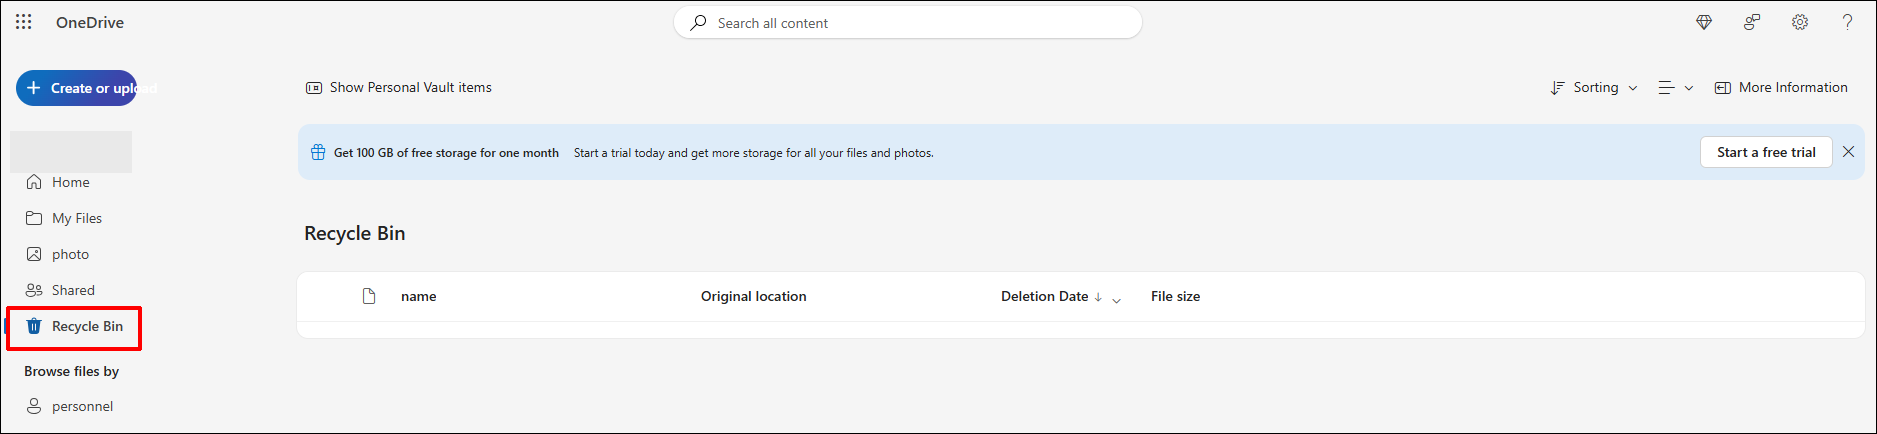
Option 1. From the OneDrive’s Recycle Bin.
Step 1. Visit the OneDrive website and log in using your Microsoft account.
Step 2. Then, navigate to the Recycle Bin in the left sidebar.
Step 3. Look for the Word document, select it, and click the Restore button to return the document to its original location in OneDrive.
Option 2. Recover the previous version.
Step 1. Sign in to OneDrive using your Microsoft account.
Step 2. Go to the folder where your Word document is located.
Step 3. Right-click on the document and choose Version history from the drop-down menu.
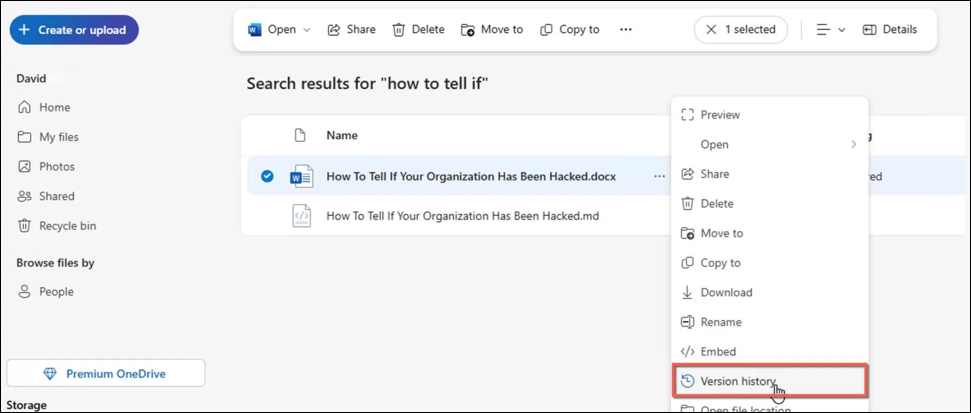
Step 4. A new window will appear, allowing you to view all previous versions. Select any version to see a preview.
Step 5. Once you find a version you wish to keep, you can download it to your device or save a copy to OneDrive.
How to Recover a Lost Unsaved Word Document
There are dependable ways to recover unsaved Word documents quickly and reliably, like using the Document Recovery panel, searching for AutoRecover files, Word Backup files, or Temporary files.
Let’s dive into the practical solutions to restore unsaved documents.
Solution 1. Use Document Recovery Panel
The Document Recovery panel is a pop-up window that shows up when Word crashes or closes unexpectedly, displaying files that can be recovered.
Step 1. To simply use it, you can restart your PC and relaunch Microsoft Word. After restarting, the Document Recovery panel will be visible on the left side.
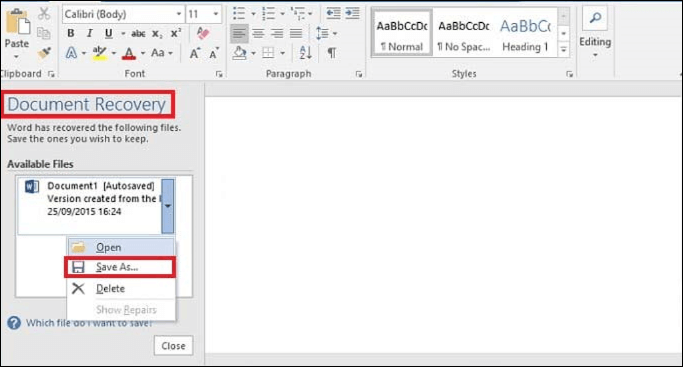
For some Word versions, it will show on the top toolbar.

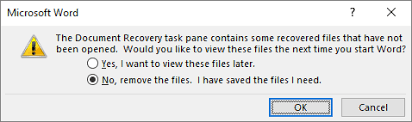
Step 2. Click Save As or the Save button.
Step 3. A pop-up will then show up; select the appropriate option based on your needs and click OK.
If it doesn’t pop up automatically, go to the next solution to manually search for the AutoRecover document file.
Solution 2. Searching for AutoRecover Files
There is a strong possibility that you can retrieve an unsaved document from your autosave.asd file. To recover unsaved documents, ensure that auto-save is activated and follow these steps:
Case 1. You can open the unsaved document.
Step 1. Open the document, access the File menu, then select Info, click on Manage Document, and opt for Recover Unsaved Documents.
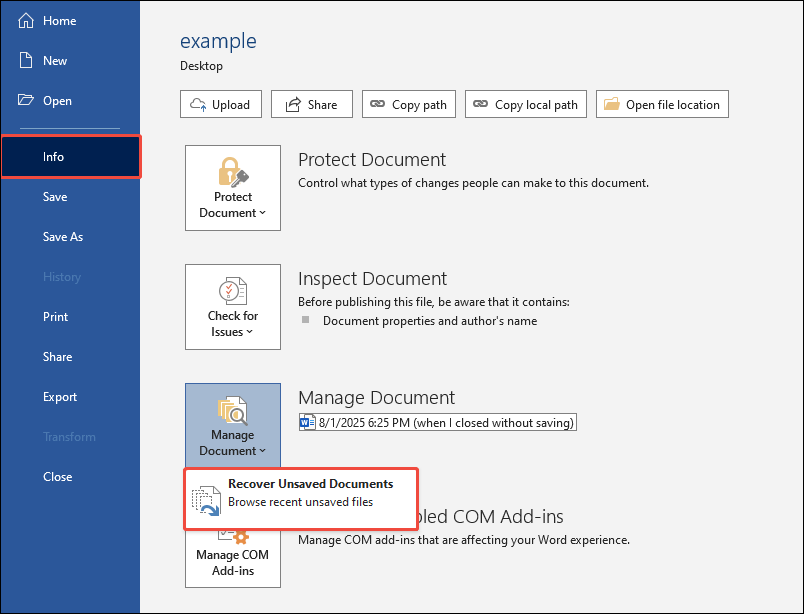
Step 2. Click on the desired .asd file according to the time. Click Open.
Step 3. In the pop-up document file, go to Infor > Save As to store the file.
Case 2. You can’t locate the unsaved document.
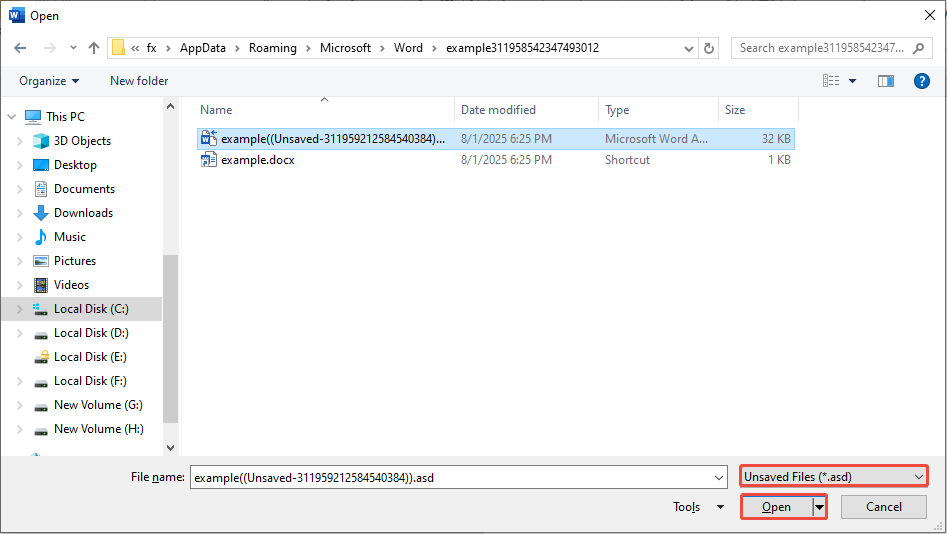
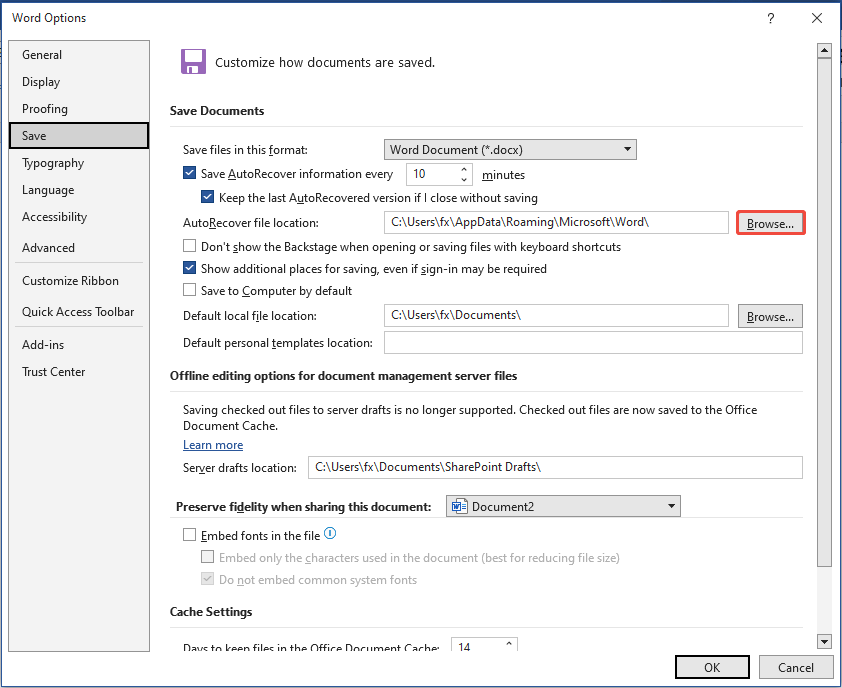
Step 1. Open MS Word, go to File > Options, select Save from the left menu.
Step 2. Navigate to the Save Documents section and check for the following:
- AutoRecover file location: This is the storage location for temporarily unsaved files.
- Default local file location: This is where files that you save manually are located.
Step 3. Click the Browse button for the two locations.
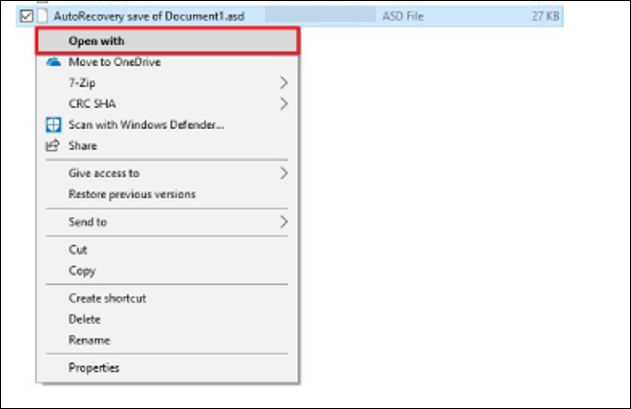
Look in the AutoRecover folder for .asd files, then right-click and choose the Open with option.
Meanwhile, check the Documents folder and see whether your document is here.
Step 4. Once the document is opened, save it to your PC.
For Word versions 2002-2007:
- In Word 2007, click the Microsoft Office button, select Word Options, then go to Save to check the automatic file recovery location. Click Cancel to exit Word, then open the noted folder to find the .asd file for your document. Double-click to open and save it.
- In Word 2003 and 2002, go to Tools, select Options, and click on the file location tab. Copy the automatic file path, exit Word, and find the AutoRecover file at that location. Look for the .asd file and double-click to open and save it.
Additional Help – Back Up Your Documents
Option 1. How to turn on AutoRecover.
To prevent an unexpected loss of Word documents, it is advised to activate automatic recovery.
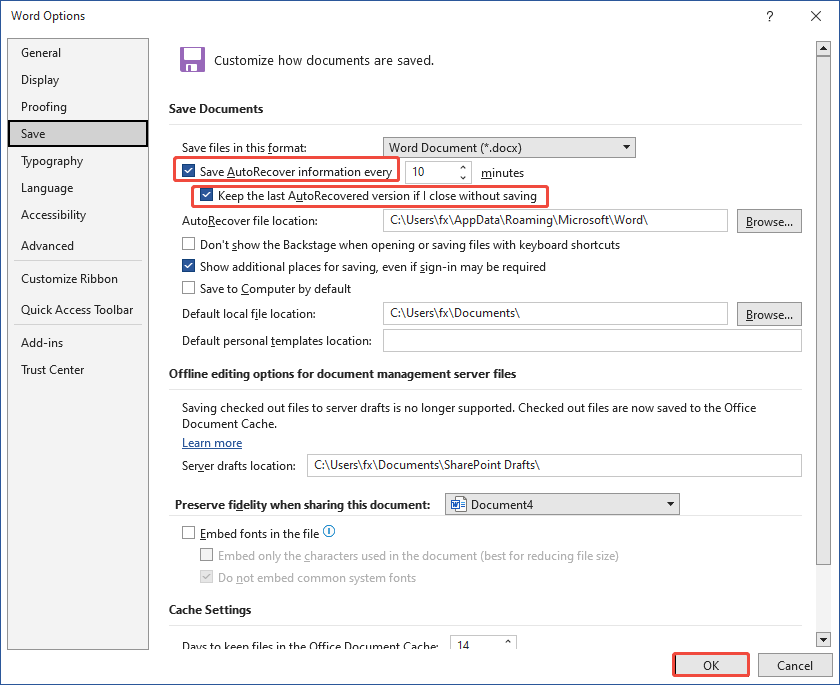
- Launch Word and navigate to File > Options > Save.
- Check the option Save auto-recovery information every [insert required time] minutes and Keep the most recent version saved by Auto Recover if I close without saving.
- Click OK to apply the changes.
Option 2. Use MiniTool ShadowMaker.
For a professional document backup, MiniTool ShadowMaker is highly recommended. This powerful data backup tool (free for 30 days) is easy to use to schedule automatic file or system backups.
It helps create a file or system image and enables you to restore files or the system when there is a need.
How to use MiniTool ShadowMaker to back up documents? Only three steps.
- Select the files you want to back up.
- Choose a location to save the backup image.
- Configure the backup type and schedule, and then start the backup.
MiniTool ShadowMaker TrialClick to Download100%Clean & Safe
Solution 3. Searching for Word Backup Files
Files created as backups in Word end with a “.wbk” file extension. If the “backup copy” feature is enabled in Word, you may have a backup version of your document.
Process 1. Ensure the “backup copy” feature is activated.
To verify if this feature is activated, go to File > Options > Advanced, scroll down to the Save section, and check the option for Always create backup copy.
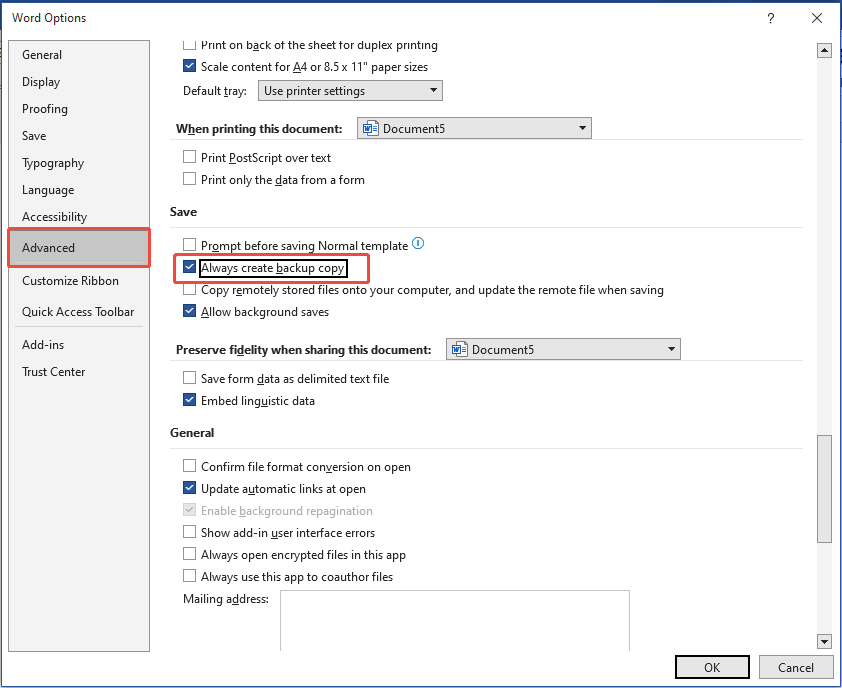
If this feature is not enabled, you can tick it and click OK to create the Word backup files to protect your documents.
Process 2. Locate the Word Backup folder.
For users with a Microsoft 365 subscription, look for a backup file in these two directories:
- C:\Users\UserName\AppData\Roaming\Microsoft\Word
- C:\Users\UserName\AppData\Local\Microsoft\Office\UnsavedFiles
Process 3. Find the .wbk file.
To locate the backup version of the document, press Win + E to open the File Explorer, go to This PC, and type .wbk in the Search box.
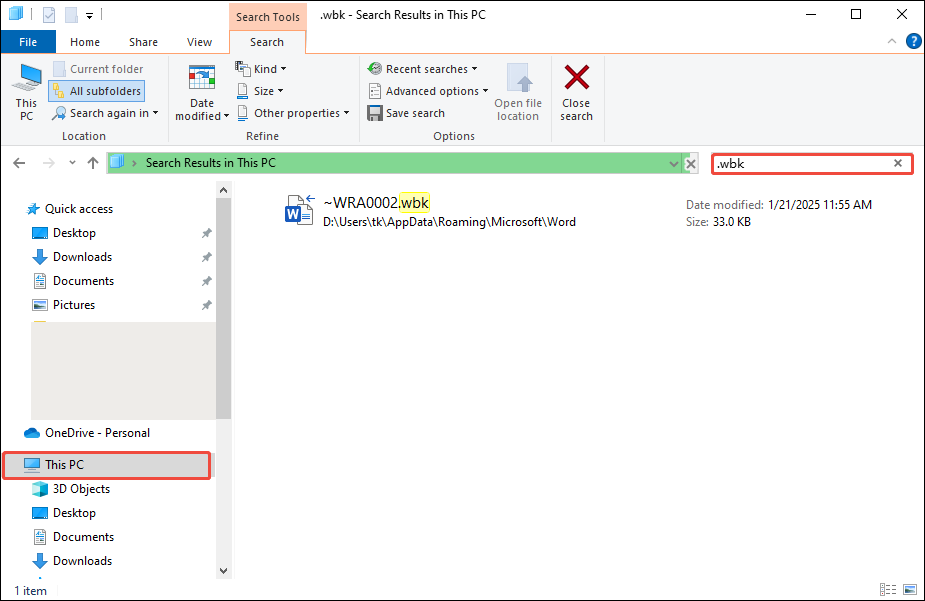
Process 4. Open the wanted backup file.
If you see any files with the .wbk extension followed by the title of the lost document, double-click on the file name to open it. Don’t forget to save it to your PC.
If you are unable to locate a backup file for your document, proceed to the next method.
Solution 4. Searching for Temporary Files
The ability to create temporary files while your system is operational is particularly effective in Windows for recovery purposes.
For instance, when you open a Word document, Windows automatically creates a hidden temporary file in locations such as %systemdrive%\Windows\Temp or %userprofile%\AppData\Local\Temp.
You can then retrieve deleted Word documents from these temporary file directories.
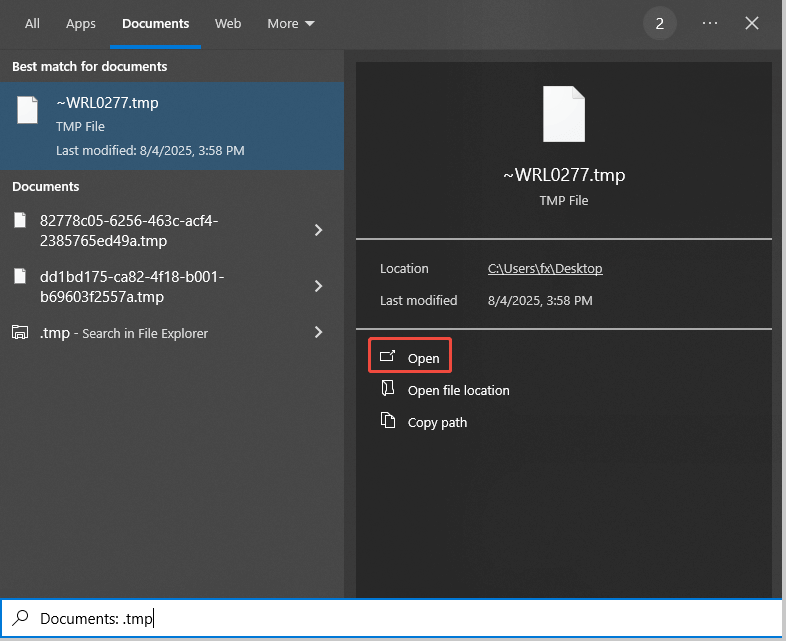
Step 1. Click the Search icon and choose Document.
Step 2. Type .tmp in the search box. Browse through the results and look for a file that meets your needs.
If you find the wanted document, select it and click Open.
Conclusion
How to recover a Word document? This tutorial explores 8 ways to restore saved/unsaved Word documents on Windows. With MiniTool Power Data Recovery at hand, you can easily restore lost or deleted documents.
What’s more, you can use Word’s features, like AutoRecover and backup, and check the Recycle Bin or OneDrive to restore your documents.
To prevent future data loss, be sure to enable the AutoRecover feature in Word or regularly back up your documents.
If you need any help when using MiniTool products, please send an email to our support team via [email protected].
About The Author

Position: Columnist
Sandy became an English editor after graduation. She is devoted to finding effective solutions for diverse IT problems and provides articles on data recovery, data backup, and computer partitions and drives. In her spare time, she likes listening to music and playing games.
User Comments :