No Audio After BIOS Update
Updating BIOS is a great way to improve system stability and hardware compatibility. However, after completing this action, you may encounter various issues such as “PC stuttering after BIOS update” and “audio not working after BIOS update” which I am going to discuss today.
This may manifest as no sound output when connecting to headphones or other devices, errors when playing sound, the volume icon is grayed out, or other failures. These phenomena may be caused by changes in BIOS settings, driver incompatibility, hardware detection problems, etc. You can take the following measures for troubleshooting.
How to Fix Audio Not Working After BIOS Update
Fix 1. Run the Audio Troubleshooter
The built-in audio troubleshooter is designed to detect and repair sound-related problems. So, when there is no audio after BIOS update, you can run this troubleshooter.
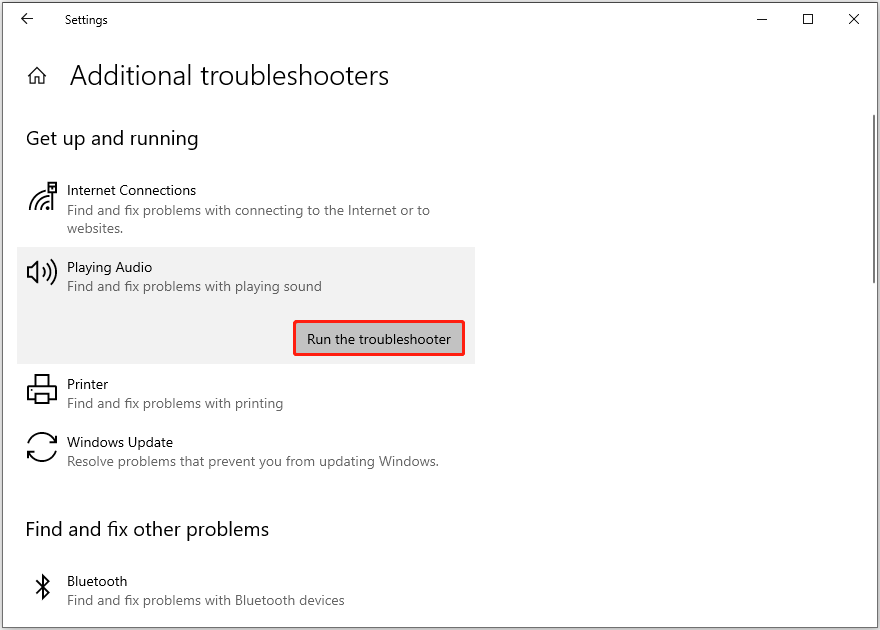
Step 1. Press the Windows + I keyboard shortcut to open Settings.
Step 2. Select Update & Security > Troubleshoot > Additional troubleshooters.
Step 3. In the new window, expand the Playing Audio option, and then click Run the troubleshooter.
Fix 2. Uninstall and Reinstall the Audio Driver
When the “sound not working after BIOS update” issue is associated with the corrupted audio driver, reinstalling the driver is the most straightforward workaround.
Step 1. Right-click the Start button and choose Device Manager.
Step 2. Expand the Audio inputs and outputs category,
Step 3. Right-click on the Realtek audio device and select Uninstall device.
Step 4. In the new confirmation window, select Uninstall.
Step 5. Restart your computer. Windows should reinstall the Realtek audio driver automatically. If it does not, you may need to go to the manufacturer’s website to download and install the driver manually.
Fix 3. Disable and Enable HD Audio Controller
Disable and re-enable the HD Audio Controller may also help with the “audio not working after BIOS update” issue. Follow the steps below to complete this task.
Note that the steps and specific options vary depending on your computer brand and model. Here I take ASUS for example.
Step 1. Restart your computer. During the restart process, repeatedly press the F2 or Delete key on your keyboard to enter BIOS.
Step 2. Press F7 to enter the Advanced Mode.
Step 3. Under the Advanced tab, select the Onboard Devices Configuration option.
Step 4. Next to HD Audio Controller, select Disabled from the drop-down menu. After that, press F10 to save the change.
Step 5. Restart the computer, then go to BIOS, and enable HD Audio Controller.

Fix 4. Clear CMOS
The BIOS update you installed may brought some setting changes or incompatible configurations that caused the audio to fail to work. In this case, you can restore the BIOS to factory defaults by clearing the CMOS to eliminate the error.
Step 1. Turn off your computer and remove the power cord.
Step 2. Press the Clear CMOS or CLR_CMOS button for about 5~10 seconds.
Step 3. Plug in the power cord and start your computer.
Step 4. When you are prompted that the BIOS settings have been reset, follow the prompt and press F1 to enter BIOS. After that, press F5 to select the Load Optimized Defaults option, and then press F10 to save the change.
Fix 5. Downgrade BIOS
If all the methods above fail to get your audio working again, you may consider downgrading the BIOS.
MiniTool ShadowMaker TrialClick to Download100%Clean & Safe
After making a file backup, you need to go to the official website of your motherboard manufacturer to download the BIOS installer for the version needed. Then, you can run the BIOS update utility to complete the downgrade process.
Related Post: PC Not Booting After BIOS Update – Recovery & Repair
Bottom Line
As you can see, several ways can be used to deal with the “audio not working after BIOS update” issue. I believe that you can successfully get the problem resolved after trying the approaches above.
About The Author

Position: Columnist
Shirley holds a bachelor’s degree in English and has been an editor at the MiniTool Team for many years. She specializes in IT-related content, with a focus on data recovery, file backup, disk management, and other technical topics. She is committed to delivering clear, accurate, and practical solutions to help users resolve common computer issues.
User Comments :