By default, when you open File Explorer, you come to the Quick Access folder that gives you access to your frequently used folders and allows you to open recent files as well. Though it is handy for many users, however, some users want to change the Windows Explorer default folder and open File Explorer to a specific folder. If you are one of them, you can keep reading to find specific methods.
How to Change the Default Folder in File Explorer
Way 1. Change Quick Access Folder to This PC
You can easily change the File Explorer default folder from Quick Access to This PC or vice versa by using Folder Options.
Step 1. Press Windows + E key combinations to open File Explorer.
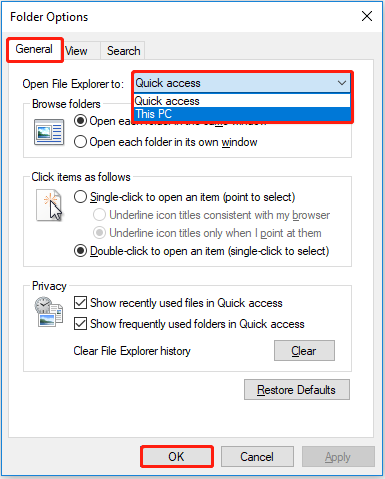
Step 2. In File Explorer, click View > Options.
Step 3. Under the General section, click the drop-down triangle next to Open File Explorer to. Then choose Quick Access or This PC based on your own needs. Finally, click OK to save your changes.
After this, when you open File Explorer, you will be navigated to Quick Access or This PC according to the folder settings.
Here is an alternative way to change the File Explorer default folder from Quick Access to This PC or vice versa, that is by using the Windows registry.
Note: Any wrong operations to the Windows registry may cause computer failure. So, it is highly recommended to back up the registry in advance.
Now you can follow the steps below to change the Windows Explorer default folder in Windows 10.
Step 1. Press Windows + R key combinations to open Run.
Step 2. In the text box, type regedit and press Enter. You need to click Yes in the UAC window.
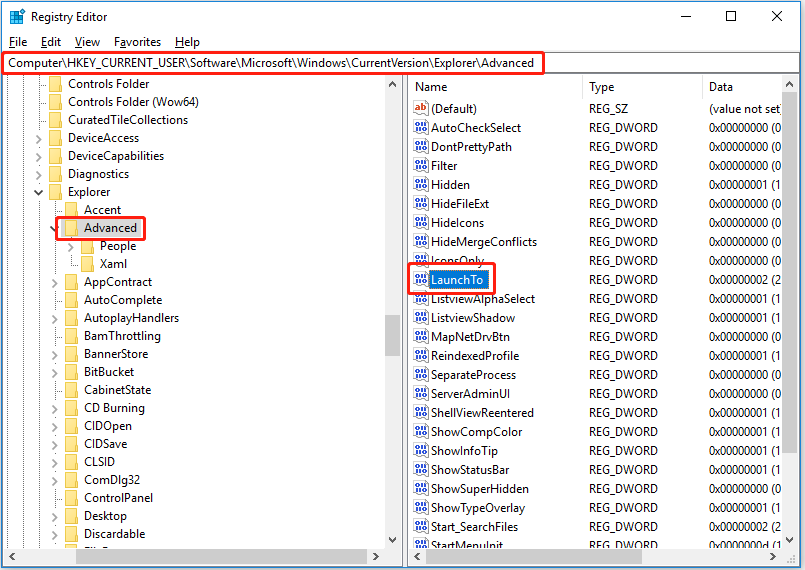
Step 3. In the address bar, input the following address and press Enter:
Computer\HKEY_CURRENT_USER\Software\Microsoft\Windows\CurrentVersion\Explorer\Advanced
Step 4. In the right panel, double-click LaunchTo.
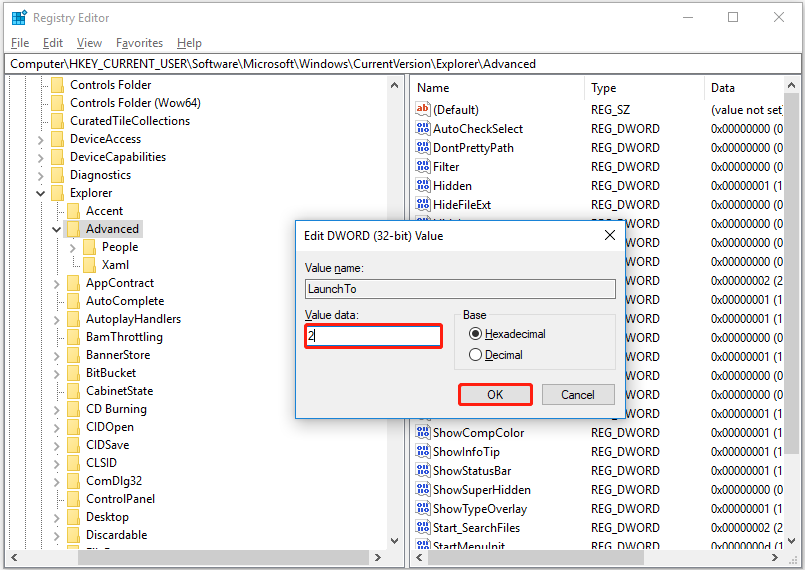
Step 5. To change the default folder to This PC, you need to set up the value data to 1. To change the default folder to Quick Access, you need to change the value data to 2. Finally, click OK to apply your settings.

Bonus Time
As said before, any accidental operations to the Windows registry may cause the computer to malfunction or become unbootable. In this situation, you cannot access your data on the computer. So, how can you recover lost files when your PC won’t boot?
Now, a piece of professional data recovery software – MiniTool Power Data Recovery is recommended. it is a reliable and easy-to-use file restore tool used for recovering documents, emails, pictures, videos, audio, and so on from external hard drives, external hard drives, USB flash drives, CDs/DVDs, and more.
To recover data from an unbootable computer, you need to use the registered edition, such as the MiniTool Power Data Recovery Personal. The full edition offers you a feature called Bootable Media Builder that allows you to boot your computer and recover files on it.
What’s more, if you lost some files but your computer can start normally, you can use the free edition of MiniTool Power Data Recovery. It supports scanning and displaying all found files on your drives and recovering data of no more than 1 GB for free. So, you can download the free edition to have a try.
MiniTool Power Data Recovery FreeClick to Download100%Clean & Safe
Way 2. Change the Default Folder to Any Folder You Want
In addition to changing the default folder between Quick Access and This PC, you can also change it to any folder you want by following the steps below.
Before you do, you need to remove the original File Explorer icon from the Windows taskbar.
Step 1. Right-click any blank area on your desktop and select New > Shortcut.
Step 2. In the location box, input this path: %SYSTEMROOT%\explorer.exe /e, target folder path, and click Next (Remember to replace the target folder path with the actual full folder path you want to set as the default folder).
For example, %SYSTEMROOT%\explorer.exe /e, E:\OneDrive\Desktop\test.

Step 3. Assign the shortcut a name and click Finish.
Step 4. Right-click the shortcut and select Pin to taskbar.
Now you can open File Explorer to the specific folder you have chosen by clicking the pinned icon in the taskbar.
Tip: To avoid confusion, you can change the pinned folder icon: Right-click the pinned folder and right-click its name to select Properties. Then click Change Icon and follow the prompts on your screen to finish the process.
Wrapping Things Up
Now you should know how to change the default folder in File Explorer and how to recover lost or deleted files using MiniTool Power Data Recovery.
If you have any questions about File Explorer, you can let us know by leaving your comments in the comment area below.
About The Author

Position: Columnist
Shirley holds a bachelor’s degree in English and has been an editor at the MiniTool Team for many years. She specializes in IT-related content, with a focus on data recovery, file backup, disk management, and other technical topics. She is committed to delivering clear, accurate, and practical solutions to help users resolve common computer issues.
User Comments :