The Current Input Timing Is Not Supported by the Monitor Display Black Screen
When using a computer, you always encounter some problems, for example, monitor issues like monitor not displaying full screen, the second monitor not detected, vertical lines on monitor, etc. Additionally, you may experience other issues, for instance, current input timing is not supported Windows 7/8/10. This is the topic we will discuss today.
It is reported that many users are having this issue when they open certain applications or boot the Windows operating system. To be specific, the computer screen shows you the error message:
“The current input timing is not supported by the monitor display. Please change your input timing to XX or any other monitor listed timing as per the monitor specifications”.
According to users, this issue mainly affects Dell monitors, for example, Dell U2414H, U2312HM, etc. This issue is triggered mainly because the monitor connection goes wrong or the monitor is set outside its allowed resolution or refresh rate. But don’t worry and we will give you some solutions in the following part to fix the error.
Fix the Current Input Timing Is Not Supported by the Monitor Display Dell
Change the Resolution & Refresh Rate to Allowed Values
As mentioned above, the correct resolution may cause the current input timing not supported error in Windows 10/8/7. To fix this issue, you should change the input timing to the specific resolution and refresh rate (in my case, it is 1920×1080@60Hz), as suggested in the error message.
How to Change Input Timing on Monitor Windows 7
Step 1: In Safe Mode, right-click the empty area on your desktop and choose Screen resolution.
Step 2: Choose the resolution to 1920×1080.
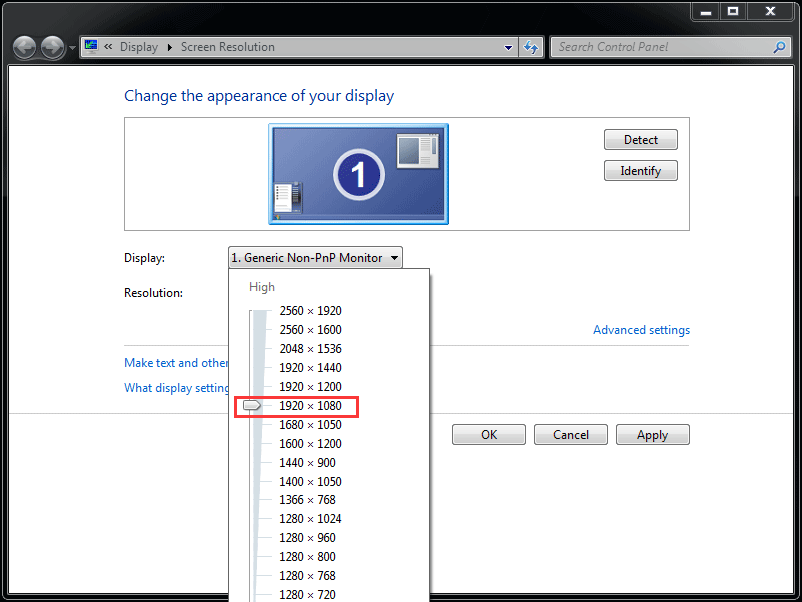
Step 3: Click Apply and Keep changes.
Step 4: On the Screen Resolution interface, click the Advanced settings link.
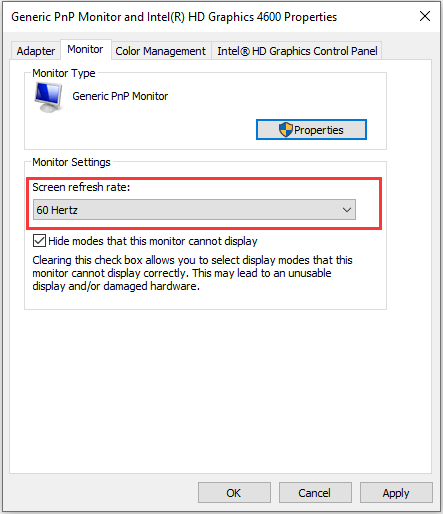
Step 5: Under the Monitor tab, set Screen refresh rate to 60 Hertz.
Step 6: Save the changes by hitting Apply and OK.
How to Change Input Timing on Monitor Windows 10
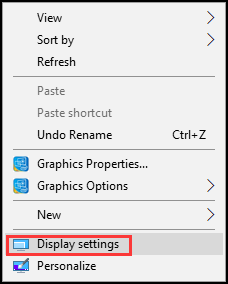
Step 1: Similarly, right-click the blank space of the desktop and choose Display settings.
Step 2: In the Display window, scroll down to find Resolution and change it to the specific resolution, for example, 1080×1920.
Step 3: Click Keep changes to confirm the change.
Step 4: Click Advanced display settings > Display adapter properties for Display.
Step 5: Go to Monitor and set the screen refresh rate to 60 Hertz.
Update Graphics Card Driver
Video card driver corruption may cause the current input timing not supported issue. To fix the issue, you should upgrade the driver.
Step 1: In Safe Mode, input device manager to the search bar and click the result to open this tool.
Step 2: Go to Monitors and double-click your driver to open the Properties window.
Step 3: Under the Driver tab, click Update Driver.

Step 4: Choose the first option to let Windows automatically search for the latest driver.
Boot Your Computer in Low-Resolution Mode
This method has been said to be effective by many people to fix the error “the current input timing is not supported by the monitor display”. So, you can also try to boot your computer in low-resolution mode to match the resolution for your monitor.
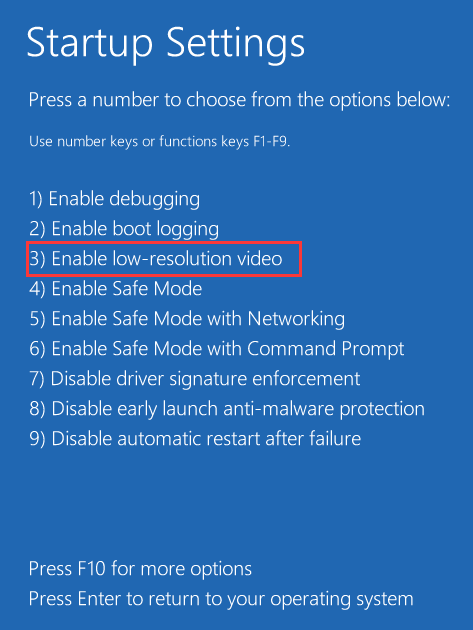
Windows 10/8
Step 1: Boot your PC to the Windows Recovery Environment (WinRE).
Step 2: Go to Troubleshoot > Advanced options > Startup settings > Start.
Step 3: Press F3 to choose Enable low-resolution video.
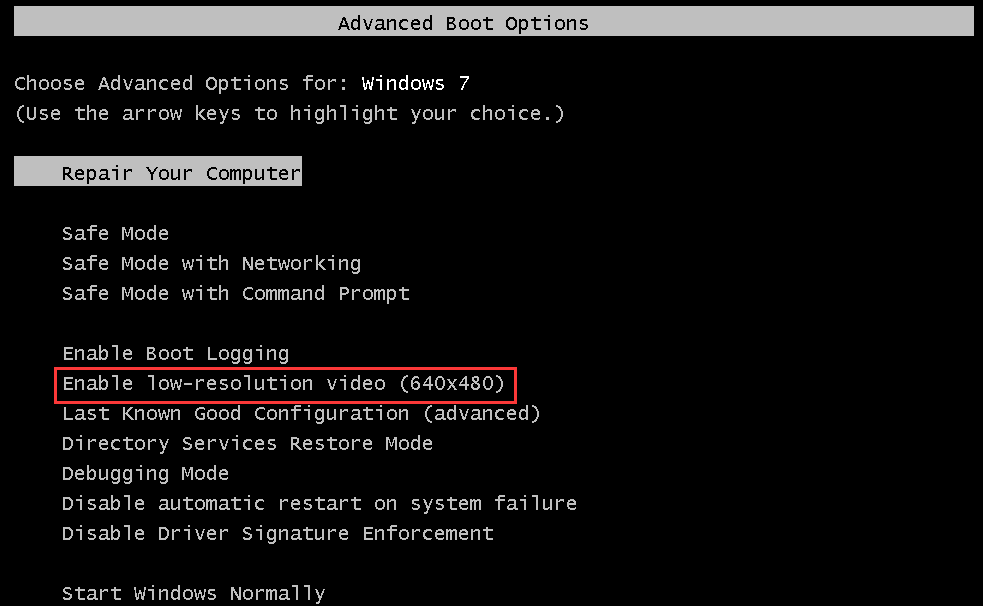
Windows 7
Step 1: Reboot your PC and press F8 after the monitor displays its logo or post screen and before the Windows logo appears.
Step 2: Under the Advanced Boot Options window, select Enable low-resolution video to boot the computer. Now, your issue should be fixed.
Use a Different Cable
If these ways don’t work, you may need to consider the possibility of a hardware issue. Some affected users found that the culprit was the connection cable between the PC and the monitor. Just use another cable to connect your PC and your monitor and see if the error still appears.
Final Words
Now, some possible methods are offered to you to fix the error “the current input timing is not supported by the monitor display” on Dell monitors. If you try them, you should easily get rid of the trouble.
About The Author

Position: Columnist
Vera has been working at the MiniTool Team for over 10 years as a technical editor and content writer. She mainly focuses on disk and partition management, data recovery, Windows backup and restore, and PC troubleshooting. Through in-depth software testing and hands-on experience, she has helped users solve a wide range of computer problems and better protect their data on Windows devices.
User Comments :