You must be familiar with File Explorer since you use it to list, navigate, and open files and folders. When the duplicate folders in the left pane of File Explorer problem happens, it not only messes up the interface but also lowers the efficiency of finding files. Here we collect some methods for you to fix this problem.

How to Get Rid of the Duplicate Folders in File Explorer
Way 1: Change Folder Options
You can change the settings of the Navigation pane in File Explorer. Follow the next steps to complete the settings.
Step 1: Click on the folder icon on the taskbar to open File Explorer.
Step 2: Turn to the View tab on the toolbar and select the Options choice at the right corner.
Step 3: Click on the View tab in the Folder Options window.
Step 4: Scroll down in the Advanced setting section to find Navigation pane.
Step 5: Uncheck all the choices under the Navigation pane.
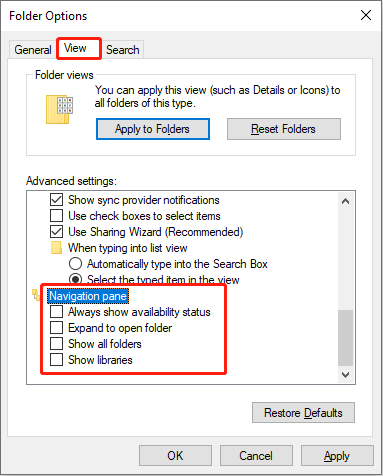
Step 6: Click Apply > OK to apply the changes.
After this, you can close the window and back to File Explorer to see whether the duplicate folders have been removed.

Way 2: Reset Folder Options
Restoring the settings to default can correct some misconfiguration of File Explorer; thus, it might be able to remove duplicates in File Explorer.
Step 1: Press Win + E to open File Explorer.
Step 2: Shift to the View tab on the top toolbar, then click on the Options button.
Step 3: Click on the Restore Defaults button at the bottom in the Folder Options window.
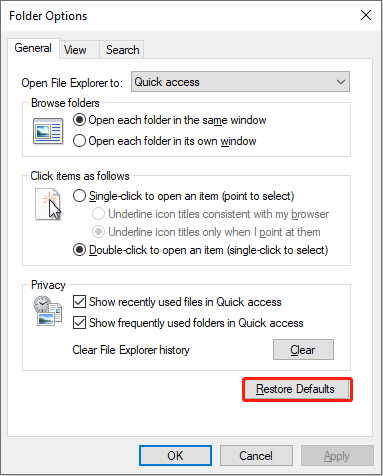
Step 4: Click on Apply > OK to confirm the change.

Way 3: Delete Icon Cache
Probably, the corrupted icon cache might cause the duplicate folders in the left pane of File Explorer. You can delete the icon cache to try to tackle this problem.
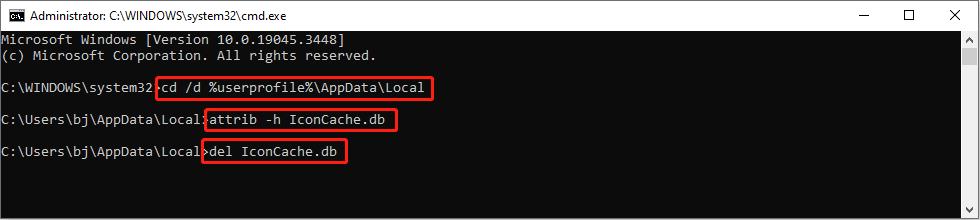
Step 1: Press Win + R to open the Run window.
Step 2: Type cmd into the text box and press Shift + Ctrl + Enter to run Command Prompt as administrator.
Step 3: Copy and paste the following command lines and hit Enter at the end of each command.
cd /d %userprofile%\AppData\Local
attrib -h IconCache.db
del IconCache.db
Way 4: Run SFC & DISM Command Lines
If this problem on your computer is triggered by corrupted system files, you can use the Windows built-in tool to fix this problem. The SFC and DISM command lines are utilized to find and repair corrupted or missing system files.
Step 1: Press Win + S and type Command Prompt into the search bar.
Step 2: Choose Run as administrator on the right pane.
Step 3: Type sfc /scannowand hit Enter to run the command line.

Step 4: When the scan process is finished, you can input the following command lines and press Enter at the end of each command.
DISM /Online /Cleanup-Image /Checkhealth
DISM /Online /Cleanup-Image /Scanhealth
DISM /Online /Cleanup-Image /Restorehealth

When the corrupted system files are fixed, you can go to File Explorer to see if the folders display normally.
Bonus Tip
Problems occurring in File Explorer are also possible to threaten your files. If your files are lost after fixing the duplicate folders in the left pane of File Explorer problem, you should get them back immediately because the longer they are lost, the more impossible to restore them.
Here we recommend you use MiniTool Power Data Recovery. This free file recovery software is capable of retrieving files from internal and external hard drives, USB flash drives, SD cards, and other data storage devices.
With a secure data recovery service, this data restore tool will guarantee the safety of your original data and cause no damage to them. If needed, you can download and install the free edition to scan and restore up to 1GB of files for free.
MiniTool Power Data Recovery FreeClick to Download100%Clean & Safe
Final Words
The duplicate folders in the left pane of File Explorer cost more time for users to distinguish them. They might not be a serious problem but really troubled users. Hope one of the above methods can help you resolve the problem.
User Comments :