What Is System File Checker?
System File Checker (Sfc.exe) is a utility built into Windows, integrated with Windows Resource Protection, to scan and repair damaged, lost, or tampered system files. Its working principle is as follows:
- Scan system files and compare their hash values. If the hash value doesn’t match, the file may have been corrupted or tampered with.
- SFC will retrieve the correct version of the file from the %WinDir%\WinSxS\Backup folder that stores backup files of system updates, drivers, and critical system components.
- Replace the incorrect file with the correct version.
Common SFC Command Parameters and Functions
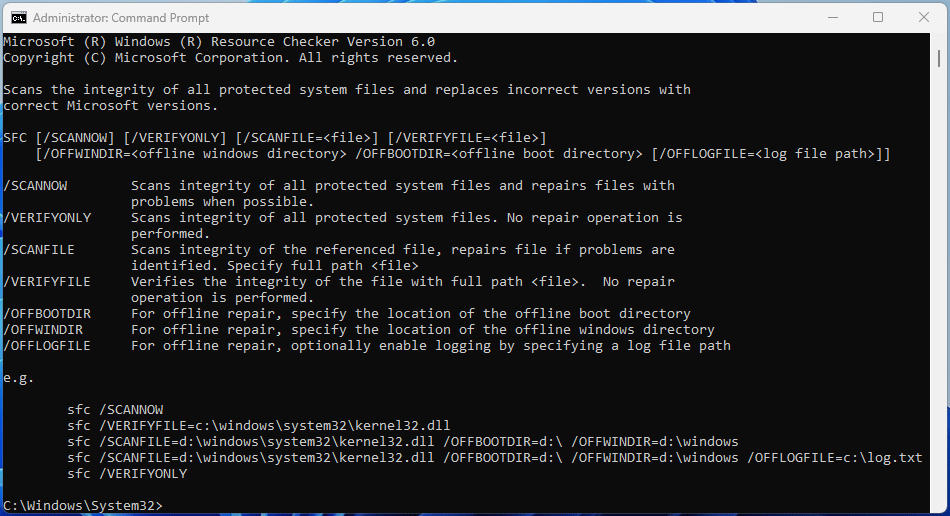
The syntax for the SFC command is: SFC + a parameter. The core parameters of the SFC command include: /SCANNOW, /VERIFYONLY, /SCANFILE, /VERIFYFILE, /OFFBOOTDIR, and /OFFWINDIR.
- /scannow: It scans the integrity of all protected system files and repairs files with problems automatically.
- /verifyonly: It scans the integrity of all protected system files, but does not perform any repair operations. This is only used to detect if files are corrupted.
- /scanfile: It scans the integrity of the referenced file and repairs the file if problems are identified. To use this command, you need to specify the full path of the file. The full command should be Sfc /scanfile = file_path.
- /verifyfile: It verifies the integrity of the referenced file, but no repair operation is performed. The full command should be Sfc / verifyfile = file_path.
- /offbootdir: It specifies the location of the boot partition (where the corrupt Windows files are located). The full syntax should be offbootdir = your_boot_drive. This command is needed if you run SFC in WinPE or WinRE, where the C drive may have been assigned a different drive letter.
- /offwindir: It is usually used in WinPE or WinRE to specify the location of the WINDOWS directory so that SFC can scan system files in this folder and then retrieve the correct version of the file from the WINDOWS\WinSxS\Backup folder. The full syntax should be /offwindir = Windows_folder_path.
- /offlogfile: The sfc /scannow log file, called CBS.log, is located in the C:\Windows\Logs\CBS\ folder, containing details for online scans. For offline scans, the /offlogfile parameter can specify a different location to save the log file.
When to Run SFC Scannow
SFC scannow is the most commonly used SFC command and can solve most problems caused by lost, corrupt, or tampered Windows system files.
In general, if you notice the following problems, it’s time to run SFC scannow to repair Windows system files.
- System Instability and Crashes: The operating system may become unstable, frequently freezing, crashing, or popping up various error messages. They prompt you that the file system is damaged, the drive needs to be formatted, or that a certain file needs to be repaired.
- Failure to Boot: If critical boot files or core system files are affected, the computer may be unable to start up at all and display various BSOD errors.
- Malfunctioning Applications: Programs may not load, crash unexpectedly, or exhibit incorrect behavior if the system files they rely on are compromised.
- Security Vulnerabilities: Tampered files, especially those modified by malware, can open backdoors, disable security software, or allow unauthorized access to the system and sensitive data.
- Performance Degradation: The system may slow down significantly due to errors in processing or the need to repeatedly attempt to read damaged files.
- Abnormal Features: Some system features (such as network, updates, Microsoft Store, File Explorer, etc.) might stop working correctly.
How to Run SFC Scannow to Repair Windows System Files
The SFC scannow command can be run in Windows, WinRE, and WinPE to repair Windows 11/10 system files, regardless of whether the PC can boot.
Run SFC Scannow in Windows
If the PC can boot into Windows, run SFC scannow to repair the system files. Here are the steps.
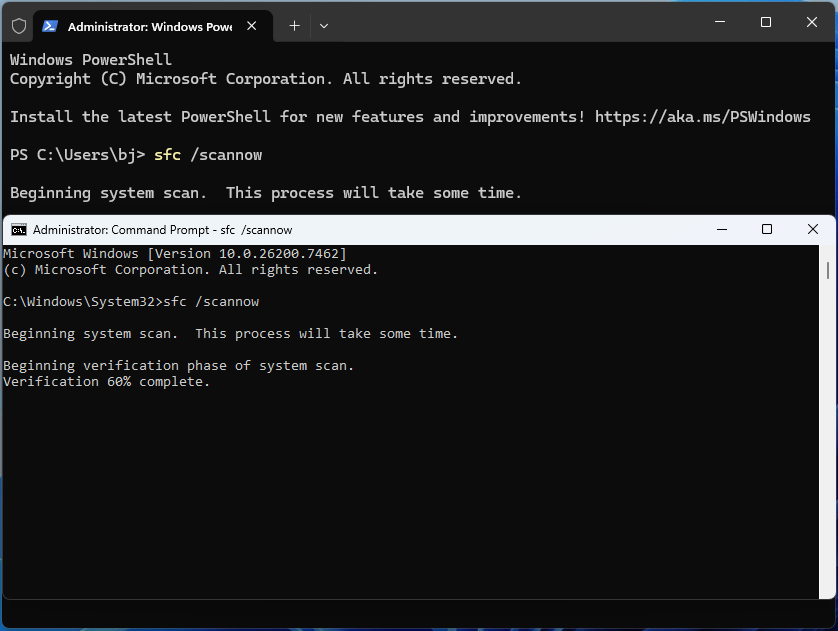
Step 1: Run Command Prompt or Terminal as administrator.
- Open Terminal: Press the Windows logo key + X and then select Terminal (Admin).
- Open Command Prompt: In the Windows Search bar, type “cmd”. From the result list, right-click Command Prompt and choose Run as administrator.
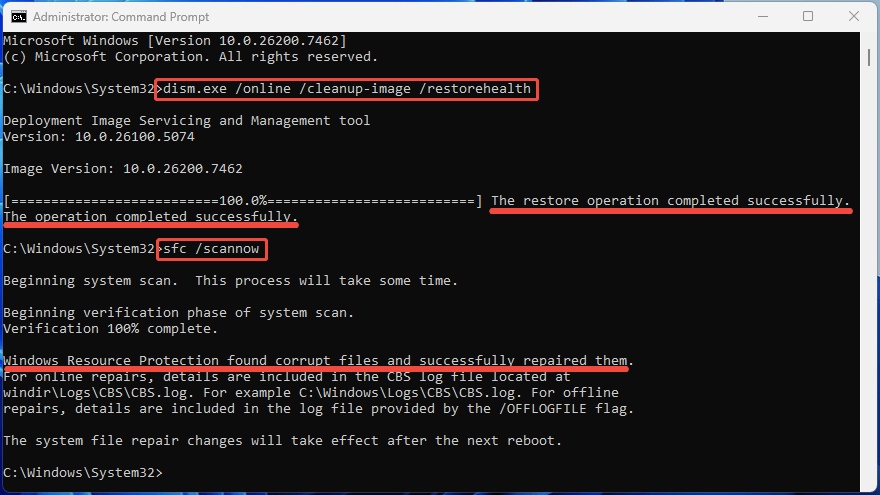
Step 2: Type “sfc /scannow” and press Enter.
Run SFC Scannow in WinRE
If the computer can’t boot up, run SFC scannow in WinRE to do the Windows repair. Here is the guide:
Step 1: Boot into WinRE by forcefully interrupting the startup process (power off once the PC doesn’t boot up) two or three times.
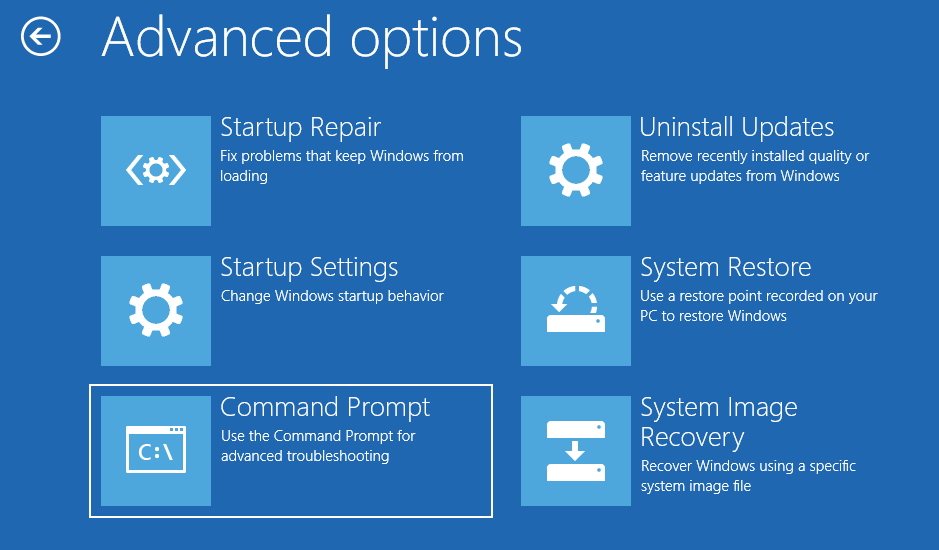
Step 2: Once in WinRE, go to Troubleshoot > Advanced options > Command Prompt. Choose your account to continue. Enter your password and click Continue.
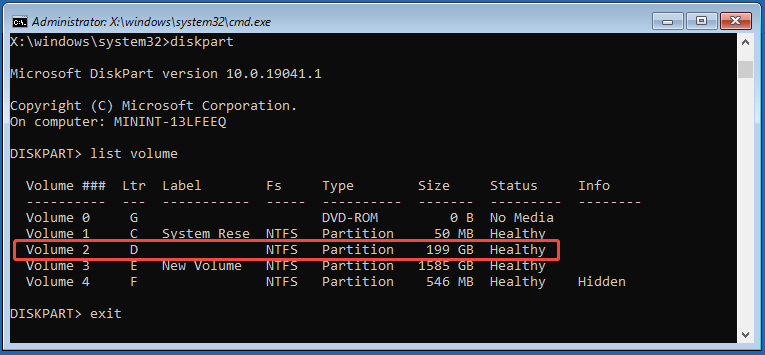
Step 3: Once Command Prompt opens, use the following DiskPart commands to check if the boot drive still has the drive letter C. Note that each command is followed by pressing Enter.
- DiskPart (This command opens the DiskPart tool)
- List volume (It lists all volumes, including the partitions. You need to find the boot partition by its size and then check its drive letter)
- Exit (Leaves DiskPart)
Step 4: Type the SFC scannow command according to the drive letter situation.
- If the boot partition still has the C drive letter: Type “sfc /scannow” and press Enter to do the Windows repair.
- If the boot partition has a different drive letter: Type “sfc /scannow /offbootdir=*:\ /offwindir=*:\windows” and press Enter. Note that * is the drive letter of the boot partition.

Run SFC Scannow in WinPE
If you can’t even get into WinRE, try running SFC scannow in WinPE. Follow the steps below:
- Use the Windows media creation tool to create a bootable USB drive.
- Boot the problematic PC from the bootable USB drive.
- Once in WinPE, press Shift + F10 to open Command Prompt.
- Similarly, use DiskPart commands to check the drive letter of the boot partition.
- Use the “sfc /scannow /offbootdir=*:\ /offwindir=*:\windows” command to repair Windows.

Common SFC Scannow Results and Their Explanations
When the SFC scannow command finishes running, it will return a result to you. Here are some of the SFC scannow results and their explanations.
| Scan Result | What It Means |
| Windows Resource Protection did not find any integrity violations. | SFC did not detect any corrupted or replaced system files. |
| Windows Resource Protection found corrupt files and successfully repaired them. | SFC detected corrupted system files and successfully extracted the correct version of the files from the backup files for repair. |
| Windows Resource Protection could not perform the requested operation. | SFC is unable to fully execute the repair operation for reasons. For example, the location of the WINDOWS folder is not correct, the WINDOWS folder lacks some important files, the Windows Modules Installer Service is disabled, etc. |
| Windows resource protection could not start the repair service. | SFC can’t start the repair service, and the main reason is the disabled Windows Modules Installer. |
| Windows Resource Protection found corrupt files but was unable to fix some of them. | As it implies, SFC fails to repair Windows. |
| You must be an administrator running a console session in order to use the sfc utility. | This result occurs when you type sfc /scannow in Command Prompt or Terminal without administrator privileges. |
Corresponding Actions to Different SFC Scannow Results
If you have received the “Windows Resource Protection did not find any integrity violations” or “Windows Resource Protection found corrupt files and successfully repaired them” result, no action is needed.
If you have received the “Windows Resource Protection could not perform the requested operation” or “Windows resource protection could not start the repair service” error message, try the following methods to solve it.
#1. Adhere to the SFC Operation Rules
When you run SFC scannow, pay attention to the following points.
- Open Command Prompt or Terminal with administrator privileges.
- In WinRE or WinPE, check whether the C drive is the boot partition. If not, run “sfc /scannow /offbootdir=*:\ /offwindir=*:\windows” to specify the boot partition and Windows folder.
#2. Check PendingDeletes and PendingRenames Folders
Make sure that the PendingDeletes and PendingRenames folders exist under the C:\Windows\WinSxS\Temp folder.
The PendingDeletes folder contains temporary files related to Windows updates and system components. It is used by Windows to manage files that are marked for deletion but cannot be removed immediately due to ongoing processes or pending operations.
The PendingRenames folder is part of the temporary storage used by Windows during installation or update processes. It holds files that are scheduled to be renamed or moved once the system is ready to complete the operation.
If the two folders are not in the C:\Windows\WinSxS\Temp folder, the SFC might not run properly.
Verifying the two folders in Windows is straightforward. However, in WinPE or WinRE, it requires additional steps:
- In the Command Prompt window, type “notepad” and press Enter. This will open the Notepad tool.
- Click File > Open.
- Go to the boot partition and then the \Windows\WinSxS\Temp folder to check if the two folders exist.

#3. Enable Windows Modules Installer
The Windows Modules Installer, also known as TiWorker.exe, is a system process in Windows that manages the installation, modification, and removal of Windows updates and optional components. SFC scannow requires this service to be running.
To enable this service, run Command Prompt as administrator and execute the following commands:
- Sc config trustedinstaller start= auto (This command sets the Windows Modules Installer service startup type to Automatic).
- Net start trustedinstaller (This command starts the Windows Modules Installer service).
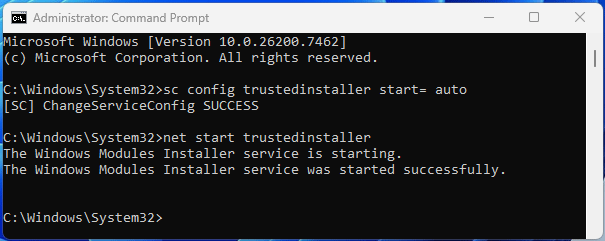
Then, try running SFC scannow again.
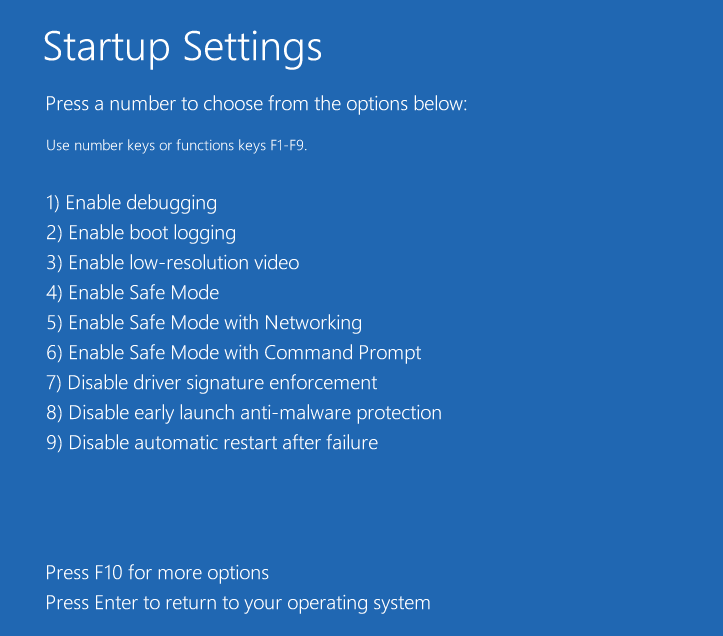
#4. Run SFC Scannow in Safe Mode
In Safe Mode, Windows loads only essential system files and drivers, while third-party apps and services are disabled. This prevents other programs from locking system files that need repair. As a result, SFC can fully access and replace corrupted Windows files, increasing the chance of a successful repair.
Here is how to enter Safe Mode.
- Enter WinRE first.
- Go to Troubleshoot > Advanced options > Startup Settings.
- Click Restart.
- Press F4, F5, or F6 to enable Safe Mode.
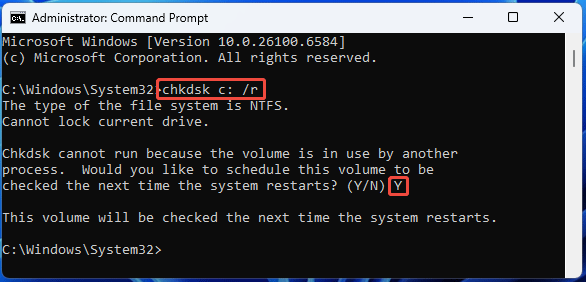
#5. Fix Disk Errors with CHKDSK
Errors or bad sectors on the disk may result in SFC scannow not working. Then, try running CHKDSK to fix errors on the disk, locate bad sectors, and recover readable information.
Here is the guide:
- Run Command Prompt as administrator.
- Type “chkdsk C: /r” and press Enter. If you run CHKDSK in WinPE or WinRE, check the drive letter of the boot partition first. Then, replace C: with the correct one.
- Since the C: drive is in use, Windows will ask you whether to schedule the scan for the next time you restart your computer. Type “Y” and press Enter to confirm.
What to Do If SFC Scannow Fails to Repair Windows?
If you get the result “Windows Resource Protection found corrupt files but was unable to fix some of them”, the main solution is running DISM (Deployment Image Servicing and Management) before SFC scannow.
DISM.exe, located in the c:\windows\system32 folder, is a command-line tool used to service Windows images. It can be called out in Terminal or Command Prompt to install, uninstall, configure, and update Windows features, packages, drivers, and international settings.
DISM has many powerful command lines, in which the DISM /Cleanup-Image commands are typically used in conjunction with SFC to repair Windows system files.
In addition, the DISM /Cleanup-Image commands are usually used before SFC scannow. The reason is that DISM repairs the underlying Windows Component Store (the source for good files), while SFC copies files from this store to replace corrupt system files.
Apparently, if the component store itself is broken, SFC can’t fix anything, so DISM ensures SFC has a healthy base to work from to effectively restore your system’s integrity.
Run DISM Before SFC Scannow
The DISM repair command syntax is DISM.exe [/Image:path_to_image_directory | /Online] /Cleanup-Image /RestoreHealth. This command scans the image (online or offline) for component store corruption and then performs repair operations automatically.
How to use DISM commands to complete a Windows repair? Here are the guides.
#1. If Your PC Can Boot into Windows
- Run Command Prompt as administrator.
- Type “dism.exe /online /cleanup-image /restorehealth” and press Enter.
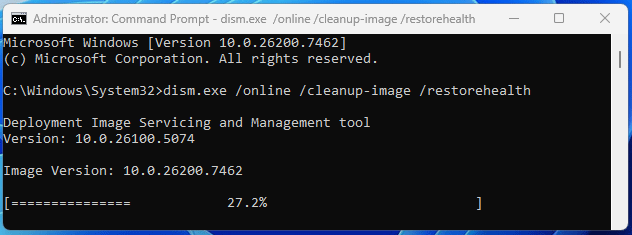
The dism /online /cleanup-image /restorehealth command will repair the current running Windows system (the online system) using Windows Update as the source to get the necessary files.
However, this command may fail if the Windows Update client is broken. In this case, run the following command instead: DISM.exe /Online /Cleanup-Image /RestoreHealth /Source:Windows_path /LimitAccess.
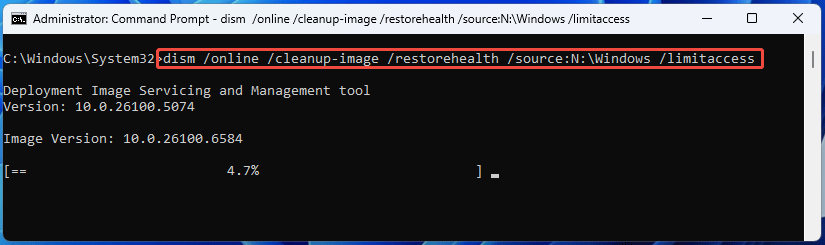
The /Source parameter is used with /RestoreHealth. It specifies the location of known good versions of files that can be used for the repair. For example, a path to the Windows directory of a mounted image.
The /LimitAccess parameter prevents DISM from contacting Windows Update for repair of online images.
#2. If Your PC Can’t Boot up
In this case, first try entering Safe Mode with networking and then running the dism /online /cleanup-image /restorehealth command.
If you are unable to enter safe mode, you need to perform the DISM repair in Command Prompt under WinRE or WinPE. Use the following command instead: DISM.exe /Image:path_to_image_directory /Cleanup-Image /RestoreHealth /Source:Windows_path /LimitAccess.
The /Image:path_to_image_directory parameter specifies the path of the Windows image to be repaired. Check the drive letter of the boot partition. If its drive letter is D, the path_to_image_directory could be D:\ or D:\Windows.
Common DISM Errors and Solutions
If you receive the “The operation completed successfully” message, it indicates that the tool found and successfully repaired the Windows image corruption, or found no corruption to begin with. Then, you can run SFC scannow to repair the individual system files.
Sometimes, you may encounter the following issues. Then, take corresponding measures to fix them.
#1. DISM Stuck at 62.3
Is your DISM restore health stuck at 62.3 or other percentages? If so, try the following methods.
- No action is needed. Just be patient and let it run to completion. In most cases, the DISM stuck issue is because the DISM is downloading large files or encountering network/service issues. Wait 20-30 minutes, and then press Enter to check progress.
- Use a stable network. The DISM repair typically requires an internet connection because it uses Windows Update servers to download clean copies of any corrupted or missing system files. If the network is not stable, it gets stuck.
- Update Windows. A successful Windows update indicates a stable network, the newest DISM version, and a well-running Windows update service, which are important for DISM repair. If the Windows update fails, try running net start bits, net start dovc, net start usosvc, and net start wuauserv to start related services.
- Use a local source. Download a Windows ISO and mount it. Windows will assign a drive letter to the mounted ISO (X: for example). Next, identify the index numbers of the Windows editions in the image by running “dism /get-wiminfo /wimfile:X:\sources\install.esd”. Now, run “DISM.exe /Online /Cleanup-Image /RestoreHealth /Source:X:\sources\install.wim:index_number /LimitAccess” or “DISM.exe /Image:path_to_image_directory /Cleanup-Image /RestoreHealth /Source:X:\sources\install.wim:index_number /LimitAccess” to repair the image.
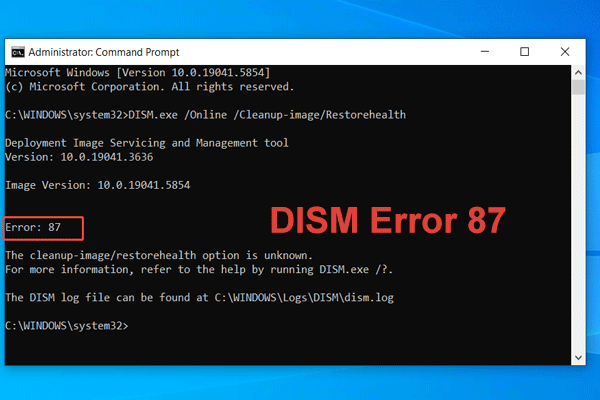
#2. DISM Error 87
The DISM error 87 is usually related to unknown or unrecognizable parameters. The corresponding solutions are as follows:
- Type the correct command. Change the command parameters depending on whether the PC is bootable. In addition, pay attention to the word spelling, spaces, and slashes.
- Run SFC. There are some file corruptions within the DISM directory (C:\Windows\System32\DISM). Try running the SFC scannow command to repair the files. If this doesn’t work, check the C:\Windows\Logs\CBS file to figure out what file is corrupt. Then, copy the same file from the normal PC and replace it on the problematic PC.
- Perform an in-place upgrade. It updates Windows to a newer version while preserving personal files, installed applications, and settings. It essentially refreshes system files without a full wipe, making it great for upgrades or fixing corrupted systems without data loss.
#3. DISM Error 0x800f081f
This error always indicates that the DISM can’t find the source files to repair Windows. Then, using a local source or performing an in-place upgrade can solve the issue.
2. Refreshing the DISM using the dism.exe /image:C: /cleanup-image /revertpendingactions command may also be effective in resolving DISM errors.
3. For DISM error 1726, an effective solution may be starting the Remote Procedure Call (RPC) service. You can do that in the Services tool.

Alternative Solutions to SFC Scannow
In addition to SFC scannow, there are other measures to repair the Windows system. This part introduces two alternative solutions for you.
Use Windows Built-in Recovery Options
Windows Recovery Environment offers several options to troubleshoot Windows issues. Among them, Startup Repair, System Restore, and System Image Recovery may help repair Windows. You can access them in Troubleshoot > Advanced options.
- Startup Repair: It automatically diagnoses and fixes common problems that prevent your PC from starting correctly, like missing system files or corrupted boot data. This repair doesn’t affect personal files.
- System Restore: It reverts your computer’s system files, registry, installed applications, and settings to a previous point in time (a restore point, created automatically during updates or installations, or manually) to fix issues like software conflicts or driver problems without affecting personal files.
- System Image Recovery: It restores your entire computer, including the OS, programs, settings, and personal files, from a complete, point-in-time system image. Note that the image needs to be created manually.
For detailed steps to use these Windows recovery options, read the following post:
![How to Use Recovery Options on Windows 10 [Premise and Steps]](https://images.minitool.com/minitool.com/images/uploads/2019/04/windows-10-recovery-options-thumbnail.jpg)
Use Windows Installation Media
The Windows Installation Media can be used to install a new Windows OS, upgrade an existing system, or access recovery tools (click Repair your computer instead of Install now to enter WinRE).
Here is how to use this tool to repair Windows.
If the PC can boot into Windows:
- Download the Windows Media Creation Tool from Microsoft’s website.
- Run this tool all the way until it asks you to choose which media to use.
- Select the ISO file option and then continue.
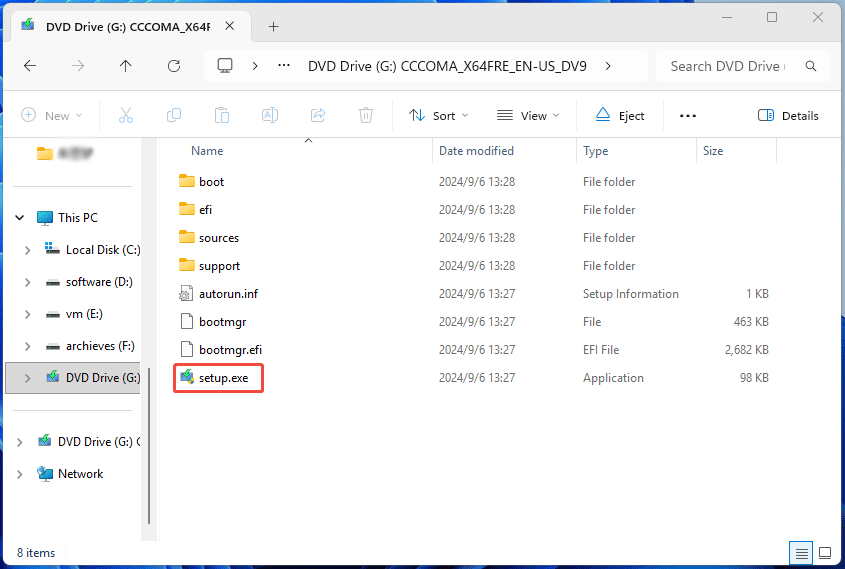
- Once the ISO file is created, right-click the ISO file and choose Mount.
- Open the mounted drive, and double-click the setup.exe.
- Follow the on-screen instructions to complete the upgrade.
If the PC can’t boot into Windows:
- On a well-running PC, use the Windows Media Creation Tool to create a bootable USB drive (when it asks you to choose which media to use, choose the USB flash drive option).
- Insert the bootable USB drive into the failing PC and boot the PC from it.
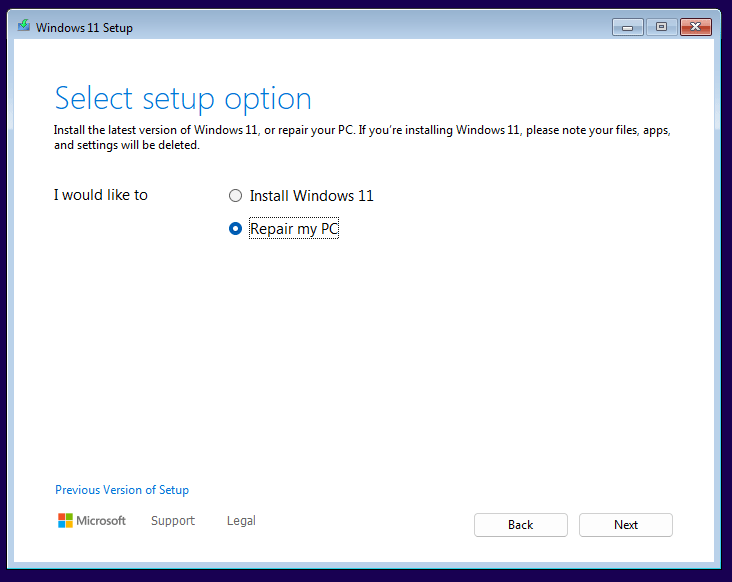
- Once the Windows Setup appears, follow the on-screen instructions to continue until it asks you to select a setup option.
- Choose the Repair my PC option to access WinRE. Then, use the Reset this PC option to reinstall Windows while keeping personal files.
Causes of Corrupted Windows Files
How do Windows system files become corrupt? There are 4 main reasons.
- Faulty Hard Drive: There are bad sectors on the disk or the storage device is failing, which will create unreadable/unwritable areas, corrupting any file stored there.
- Malware & Viruses: Malicious software may directly corrupt, alter, or overwrite system files.
- System Inconsistency: A failed or interrupted update can leave system files partially updated, creating internal conflicts.
- Interrupted Writes: When a system file is being written or modified, and the process is interrupted, the system file may become incomplete and corrupt.
The following issues may lead to interrupted writes.
- Sudden power outages, surges, or improper shutdowns.
- RAM errors or other hardware issues.
- System crashes.
- Software conflicts due to unreliable software, application bugs, etc.
- Outdated or incompatible drivers, which may result in system instability, interrupting writes.
How to Prevent Windows System File Corruption
Repairing Windows is troublesome and has a certain chance of failure. To ensure the normal operation of the system, it’s recommended to take measures to prevent Windows system file corruption.
Basic Measures
There are some simple but practical methods to minimize the risk of system file corruption. For example:
- Always shut down your PC correctly, avoiding abrupt power loss. If necessary, use surge protectors or a UPS to guard against power fluctuations.
- Always keep Windows and all applications up to date to patch vulnerabilities. You can do Windows updates via Settings. As for the application updates, you can get them from their own settings or help menu.
- Install and maintain reputable security software. Windows Defender, Norton, Avast, and McAfee are good choices.
- Only install software from reliable publishers. Unknown software may carry viruses.
- Back up the system regularly. Thus, once the system fails, you can restore it easily.
- Ensure your hard drive/SSD is reliable. Check the hard drive health regularly (maybe once every six months).
Back Up Windows and Files
To protect the Windows system, one of the effective measures is to back up Windows regularly. MiniTool ShadowMaker is capable of this job. It can back up and restore files, the system, a partition, and the entire disk.
MiniTool ShadowMaker TrialClick to Download100%Clean & Safe
Here is how to back up the Windows system to an external hard drive with this software.
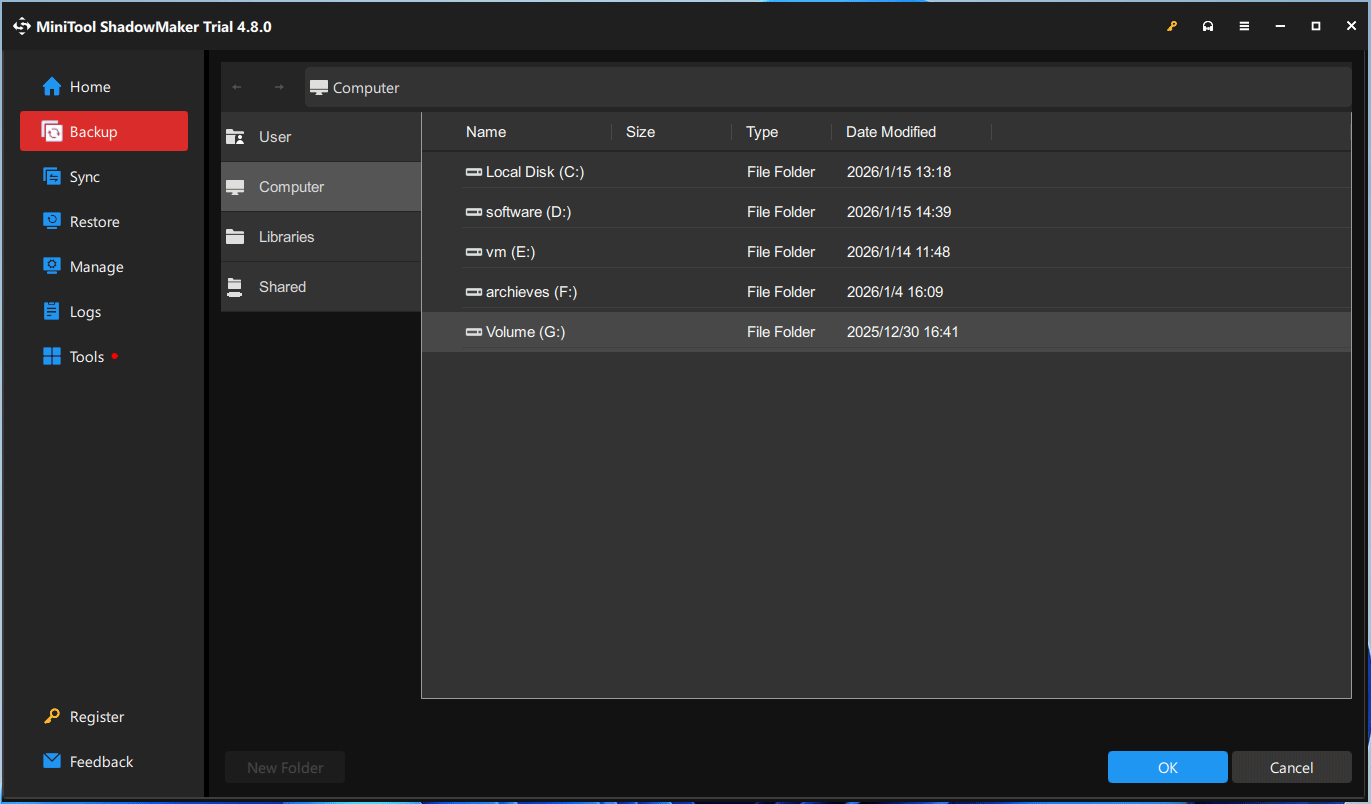
Step 1: Connect an external hard drive into your computer and launch this software. Then, click Backup. The SOURCE is the current Windows OS partitions (the system and boot partitions) by default. Now, click DESTINATION.
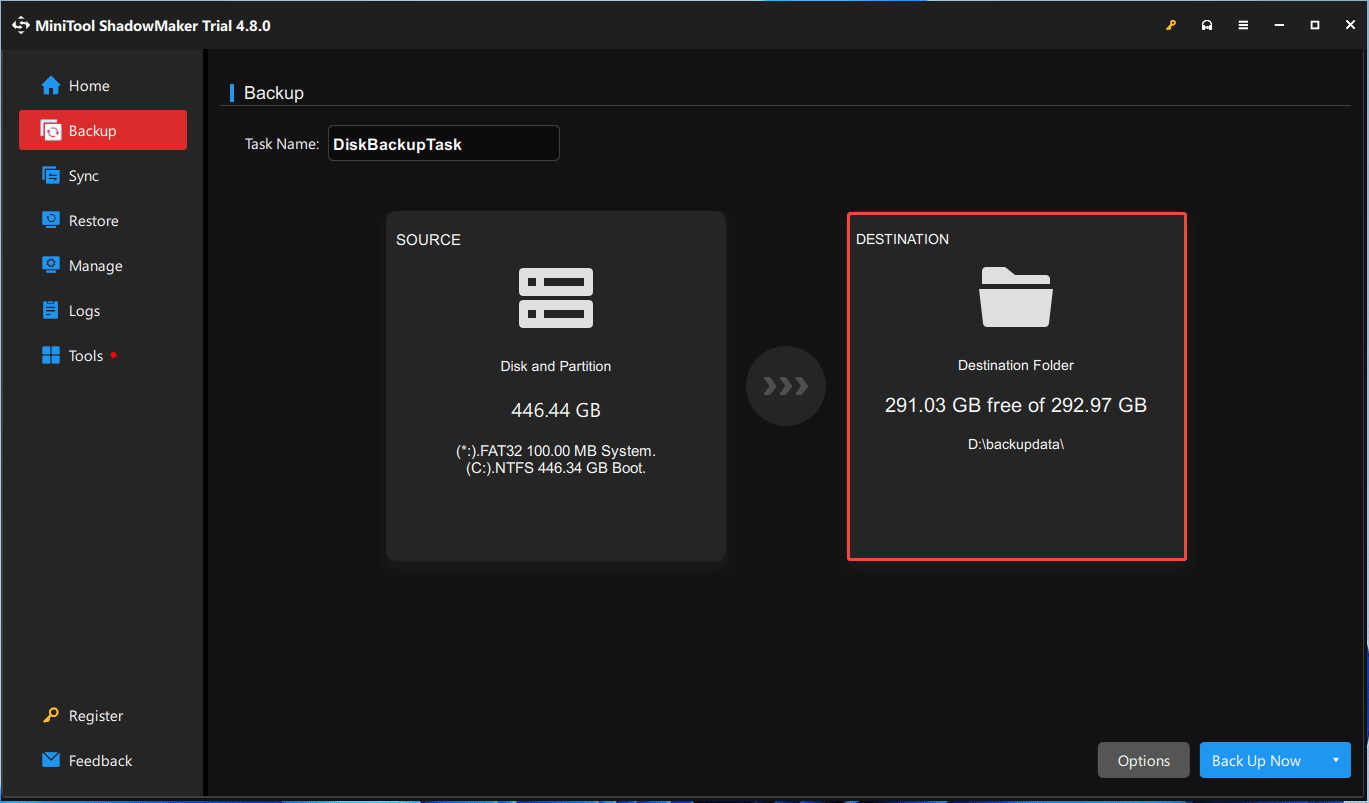
Step 2: Select the external hard drive as the destination and then click OK.
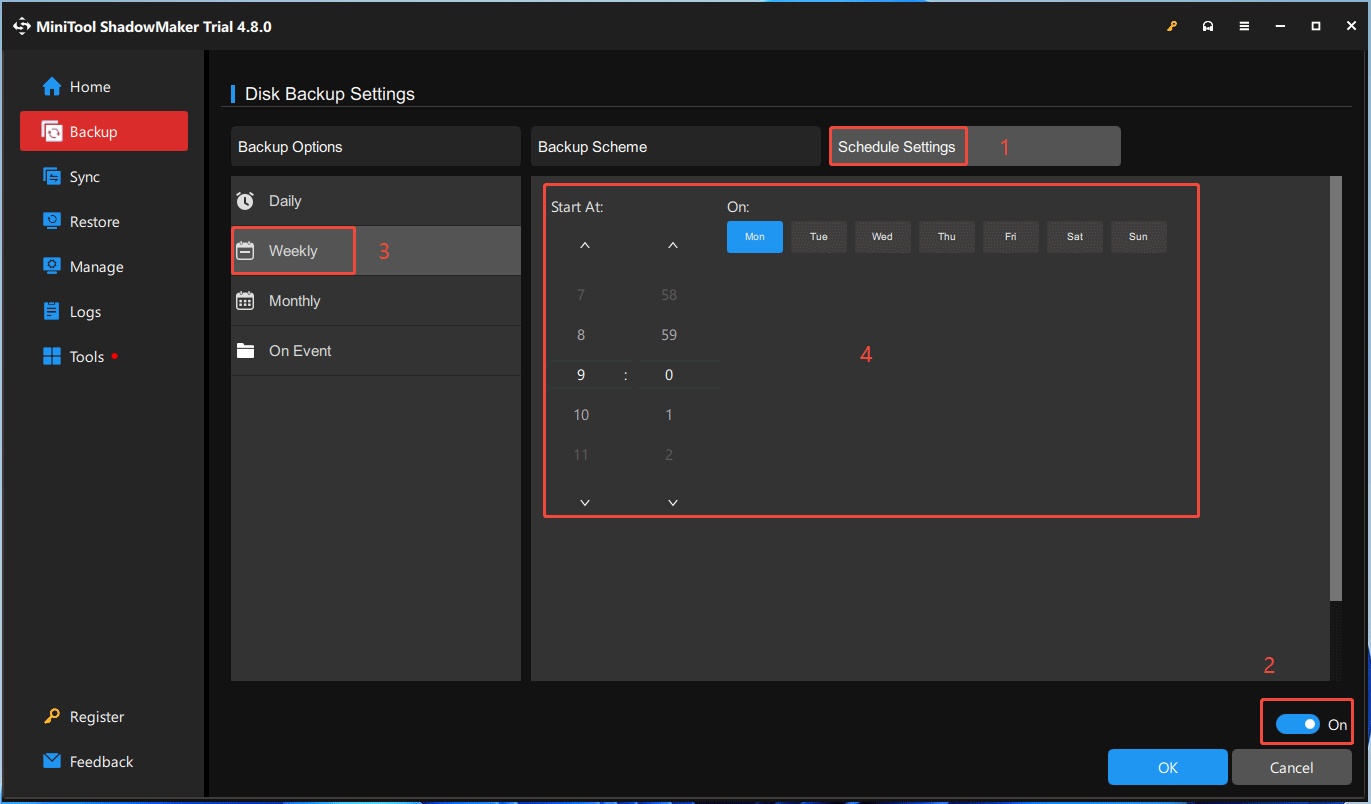
Step 3: Back to the Backup interface, click Options. Click Scheme Settings and turn it on. Select the backup frequency: Daily, Weekly (recommended), Monthly, or On Event. Then, choose what days of the week and what time to back up.
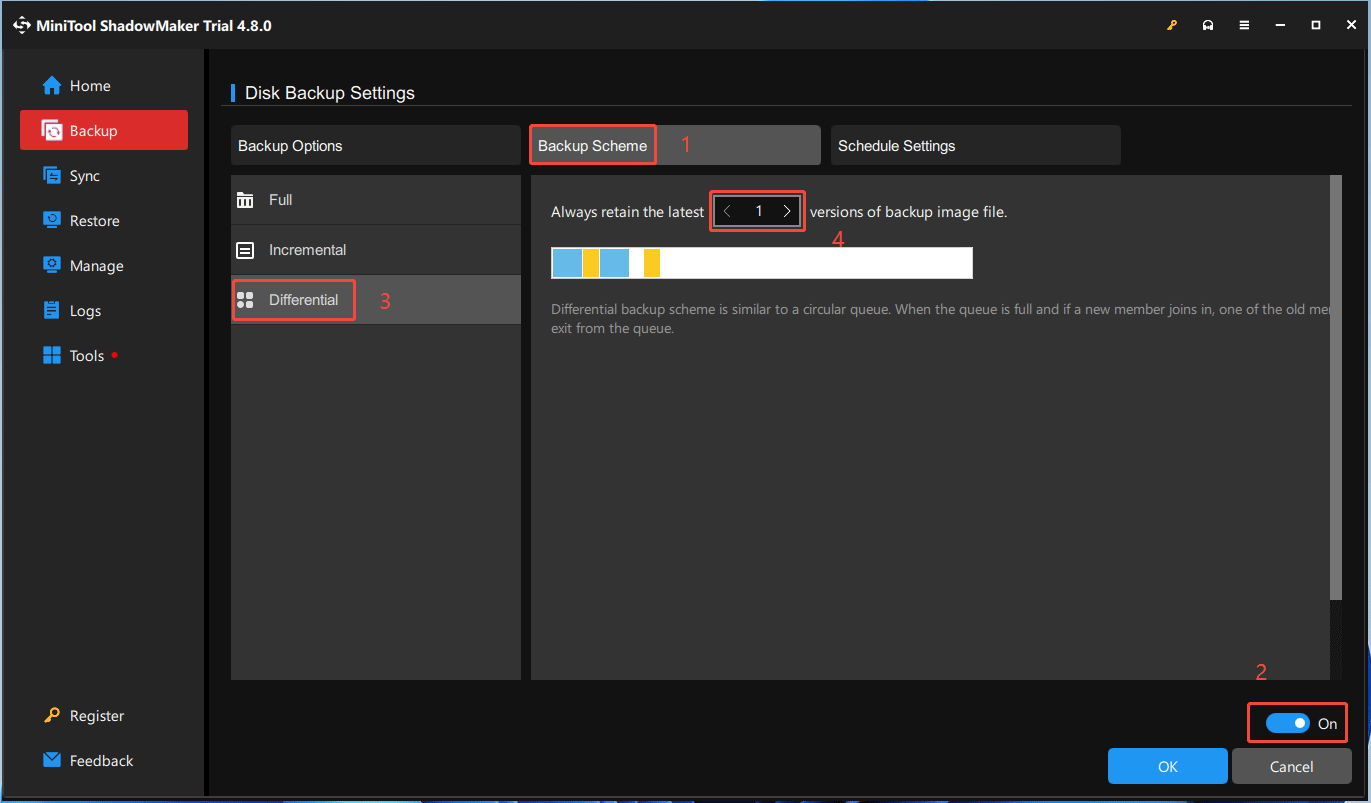
Step 4: Click Backup Scheme and turn it on. Select Differential. For individual users, to save storage space, it’s recommended to always retain the latest 1 version of the backup image file. Then, click OK. MiniTool ShadowMaker will make a full backup for the first time and then make differential backups in all subsequent backup operations.
2. Incremental Backup: It backs up all files that have changed since the last full or incremental backup. Its advantage is the fast backup speed, but its disadvantage is the slow restore speed because it needs to load all incremental backups.
3. Differential Backup: It backs up all files that have changed since the last full backup. During restore, it only restores the first full backup and the last differential backup. Its backup and restore speeds are moderate, striking a balance between full and incremental backups.
Step 5: Click Back Up Now and then click OK to confirm the operation.

Step 6: The Manage tab will open automatically, and your backup task is listed here. The icon of the backup task is red. When it finishes, it will turn green.

If the Windows system files get corrupted and you need to restore the system with this backup, you need to create a bootable USB drive using MiniTool ShadowMaker, boot the PC from it, and go to the Restore tab of this software to perform the system restore.

Check the Disk Health
Regularly monitor disk health, and if any risk of disk failure is detected, immediately migrate the system and data to a new disk. This can prevent system file corruption and permanent data loss due to disk failure.
To check the disk health, here are two methods for you.
#1. Run a S.M.A.R.T. Test
Drives will track internal metrics like temperature, error rates, and spin-up times. If these metrics cross certain thresholds, the drive flags a potential issue. The S.M.A.R.T. test (Self-Monitoring, Analysis, and Reporting Technology) will read these flags and alert you to back up your data and replace the drive.
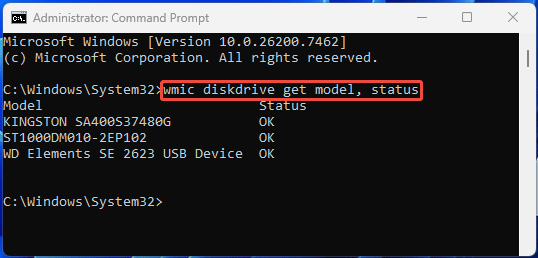
Here is how to run a S.M.A.R.T test in Windows:
- Run Command Prompt as administrator.
- Type “wmic diskdrive get model, status” and press Enter.
- Check the disk status. The status OK means a healthy disk. The status Pred Fail indicates that the drive is showing early signs of failure and needs immediate attention (backup & replacement).
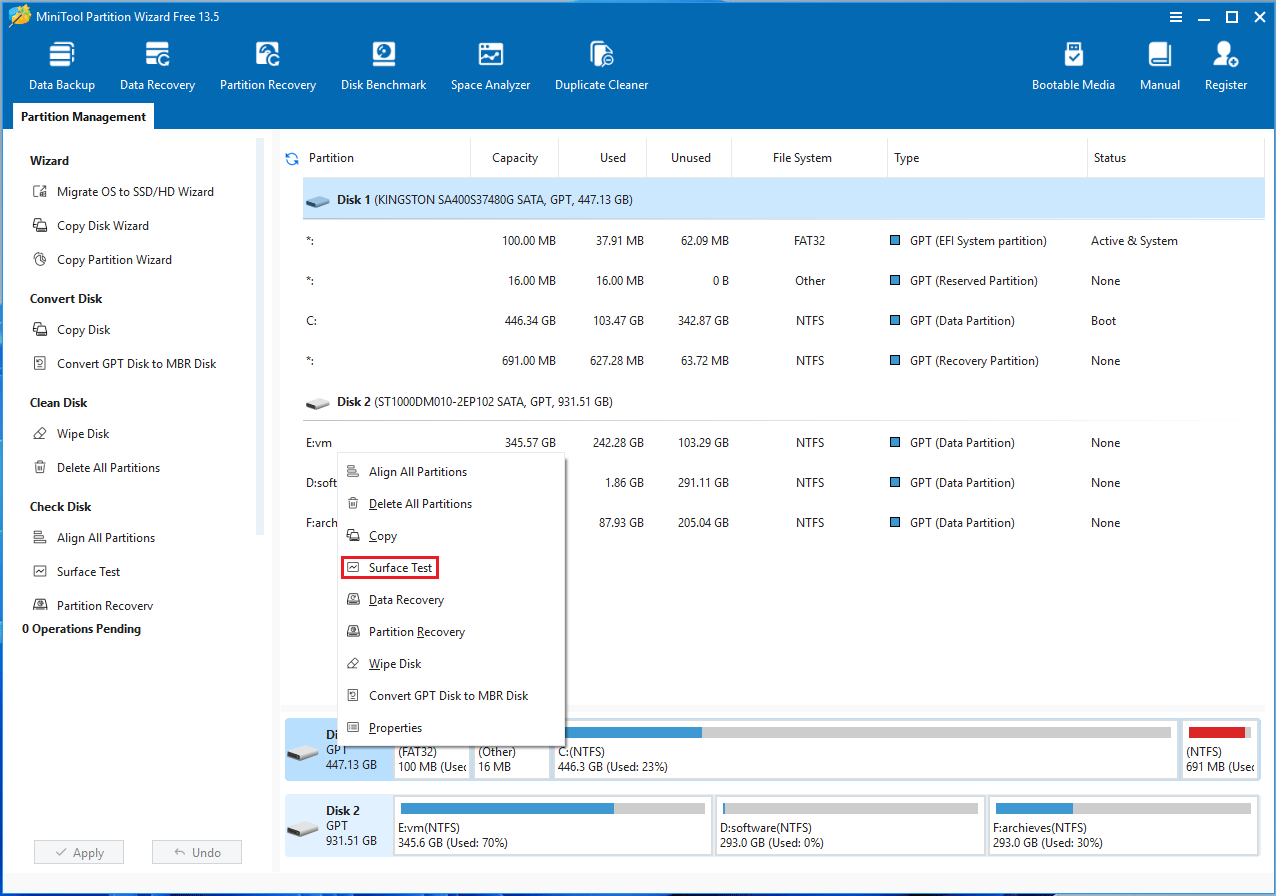
#2. Use MiniTool Partition Wizard
MiniTool Partition Wizard Free offers a feature named Surfest Test, which can scan the disk for bad sectors fast and safely. If there are too many bad sectors, disk replacement is needed.
Tip: This software can also clone hard drives and partitions, recover hard drive data and lost partitions, and do other basic disk and partition management tasks.
MiniTool Partition Wizard FreeClick to Download100%Clean & Safe
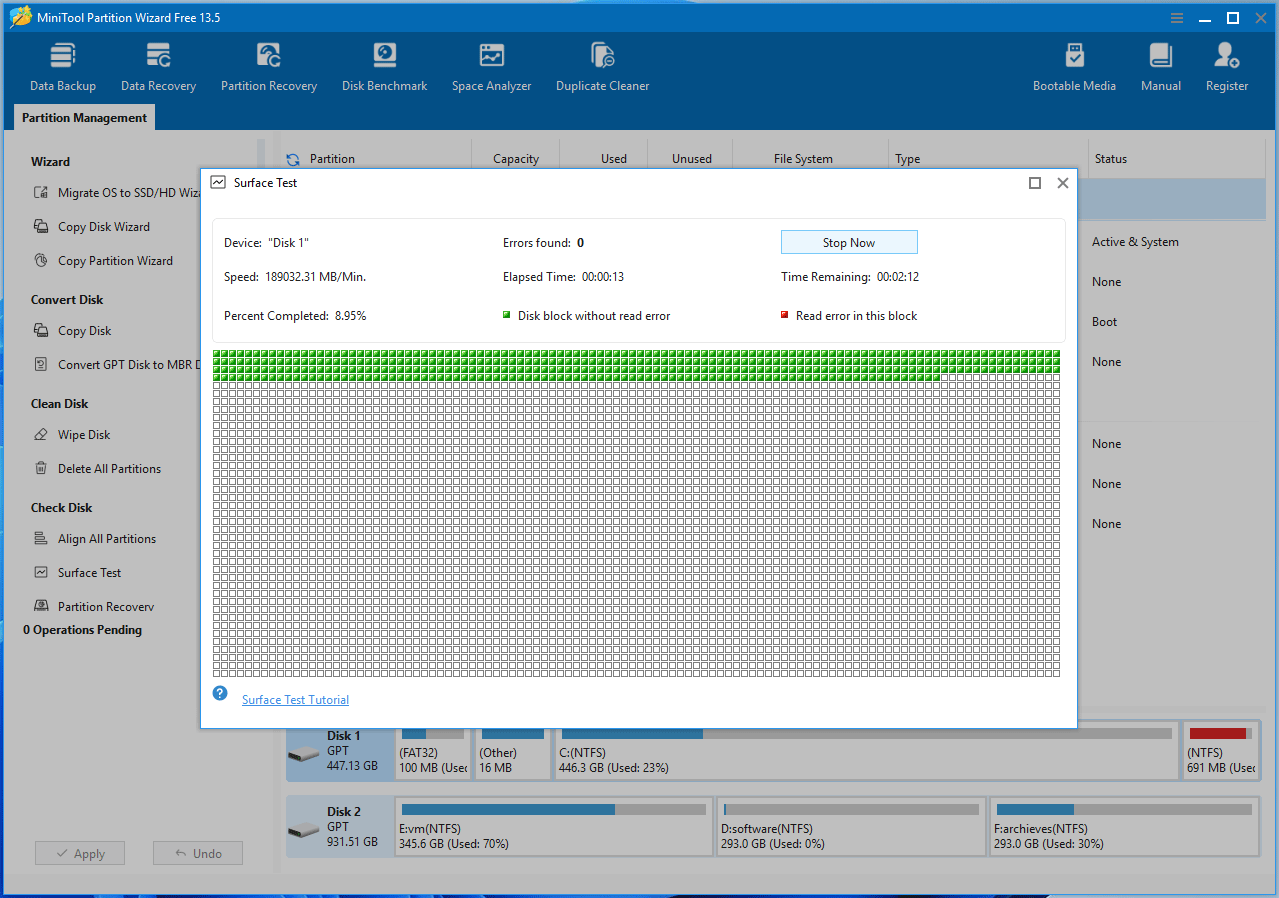
Here is how to run the Surfest Test feature of MiniTool Partition Wizard.
Step 1: Launch this software. Right-click on the system disk and choose Surfest Test.
Step 2: In the Surfest Test window, click Start Now. Then, MiniTool Partition Wizard will try to read data from every sector of the disk. If the data is read successfully, the sector will be marked in green. If the read fails, it indicates that there is a problem with the sector, and it will be marked in red.
If you want to replace the hard drive, MiniTool Partition Wizard can also help you. Its OS migration feature can migrate the OS only or clone the entire system disk to the new disk. For more detailed steps, read the guide on How to Replace Laptop Hard Drive With/Without Reinstalling OS.
Bottom Line
This guide provides a comprehensive overview of the SFC scannow command and Windows system file repair. You now understand what SFC is, when and how to run it in Windows, WinRE, or WinPE, and how to address common SFC and DISM errors. The article also covers the causes of system file corruption and practical ways to protect your Windows files.
To maintain the integrity of your system, consider using reliable backup and repair tools such as MiniTool Partition Wizard and MiniTool ShadowMaker. If you encounter issues with these tools, you can contact us at [email protected].
About The Author

Position: Columnist
Linda has been an editor at MiniTool for seven years. She continuously learns about computers and puts her knowledge into practice. Moreover, she is particularly knowledgeable in disk management, data recovery, system installation, and PDF editing. Her articles typically reference multiple examples or are based on her own experience, providing users with the most suitable solutions.
User Comments :