Windows Defender is a useful tool that can protect your computer in real-time. You can use it to scan a file or a folder for malware. The file can be a local file or a network file. But in the new version of this Windows Defender Antivirus, the network virus scanning is not enabled by default. If you need to enable network scanning in Windows Defender, here are three different methods from MiniTool Software.
Windows Defender Antivirus is a Windows built-in security service. It can offer real-time protection from viruses, ransomware, spyware, malware, and hacker attacks. It can not only scan your local files but also scan network files.
The network virus scanning feature in Windows Defender is enabled by default previously. But now it is not like that. It is not recommended to turn on this feature. But for some reason, you may need to enable network scanning in Windows Defender. In this post, we will show you three methods to enable Microsoft Defender scan network files.
![[Solution] How to Disable Windows Defender Antivirus on Win 10](https://images.minitool.com/minitool.com/images/uploads/2019/04/disable-windows-defender-win10-thumbnail.jpg)
How to Enable Network Scanning in Windows Defender?
- How to enable network scanning in Windows Defender using Group Policy?
- How to enable network scanning in Windows Defender using PowerShell?
- How to enable network scanning in Windows Defender using Registry?
How to Enable Network Scanning in Windows Defender Using Group Policy?
If you are using Windows 10 Pro or Enterprise, this is the easiest method for you to enable the network virus scanning feature in Windows Defender.
Here is a guide:
1. Use Windows Search to search for gpedit and then select the first search result Group Policy Editor to open it.
2. Go to this path: Computer Configuration > Administrative Templates > Windows Components > Windows Defender Antivirus > Scan.
3. Double-click Scan network files.
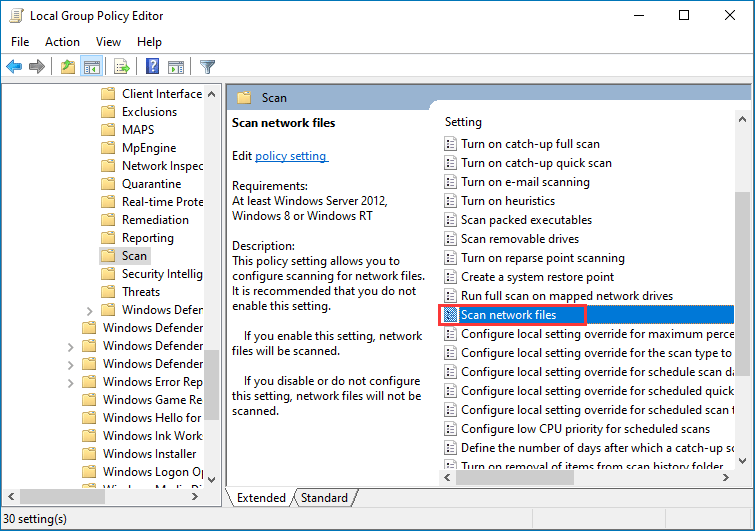
4. Check the Enabled option.
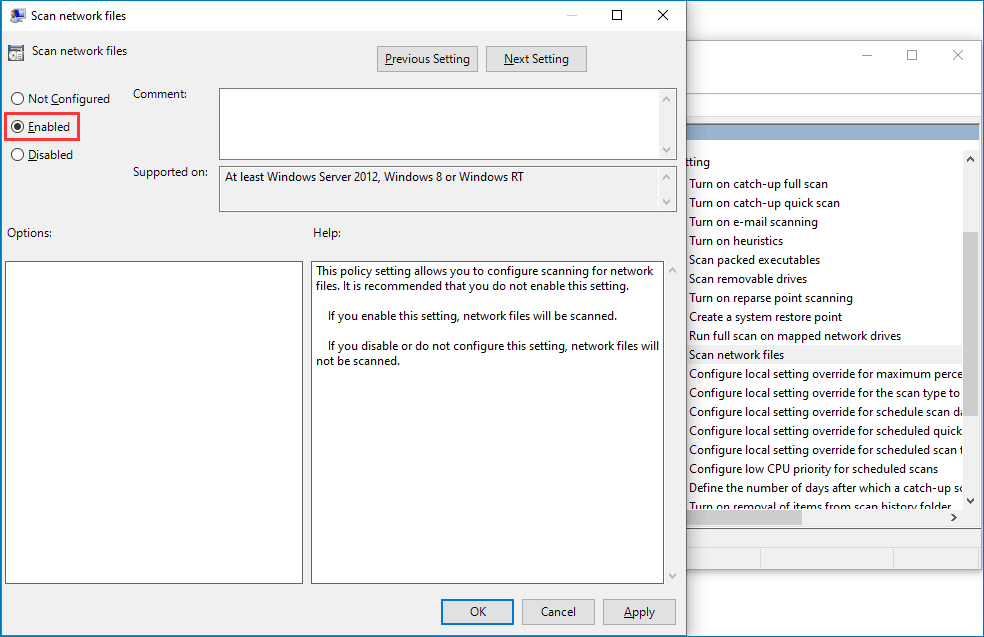
5. Click Apply.
6. Click OK.
After these steps, Windows Defender will begin to scan your network files no matter you are using automatic or manual scans.
However, if you want to disable this feature, you can repeat the above steps but select the Not Configured option in step 5.
How to Enable Network Scanning in Windows Defender Using PowerShell?
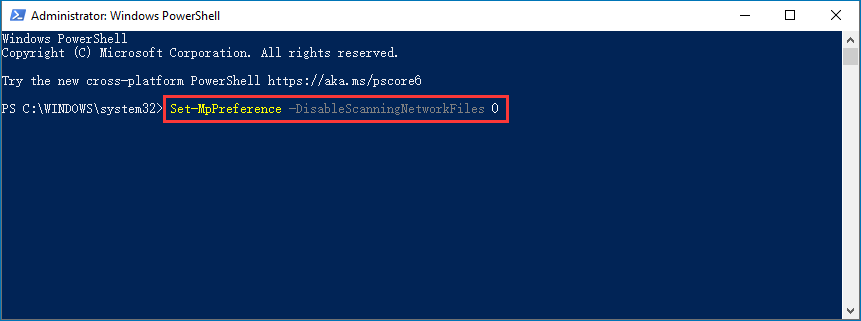
You can also make Windows Defender scan network files via PowerShell.
Here is a guide:
- Right-click Start.
- Select Windows PowerShell (Admin).
- Type the following command Set-MpPreference -DisableScanningNetworkFiles 0.
- Press Enter to execute the command.
If you want to disable the network scanning feature in Windows Defender, you need to use this command instead: Set-MpPreference -DisableScanningNetworkFiles 1.
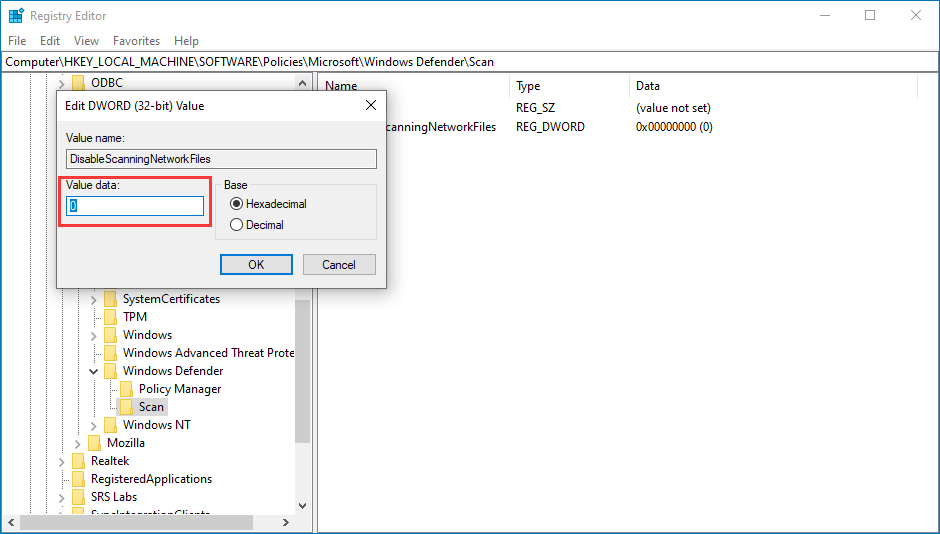
How to Enable Network Scanning in Windows Defender Using Registry?
Another way to enable network file scan in Windows Defender is to use the Registry. However, modifying the registry key has risky that can cause irreversible damage to the installation if the operation is not correct. So, you’d better back up the Registry in advance.
Here is a guide:
1. Use Windows Search to search for regedit and select the first result to open Registry.
2. Go to this path: HKEY_LOCAL_MACHINE\SOFTWARE\Policies\Microsoft\Windows Defender.
3. Right-click the Windows Defender folder and then go to New > Key.
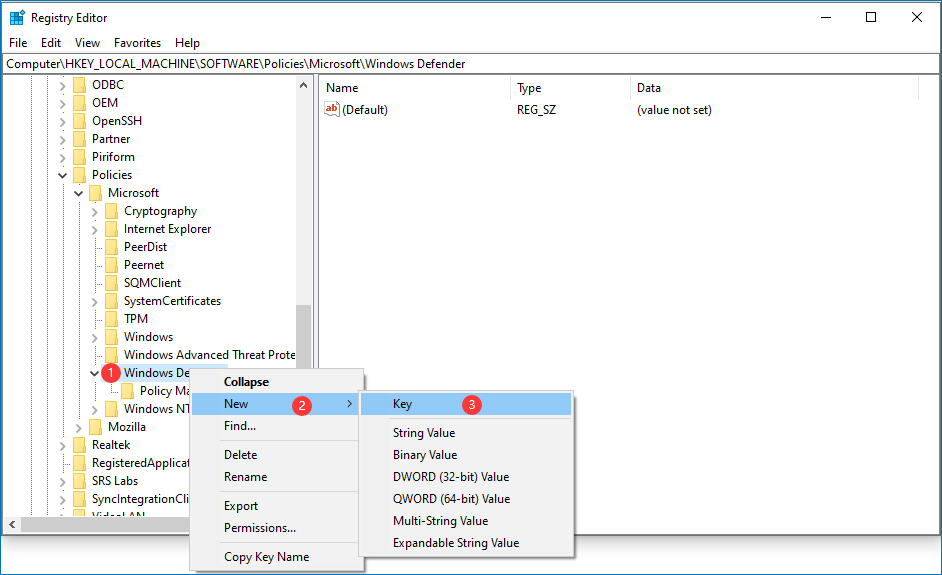
4. Name the key Scan and press Enter.
5. Right-click the newly created key and select New.
6. Select DWORD (32-bit) Value.
7. Name the key DisableScanningNetworkFiles and press Enter.
8. Double-click the newly created DWORD to open it and make sure the Value Data is 0.
9. Click OK to save the setting.
10. Restart your computer.
After these steps, your network files will be checked for malware by Windows Defender.
However, if you want to revert the change, you just need to delete the Scan key in Registry.
If You Lose Some Important Files due to Modifying the Registry
If some of your files get lost after modifying the Registry, you can use a free file recovery tool to get them back. MiniTool Power Data Recovery is just such a tool.
This software is specially designed to recover all kinds of files from various data storage devices like internal hard drives, external hard drives, memory cards, SD cards, and more. Besides, it works under different data loss situations like virus attack, hard drive failure, hard drive inaccessible, and more.
It has a trial edition and you can use it to scan the drive you want to recover data from and then check whether it can find the files you want to rescue.
MiniTool Power Data Recovery TrialClick to Download100%Clean & Safe
If you think this software is useful for you, you can use a full edition to recover all your needed files without limits.
About The Author

Position: Columnist
Stella has been working in MiniTool Software as an English Editor for more than 8 years. Her articles mainly cover the fields of data recovery including storage media data recovery, phone data recovery, and photo recovery, videos download, partition management, and video & audio format conversions.
User Comments :