Do you have any idea how to show or remove checkboxes in File Explorer? If not, you’ve come to the right place. This paper on MiniTool shows you a couple of feasible ways to enable selection checkboxes in File Explorer.
According to the Internet, users always prefer to select multiple files by using the Shift or the Ctrl key. But some users reported that they cannot select multiple files by using these key combinations. If you are one of them, in this situation, what should you do to select multiple files or folders?
Fortunately, you can tick multiple files with the help of File Explorer checkboxes. It is a powerful feature that allows you to tick files with just one click.
However, File Explorer checkboxes are not enabled in Windows 10 by default. So, now you can see how to enable selection checkboxes in File Explorer.
How to Enable File Explorer Checkboxes in Windows 10
Way 1. Enable Selection Checkboxes in File Explorer From the Ribbon
There are many commonly used features displayed in the Ribbon bar in File Explorer. For example, you can delete files older than a specific date by using the View feature from the Ribbon menu. Now you can enable selection checkboxes from the Ribbon.
First, press Windows + E key combinations to open File Explorer.
Second, move on to the View tab, and then tick the checkbox of “Item check boxes” from the Ribbon bar.
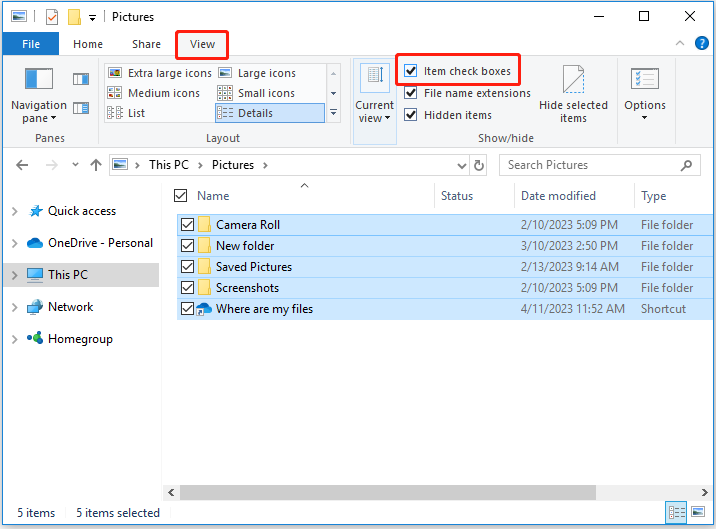
Now you can see a tick box next to all your files and icons in File Explorer and on the desktop.
Way 2. Enable Selection Checkboxes in File Explorer From the Folder Options
Another easy way to turn on the checkboxes is to use the Folder Options. With Folder Options, you can change the default folder of File Explorer, view folder size, enable checkboxes, and so on. now let’s see how to turn on checkboxes.
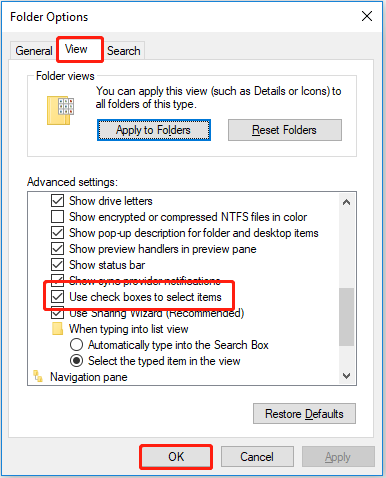
Step 1. In File Explorer, click View > Options.
Step 2. Move on to the View tab, then scroll down to check Use check boxes to select items. Finally, click the OK button to save your changes.
Way 3. Enable Selection Checkboxes in File Explorer Using Registry Editor
Registry Editor is a Windows built-in tool used to view or create Windows registry keys. It can help you enable selection checkboxes in File Explorer as well.
Tip: Before following the steps below, you need to back up your registry in advance in case of any wrong operations.
Step 1. Press Windows + R key combinations to open Run.
Step 2. In the Run window, type regedit and press Enter. Click Yes in the User Account Control window.
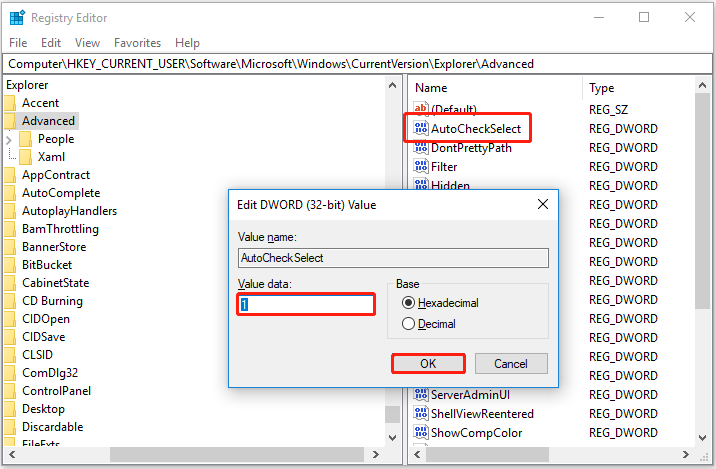
Step 3. In the top address bar, input the following location and press Enter:
Computer\HKEY_CURRENT_USER\Software\Microsoft\Windows\CurrentVersion\Explorer\Advanced
Step 4. In the right panel, double-click AutoCheckSelect. Then in the new window, change the value data to 1 and click OK.
To remove the checkboxes in Windows, you can refer to this post: How to Remove Checkboxes from Icons in Windows 11.
Top Recommendation
With the selection checkboxes turned on in File Explorer, you can easily and quickly select all files. However, this feature increases the possibility of data loss. If you accidentally deleted important files by clicking the checkboxes, how can you recover deleted files?
Now MiniTool Power Data Recovery, a piece of professional and free data recovery software, is highly recommended to you. With this easy-to-use data restore tool, you can easily recover lost files in multiple cases such as mistaken deletion, OS crash, virus attack, and so on.
The free edition of MiniTool Power Data Recovery can help you recover 1 GB of data totally for free. So, you can click the button below to download it and have a try.
MiniTool Power Data Recovery FreeClick to Download100%Clean & Safe
![[Fixed]: Files Get Deleted When Left-Clicking in Windows](https://images.minitool.com/minitool.com/images/uploads/2023/04/files-get-deleted-when-left-clicking-thumbnail.png)
Bottom Line
In a word, this post introduces how to enable selection checkboxes in File Explorer and how to recover deleted files by using MiniTool Power Data Recovery. Hope this article is beneficial for you.
If you have any questions when using MiniTool data recovery software, you can leave your comments below or contact us via [email protected].
About The Author

Position: Columnist
Shirley holds a bachelor’s degree in English and has been an editor at the MiniTool Team for many years. She specializes in IT-related content, with a focus on data recovery, file backup, disk management, and other technical topics. She is committed to delivering clear, accurate, and practical solutions to help users resolve common computer issues.
User Comments :